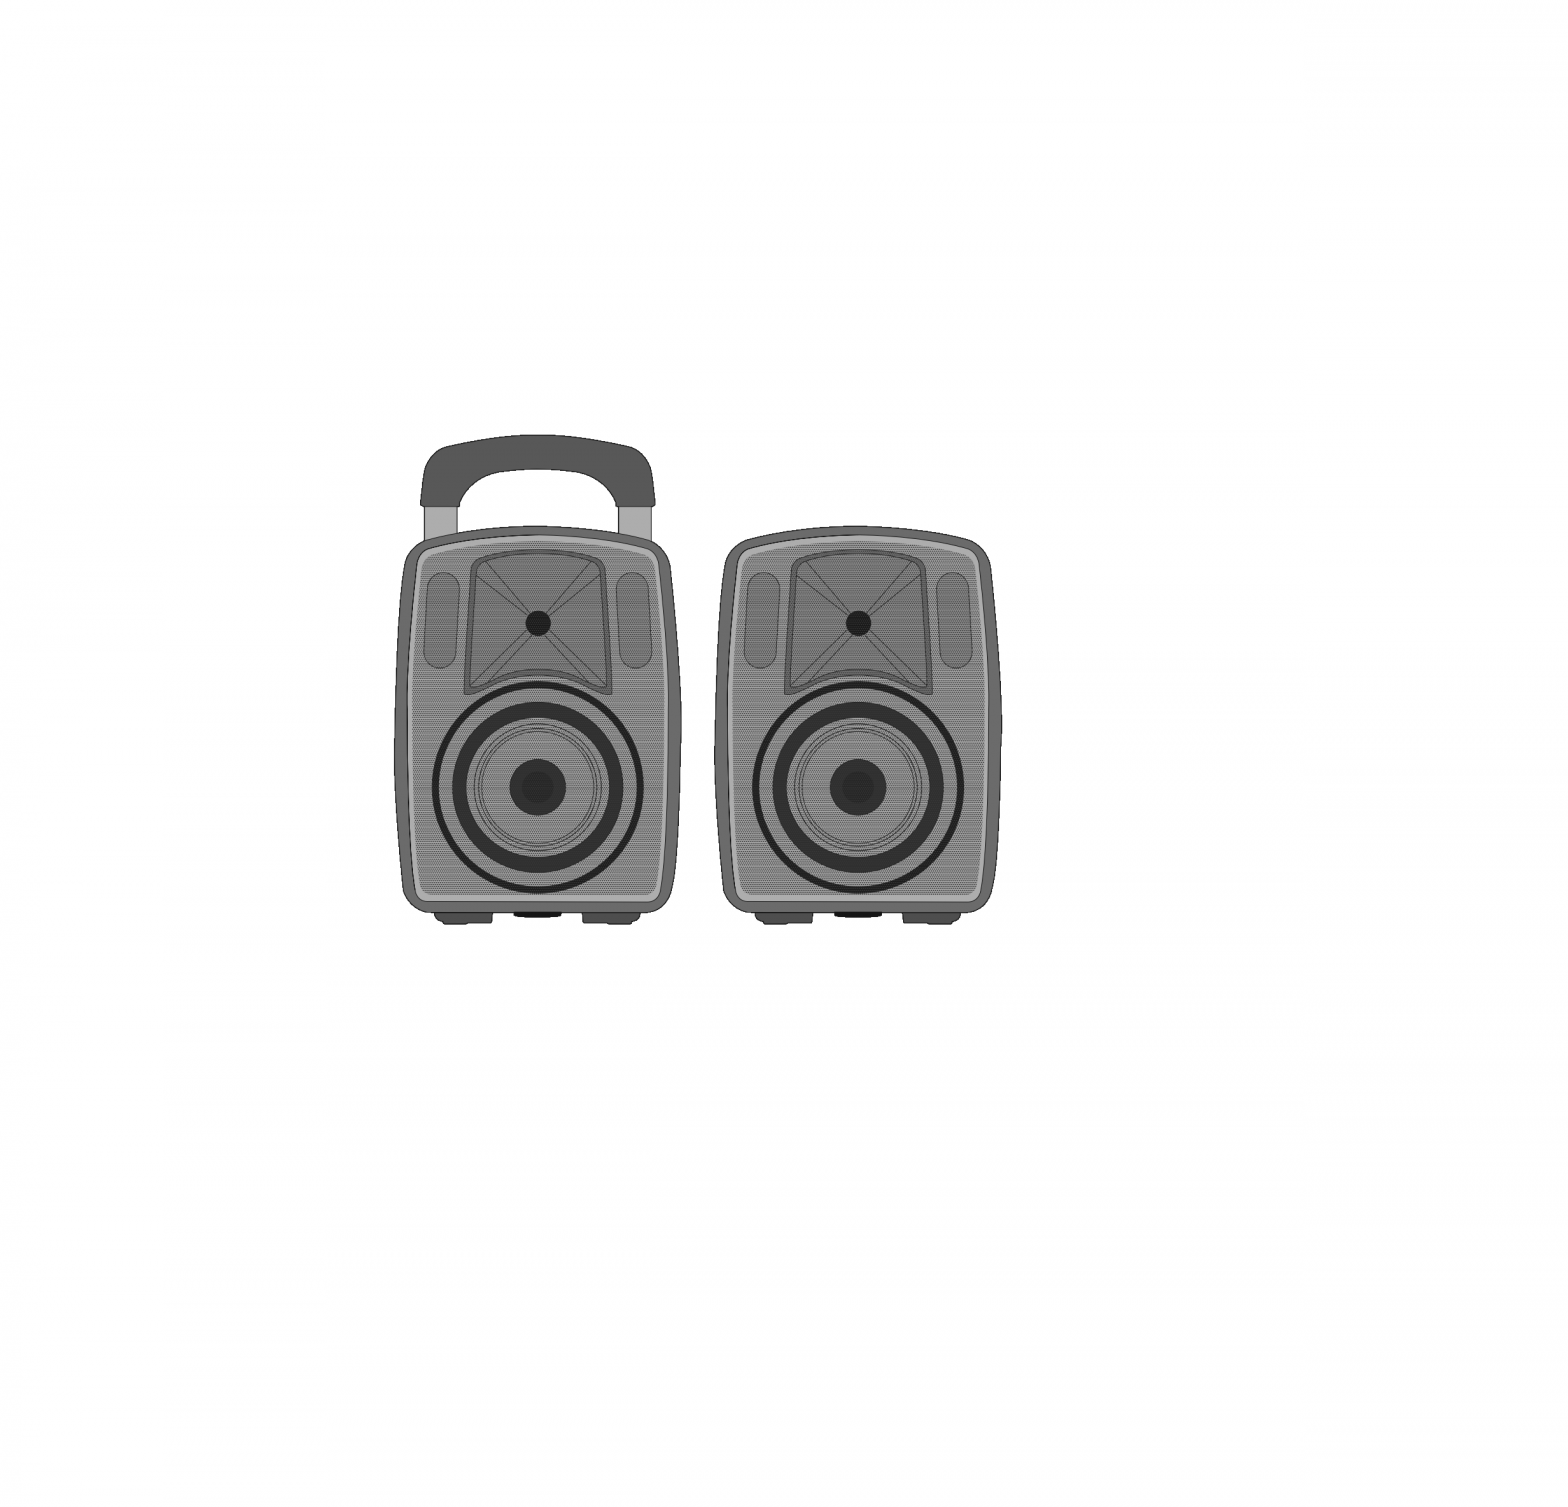
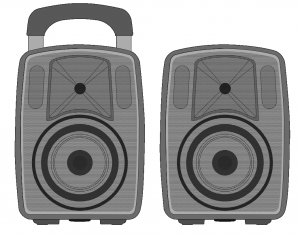
behringer All-in-One Portable 40-Watt PA System
Important Safety Instructions
 Terminals marked with this symbol carry electrical current of sufficient magnitude to constitute risk of electric shock.Use only high-quality professional speaker cables with ¼” TS or twist-locking plugs pre-installed. All other installation or modification should be performed only by qualified personnel.
This symbol, wherever it appears, alerts you to the presence of uninsulated dangerous voltage inside the enclosure – voltage that may be sufficient to constitute a risk of shock.
 This symbol, wherever it appears, alerts you to important operating and maintenance instructions in the accompanying literature. Please read the manual.
CautionTo reduce the risk of electric shock, do not remove the top cover (or the rear section).No user serviceable parts inside. Refer servicing to qualified personnel.
CautionTo reduce the risk of fi re or electric shock, do not expose this appliance to rain and moisture. The apparatus shall not be exposed to dripping or splashing liquids and no objects filled with liquids, such as vases, shall be placed on the apparatus.
CautionThese service instructions are for use by qualified service personnel only.To reduce the risk of electric shock do not perform any servicing other than that contained in the operation instructions. Repairs have to be performed by qualified service personnel.
- Read these instructions.
- Keep these instructions.
- Heed all warnings.
- Follow all instructions.
- Do not use this apparatus near water.
- Clean only with dry cloth.
- Do not block any ventilation openings. Install in accordance with the manufacturer’s instructions.
- Do not install near any heat sources such as radiators, heat registers, stoves, or other apparatus (including amplifiers) that produce heat.
- Do not defeat the safety purpose of the polarized or grounding-type plug. A polarized plug has two blades with one wider than the other. A grounding-type plug has two blades and a third grounding prong. The wide blade or the third prong are provided for your safety. If the provided plug does not fi t into your outlet, consult an electrician for replacement of the obsolete outlet.
- Protect the power cord from being walked on or pinched particularly at plugs, convenience receptacles, and the point where they exit from the apparatus.
- Use only attachments/accessories specified by the manufacturer.
- Use only with the cart, stand, tripod, bracket, or table specified by the manufacturer, or sold with the apparatus. When a cart is used, use caution when moving the cart/apparatus combination to avoid injury from tip-over.

- Unplug this apparatus during lightning storms or when unused for long periods of time.
- Refer all servicing to qualified service personnel.Servicing is required when the apparatus has been damaged in any way, such as power supply cord or plug is damaged, liquid has been spilled or objects have fallen into the apparatus, the apparatus has been exposed to rain or moisture, does not operate normally, or has been dropped.
- The apparatus shall be connected to a MAINS socket outlet with a protective earthing connection.
- Where the MAINS plug or an appliance coupler is used as the disconnect device, the disconnect device shall remain readily operable.
- Correct disposal of this product: This symbol indicates that this product must not be disposed of with household waste, according to the WEEE Directive (2012/19/EU) and your national law. This product should be taken to a collection center licensed for the recycling of waste electrical and electronic equipment (EEE). The mishandling of this type of waste could have a possible negative impact on the environment and human health due to potentially hazardous substances that are generally associated with EEE. At the same time, your cooperation in the correct disposal of this product will contribute to the efficient use of natural resources. For more information about where you can take your waste equipment for recycling, please contact your local city office, or your household waste collection service.
- Do not install in a confined space, such as a book case or similar unit.
- Do not place naked flame sources, such as lighted candles, on the apparatus.
- Please keep the environmental aspects of battery disposal in mind. Batteries must be disposed-of at a battery collection point. Use this apparatus in tropical and/or moderate climates.

LEGAL DISCLAIMER
MUSIC Group accepts no liability for any loss which may be suffered by any person who relies either wholly or in part upon any description, photograph, or statement contained herein. Technical specifications, appearances and other information are subject to change without notice. All trademarks are the property of their respective owners. MIDAS, KLARK TEKNIK, LAB GRUPPEN, LAKE, TANNOY, TURBOSOUND, TC ELECTRONIC, TC HELICON, BEHRINGER, BUGERA and DDA are trademarks or registered trademarks of MUSIC Group IP Ltd. © MUSIC Group IP Ltd. 2017 All rights reserved.
LIMITED WARRANTY
For the applicable warranty terms and conditions and additional information regarding MUSIC Group’s Limited Warranty, please see complete details online at music-group.com/warranty
MPA40BT-PRO/MPA40BT
Step 1: Hook-Up
Singer-songwriter hookup with a smartphone streaming audio over Bluetooth.
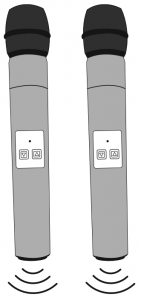
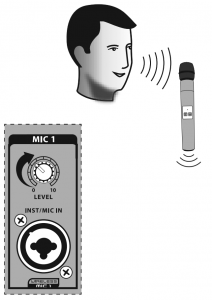
Smartphone streaming audio over Bluetooth with BEHRINGER wireless microphones.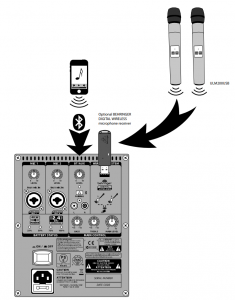
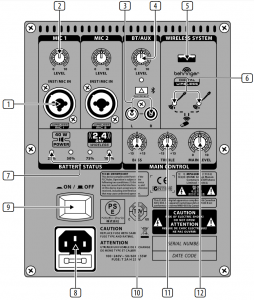
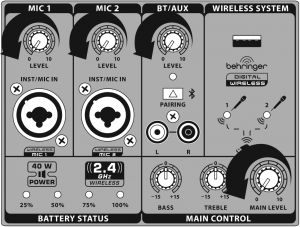
Controls
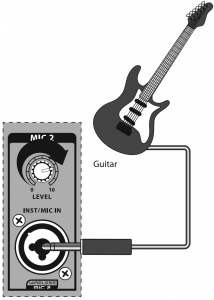
- INST/MIC IN combo jacks accept input signals over XLR balanced,¼” TRS balanced, or¼” TS unbalanced connectors. Connecting the wireless microphone system disables the MIC 1 and MIC 2 combination jacks.
- MIC 1/ MIC 2 LEVEL knobs control the gain for either the INST/MIC IN input jacks or wireless microphones 1 and 2.
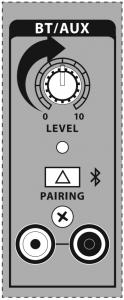
- RCA inputs accept line level inputs from auxiliary sources. The auxiliary signal will be merged with the Bluetooth signal.
- BT/AUX LEVEL knob controls the gain for Bluetooth and the auxiliary signal from the RCA inputs.
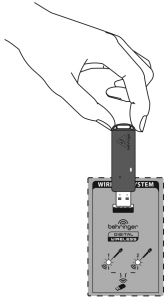
- WIRELESS SYSTEM USB input accepts the optional BEHRINGER wireless microphone receiver.
- LEDs indicate wireless microphone signal input. Connecting the wireless microphone system disables the MIC 1 and MIC 2 combination jacks.
- BATTERY LEVEL LEDs monitor the overall amount of remaining battery life when the unit is unplugged from an outlet.
- POWER SOURCE jack accepts the included IEC cable.
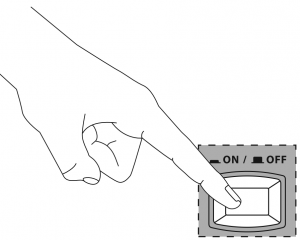
- POWER switch turns the unit off and on.
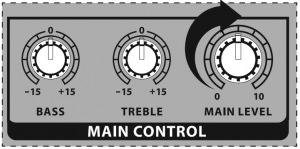
- BASS knob adjusts low frequencies in the overall sound.
- TREBLE knob adjusts high frequencies in the overall sound.
- MAIN LEVEL knob controls the overall volume.
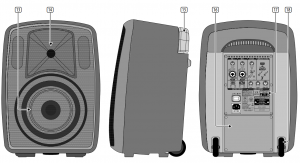
- WOOFER reproduces low frequencies.
- TWEETER reproduces high frequencies.
- LUGGAGE TROLLEY (MPA40BT-PRO only) extends and retracts for easy transport and storage.
- BATTERY COMPARTMENT contains the rechargeable battery. The battery shall not be exposed to excessive heat such as sunshine, fire or the like.
- INPUT PANEL manages levels and routing for microphone, instrument, and Bluetooth signals.
- WHEELS (MPA40BT-PRO only) allow convenient rolling transport.
NOTE: The connection range between speaker and Bluetooth streaming device may decrease if Bluetooth streaming and wireless microphones are used simultaneously.
Getting started
- Set up the MPA40BT-PRO/MPA40BT in your chosen listening location.
- Connect the MPA40BT-PRO/MPA40BT to a power outlet by using the included IEC power cable.
- Turn all LEVEL knobs and the MAIN LEVEL knob down to the full counter-clockwise setting.
- Connect all analog microphone, instrument, and/or RCA cables to their respective input jacks.
- Power up the MPA40BT-PRO/MPA40BT by pressing the POWER switch to the “on” position.
- If you are using BEHRINGER wireless microphones, plug the wireless dongle into the WIRELESS SYSTEM USB input. The WIRELESS SYSTEM LEDs will light up when the wireless microphones become active.
- To pair a Bluetooth device with the MPA40BT-PRO/MPA40BT, follow these steps:• Press and hold the BT/AUX PAIRING BUTTON until the LED flashes quickly.• Press and hold the BT/AUX PAIRING BUTTON untilthe LED flashes quickly.• Open Bluetooth in your mobile phone, MP3 player or other Bluetooth equipment to pair and connect.• In your Bluetooth device, enter the PIN code: 0000 (Bluetooth version 2.0andabove will not require a PIN code).• When the LED lights solid, you can begin playing music from your Bluetooth device.
- While playing music from your Bluetooth device, turn the BT/AUX LEVEL knob to about the 50% position.
- Slowly rotate the MAIN LEVEL knob clockwise until you achieve a comfortable listening level.
- While speaking into each microphone, slowly rotate the MIC 1 and/or MIC 2 LEVEL knobs clockwise until you find a clean, clear sound. If a microphone signal sounds distorted, rotate the LEVEL knob slowly counterclockwise until the sound cleans up.
- If you have an instrument plugged into the MIC 1 or MIC 2 channels, play the instrument and slowly rotate that channel’s LEVEL knob clockwise until you find an acceptable level.
- If you have an instrument or other external sound source plugged into the iPOD/AUX RCA jacks, adjust the volume on the instrument or sound source.
- Balance all of the audio channels against each other by adjusting each channel’s respective LEVEL knob until you find an acceptable mix.
- Adjust the BASS and TREBLE controls if the overall sound needs more low or high frequencies.
- Make final adjustments to the MAIN \LEVEL knob.
Charging the battery
The MPA40BT-PRO/MPA40BT ships with a rechargeable, internal battery that can power continuous audio playback for up to 8 hours. We recommend that you fully charge the battery before your first use.
To charge the battery for the first time, follow this procedure:
- Turn off the MPA40BT-PRO/MPA40BT by pressing the POWER switch.
- Connect the unit to an AC power outlet.
- Keep the unit plugged in to AC power until the BATTERY STATUS 100% LED indicates the battery has been fully charged.
NOTE: The MPA40BT-PRO/MPA40BT uses a sealed lead-acid gel battery, and the battery will slowly self-discharge when the MPA40BT-PRO/MPA40BT is not in use. Before storing the MPA40BT-PRO/MPA40BT for an extended period, fully charge the battery before storage, and then charge again every3 months.NOTE: The lead-acid battery needs toberechargedevery3 months for continued operation. Please replace the battery if the MPA40BT PRO/MPA40BT operating time noticeably decreases, even after a full charge cycle.
Specifications
| Amplifier | |
| Maximum output power | 40W* |
| Speaker Size | |
| Woofer | 8″ |
| Tweeter | 1″ |
| Loudspeaker System Data | |
| Frequency response | 45 Hz to18 kHz (±3dB) |
| Channel 1 & 2: XLR / ¼” TRS combo jacks (servo-balanced) | |
| Input impedance (XLR) | |
| Input impedance (¼” TRS) | 13kΩ, balanced/54 kΩ, unbalanced |
| Max. input level | 0dBu C |
| Channel 3: RCA jacks | |
| Input impedance | 10kΩ, unbalanced |
| Max. input level | +20dBu |
| Level Control | |
| Input trim | -∞ to +10dB |
| Equalizer | |
| High | ±15dB @ 12kHz |
| Low | ±15dB @ 80 Hz |
| Wireless System | |
| USB dongle (not included) | USB socket accepts signals from 2 independent BEHRINGER ULM mics |
| Signal indicator LED | 2 (green) |
| Bluetooth** | |
| Frequency Range | 2402 MHz ~ 2480 MHz |
| Channel Number | 79 |
| Version | Bluetooth spec 3.0 compliant |
| Output | Class 2 type output power |
| Compatibility | Supports A2DP1.2profiles |
| Dynamic Microphone | |
| Model number | DM20 |
| Sensitivity | 52dB ±3dB (0dB = 1 V/Par @ 1kHz) |
| Frequency response | 50 Hz – 10kHz |
| Impedance | 550 Ω, ±30% |
| Pattern | Unidirectional |
| Cord length | 4 m (13.1″) |
| Plug | 6.3 mm (¼”) |
| Battery Supply | |
| Built-in rechargeable battery | 12 V DC/5000 mAh |
| Charging time | appr.6 hours |
| Battery operating time | upto12 hours |
| Battery status indicator LED | 25% (Red),50% (Yellow), 75% and100% (Green) |
| AC Power Supply | |
| Main’s voltage (fuse) | 100-240 V,50/60 Hz (T2 A H 250 V) |
| Power consumption | 55W |
| Main’s connection | Standard IEC receptacle |
| Dimension/Weight | |
| Dimensions (HxWxD) | 420 x 309 x 242 mm (16.6×12.2×9.6″) |
| Weight | MPA40BT-PRO:9kg (19.7 lbs)MPA40BT: 8.2kg (18.1 lbs) |

[xyz-ips snippet=”download-snippet”]