

Ultra-Compact Monitor Speaker
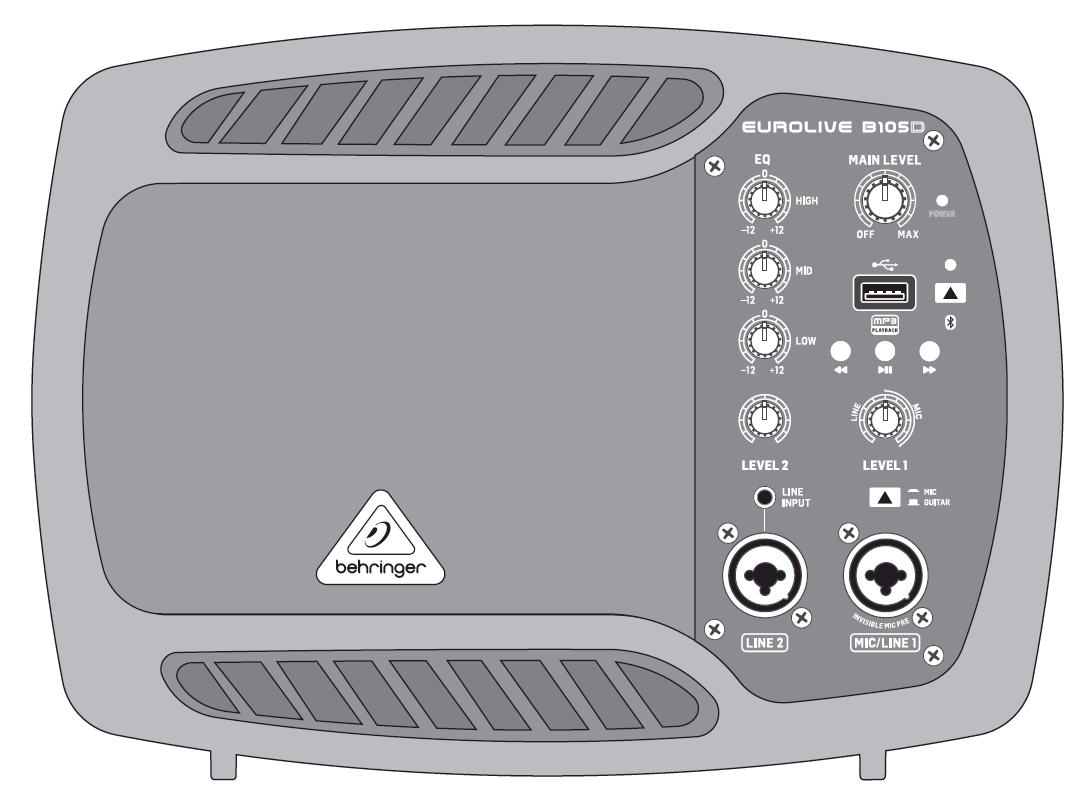
B105D Controls
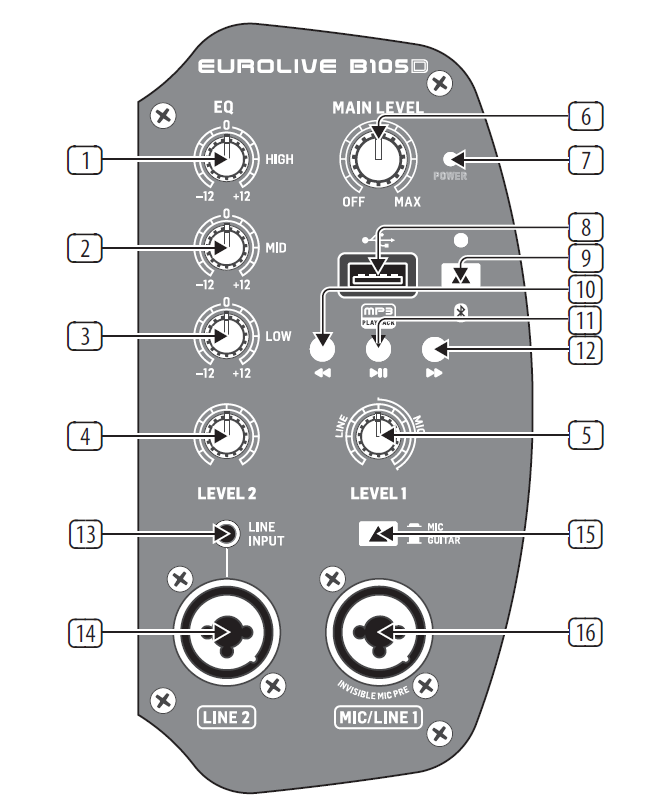
- HIGH EQ knob adjusts the level of treble frequencies.
- MID EQ knob adjusts the level of midrange frequencies.
- LOW EQ knob adjusts the level of bass frequencies.
- LEVEL 2 knob adjusts the input level for the LINE INPUT and LINE 2 jacks.
- LEVEL 1 knob adjusts the input level for the MIC/LINE 1 input.
- MAIN LEVEL knob adjusts the final, main output volume.
- POWER LED lights up to indicate the unit has been powered on.
- USB input accepts USB connection from memory devices with MP3 files.
- BLUETOOTH button activates the Bluetooth circuit and makes the unit available for Bluetooth pairing and audio playback from Bluetooth-equipped devices. When the Bluetooth circuit is first activated, the button’s indicator LED will blink; When the Bluetooth successfully pairs with a Bluetooth device, the LED will stop blinking and remain lit.
- BACK button lets you skip to the previous track (short press) or scroll backward through the current track (long press) playing back via USB or Bluetooth.
- PLAY/PAUSE button begins or stops playback of tracks via USB or Bluetooth.
- FORWARD button lets you skip forward to the next track (short press) or scroll forward through the current track (long press) playing back via USB or Bluetooth.
- LINE INPUT jack connects to external audio sources using cables with 1/8″ (3.5 mm) stereo connectors.
- LINE 2 combo jack accepts audio signals over cables using XLR, balanced ¼” TRS or unbalanced ¼” TS connectors.
- MIC/GUITAR latching switch toggles the MIC/LINE 1 input between settings optimized for balanced signals from microphones (MIC) or unbalanced signals from instruments (GUITAR), such as guitars or basses.
- MIC/LINE 1 combo jack accepts balanced microphone signals via cables with XLR connectors or unbalanced instrument signals (from guitars or basses) via cables with ¼” TS connectors. Use the MIC/GUITAR button to optimize this input for microphones or instrument signals.
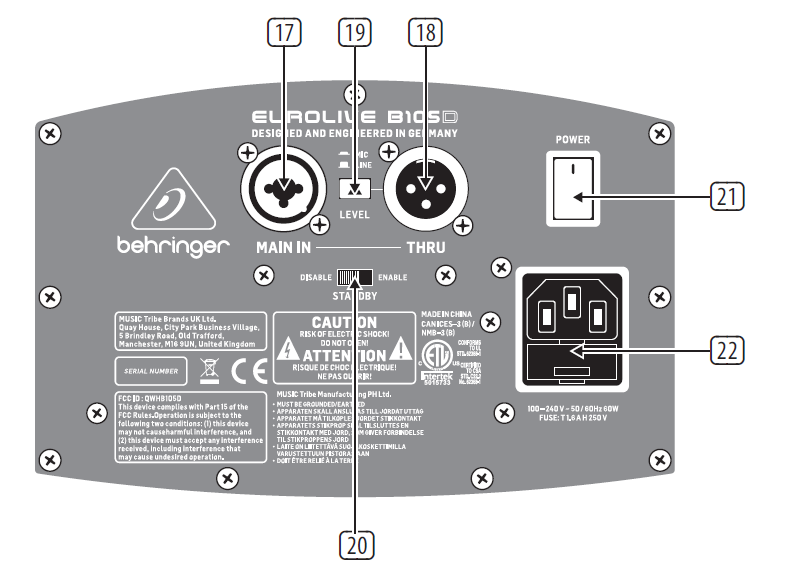
- MAIN IN combo jack accepts audio signals over cables using XLR, balanced ¼” TRS, balanced ¼” TRS or unbalanced ¼” TS connectors. The MAIN IN input level is controlled by the LINE 1 knob.
- THRU jack can be used to send your final mix out over a cable with XLR connectors to a mixer, amplifier or an additional active speaker.
- MIC/LINE LEVEL latching switch optimizes the THRU output for balanced signals (MIC, switch in) or unbalanced signals (LINE, switch out).
- STANDBY ENABLE/DISABLE switch turns the auto-standby power-saving function on (ENABLE) or off (DISABLE). When the auto-standby function is enabled, the unit will power down if no input signal is detected for 30 minutes. To exit the powered down state, turn the POWER switch off and then back on.
- POWER switch turns the unit on and off.
- POWER SOURCE jack accepts the included IEC cable.
Getting started
- Place the speaker(s) in desired locations, preferably on stands as personal monitors or mains.
- Set all controls as shown: HIGH, MID and LOW knobs to their centered position at 12 o’clock;LEVEL 1, LEVEL 2, and MAIN LEVEL knobs set to their minimum levels at the full counterclockwise position.
- Connect all analog microphone, instrument, and/or RCA cables to their respective input jacks.DO NOT turn on the power yet.
- Turn on your audio sources (mixer, microphones, instruments).
- Power up the B105D by moving the POWER switch to the “on” position. The POWER LED on the front panel will light up.
- To pair a Bluetooth device with the B105D, follow these steps:
- Press the BLUETOOTH button to activate the Bluetooth circuit. The BLUETOOTH button’s indicator LED will blink.
- Open Bluetooth in your smartphone, tablet computer, MP3 player or other Bluetooth equipment to pair and connect.
- When the BLUETOOTH button’s LED lights solid, you can begin playing back music from your Bluetooth device.
- Slowly rotate the MAIN LEVEL knob clockwise until you achieve a comfortable listening level.
- Insert your USB device with MP3 audio files into the USB input.
- Start or stop MP3 playback by pressing the PLAY/PAUSE () button. Skip or scroll through tracks by using the BACK or FORWARD buttons begins.
- Turn the MAIN LEVEL knob up to a comfortable level.
- Plug a microphone or instrument into the MIC/LINE 1 combo jack.
- If you are using a microphone, press the MIC/GUITAR latching switch to the inward MIC position. If you are using an instrument, such as guitar or bass, move the MIC/GUITAR latching switch to the outward GUITAR position.
- While playing or speaking into the microphone, slowly rotate the LEVEL 1 knob clockwise until you reach a comfortable level. If you notice any undesirable distortion in your instrument or mic sound, turn the LEVEL 1 knob back down until the distortion stops.
- Plug additional audio devices into the LINE 2 combo jack or LINE INPUT jack (for audio devices such as smartphones, tablets or MP3 players that use 1/8″ stereo connectors).
- While playing audio from these additional audio devices, slowly turn the LEVEL 2 knob clockwise until you achieve a comfortable listening level. If necessary, adjust the output levels on your audio devices.
- Balance the analog signals against the MP3 and Bluetooth playback by adjusting the LEVEL knobs for each analog channel until you find an acceptable mix. If an analog signal distorts, turn that channel’s LEVEL knob back down.
- Adjust the HIGH, MID or LOW EQ controls if the overall sound needs overall frequency adjustment.
- Set the final, overall volume by adjusting the MAIN LEVEL knob.

[xyz-ips snippet=”download-snippet”]