![]() Quick Start Guide
Quick Start Guide
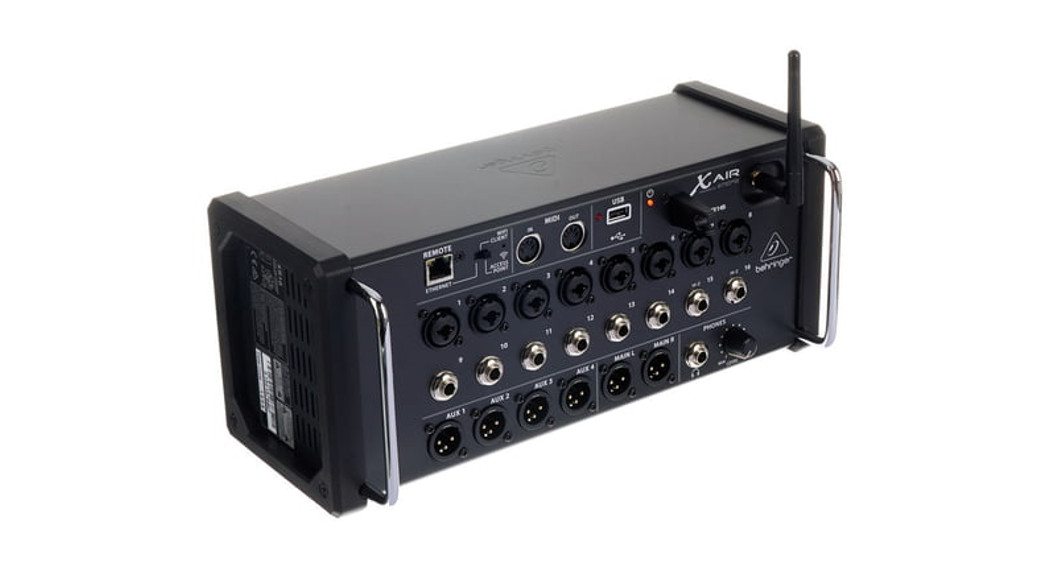
 X AIR XR16/XR1216/12-Input Digital Mixer for iPad/Android Tablets with 8/4 Programmable Midas Preamps, 8 Line Inputs,Integrated Wifi Module and USB Stereo Recorder
Important Safety Instructions

![]() Terminals marked with this symbol carry an electrical current of sufficient magnitude to constitute a risk of electric shock. Use only high-quality professional speaker cables with ¼” TSor twist-locking plugs pre-installed.All other installation or modifications should be performed only by qualified personnel.
Terminals marked with this symbol carry an electrical current of sufficient magnitude to constitute a risk of electric shock. Use only high-quality professional speaker cables with ¼” TSor twist-locking plugs pre-installed.All other installation or modifications should be performed only by qualified personnel.![]() This symbol, wherever it appears, alerts you to the presence of uninsulated dangerous voltage inside the enclosure- voltage that may be sufficient to constitute a risk of shock.
This symbol, wherever it appears, alerts you to the presence of uninsulated dangerous voltage inside the enclosure- voltage that may be sufficient to constitute a risk of shock.![]() This symbol, wherever it appears, alerts you to important operating and maintenance instructions in the accompanying literature. Please readthe manual.
This symbol, wherever it appears, alerts you to important operating and maintenance instructions in the accompanying literature. Please readthe manual.![]() CautionTo reduce the risk of electric shock, do not remove the top cover (or the rear section). No user-serviceable parts inside refer servicing to qualified personnel.
CautionTo reduce the risk of electric shock, do not remove the top cover (or the rear section). No user-serviceable parts inside refer servicing to qualified personnel.![]() CautionTo reduce the risk of fire or electric shock, do not expose this appliance to rain and moisture. The apparatus shall not be exposed to dripping or splashing liquids and no objects filled with liquids, such as vases, shall be placed on the apparatus.
CautionTo reduce the risk of fire or electric shock, do not expose this appliance to rain and moisture. The apparatus shall not be exposed to dripping or splashing liquids and no objects filled with liquids, such as vases, shall be placed on the apparatus.![]() CautionThese service instructions are for use by qualified service personnel only. To reduce the risk of electric shock do not perform any servicing other than that contained in the operation instructions repair has to be performed by qualified service personnel.
CautionThese service instructions are for use by qualified service personnel only. To reduce the risk of electric shock do not perform any servicing other than that contained in the operation instructions repair has to be performed by qualified service personnel.
- Read these instructions.
- Keep these instructions.
- Heed all warnings.
- Follow all instructions.
- Do not use this apparatus near water.
- Clean only with a dry cloth.
- Do not block any ventilation openings. Install in accordance with the manufacturer’s instructions.
- Do not install near any heat sources such as radiators, heat registers, stoves, or other apparatus (including amplifiers) that produce heat.
- Do not defeat the safety purpose of the polarized or grounding-type plug. A polarized plug has two blades with one wider than the other.A grounding-type plug has two blades and a third grounding prong. The wide blade or the third prong are provided for your safety. If the provided plug does not fit into your outlet, consult an electrician for the replacement of the obsolete outlet.
- Protect the power cord from being walked on or pinched particularly at plugs, convenience receptacles, and the point where they exit from the apparatus.
- Use only attachments/accessories specified by the manufacturer.

- Use only with the cart, stand, tripod, bracket, or table specified by the manufacturer, or sold with the apparatus. When a cart is used, use caution when moving the cart/ apparatus combination to avoid injury from tip-over.
- Unplug this apparatus during lightning storms or when unused for long periods of time.
- Refer all servicing to qualified service personnel. Servicing is required when the apparatus has been damaged n any way, such as power supply cord or plug is damaged, liquid has been spilled or objects have fallen into the apparatus, the apparatus has been exposed to rain or moisture, does to operate normally, or has been dropped.
- The apparatus shall be connected to a MAINS socket outlet with a protective earthing connection.
- Where the MAINS plug or an appliance coupler is used as the disconnect device, the disconnect device shall remain readily operable.
- Correct disposal of this product: This symbol indicates this product must be disposed of with household waste, according to the WEEE Directive (2012/19/EU) and national law. This product should be taken to a collection center licensed for the recycling of waste electrical and electronic equipment (EEE).The mishandling of this type of could have a possible negative upon the environment and humans due to potentially hazardous substances that are generally associated with EEE. At the same to your cooperation in the correct disprove of this product will contribute to the efficient use of natural resources. For more information about where you take your waste equipment for recycling, please contact your local office or your household waste collection service.
- Do not install in a confined such as a bookcase or similar unit.
- Do not place naked flame sources, such as lighted candles, on the apparatus.
- Please keep the environmental aspects of battery disposal in mini batteries must be disposed of at a battery collection point.
- This apparatus may be used in tropical and moderate climates up to 45°C.

 Correct disposal of this product: This symbol indicates this product must be disposed of with household waste, according to the WEEE Directive (2012/19/EU) and national law. This product should be taken to a collection center licensed for the recycling of waste electrical and electronic equipment (EEE).The mishandling of this type of could have a possible negative upon the environment and humans due to potentially hazardous substances that are generally associated with EEE. At the same to your cooperation in the correct disprove of this product will contribute to the efficient use of natural resources. For more information about where you take your waste equipment for recycling, please contact your local office or your household waste collection service.
LEGAL DISCLAIMERMusic Tribe accepts no liability for any loss which may be suffered by any person who relies either wholly on or in part upon any description, photograph, or statement contained herein. Technical specifications, appearances, and other information are subject to change without notice.All trademarks are the property of their respective owners. Midas, Klark Teknik, Lab Gruppen, Lake, Tannoy, Turbosound, TC Electronic, TC Helicon, Behringer, Bugera, Oberheim, Auratone and Coolaudio are trademarks or registered trademarks of Music Tribe Global Brands Ltd.© Music Tribe Global Brands Ltd.2021 All rights reserved.LIMITED WARRANTY
For the applicable warranty terms and conditions and additional information regarding Music Tribe’s LimitedWarranty, please see complete details online at musictribe.com/warranty.X AIR XR16/XR12 Hook-up
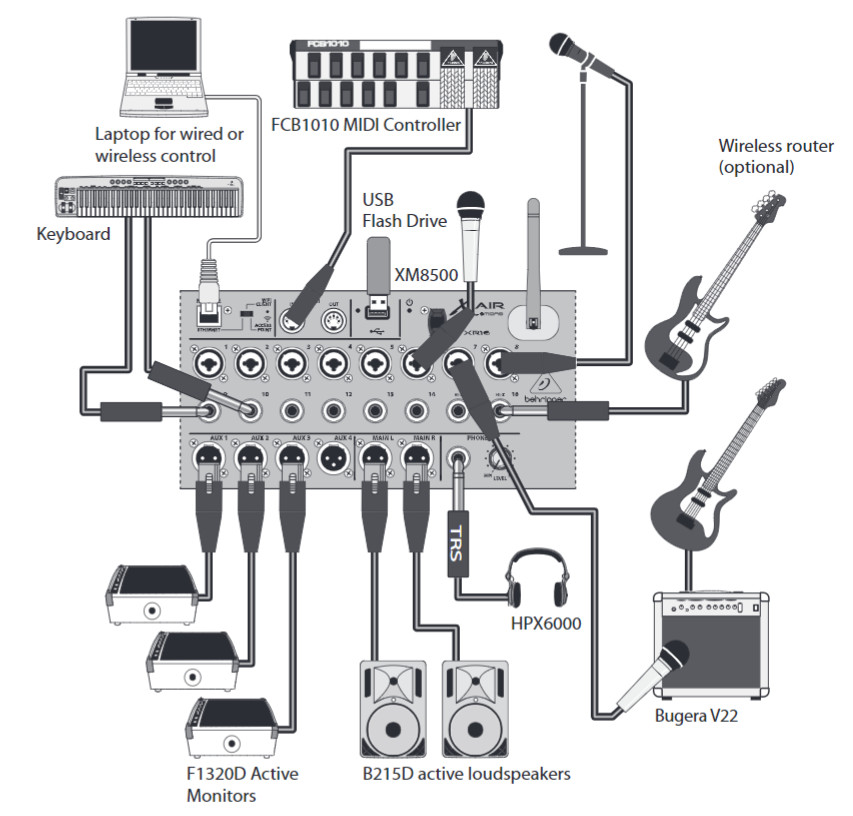
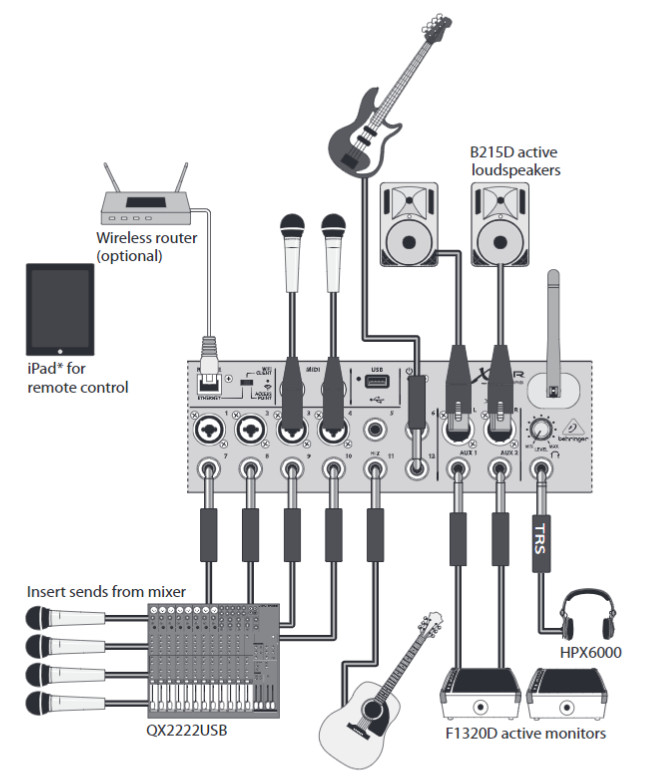
Step 1: Hook-Up
|
X AIR 16 club performance
|
X AIR 12 with sub mixer
|
 *iPad is a trademark of Apple, Inc. iPad not included.
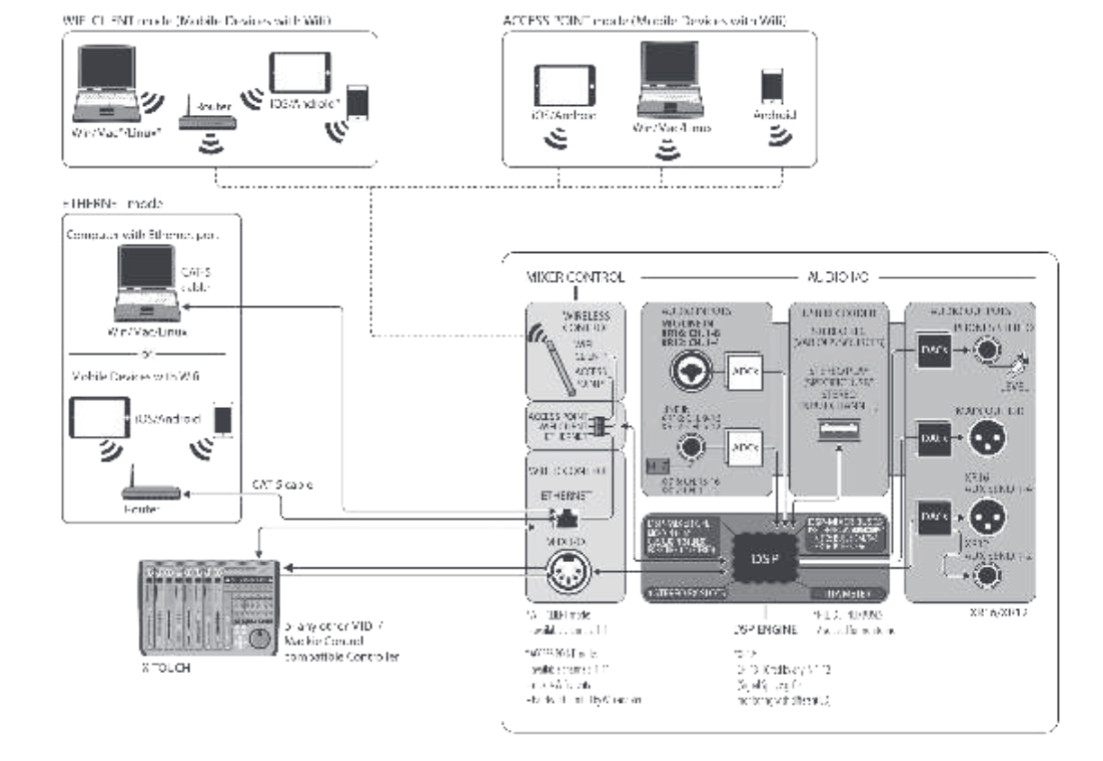
*Mac is a trademark of Apple, Inc. Linux is the registered trademark of Linus Torvalds in the U.S. and other countries. Android is a trademark of Google, Inc.
X AIR XR16/XR12 Controls
Step 2: Controls
 |
 |
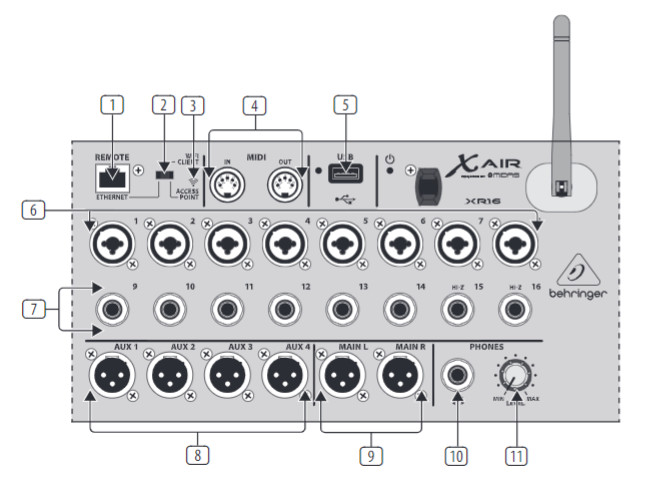
- ETHERNET port allows the mixer to be controlled via LAN or connected Wifi router.
- REMOTE switch selects between Ethernet, Wifi client, or Access Point. See the Network Connection chapter for details.
- RESET button resets the console to default network parameters when held for 2 seconds. When held for 10 seconds, all console functions are reset to factory default status.
- MIDI IN/OUT jacks send and receive MIDI signals to and from external equipment. See the MIDI Implementation chart for details.
- USB port (type A) accepts a flash drive for file storage, stereo recordings, and playback. The red LED next to it indicates file access. Do not remove the USB flash drive while it is lit!
- XLR COMBO jacks accept balanced and unbalanced XLR and 1/4″ plugs.(7) 1/4″ inputs accept balanced or unbalanced 1/4″ plugs. Channel 15 and 16 on the XR16 (channel 11 and 12 on the XR12) accept high impedance sources for direct connection of guitars and basses.
- AUX SEND jacks send your monitor mixes to stage monitors or headphone mixers. The XR16 uses XLR connectors while the XR12 uses balanced 1/4″ jacks.
- MAIN L/R jacks send the main mix signal to PA or monitor speakers via XLR cables.
- HEADPHONE jack accepts a 1/4″ TRS plug for connecting a pair of headphones.
- PHONES LEVEL knob determines the output of the headphones jack.
- POWER switch turns the mixer on and off. The front panel LED will light when the unit is powered on.
X AIR XR16/XR12 Network Connection
Step 3: Network Connection
Network ConnectionThe X AIR mixers eliminate all hassles by incorporating a wireless network router that gives access to the mixer in three different ways–via Ethernet LAN, or wirelessly as a Wifi Client or as an AccessPoint. Selection is made with the REMOTE switch [2]. You may view or change the network preferences for these on any of the X AIR remote control applications on the ‘Setup/Network’ page.IP Address and DHCPDepending on the connection scenario, the XR16/XR12 offers up to 3 options for connecting a tablet or PC for software control – DHCP Client, DHCP Server, and fixed IP operation. Connection is achieved differently depending on which option you choose:DHCP Client mode is available in Ethernet LAN or Wifi Client operation. The mixer will automatically request an IP lease from the DHCP server that owns the IP addresses in the network to which you are trying to connect.DHCP Server (DHCPS) is optionally available for Ethernet LAN connections and is standard in Access Point operation.The mixer will own the IP addresses and provide IP leases to devices requesting access to that network. The mixer will always use IP address 92.168.1.1 and assign IP addresses 192.168.1.101 – 192.168.1.132 to its clients.Static IP is available for Ethernet LAN and Wifi Client operation. The mixer will use the fixed (static) IP address, subnet mask and gateway that you specify for registering on the network. Make sure that the addresses you specify manually are not conflicting with any other addresses on the samenetwork. We generally recommend using the DHCP mode, unless you have a very specific reason to set it up manually.Note: Changing parameters of the currently selected connection mode will disconnect the software from the console.If the console is erroneously configured for a fixed IP address that is incompatible with the network it is connected to, the console will be inaccessible. In this case, one of the other two connection modes can be used to regain access and amend the settings.If that does not work, hold the Reset button for 2 seconds to return to default network settings.
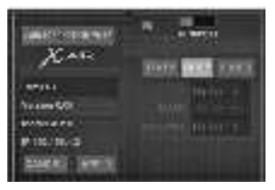 Mixer name and Ethernet setup screen
Ethernet/LANThis mode supports DHCP Client (default), DHCP Server, and fixed IP operation.Note that if the XR16/XR12 is connected to a network where no DHCP server is present, the mixer will generate an automatic IP address (range 169.254.1.0 – 169.254.254.255). There are no security options for LAN connections, so any device in that network may take control of connected XR16/XR12 consoles. When connecting via LAN/ Ethernet to a Wifi router, make sure the security settings of that router prevent unauthorized access.
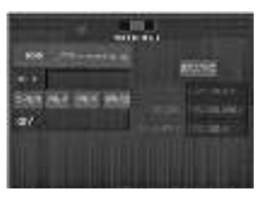
Wifi Client setup screenWifi ClientThis mode supports DHCP Client (default) and fixed IP operation.The XR16/XR12 can support WEP, WPA, and WPA2 security mechanisms in Wifi Client mode and works on Wifi channels 1-11.Correct SSID (network name) and password need to be supplied to connect to an existing network. WEP passwords have to be either 5 charactersor 13 characters long. If the supplied SSID and password are incorrect, the mixer cannot be accessed. In this case, the networking parameters have to be reset and another connection mode has to be used to regain access.The Ethernet connection mode may be used for the configuration of the Wifi Client mode. While being connected in Ethernet mode, the X AIR mixer can scan the available wireless networks and display their SSID network names, field strength, and security method. By selecting the preferred wirelessnetwork, this information can be copied to the applications’ Wifi Client setup page automatically. You will then be prompted to fill in the security password of that network. After switching from Ethernet to Wifi Client mode, the mixer should connect to the selected wireless network automatically, and will be displayed by remote applications on any device connected to the same network.
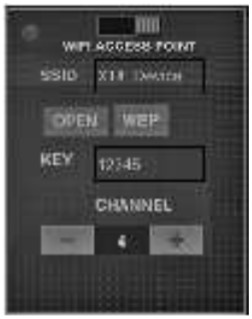
Access Point setup screenAccess PointThis mode only supports DHCP Server operation with a maximum of 4 clients, working on Wifi channels 1-11.Security is supported via WEP 40-bit (5 ASCII characters) or WEP 104-bit (13 ASCII characters). By default, the mixer will use a network name consisting of the model name plus the last bits of the mixer’s unique MAC address (e.g. XR16-17-BE-C0). The default IP address is 192.168.1.1 and nosecurity is engaged.The control software is available for Android and iPad tablets as well as PC/ Mac/Linux computers. Visit behringer.com to download the PC/Mac/Linux software. The tablet software can be downloaded from the app store on your device.To learn more about operating the control software, visit the product page on behringer.com to download the full manual.
Getting StartedFirst Wifi remote connection to your X AIR mixer
- Download and install the remote control app for your device.• Android smartphones/tablets:X AIR Android from the Google Play* store• iPad: X AIR for iPad from the App Store• PC: X AIR EDIT for Windows*,Mac or Linux from behringer.com
- Set the REMOTE switch on your X AIR mixer to ACCESS POINT mode and power on the mixer.
- Reset your X AIR mixer’s network settings to default values by holding the RESET button for 2 seconds. This is located in the small hole above the Wifi icon and requires a paper clip or similar tool to reach.
- Switch your remote control device on and open the network settings.
Android smartphones/tablets:
- Start the Settings/Wireless & Networks dialog on your Android system.
- Switch ‘Wifi’ on.
- Click on ‘Wifi’ to select a network.From the list of networks, select your X AIR mixer’s name, e.g. “XR16-19-1B-07”. After a few seconds, the status should change to ‘Connected’.
- Open your X AIR for Android app and it will show similar information:• Mix Access = All• IP Address = 192.168.1.1• Wifi Lock = None• Wifi connected toXR16-19-1B-07
- You may choose to lock the connection to this specific Wifi network if you want to ensure that your device cannot automatically connect to another network while you are controlling your mixer.
- Click on ‘Connect’ and tap on the mixer’s name in order to connect the app with your mixer.Note – if a warning pops up telling you that the mixer firmware is not supported, it is recommended to update the firmware to the latest version (see the XR16/XR12 pages on behringer.com for details).You can, however, choose to connect anyway.
- Once the app is connected to your mixer, all parameters will be loaded automatically. Enjoy exploring all mixing functions of your X AIR mixer remotely!
iPad:
- Start the Settings/Wifi dialog on your iOS.
- Switch ‘Wifi’ on.
- Select your X AIR mixer’s name from the list of networks, e.g. “XR16-19-1B-07”. After a couple of seconds, the status should change to ‘Connected’, indicated by a checkmark.
- Open your X AIR for the iPad app and it will show any X AIR mixers (‘Devices’) found in that network, with their IP address, which in this case is 192.168.1.1.
- Tap on the mixer’s icon to connect the app with your mixer.Note – if a warning pops up telling you that the mixer firmware is not supported, it is recommended to update the firmware to the latest version (see the XR16/XR12 pages on behringer.com for details).You can, however, choose to connect anyway.
- Once the app is connected to your mixer, all parameters will be loaded automatically.Enjoy exploring all mixing functions of your X AIR mixer remotely!
PC: X AIR EDIT for Windows, Mac or Linux
- Open the Wireless Network Connections dialog on your operating system.
- Make sure the ‘WLAN’ or ‘Wifi’ adapter is switched on.
- View the list of wireless networks and select your X AIR mixer’s name, e.g. “XR16-19-1B-07”. After a couple of seconds, the status should change to ‘Connected’, indicated by a checkmark.
- Open your X AIR Editor for Win/ Mac/Linux and click on ‘Setup’.The list will show any X AIR mixers found in that network, with their name and IP address, which in this case is 192.168.1.1.
- Click on your mixer’s name, e.g. “XR16-19-1B-07”, and confirm to synchronize from the mixer to PC in order to connect the app with your mixer. If a warning pops up telling you that the mixer firmware is not supported, it is recommended to update the firmware to the latest version (see the XR16/XR12 pages on behringer.com for details).You can, however, choose to connect anyway.
- Once the app is connected to your mixer, all parameters will be transferred automatically.Enjoy exploring all mixing functions of your X AIR mixer remotely!
*App Store is a service mark of Apple Inc. Google Play is a trademark of Google Inc.Windows is either a registered trademark or trademark of Microsoft Corporation in the United States and/or other countries.
X AIR XR16/XR12 USB Recorder
Step 4: USB Recorder
The USB port (type A) accepts a flash drive for file storage, stereo recordings, and playback. The operation is remotely controlled via X AIR apps.
- Supported file system: FAT32.
- Supported audio file format:WAV, 16-bit, 44.1, or 48.0 kHz – depending on the mixer sample rate.
- Maximum recording time: approx.3 hours for each file, with a file size limit of 2 GB.
It is recommended to do a test recording after formatting the USB drive.
X AIR XR16/XR12 MIDI ImplementationXR16/XR12 MIDI Implementation Chart
|
MIDI RX / TX |
Channel | Command | CC No. | Value |
Comment |
|
Snapshot |
|||||
| Snapshots | 1 | Prg Chg | Jan-64 | Program Changes 1-64 on Channel 1 can be used to recall snapshots 1-64 stored inside X AIR mixers. | |
|
Fader |
|||||
| CH Faders | 1 | CC | 0 -15 | 0/127 | Input Channels |
| CH Faders | 1 | CC | 16 | 0/127 | USB Recorder Playback (stereo) |
| CH Faders | 1 | CC | 17-20 | 0/127 | FX1-4 Return (stereo) |
| Send Faders | 1 | CC | 21-26 | 0/127 | Aux Sends / Subgroups |
| Send Faders | 1 | CC | 27-30 | 0/127 | FX 1-4 Send |
| Main Fader | 1 | CC | 31 | 0/127 | Main LR (stereo) |
|
Mute |
|||||
| CH Mutes | 2 | CC | 0 -15 | 0/127 | Input Channels |
| CH Mutes | 2 | CC | 16 | 0/127 | USB Recorder Playback (stereo) |
| CH Mutes | 2 | CC | 17-20 | 0/127 | FX 1-4 Return (stereo) |
| Send Mutes | 2 | CC | 21-26 | 0/127 | Aux Sends / Subgroups |
| Send Mutes | 2 | CC | 27-30 | 0/127 | FX 1-4 Send |
| Main Mute | 2 | CC | 31 | 0/127 | Main LR (stereo) |
|
Panorama/BalanCH PAN |
|||||
| CH PAN | 3 | CC | 0 -15 | 1…127 | Panorama Input Channels;value 64 = center |
| CH PAN | 3 | CC | 16 | 1…127 | Balance USB Recorder Playback (stereo);value 64 = center |
| CH PAN | 3 | CC | 17-20 | 1…127 | Balance FX 1-4 Return (stereo);value 64 = center |
| Aux / Sub Pan | 3 | CC | 21-26 | 1…127 | Panorama Aux Sends / Subgroups;value 64 = center |
| Main Bal | 3 | CC | 31 | 1…127 | Balance Main LR (stereo);value 64 = stereo |
|
X OSC |
|||||
| Text-based OSC | SYX | Open Sound Control via Sysex F0 00 20 32 32 TEXT F7 With ‘TEXT’ being OSC strings in hex format, up to 39 kB in length |
SpecificationsX AIR Mixer Series Specifications
| X AIR Mixer Series Specifications | XR16 | XR12 |
| Processing | ||
| Number of processing channels | 16 input channels, 1 stereo USB return channel, 4 stereo FX return channels, 6 aux buses, main LR | 16 input channels, 1 stereo USB return channel, 4 stereo FX return channels, 6 aux buses, main LR |
| Internal effects engines | 4 true stereo | 4 true stereo |
| Signal processing | 40-bit floating-point | 40-bit floating-point |
| A/D-D/A conversion (Cirrus Logic A/D CS5368, D/A CS4385) | 24-bit @ 44.1 / 48 kHz,114 dB dynamic range | 24-bit @ 44.1 / 48 kHz,114 dB A/D dynamic range |
| Analog I/O latency* | 0.8 ms | 0.8 ms |
| Connectors | ||
| Programmable mic preamps, designed | 8 XLR/TRS combo jacks, balanced | 4 XLR/TRS combo jacks, balanced |
| Line inputs | 8 TRS, balanced | 8 TRS, balanced |
| Main outputs | 2 XLR, balanced | 2 XLR, balanced |
| Aux outputs | 4 XLR, balanced | 2 TRS, balanced |
| Phones outputs | 1 TRS | 1 TRS |
| MIDI inputs / outputs | 1/1 DIN | 1/1 DIN |
| Ethernet | 1 RJ45 | 1 RJ45 |
| USB port | Type A | Type A |
| Mic Input Characteristics | ||
| Preamp design | Midas | Midas |
| THD + noise, 20 dB gain, 0 dBu out | < 0.005%, A-weighted | < 0.005%, A-weighted |
| Phantom power, switchable per input | 48 V | 48 V |
| Equivalent input noise level,XLR (input shorted) | -128 dBu, A-weighted | -128 dBu, A-weighted |
| CMRR, XLR, @ 20 dB gain (typical) | >60 dB | >60 dB |
| CMRR, XLR, @ 40 dB gain | >65 dB | >65 dB |
| Input/Output Characteristics | ||
| Frequency range, @ 48 kHz sample rate, 0 dB to -1 dB | 10 Hz – 22 kHz | 10 Hz – 22 kHz |
| Dynamic range, analog mic into analog out (typical) | 105 dB | 104 dB |
| A/D dynamic range, mic preamp to converter (typical) | 109 dB | 109 dB |
| D/A dynamic range, converter and output | 108 dB | 108 dB |
| Cross talk rejection @ 1 kHz, adjacent channels | 90 dB | 90 dB |
| Mic input impedance XLR jack, unbal. / bal. | 5 kΩ / 10 kΩ | 5 kΩ / 10 kΩ |
| Non clip maximum input level, XLR | +23 dBu | +23 dBu |
| Hi-Z input impedance TRS jack, unbal. / bal. | 1 MΩ / 2 MΩ | 1 MΩ / 2 MΩ |
| Line input impedance TRS jack, unbal. / bal. | 20 kΩ / 40 kΩ | 20 kΩ / 40 kΩ |
| Non clip maximum input level, TRS | +21 dBu | +21 dBu |
| Output Characteristics | ||
| Output impedance, XLR, unbal. / bal. | 50 Ω / 50 Ω | 50 Ω / 50 Ω |
| Output level, XLR, nom./max. | +4 dBu / +16 dBu | +4 dBu / +16 dBu |
| Output impedance, TRS, unbal. / bal. | 50 Ω / 50 Ω | 50 Ω / 50 Ω |
| Output level, TRS, nom./max. | +4 dBu / +16 dBu | +4 dBu / +16 dBu |
| Phones output impedance / level | 40 Ω / +35 dBm (stereo) | 40 Ω / +35 dBm (stereo) |
| Residual noise level, XLR and TRS | -92 dBu, A-weighted | -92 dBu, A-weighted |
| WLAN Module | ||
| Antenna | External, SMA connector, 50 Ω | External, SMA connector, 50 Ω |
| Access Point, number of clients | Max. 4 | Max. 4 |
| IEEE 802.11 b/g standard | 2.4 GHz | 2.4 GHz |
| Frequency Range | 2,412-2,462 MHz | 2,412-2,462 MHz |
| WLAN channels (Wifi Client, Access Point) | 1-11 / 1-11 | 1-11 / 1-11 |
| Max Output Power | 19 dBm (802.11b) / 18 dBm (802.11g) | 19 dBm (802.11b) / 18 dBm (802.11g) |
| Power | ||
| Switch-mode power supply | Autorange 100-240 V, (50/60 Hz) | Autorange 100-240 V, (50/60 Hz) |
| Power consumption | 30 W | 30 W |
| Physical | ||
| Standard operating temperature range | 5°C – 40°C (41°F – 104°F) | 5°C – 40°C (41°F – 104°F) |
| Dimensions | 333 x 149 x 140 mm (13.1 x 5.9 x 5.5 in) | 333 x 149 x 95 mm (13.1 x 5.9 x 3.7 in) |
| Weight | 3.0 kg (6.6 lb) | 2.4 kg (5.3 lb) |
* including all channel and bus processing, excluding insert effects
Other important informationImportant information
- Register online.Please register your new Music Tribe equipment right after you purchase it by visiting musictribe.com. Registering your purchase using our simple online form helps us to process your repair claims more quickly and efficiently.Also, read the terms and conditions of our warranty, if applicable.
- Malfunction. Should your Music Tribe Authorized Reseller not be located in your vicinity, you may contact the Music Tribe Authorized Fulfiller for your country listed under “Support” at musictribe.com. Should your country not be listed, please check if your problem can be dealt with by our “Online Support”which may also be found under “Support” at musictribe.com. Alternatively, please submit an online warranty claim at musictribe.com BEFORE returning the product.
- Power Connections.Before plugging the unit into a power socket, please make sure you are using the correct mains voltage for your particular model. Faulty fuses must be replaced with fuses of the same type and rating without exception.
FEDERAL COMMUNICATIONS COMMISSIONCOMPLIANCE INFORMATION
| Responsible Party Name: | Music Tribe Commercial NV Inc. |
| Address: | 5270 Procyon Street, Las Vegas NV 89118,United States |
| Phone Number: | +1 702 800 8290 |
X AIR XR16/XR12This equipment has been tested and found to comply with the limits for a Class A digital device, pursuant to part 15 of the FCC Rules.These limits are designed to provide reasonable protection against harmful interference when the equipment is operated in a commercial environment. This equipment generates, uses, and can radiate radio frequency energy and, if not installed and used in accordance with the instruction manual, may cause harmful interference to radio communications.Operation of this equipment in a residential area is likely to cause harmful interference in which case the user will be required to correct the interference at his own expense.
- Reorient or relocate the receiving antenna.
- Increase the separation between the equipment and receiver.
- Connect the equipment into an outlet on a circuit different from that to which the receiver is connected.
- Consult the dealer or an experienced radio/TV technician for help.
This device complies with Part 15 of the FCC rules. Operation is subject to the following two conditions:
- this device may not cause harmful interference, and
- this device must accept any interference received, including interference that may cause undesired operation.
Important information:Changes or modifications to the equipment not expressly approved by Music Tribe can void the user’s authority to use the equipment.Caution!The manufacturer is not responsible for any radio or TV interference caused by unauthorized modification to this equipment.Such modifications could void the user’s authority to operate the equipment.FCC RF Radiation Exposure Statement:
- This Transmitter must not be co-located or operating in conjunction with any other antenna or transmitter.
- This equipment complies with FCC RF radiation exposure limits set forth for an uncontrolled environment. This equipment should be installed and operated with a minimum distance of 20 centimeters between the radiator and your body.
![]() Hereby, Music Tribe declares that this product is in compliance with Directive 2014/53/EU, Directive 2014/30/EU, Directive 2014/35/EU,Directive 2011/65/EU and Amendment 2015/863/EU, Directive 2012/19/EU, Regulation 519/2012 REACH SVHC and Directive 1907/2006/EC.Full text of EU DoC is available at https://community.musictribe.com/EU Representative: Music Tribe Brands DK A/SAddress: Ib Spang Olsens Gade 17, DK – 8200 Aarhus N, Denmark
Hereby, Music Tribe declares that this product is in compliance with Directive 2014/53/EU, Directive 2014/30/EU, Directive 2014/35/EU,Directive 2011/65/EU and Amendment 2015/863/EU, Directive 2012/19/EU, Regulation 519/2012 REACH SVHC and Directive 1907/2006/EC.Full text of EU DoC is available at https://community.musictribe.com/EU Representative: Music Tribe Brands DK A/SAddress: Ib Spang Olsens Gade 17, DK – 8200 Aarhus N, Denmark
We Hear You
![]()
References
[xyz-ips snippet=”download-snippet”]