

ELECTRIC FIRE SUITEINSTRUCTION MANUAL*This product is only suitable for well insulated spaces or occasional use.
Please read all of the instructions carefully and retain for future reference.
Safety Instructions
When using electrical products, basic safety precautions should always be followed. Check that the voltage indicated on the rating plate corresponds with that of the local network before connecting the product to the mains power supply.Children younger than 3 years old should be kept away from the product unless continuously supervised.Children aged from 3 years and less than 8 years should not plug in, regulate or clean the product or perform user maintenance. Children aged from 8 years and people with reduced physical, sensory or mental capabilities or lack of experience and knowledge can use this appliance, only if it has been installed in its intended operating position and they have been given supervision or instruction concerning the use of the appliance in a safe way and understand the hazards involved.Children should not perform cleaning or user maintenance unless they are older than 8 years and supervised. This is not a toy – children should be supervised to ensure they do not play with the product. Always unplug the product and allow to cool fully after use and before any cleaning or maintenance. Normal voltage is still present in this product as long as the product is connected to the electrical source.This product contains no user-serviceable parts. If the power supply cord, plug or any part of the product is malfunctioning or if it has been dropped or damaged, only a qualified electrician should carry out repairs. Improper repairs may place the user at risk of harm. Keep the product and its power supply cord out of the reach of children and away from heat or sharp edges that could cause damage. This includes any parts of the product that may become hot during use and other heat-emitting products. Keep furniture, curtains and other flammable material at least 1 meter away from the product.Do not run the supply cord under carpets, rugs, etc. or anywhere where it may present a trip hazard.Do not immerse the product or plug in water or any other liquid.Do not operate the product with wet hands.Do not use this product in the immediate surroundings of a bath, a shower or swimming pool.Do not leave the product unattended whilst connected to the mains power supply or when in use.Do not remove from the mains power supply by pulling the cord; switch off and remove the plug by hand.Do not use this product for extended periods of time.Do not leave the product operating overnight.Do not use the product for anything other than its intended use.Do not cover this product.Do not block the air intake of the product; place in an open, well-ventilated space and install it according to the instructions provided.Do not use this product outdoors.Do not attempt to move the product whilst it is in use. Do not put objects into any of the openings.Do not use the product with a programmer, timer, separate remote-control system or any other device that will switch the product on automatically other than that supplied with the product, as there is a risk of fire if the heater is covered or positioned incorrectly.Do not clean the product with abrasive chemicals or materials such as scourers, as they may damage the product. This includes insecticide and chemical solvents. The product should be used on a stable, heat-resistant surface. The product must not be located immediately below or next to a mains power supply. Never use accessories that are not recommended or supplied by the manufacturer. It could cause danger to the user and damage Use of an extension cord with the product is not recommended. to the product. This product is intended for domestic use only. It should not be used for commercial purposes.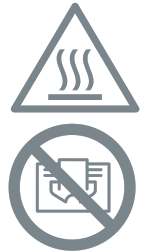 Caution: Some parts of this product can become very hot and cause burns. Particular attention has to be given where children and vulnerable people are present. Hot surface – do not touch the hot section or heating components of the product.Warning: In order to avoid overheating, do not cover the product. Do not use this product in small rooms whilst occupied by persons incapable of leaving the room on their own, unless constant supervision is provided.
Battery SafetyDo not short-circuit a cell or battery.Do not store cells and batteries haphazardly in a box or drawer where they may short-circuit each other or be short-circuited by other metal objects. Check that the battery compartment is secure. Only batteries of the same or equivalent type as those recommended should be used with this product. Batteries are to be inserted with the correct polarity. Replace a full set of batteries at any one time. Remove any batteries from the product when it is not being used for a long period of time to avoid leakage. Exhausted batteries should be removed from the product to avoid leakage. In the event of batteries leaking, do not allow any liquid to come into contact with the skin or eyes. If contact has been made, wash the affected area with copious amounts of water and seek medical advice. Keep batteries out of the reach of children. Seek medical advice immediately if a cell or battery has been swallowed.Non-rechargeable batteries should not be recharged. Rechargeable batteries must be removed from the product before being charged. Rechargeable batteries should only be recharged under adult supervision. When possible, remove the battery from the product when not in use. Exhausted batteries must be removed and disposed of safely. Do not dispose of batteries in a fire. Do not crush, puncture, dismantle or otherwise damage the batteries. Do not expose batteries to heat or fire as they may explode. Do not mix alkaline, standard (carbon-zinc), and rechargeable batteries (nickel hydride). Do not subject the batteries to mechanical shock. Do not dispose of batteries in household waste. To dispose of any batteries, take them to a local recycling station. Contact the local government offices for details. This product requires 2 x AAA batteries (not included).
Thermal Cut-out Device
This fire suite is fitted with a thermal safety cut-out device, built in to prevent it from overheating. Should the fire suite start to overheat, the thermal safety cut-out system will automatically operate and the heat settings will switch off.STEP 1: Switch off the fire suite by setting the on/off switch to (o). If this happens:STEP 2: Check that the fire suite is unplugged from the mains power supply and allow it to cool for approx. 15 minutes.STEP 3: Clear any blockages present on the vent, being careful not to damage the fire suite.STEP 4: Plugin and switch on the fire suite at the mains power supply.Caution: In order to avoid a hazard, due to inadvertent resetting of the thermal cut-out, this fire suite must not be supplied through an external switching device such as a timer or connected to a circuit that is regularly switched on and off by the utility.
Care and Maintenance
Always unplug the fire suite from the mains power supply and allow it to cool sufficiently before performing any cleaning or maintenance. Wipe the exterior of the fire suite with a soft, damp cloth and allow to dry thoroughly. Do not use harsh or abrasive cleaning solvents or scourers, as they may damage the finish of the fire suite. Check regularly for any blockages on the vent, so that the thermal cut-out device does not operate.
Getting Started
Remove the fire suite from the box.Remove any packaging from the fire suite.Place packaging inside the box and either store
In the Box
Electric Fire SuiteRemote controlWall brackets (qty. 2)Description of Parts (Electric Fire Suite) disposes of safely.Ø 16 mm screws (qty. 4)Ø 30 mm screws (qty. Wall plugs (qty. 2)Instruction manual
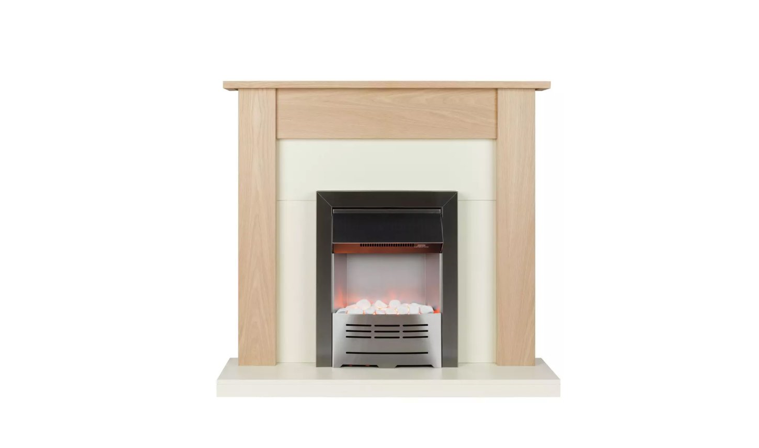
Description of Part (Electric Fire Suite)

1. Electric Fire Suite main body2. Surround3. Fascia4. Hearth5. Control Panel6. On/off switch7. POWER button8. FLAME button9. HEAT button10. Inset Fire
Description of Part (Remote Control)
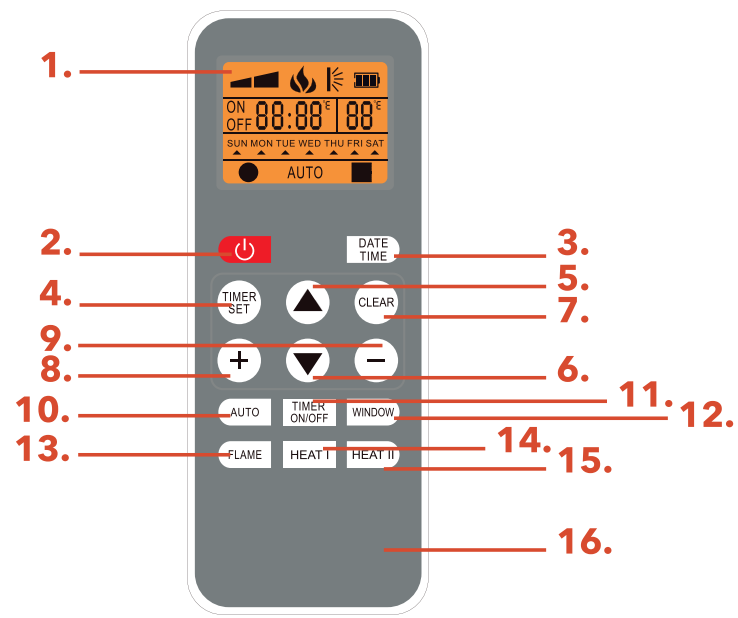
1. LCD display2. POWER button3. DATE/TIME button4. TIMER SET button5. UP button ![]() 6. DOWN button
6. DOWN button ![]() 7. CLEAR button8. Temperature increase button (+)9. Advice Before Fitting (-)10. Temperature decrease button11. UTO button11. TIMER ON/OFF button12. WINDOW button13. FLAME button14. HEAT I button15. HEAT II button16. Battery compartment
7. CLEAR button8. Temperature increase button (+)9. Advice Before Fitting (-)10. Temperature decrease button11. UTO button11. TIMER ON/OFF button12. WINDOW button13. FLAME button14. HEAT I button15. HEAT II button16. Battery compartment
Advice Before Fitting
Please retain all of the packagings until all of the parts and the contents of the fixing pack have been checked and counted against the parts list (In the Box). The fixing pack contains small items, which should be kept away from young children. It is suggested that all of the fixing pack contents are placed into a container, to reduce the risk of losing any small pieces.
Installation Guide
Do not connect the fire suite to the mains power supply until all of the instructions have been read, fully understood and the fire suite has been properly and securely fitted. The minimum safe distances must be observed.Note: Installation of the fire suite should be carried out by two people, in order to avoid injury, damage to the property or the fire suite.Warning: Do not connect the fire suite to the mains power supply until all of the instructions have been read, fully understood and the fire suite has been properly and securely fitted.
Instructions for Use
Before First Use
Place the fire suite onto a flat, stable, heat-resistant surface at least 1 meter away from furniture, curtains or any other flammable materials. If placing the fire suite in an alcove, make sure that there is at least 600 mm of space above and 200 mm of space on each side, for air to circulate. The fire suite must not be located over a mains power socket. The mains power socket must always be accessible, in order to disconnect the fire suite from the mains power supply before cleaning or maintenance.
Note: When using the fire suite for the first time, a slight odor may be emitted. This is normal and will soon subside. Allow for sufficient ventilation around the fire suite.Wall Mounting the Electric Fire SuiteSTEP 1: Check that the fire suite is switched off and unplugged from the mains power supply.STEP 2: Open the fixing pack and place all of the contents into a container. This will reduce the risk of losing any small pieces:STEP 3: Place the wall brackets against the rear edge of the fire suite. Secure them approx. 60 cm from the base of the fire suite using the four 16 mm screws (two per bracket). STEP 4: Hold the fire suite in the desired location and using a pencil, mark the position of the screw hole in each wall bracket.STEP 5: Drill where the holes have been marked and insert the wall plugs, making sure that the edge is flush with the surface of the wall.STEP 6: Using the two 30 mm screws, secure the fire suite onto the wall by screwing through the wall bracket and into the wall plugs.Note: There will be a slight gap behind the fire suite, this is normal and is required for air ventilation. Do not remove the plug and wire the fire suite into the mains power supply, as this will invalidate the guarantee.Caution: Make sure that there are no electrical, plumbing, or gas supplies situated beneath the surface of the wall. Testers are available from all good DIY stores.
Using the Electric Fire Suite (Manual Operation)
STEP 1: Plugin and switch on the fire suite at the mains power supply.STEP 2: Switch on the electric fireplace using the on/off switch. Press the POWER button to turn on the LED flame effect.STEP 3: Select the desired heat output by pressing the HEAT button: To operate the electric fireplace on a low heat setting (1000 W), press the HEAT button. Press it again to operate the fire suite on the high heat setting (2000 W). Use the HEAT button once more to turn off the heat settings.STEP 4: To change the flame brightness, press the FLAME button to cycle through the brightness options. Turn off the LED flame effect by pressing the FLAME button repeatedly until the flame effect cycles off.STEP 5: Turn off the electric fireplace using the POWER button and then the on/off switch.Note: When using the fire suite manually, the heat output will be continuous until switched off by the user; it will not be controlled by the thermostat.
Using the Electric Fire Suite (Remote Operation)
STEP 1: Switch on the fire suite using the on/off switch on the main body.
STEP 2: To turn on the flame effects, press the POWER button on the remote control; the LCD display will illuminate and the flame effect will switch on.STEP 3: Press the FLAME button on the remote control to select the desired flame brightness; there are 3 different LED brightness levels available.STEP 4: Select the desired heat output by pressing the relevant heat setting switch: To operate the fire on a low heat setting, press ‘HEAT I’; press it again to turn it off.To operate the fire on a high heat setting, press ‘HEAT II’; press it again to turn it off.STEP 5: To use the fire suite in manual mode, disengage the automatic temperature control and timer modes by pressing the AUTO and TIMER ON/ OFF buttons respectively. The heat output will be continuous until switched off by the user.STEP 6: Place the fire suite into standby mode by pressing the POWER button. Turn off the fire suite using the on/off switch on the main body.Note: After an idle period of approx. 10 seconds, the LCD display on the remote control will dim to save power. Press any button to wake up the remote control before pressing the desired command button. The automatic or timer modes are engaged by default when the remote control is switched on for the first time. Disengage them by pressing the AUTO or TIMER ON/OFF buttons to use the fire suite in manual mode.
Setting the Current Day and Time
The day and time can only be set using the remote control.STEP 1: Press the DATE/TIME button on the remote control. The day of the week will flash. Use the UP ![]() and DOWN
and DOWN ![]() buttons to set the current day. Once the current day is set, press the DATE/TIME button to confirm.STEP 2: The hour setting will flash. Use + or – to adjust the time until the current hour is selected. Press the DATE/TIME button to confirm the current hour.STEP 3: The minute setting will flash. Use + or – to adjust the time until the current minute is selected. Press the DATE/TIME button to confirm the current minute. The day and time are now set.
buttons to set the current day. Once the current day is set, press the DATE/TIME button to confirm.STEP 2: The hour setting will flash. Use + or – to adjust the time until the current hour is selected. Press the DATE/TIME button to confirm the current hour.STEP 3: The minute setting will flash. Use + or – to adjust the time until the current minute is selected. Press the DATE/TIME button to confirm the current minute. The day and time are now set.
Temperature Setting Operations -Automatic Mode
The temperature can only be set using the remote control.STEP 1: Press + on the remote control to increase the set temperature.STEP 2: Press – to decrease the set temperature. The temperature can be set between 15-30 °C.STEP 3: Press the AUTO button on the remote control to engage automatic mode and allow the fire suite to regulate the heat output-based temperature. The word ‘AUTO’ will illuminate on the remote control’s LCD display to show this mode is active.STEP 4: Press the AUTO button again to disable automatic mode.(-)The set temperature must be higher than the room temperature for the heat settings to work.
Setting the Timer
STEP 1: Press the TIMER SET button on the remote control. The program number will flash. Use ‘+’ and ‘-‘ to choose the program number. Press the CLEAR button to delete any existing settings the programme contains, otherwise press the TIMER SET button to confirm.STEP 2: An arrow will flash under the selected day; the default day is Sunday (‘SUN’). Press the UP ![]() and DOWN
and DOWN ![]() buttons on the remote control to choose the desired day. To repeat on another day, press + to add and then use the UP
buttons on the remote control to choose the desired day. To repeat on another day, press + to add and then use the UP ![]() and DOWN
and DOWN ![]() buttons to select the second day. To remove a day, select it using the UP
buttons to select the second day. To remove a day, select it using the UP ![]() and DOWN
and DOWN![]() buttons and then press -. Repeat for the desired number of days and then press the TIMER SET button to confirm.STEP 3: The hour setting will flash. This is the time the fire suite will turn on when the timer is engaged. Use + or adjust the time until the hour is selected. Press the TIMER SET button to confirm. The minute setting will flash. Use + or to adjust the time until the minute is selected. Press the TIMER SET button to confirm.STEP 4: The hour setting will flash. This is the time the fire will turn off when the timer is engaged. Use + or to adjust the time until the hour is selected. Press TIMER SET to confirm. The minute setting will flash. Use + or – to adjust the time until the minute is selected. Press TIMER SET to confirm.STEP 5: The temperature will flash. Use + or – to set the desired temperature between 15-30 °C. Press the TIMER SET button to confirm the settings. Repeat steps 1-4 to set additional timers. STEP 6: Press the AUTO button and the TIMER ON/OFF button to activate heat timer.
buttons and then press -. Repeat for the desired number of days and then press the TIMER SET button to confirm.STEP 3: The hour setting will flash. This is the time the fire suite will turn on when the timer is engaged. Use + or adjust the time until the hour is selected. Press the TIMER SET button to confirm. The minute setting will flash. Use + or to adjust the time until the minute is selected. Press the TIMER SET button to confirm.STEP 4: The hour setting will flash. This is the time the fire will turn off when the timer is engaged. Use + or to adjust the time until the hour is selected. Press TIMER SET to confirm. The minute setting will flash. Use + or – to adjust the time until the minute is selected. Press TIMER SET to confirm.STEP 5: The temperature will flash. Use + or – to set the desired temperature between 15-30 °C. Press the TIMER SET button to confirm the settings. Repeat steps 1-4 to set additional timers. STEP 6: Press the AUTO button and the TIMER ON/OFF button to activate heat timer.
Open Window Function
If the fire suite detects a sudden drop in the room temperature (for example, if windows or doors are open) of more than 8 °C, the indicator light for the HEAT button on the fire suite will blink. If the user does not press the HEAT button to cancel the open window function, the fire suite will turn off the fan and any active heat settings for a period of 15 minutes to save energy. To turn on the open window function, press the WINDOW button on the remote control. The open window mode icon will appear on the LCD display. To turn off the open window function, press the WINDOW button again.
Troubleshooting
| Problem | Cause | Solution |
| The fire suite is
not operating. The fan is not running. |
The fire suite is not plugged in and switched on at the mains
power supply. The thermal cut-out device has activated. The fuse has blown. |
Make sure that the fire suite is plugged in and switched on at the mains power supply.
Unplug the fire suite from the mains power supply and allow it to cool for approx. 15 minutes. Plug in and switch on the fire suite at the mains power supply before trying again. Unplug the fire suite from the mains power supply and replace the fuse with one that is the same amp. |
| No heat or light is being emitted from the fire suite. | There may be a problem with the power supply to the fire suite. | Check the mains power supply by plugging in a working appliance. If the mains power supply is functional and the power cord or plug of
the fire suite is suspected to be faulty, have it checked by a qualified electrician. |
| The remote control is
not working. |
The batteries inside the remote control
are exhausted. The receiver cannot receive the command signal. The range is too great for the remote control. |
Remove the battery cover on the back of the remote control and replace the exhausted batteries with 2 x AAA batteries.
The command signal from the remote control is line of sight. Position the remote control so that there are no obstructions preventing signal from reaching the receiver. Move the remote control closer to the fire suite. |
Specifications
Product code: EH3226Input: 220-240 v ~50hzOutput: 1000/2000 WFuse: 13 A
ERP Table
| Item | I Symbol | I Value | I Unit | Item | Unit |
| Heat Output | Type of heat input for electric storage local space heaters only (select one) | ||||
| Nominal heat output | Pnom | 2,0 | kW | Manual heat charge control, with integrated thermostat. | 110j |
| Nominal heat output (indicative) | Pmin | 1,0 | kW | Manual heat charge control with room and/or outdoor temperature feedback. | |
| Maximum continuous heat output | Pmax,c | 2,0 | kW | Electronic heat charge contra. with room and/or outdoor temperature feedback. | |
| Auxiliary electricity consumption | Fan-assisted heat output. | ||||
| At nominal heat output | elmax | 1,872 | kW | Type of heat output/room temperature control (select one) | |
| At minimum heat output | elmin | 0,953 | kW | Single-stage heat output and no room temperature control. | [no] |
| In standby mode | eISB | 0,31 | Two or more manual stages, no room temperature control. | [no/ | |
| With mechanic thermostat room temperature control. | [nol | ||||
| With electronic room temperature. | [no! | ||||
| Electronic room temperature control plus day timer. | [nol | ||||
| Electronic room temperature control –iiiis week timer. | [yes] | ||||
| Other control options (multiple selections possible) | |||||
| Room temperature control, with presence detection. | [no] | ||||
| Room temperature control, with open window detection. | (yes) | ||||
| With distance control option. | (no) | ||||
| .r.’ th adaptive start control. | (no) | ||||
| With working time limitation. | (no] | ||||
| With black bulb sensor. | (no) |
Connection to the mains
Please check that the voltage indicated on the product corresponds with your supply voltage.
Important
As the colors in the mains lead of this appliance may not correspond with the colored markings identifying the terminals in your plug, please proceed as follows:
 The wires in the mains lead are colored in accordance with the following code:Blue Neutral (N)Brown Live (L)Green/Yellow Earth
 ![]() FOR UK USE ONLY-Plug fitting details (where applicable).
FOR UK USE ONLY-Plug fitting details (where applicable).
The wire colored BLUE is the NEUTRAL and must be connected to the terminal marked N or colored BLACK. The wire colored BROWN is the LIVE wire and must be connected to the terminal marked L or colored RED. The wire colored GREEN/YELLOW must be connected to the terminal marked letter E or marked ![]() .On no account must either the BROWN or the BLUE wire be connected to the EARTH terminal
.On no account must either the BROWN or the BLUE wire be connected to the EARTH terminal ![]() . Always ensure that the cord grip is fastened correctly. The plug must be fitted with a fuse of the same rating already fitted and conforming to BS 1362 and be ASTA approved. If in doubt consult a qualified electrician who will be pleased to do this for you.
. Always ensure that the cord grip is fastened correctly. The plug must be fitted with a fuse of the same rating already fitted and conforming to BS 1362 and be ASTA approved. If in doubt consult a qualified electrician who will be pleased to do this for you.
Non-rewireable mains plug
If your appliance is supplied with a non-rewireable plug fitted to the mains lead and should the fuse need replacing, you must use an ASTA-approved one (conforming to BS 1362 of the same rating). If in doubt, consult a qualified electrician who will be pleased to do this for you. If you need to remove the plug-DISCONNECT IT FROM THE MAINS and then cut it off the mains lead and immediately dispose of it safely. Never attempt to reuse the plug or insert it into a socket outlet as there is a danger of an electric shock.
UP Global Sourcing UK Ltd., Victoria Street, Manchester OL9 ODD. UK.
If this product does not reach you in an acceptable condition please Customer Services Department by one of the following methods:Telephone: +44 (0)333 577 9820*Telephone lines are open Monday-Friday, 9am-5 pm (Closed Bank Holidays)Email: [email protected] Fax: 0161 628 2126Please have your delivery note to hand as details from it will be required. If you wish to return this product please return it to the retailer from where it was purchased with your receipt (subject to their terms and conditions).
Guarantee
All products purchased as new carry a manufacturer’s guarantee; the time period of the guarantee will vary dependent upon the product. Where reasonable proof of purchase can be provided, Beldray will provide a standard 12-month guarantee with the retailer from the date of purchase. This is only applicable when products have been used as instructed for their intended, domestic use. Any misuse or dismantling of products will invalidate any guarantee.
Under the guarantee, we undertake to repair or replace free of any charge any parts found to be defective. In the event that we cannot provide an exact replacement, a similar product will be offered or the cost refunded. Any damages from daily wear and tear are not covered by this guarantee, nor are consumables such as plugs, fuses, etc.Please note that the above terms and conditions may be updated from time to time and we, therefore, recommend that you check these each time you revisit the website.Nothing in this guarantee or in the instructions relating to this product excludes, restricts or otherwise affects your statutory rights.The crossed-out wheelie bin symbol on this item indicates that this appliance needs to be disposed of in an environmentally friendly way when it becomes of no further use or has worn out. Contact your local authority for details of where to take the item for recycling.
2YEAR GUARANTEE*![]()

*To be eligible for the extended guarantee, go to and register your product within 30 days of purchase.![]() www.facebook.com/Beldray
www.facebook.com/Beldray
Manufactured by: UP Global Sourcing UK Ltd., Victoria Street, Manchester OL9 ODD. UK +44 (0)333 577 9820[email protected] Beldray Trademark. All rights reserved. Please retain instructions for future reference.Made in China.CD010719/MD000000N1
![]()
[xyz-ips snippet=”download-snippet”]