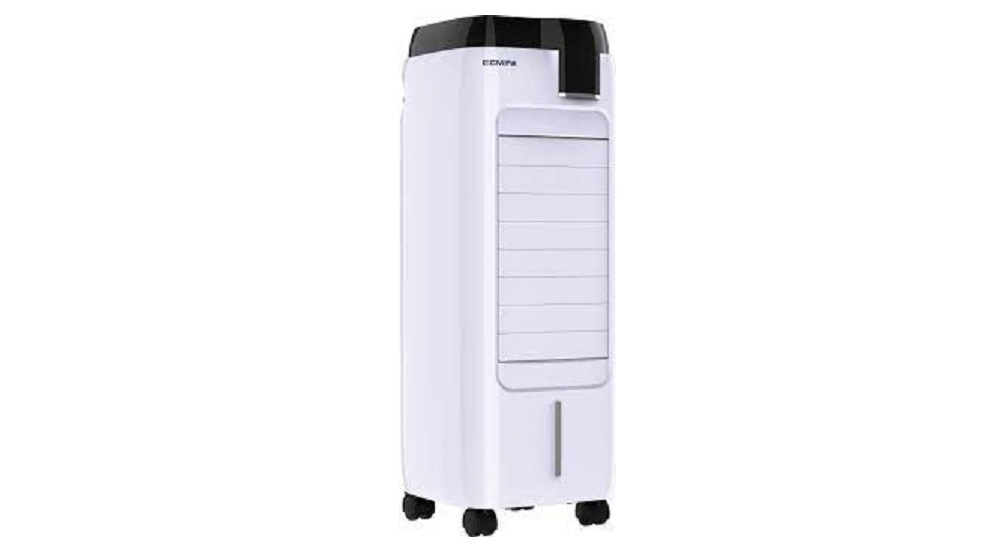
BERGSTROM Deluxe Peltier Air Cooler H295 User Manual
TECHNICAL PARAMETERS
Model: ST-89ICERatings: 220-240V a.c., 50-60Hz, 120WMax. water volume: 6 litres
- PREMIUM AIR COOLER THAT USES PELTIER COOLING TECHNOLOGY
- REMOVES HOT AIR AND SENDS OUT ICE COLD AIR UP TO 5 DEGREES COOLER THAN A REGULAR AIR COOLER
- THE CLEVER TECHNOLOGY INSIDE MEANS THAT IT MAINTAINS ITS ICE COLD TEMPERATURE THROUGH THE ENTIRE TIME YOU USE IT
- NO NEED TO ADD ICE PACKS AND UNLIKE AIRCONDITIONERS THERE IS NO NEED FOR AN EXHAUST KIT JUST PLUG IN AND GO!
- LOCKABLE WHEELS FOR EASY MANOUVERING FROM ROOM TO ROOM
- 3 SPEEDS LOW, MID, HIGH
- OSCILLATING BLADES
- 8 HOUR TIMER
- 6L WATER TANKL
- SOFT TOUCH BUTTONS
- REMOTE CONTROL
- LED TEMP DISPLAY
- AUTO CUT OFF IF THE WATER TANK IS EMPTY
- 4 SWING DIRECTIONS
- 60dB QUIET OPERATION
- 1.5M POWER LEAD
- 5-6 METRE WIND DISTANCE
Dimensions30 x30 x78cm
IMPORTANT SAFEGUARDS
- ONLY FOR USE IN DRY ROOMS. THE DEVICE MUST NOT BE OPERATED IN WET ROOMS, AREAS WITH HIGH HUMIDITY, GREENHOUSES OR SIMILAR LOCALITIES.
- DO NOT PLACE THE APPLIANCE NEAR A BATHTUB, SWIMMING POOL, SINK OR SIMILAR WATER BODIES. NEVER IMMERSE THE APPLIANCE IN WATER OR OTHER LIQUIDS!
- BEFORE CONNECTING THE APPLIANCE, CHECK IF THE VOLTAGE INDICATED ON THE BOTTOM OF THE APPLIANCE IS IN ACCORDANCE WITH THE MAINS VOLTAGE IN YOUR HOME.
- BEFORE USE, CHECK THOROUGHLY FOR ANY DEFECTS AND DO NOT USE IF DEFECTS ARE FOUND. TAKE CARE NOT TO DROP THE APPLIANCE AS HEAVY IMPACTS MAY CAUSE INTERNAL DAMAGE.
- THE SOCKET MUST BE ACCESSIBLE AT ALL TIMES TO ENABLE QUICK REMOVAL OF THE POWER PLUG.
- THE DEVICE MAY NOT BE OPERATED DIRECTLY UNDER A MAINS SOCKET.
- IF POSSIBLE, DO NOT USE MULTIPLE OUTLETS OR EXTENSION CORDS. IF THIS CANNOT BE AVOIDED, THE POWER STRIP OR EXTENSION CORD MUST COMPLY WITH LOCAL REGULATIONS. THE TECHNICAL DATA OF THE POWER STRIP OR EXTENSION CORD MUST MATCH THE DATA LISTED ON THE RATING PLATE OF THIS DEVICE.
- ATTENTION! THE DEVICE SHOULD NOT BE OPERATED UNATTENDED. IT MUST ALSO NOT BE CONNECTED TO THE POWER SUPPLY VIA A TIMER SWITCH.
- THE DEVICE MAY NOT BE POWERED BY AN EXTERNAL VOLTAGE CONTROL (FOR EXAMPLE, DIMMER, SPEED CONTROL OR THE LIKE).
- THIS APPLIANCE CAN BE USED BY CHILDREN AGED FROM 8 YEARS AND ABOVE AND PERSONS WITH REDUCED PHYSICAL, SENSORY OR MENTAL CAPABILITIES OR LACK OF EXPERIENCE AND KNOWLEDGE IF THEY HAVE BEEN GIVEN SUPERVISION OR INSTRUCTION CONCERNING USE OF THE APPLIANCE IN A SAFE WAY AND UNDERSTAND THE HAZARDS INVOLVED. CHILDREN SHALL NOT PLAY WITH THE APPLIANCE. CLEANING AND USER MAINTENANCE SHALL NOT BE MADE BY CHILDREN WITHOUT SUPERVISION.
- CHILDREN OF LESS THAN 3 YEARS SHOULD BE KEPT AWAY UNLESS CONTINUOUSLY SUPERVISED.
- DO NOT OPERATE IN FLAMMABLE ATMOSPHERES (FOR EXAMPLE, IN THE PRESENCE OF FLAMMABLE GASES OR SPRAY CANS)! EXPLOSION AND FIRE HAZARD!
- DO NOT STORE ANY FLAMMABLE LIQUIDS, PAINTS, GAS CONTAINER OR THE LIKE IN THE IMMEDIATE VICINITY OF THE DEVICE.
- CAUTION! DO NOT INSERT FOREIGN OBJECTS INTO THE VENTILATION SLOTS! RISK OF INJURY FROM ELECTRICAL SHOCK AND POSSIBLE DAMAGE TO THE UNIT!
- ALWAYS ENSURE THAT THE POWER CABLE IS FREE FROM PRESSURE U. TENSILE FORCES AND IS NOT TRAPPED UNDER THE APPLIANCE.
- THE CABLE MUST ALWAYS BE COMPLETELY UNROLLED AND MAY NOT BE WRAPPED AROUND THE DEVICE.
- MAKE SURE THAT THE POWER CORD DOES NOT RUN OVER SHARP EDGES AND DOES NOT COME INTO CONTACT WITH HOT SURFACES.
- KEEP THE DEVICE CLEAN. THIS IS TO PREVENT FIRE AND OTHER HAZARDS.
- ALWAYS KEEP THE DEVICE UNRESTRICTED! DO NOT COVER THE VENTILATION SLOTS APPLY FOIL, BLANKETS, MATS OR THE LIKE. KEEP CLEAN VENTS.
- THE INSTALLATION SURFACE MUST BE DRY, FLAT, NON-SLIP AND BE SUFFICIENTLY STABLE. MAKE SURE THAT NOBODY CAN TRIP OVER THE POWER CORD.
- THE APPLIANCE MUST NEVER BE CLEANED WITH WATER SPRAY, STEAM CLEANERS OR THE LIKE!
- NEVER PULL ON THE CABLE PLUG FROM THE SOCKET! ALWAYS GRIP THE PLUG AND PULL TO DISCONNECT.
- NEVER MOVE BY PULLING THE CABLE AND NEVER USE THE CABLE FOR CARRYING PURPOSES!
- NEVER TRY TO REPAIR THE APPLIANCE YOURSELF. IF A REPAIR IS NECESSARY, PLEASE CONTACT A QUALIFIED TECHNICIAN.
- THE DEVICE IS NOT APPROVED FOR COMMERCIAL OR INDUSTRIAL USE.
- THIS PRODUCT CAN ONLY BE USED ACCORDING TO THE SPECIFICATIONS INDICATED ON THE IDENTIFICATION PLATE AND IN THE INSTRUCTION MANUAL. ANY OTHER USE OF THE DEVICE AS DESCRIBED CAN LEAD TO HAZARDS SUCH AS SHORT CIRCUITS, FIRE, ETC. IT IS NOT ALLOWED TO MODIFY THIS PRODUCT IN ANY WAY, OR TO OPEN THE CASE, OTHERWISE THE PRODUCT NO LONGER MEETS THE REQUIREMENTS OF ITS SAFETY CLASS.
- BEFORE EACH USE, CHECK THE UNIT, INCLUDING THE CABLE AND THE COMPONENTS FOR DEFECTS THAT COULD IMPAIR THE FUNCTIONAL RELIABILITY OF THE DEVICE.
- ALWAYS UNPLUG THE POWER CORD BEFORE REFILLING WATER, CLEANING OR MOVING.
- UNPLUG THE POWER PLUG WHEN THE APPLIANCE IS NOT IN USE.
- DO NOT OVERFILL THE WATER TANK.
- TO AVOID ANY POSSIBLE HAZARD, THE DEVICE SHOULD NOT BE SPLASHED WITH WATER WHEN THE TANK IS FULL.
- NEVER USE THE DEVICE IN LATERAL OR SUPINE POSITION.
- DO NOT SHAKE THE UNIT.
- FOR SAFETY CLEANING AND HYGIENE CONCERNING SEE SECTION CLEANING.
- THE EXTERNAL FLEXIBLE CABLE OF THIS APPLIANCE CANNOT BE REPLACED. IF THE SUPPLY CORD OR PLUG IS DAMAGED, THE DEVICE MUST NO LONGER BE USED AND SHOULD BE DISCARDED.
- DO NOT USE OLD AND NEW BATTERIES AT THE SAME TIME IN THE REMOTE CONTROL.
- REMOVE THE BATTERIES FROM THE REMOTE CONTROL WHEN IT IS NOT USED LONG TERM.
- WATER LEVEL MUST BE BETWEEN THE MIN AND MAX LINE.
- DO NOT USE THE UNIT FOR OTHER THAN ITS INTENDED USE.
- CHILDREN SHOULD BE SUPERVISED TO ENSURE THAT THEY DO NOT PLAY WITH THE APPLIANCE.
- THIS APPLIANCE IS INTENDED FOR HOUSEHOLD AND INDOOR USE ONLY.
OPERATION INSTRUCTION
- Pull the unit outwards from the carton and place it on a solid heat-proof level surface.
- Unpack the components carefully. Please check all parts have been removed from the packaging.
- Place the unit on a solid heat-proof level surface. Take out the casters and caster wrench to assemble.
- Note: casters with skid are for the two front holes and casters without skid are for the two back holes at the bottom of the unit. (shown as figure.1)
 Fig. 1Add water:Pull the water tank upwards and pull outwards about 10cm to the locking pin, then add water. (shown in figure.2)Fig. 2Note:The water level must be between the min and max line. (shown in fig.3)Fig. 3After some time of operation, dust and dirt may occur in water tank. It is recommended to change the waterand clean water tank frequently.
 - Only use the unit with a correct power outlet.
- Insert the plug pin into a wall socket and turn on the power switch which is at the side of the unit. A small beep sound can be heard and the power indicator will be on.Note:
- To protect against electric shock, do not remove the plug from the wall socket with wet hands.
- Do not unplug from outlet while moving the unit.
- ƒ Insert the plug pin into the wall socket and make sure it is connected well
 Fig. 1Add water:Pull the water tank upwards and pull outwards about 10cm to the locking pin, then add water. (shown in figure.2)
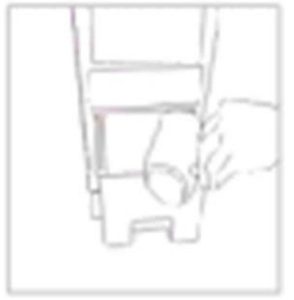 Fig. 2Note:The water level must be between the min and max line. (shown in fig.3)
 Fig. 3After some time of operation, dust and dirt may occur in water tank. It is recommended to change the waterand clean water tank frequently.
Control Panel and Remote Control Instructions
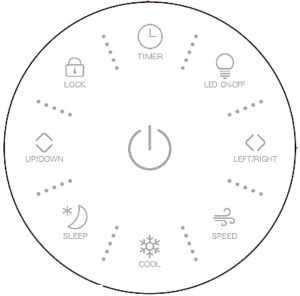 Control panel
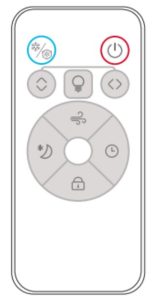 Remote control
Insert the plug pin into a wall socket and turn on the power switch which is at the side of the unit. A small beep sound can be heard and the power indicator will be on.
POWER ![]() : Press this button once to switch the unit on. It will start up with MID in 3 seconds and then revert to work under the memorized status. If used for the first time, it will start up with MID in 3 seconds and then work with LOW. Press this button again to turn OFF.
: Press this button once to switch the unit on. It will start up with MID in 3 seconds and then revert to work under the memorized status. If used for the first time, it will start up with MID in 3 seconds and then work with LOW. Press this button again to turn OFF.
SPEED ![]() : Press this button to select desired fan speed,
: Press this button to select desired fan speed,
LOW ![]() →MID
→MID ![]() →HIGH
→HIGH ![]() →LOW
→LOW ![]()
in sequence. At the same time digital display shows 1 for LOW, .2 for MID, 3 for HIGH.
SLEEP MODE ![]() : Press this button to select desired wind mode. Programs are pre-set alternating between different fan speeds. Press button again to exit sleep mode.
: Press this button to select desired wind mode. Programs are pre-set alternating between different fan speeds. Press button again to exit sleep mode.
UP/DOWN ![]() : Press this button once for the louvers to swing vertically. The
: Press this button once for the louvers to swing vertically. The ![]() indicator will be displayed. Press again for fixed air direction.
indicator will be displayed. Press again for fixed air direction.
LEFT/RIGHT ![]() : Press this button once for the louvers to swing horizontally, the
: Press this button once for the louvers to swing horizontally, the ![]() indicator will be displayed. Press again for fixed air direction.
indicator will be displayed. Press again for fixed air direction.
COOL ![]() : Press this button once to start the evaporative cooling function. Press this button again to cancel.
: Press this button once to start the evaporative cooling function. Press this button again to cancel.
ICE COOL ![]() : Press the button twice
: Press the button twice ![]() to start the ICE cooling function. Press this button again to cancel.
to start the ICE cooling function. Press this button again to cancel.
TIMER ![]() : The timer can be set between 0.5 to 8 hours, increasing by 0.5 hour intervals. You can see the timer on the digital display. When the digital display shows 8 hours, press this button again to cancel.
: The timer can be set between 0.5 to 8 hours, increasing by 0.5 hour intervals. You can see the timer on the digital display. When the digital display shows 8 hours, press this button again to cancel.
POWER SAVE MODE ![]() : Press this button once to light-off the LED monitor, press one more time to light-up again.
: Press this button once to light-off the LED monitor, press one more time to light-up again.
LOCK ![]() Maintenance and cleaningNote: Before any cleaning or maintenance unplug the unit from the mains and ensure there is no water onthe control panel.Cleaning the filtration mesh• Remove plug from wall socket.• Catch the filtration mesh handle and pull upwards.(shown in fig.4)• Clean filtration mesh with mild detergent and soft brush.• Make sure filtration mesh is completely dry before installing.Note: After long time operation, the filtration mesh becomes clogged with dust and dirt, which will greatlyaffect the unit’s performance. It is recommended to clean the filtration mesh frequently. : Press this button 3s to lock the control panel. Press again 3s to cancel this function.
Maintenance and cleaningNote: Before any cleaning or maintenance unplug the unit from the mains and ensure there is no water onthe control panel.Cleaning the filtration mesh• Remove plug from wall socket.• Catch the filtration mesh handle and pull upwards.(shown in fig.4)• Clean filtration mesh with mild detergent and soft brush.• Make sure filtration mesh is completely dry before installing.Note: After long time operation, the filtration mesh becomes clogged with dust and dirt, which will greatlyaffect the unit’s performance. It is recommended to clean the filtration mesh frequently. : Press this button 3s to lock the control panel. Press again 3s to cancel this function.
Maintenance and cleaning
Note: Before any cleaning or maintenance unplug the unit from the mains and ensure there is no water on the control panel.
Cleaning the filtration mesh
- Remove plug from wall socket.
- Catch the filtration mesh handle and pull upwards.(shown in fig.4)fig.4
- Clean filtration mesh with mild detergent and soft brush.
- Make sure filtration mesh is completely dry before installing.
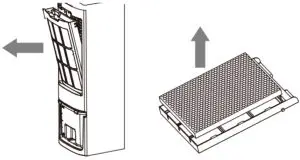 fig.4
fig.4Note: After long time operation, the filtration mesh becomes clogged with dust and dirt, which will greatly affect the unit’s performance. It is recommended to clean the filtration mesh frequently.
Cleaning the water tank
- Remove plug from wall socket.
- Pull out the water tank.(shown in fig.5)fig.5
- Clean the water tank with a little mild detergent on a towel and then rinse in water.
- Put the water tank back in place after cleaning.
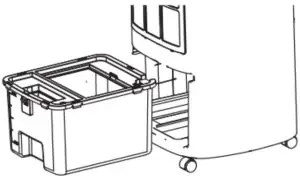 fig.5
fig.5Note: After some time operation, dust and dirt may occur in the water tank. It is recommended to change water and clean water tank frequently.
Cleaning the body
- Remove plug from wall socket.
- Do NOT use abrasive cleaners or sharp utensils to clean the unit body. For slight dirt on the body, wipe it off with a soft damp cloth. For greasy dirt, squeeze a little toothpaste or mild detergent on a soft damp cloth, and then wipe the dirt off.
- Let it dry completely before next use.
Troubleshooting
Please check against the following list
| Problems | Possible reasons | Solutions |
| Not working |
|
|
| Cleaning issues |
|
|
Notice:
- 1. If the problem cannot be found in the list or it persists, please contact Customer Services or a qualified technician for further inspection.
- Do NOT open and repair the unit by yourself.
PLUG WIRING (UK & IRELAND)This appliance is fitted with a BS 1363 13-amp plug. If you have to replace the fuse, only those that are ASTA or BSI approved to BS1362 and with a rated current of 13-amps should be used. If there is a fuse cover fitted, this cover must be re-fitted after changing the fuse. If the fuse cover is lost or damaged the plug must not be used. Spare fuse holders and fuses are available from electrical outlets. If the socket outlets in your home or office are not suitable for this product’s plug, the plug must be removed and disposed of safely. Attempts to insert the plug into the wrong socket is likely to cause electric hazard. A replacement plug should be wired according to the following instructions:
The cableA mains electricity cable contains two or three inner wires. Each has a core of copper and an outer layer offlexible plastic. This product is insulated; the wires in the cord set are colour coded in the following way:
|
BLUE |
NEUTRAL |
|
BROWN |
LIVE |
| GREEN & YELLOW |
EARTH |
The diagram below shows the key features of a correctly wired three-pin mains plug.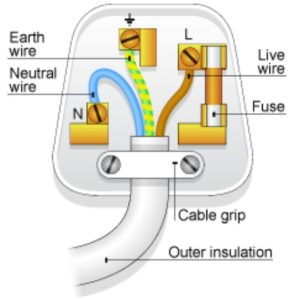 Note:Double insulated appliances do not need the green & yellow Earth wire.They may only have the Brown and Blue wires.
DISPOSAL
- Coopers of Stortford use recyclable or recycled packaging where possible.
- Please dispose of all packaging, paper, cartons, packaging in accordance with your local recycling regulations.
- Plastics, polybags – Contains the following recyclable plastic.
|
Code & Symbol |
 |
 |
|
Type of Plastic |
Low Density Polyethylene |
ABS |
|
Commonly used for |
Shopping bags, bread bags, squeezy bottles, stretch/pallet wrap, bubble wrap, multi pack can holders |
CD’s, crisp packets, various flexible packaging, baby bottles, sunglass lenses |
|
Notes |
Usually recyclable supermarket deposit points. Check other plastic films as any non polythene film e.g.cling film, crisp packets film lids |
Not often or widely recycled |
At the end of the product’s lifespan please check with your local council authorised household waste recycling centre for disposal.![]()
![]()
 report this ad
[xyz-ips snippet=”download-snippet”]