![]()
Portable DVD PlayerG724 v01: 08/06/20

Please read and retain these instructions for future reference
Specification
| Compatible disc | DVD, VCD, MP3, MPEG4 |
| Frequency response | 20Hz to 20Khz |
| Video output | 1 Vp-p75 Ohm unbalanced |
| Audio output | 1.4 Vrms/10 Kohm |
| Dynamic range | Better than 85dB |
| Laser | Semiconductor laserWaver length: 650 |
| Power source | DC9-12V adapter:Input: 100-240VAC; 50/60Hz, 0.5AOutput: 12V DC; 1A |
| Operation temperature: | 5-40 °C |
| Battery type | Li-ion 7.4VDC; 1200mAh |
- 270-degree rotating design, MTK solution, SANYO 870A lens
- High definition 9” TFT-LCD Screen 16:9 A grade new digital screen resolution 800*480
- Headphone jack
- Compatible with DVD/DVD+R/DVD+RW/VCD/MP3/MP4/CD=R/CD+RW/JPEG/DIVX/RM/RMVB
- 1400mah Built-in rechargeable li-ion battery 120mins
- MP3 CD copy function
- USB port red SD/MMC card
- AV input/output and copy function
- Power supply AC100-240V DC12V 1A
- Accessories 1 BS adaptor 1.5m 1 remote control, user manual, 1 AV cable
SAFETY INSTRUCTIONS:
WHEN USING ELECTRICAL APPLIANCES, BASIC SAFETY PRECAUTIONS SHOULD ALWAYS BE FOLLOWED:WHEN USING ELECTRICAL APPLIANCES, BASIC SAFETY PRECAUTIONS SHOULD ALWAYS BE FOLLOWED:
- READ ALL INSTRUCTIONS BEFORE USE.
- FOR DOMESTIC INDOOR USE ONLY.
- DO NOT USE OUTDOORS OR FOR COMMERCIAL USE.
- BEFORE USE, CHECK THOROUGHLY FOR ANY DEFECTS AND DMAO NOT USE IF DEFECTS ARE FOUND.TAKE CARE NOT TO DROP THE APPLIANCE AS HEAVY IMPACTS Y CAUSE INTERNAL DAMAGE.
- BEFORE CONNECTING THE APPLIANCE, CHECK IF THE VOLTAGE INDICATED ON THE BOTTOM OF THE APPLIANCE IS IN ACCORDANCE WITH THE MAINS VOLTAGE IN YOUR HOME.
- ONLY USE WITH THE MAINS ADAPTOR PROVIDED. DO NOT USE ANY OTHER ADAPTOR.
- CHECK THE APPLIANCE AND POWER CABLE CAREFULLY FOR DAMAGE BEFORE EACH USE.
- THIS APPLIANCE CAN BE USED BY CHILDREN AGED FROM 8 YEARS AND ABOVE AND PERSONS WITH REDUCED PHYSICAL, SENSORY OR MENTAL CAPABILITIES OR LACK OF EXPERIENCE AND KNOWLEDGE IF THEY HAVE BEEN GIVEN SUPERVISION OR INSTRUCTION CONCERNING THE USE OF THE APPLIANCE INA IS SAFE WAY AND UNDERSTANDS THE HAZARDS INVOLVED. CHILDREN SHALL NOT PLAY WITH THE APPLIANCE. CLEANING AND USER MAINTENANCE SHALL NOT BE MADE BY CHILDREN WITHOUT SUPERVISION.
- CHILDREN OF LESS THAN 3 YEARS SHOULD BE KEPT AWAY UNLESS CONTINUOUSLY SUPERVISED.
- SOME PARTS OF THIS PRODUCT CAN BECOME VERY HOT AND CAUSE BURNS. PARTICULAR ATTENTION HAS TO BE GIVEN WHERE CHILDREN AND VULNERABLE PEOPLE ARE PRESENT.
- THE USE OF ANY ACCESSORY ATTACHMENTS NOT RECOMMENDED BY COOPERS OF STORTFORD MAY CAUSE INJURIES AND INVALIDATE ANY WARRANTY YOU MAY HAVE.
- DO NOT LET THE POWER CABLE HANGOVER THE EDGE OF A TABLE OR COUNTER, OR TOUCH HOT SURFACES.
- DO NOT PLACE ON OR NEAR HEAT SOURCES.
- USE ON A LEVEL, STABLE SURFACE.
- DO NOT COVER THE ITEM IN ANY WAY WHEN IN USE AS THIS MAY CAUSE OVERHEATING.
- DO NOT USE THIS APPLIANCE FOR ANY OTHER USE THAN THE INTENDED USE IT IS DESIGNED FOR.
- ENSURE THERE IS SUFFICIENT DISTANCE BETWEEN THIS APPLIANCE AND OTHER ITEMS ON THE WORKSURFACE OR WORK STATION, OR SUFFICIENT DISTANCE BETWEEN THE APPLIANCE AND THE CONFINES OF THE AREA IN WHICH IT IS SITUATED. WE RECOMMEND A MINIMUM CLEARANCE AROUND ALL FACES OF AT LEAST 10CM.
- TO PROTECT AGAINST ELECTRIC SHOCK, DO NOT IMMERSE POWER CABLE, PLUG OR APPLIANCE, IN WATER OR ANY OTHER LIQUID.
- UNPLUG FROM OUTLET WHEN NOT IN USE AND BEFORE CLEANING.
- DO NOT OPERATE ANY APPLIANCE WITH A DAMAGED POWER CABLE OR PLUG OR AFTER THE APPLIANCE MALFUNCTIONS, OR HAS BEEN DAMAGED IN ANY MANNER. WE RECOMMEND THAT THE POWER CABLE IS NOT KINKED OR STORED IN A TWISTED MANNER, AND THAT YOU REGULARLY CHECK ITS CONDITION.
- ANY REPAIRS MUST BE CONDUCTED BY A QUALIFIED ELECTRICIAN OR ELECTRICAL SERVICE AGENT.
- MAY CAUSE INTERNAL DAMAGE.
- Do not allow children to use the unit without supervision.
- Liquids and foodstuffs must not be spilled or dropped into the unit.
- Never leave the product unsupervised. Switch off the product when it is not in use, even if this is only for a short while.
- The unit must be free-standing. It must not be placed in a cabinet.
- Water and moisture: Do not use this product near water (e.g. near a bathtub, washbowl, kitchen sink, laundry tub, wet basements, or near a swimming pool and the like).
- Ventilation: Slots and openings in the cabinet are provided for ventilation to ensure the reliable operation of the product and to protect it from overheating. These openings should never be blocked by placing the product on a bed, sofa, rug, or similar surfaces. This product should not be placed in a built-in installation such as a bookcase or rack unless proper ventilation is provided.
- This unit must not be exposed to dripping or splashing and objects filled with liquids such as vases, must not be placed on the apparatus.
- When the adapter is used as the disconnect device, the disconnect device must remain readily operable. To completely disconnect the power input, the AC/DC adapter must be completely disconnected from the mains
Precautions and Warnings
- Placement• To prevent fire or shock hazards, do not expose this appliance to rain or moisture.• Do not expose this appliance to direct sunlight.• Keep this appliance away from strong magnets, heat sources, and excessive dust.• Do not place this appliance on an unstable surface.• If the unit is brought directly from a cold place to a warm one, moisture may condense inside the unit and cause a malfunction. If this occurs, leave the unit turned on for a few hours until the moisture evaporates.
- InstallationEnsure the portable DVD player is installed according to the instructions and illustrations provided in this manual.
- Caution• Do not drop any objects into the unit through the openings.• Do not spill or spray liquid of any kind on or in the unit (this may result in a fire or electric shock).• Do not place anything heavy on the unit.• To ensure proper ventilation and proper operation, never cover or block the slots and openings with a cloth or other materials.• Keep the unit away from an open flame such as fire, candle, etc.• Install the batteries correctly as incorrect replacement is hazardous.• The maximum working temperature is 35 °C.• Never attempt to disassemble the unit as this is very dangerous and may cause an electric shock and/or harm from exposure to the laser beam. Please refer all servicing and maintenance to an authorized service center.
- Cleaning unit1. When cleaning, please make sure the unit is unplugged from the power source.2. Do not use chemicals or detergents when cleaning.
- Disc handling• Do not leave discs near heat sources, in direct sunlight, or in high humidity.• Store discs in their cases when they are not being used.• Stacking discs or standing them at an angle without putting them in the case can cause the disc to warp.• Do not touch the disc surface when handling a disc; hold it by the edges.• Fingerprints, dust, dirt, or scratches on the disc can distort the picture or reduce sound quality.Always handle carefully and make sure discs are clean before use.• Do not stick paper or tape onto the disc.• Do not write on the disc with a marker, etc. Clean discs using a soft cloth, lightly wiping from the centre outwards.• Do not use solvents such as benzene, commercially available cleaners not intended for CDs or antistatic sprayintended for vinyl LPs as these may damage your disc.
Package contents
- AC Adaptor
- Remote control (requires 2x AAA batteries – not included)
- AV Cable
- Car adaptor
- Instruction manual
- Carry bag
Parts
Front/Rear Panel

| 1. PREY | 8. VOL- | 15. SD/MMC CARD SLOT |
| 2. REV | 9. PLAY/PAUSE | 16. HEADPHONE JACK |
| 3. FWD | 10. SETUP | 17. AV OUT |
| 4. NEXT | 11. STOP | 18. AV IN |
| 5. MENU | 12. MODE | 19. POWER OFF/ON |
| 6. DVD/USB/SD | 13. OPEN | 20. DC IN 9-12V |
| 7. VOL+ | 14. USB PORT |
Remote control
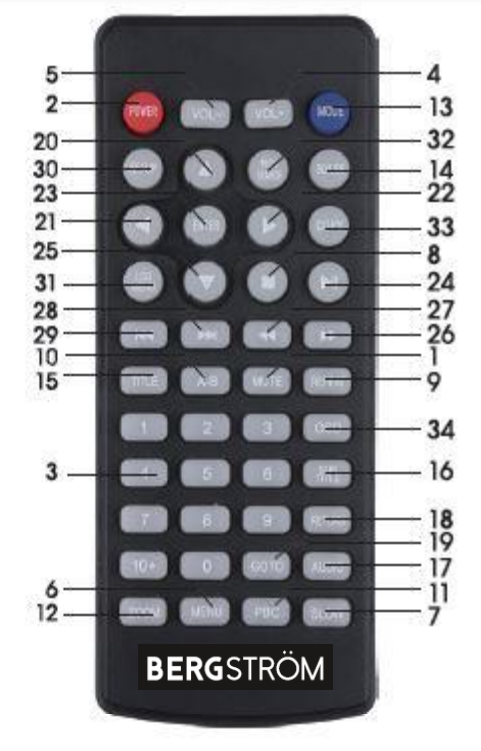
| 2. POWER | 19. GOTO |
| 3.0-9,10+ NUMBERS | 20. UP |
| 4.VOL+ | 21. LEFT |
| S.VOL- | 22. RIGHT |
| 6. MENU | 23. PLAY ENTER |
| 7. SLOW | 24. PAUSE |
| 8. STOP | 25. DOWN |
| 9. REPEAT | 26. FWD |
| 10. A-B | 27. REV |
| 11. PBC | 28. NEXT |
| 12. ZOOM | 29. PRE |
| 13. MODE | 30.1INFO/SETUP |
| 14. SD/USB | 31. LCD MENU |
| 15J1ITLE | 32. PROG SEARCH |
| 16. SUBTITLE | 33. COPY |
| 17. AUDIO | 34, OSD |
Panel Keys
Common keys functions on the panel:
| Key | Function |
| Menu | Press to return to the main menu for DVD |
| Stop | Press to suspend current broadcast. |
| Play/Pause | Press once to pause the playing. Press again to resume. |
| Setup | Press to enter the setup menu, then use the direction keys and OK to set the system menu. |
| USB/CARD | Press repeatedly to switch among the input of the disc, SD card, USB source. |
| Direction keys | Use direction keys for previous/next, fast forward/fast rewind |
| OK | Press to enter the selected item or the choice |
| Open | Press to open the door. |
Battery installation and replacement
- Unscrew the battery cover and remove it.
- Insert 2 new AAA batteries (not included).
- Ensure positive (+) and negative (-) ends of the batteries are facing in the correct direction.
Replace the battery cover.
Key Functions
Note: Some of the following buttons are only on the remote, some are only on the unit and some are on both.
 |
Switch on/off the unit. |
| Press repeatedly to switch between disc, SD card, USB source input. | |
 |
Press to enter/exit the setup menu. |
 |
The digit keys can be used to input the numbers or to select a track or a chapter number. |
 |
Press to enter an item in the menu or to confirm and execute a selection. |
 |
The direction keys can be used to move the highlight in the menu. |
 |
Press the button to switch to DVD or AV INPUT |
 |
Press to switch the repeat modes. (Note: This function is invalid when the PBC function is activated). |
 |
Use to repeat specific sections of a disc. Press this button to mark the starting point (A) and press it again to mark the ending point (B) and the unit will play the selected section over and over again. Press a third time to cancel A-B repeat and resume normal playback.(Note: points A and B must be in the same title/track). |
 |
Skip to the previous chapter/track. |
|
Skip to the next chapter/track. |
 |
Press to start playback or resume normal playback from fast forward, fast reverse, slow-motion, frame-by-frame playback, etc. |
 |
Press to temporarily pause playback; press again or press to |
 |
Press once to pause playback, then press to |
 |
Fast forward playback. Available speed: 2x, 4x, 8x 16x, 32x, and normal speed. |
|
Fast reverse playback. Available speed: 2x, 4x, 8x, 16x, 32x, and normal speed. |
 |
Press to enter the TIME menu. Use the digit keys to select a title, chapter, track, track time, or disc time to play. Press again to exit the TIME menu. |
 |
Press this button to temporarily switch off the sound. Press it again to switch it on. |
 |
Press VOLUME+ to turn up the volume. Press VOLUME- to turn down the volume. |
 |
Press repeatedly to select the available audio languages provided by the disc (for DVD).Press repeatedly to switch the available audio channels provided by the disc (for VCD). |
|
Press to return to the main menu when playing DVD. |
| Press repeatedly to switch/show the subtitles or turn off the subtitle function. (Note: this function only works if the disc is encoded with subtitles.) | |
 |
Press repeatedly to switch or hide the relative information of the playing disc. |
 |
Press this button to zoom in on the scene. The available zoom ratios are: 2x, 3x, and 4x in zoomed-in mode, the direction keys can be used to move the zooming center. (Note: Applies to DVD, VCD, MPEG4, etc) |
 |
Press “REV” to search backward, “FWD” to search forward. |
General Setup
Charging the unit
This player is powered by a lithium-polymer battery. It features a high ratio of energy to weight. It has no memory effect and can be recharged at any time regardless of whether it is fully or partially discharged. It takes about 6 hours to fully charge the battery and a fully charged battery can be used for about 4-5 hours.
Connect the attached AC/DC adaptor to the DC INPUT jack on the unit, then plug the adaptor into a 240V AC outlet.Note: Make sure to switch off the unit before charging. The charging indicator LED will change from RED to GREEN to indicate that the battery has been fully charged.Usage and Maintenance of the rechargeable battery
- The working temperature of the rechargeable battery ranges from 0 °C to 45 °.
- Always unplug the unit when it is not being used unless it is being charged.
- Heat is inevitably produced during playback, this is normal. However, switch off and allow it to cool down.
- Avoid banging the battery and keep it away from heat and moisture.
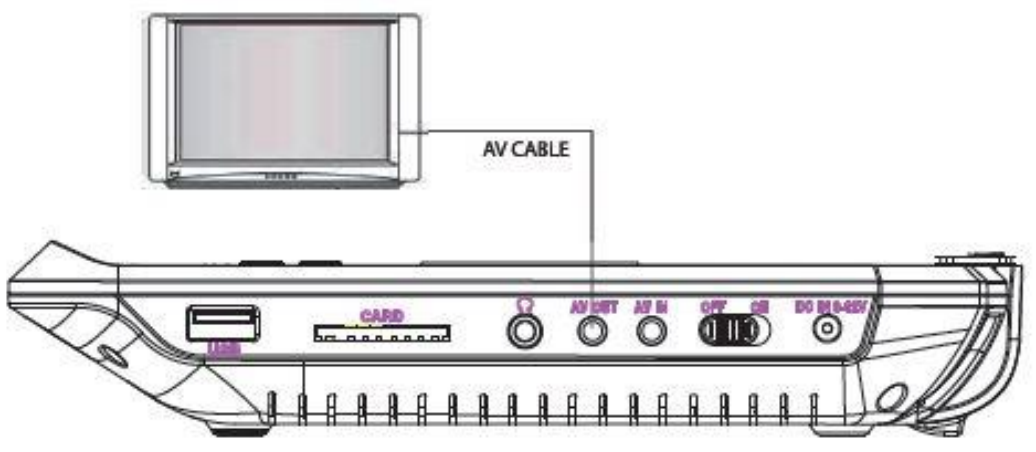
Connection to TVThis unit can be connected to a TV in order to enjoy high-quality music, movies, etc with a TV.Use an AV cable to connect the AV OUT jack on the unit to the AV IN jack of a TV. The DVD player has sound and video input jacks for connecting external audio and video inputs.Menu Operation
- Press (SETUP) on the remote control or on the unit to show the setup menu.
- Press (LEFT)(RIGHT) to select an item. The submenu of the selected item will be instantly shown.
- Press (UP)/(DOWN) to select an item in the submenu, then press (OK)(ENTER)(RIGHT) to enter. Use (UP)/(DOWN) to select an option, then press (OK)/(ENTER) to confirm it, or press (LEFT) to cancel.
- Press (UP)/(DOWN) to continue to set other items in the submenu.
- Press (LEFT) to go back to the superior menu of the current one.
- Press (SETUP) again and press (ENTER)/(OK) to exit the setup menu.
1. General Setup Page
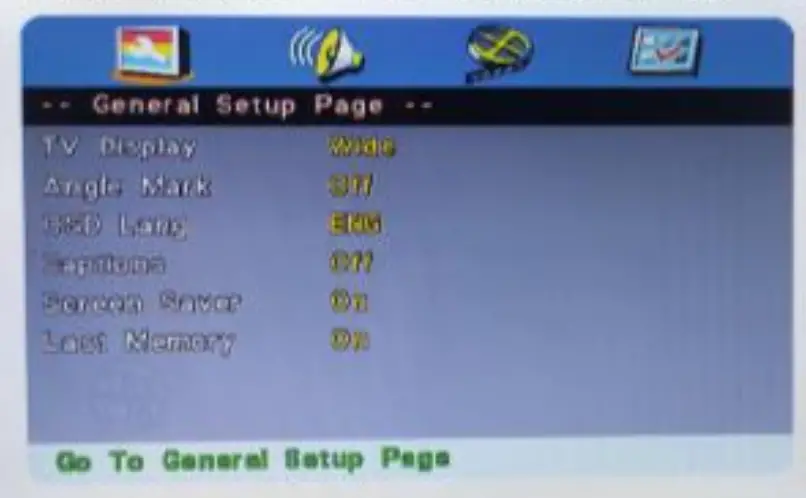
There are six items in the GENERAL SETUP PAGE. They are TV DISPLAY, ANGLE MARK, OSD LANGUAGE, CAPTIONS, SCREEN SAVER, and LAST MEMORY.When setting up the portable DVD Player the setup is done for you. Press set up twice this will get to the audio set up page then keep pressing to your right to get on other pages.1.1. TV Display4:3 PanscanIf the unit is connected to a conventional TV set, the wide-screen image will be displayed on the screen in its native aspect ratio with some part on the left and right cut off.4:3 LetterboxIf the unit is connected to a conventional TV set, the wide-screen image will be displayed in its native aspect ratio with black borders on the top and the bottom side.16:9 wide:Select this option if the unit is connected to a wide-screen TV set. The wide-screen image will be displayed in full screen in its native aspect ratio while the 4:3 image will be stretched out horizontally to fit in the screen.1.2 Angle MarkSet this item to ON. When a disc encoded with multiple camera angles is playing, the angle mark will display on the screen. Then you can view the video of different camera angles by pressing (ANGLE) on the remote control.
Set this item to OFF to disable this function.NOTE: This function only works with those discs encoded with multiple camera angles.1.3 OSD (On Screen Display) languageSet this on-screen display language in this item.1.4 Captions Set this item to ON. When a disc is encoded with closed captions, the closed captions will be shown on the screen. Set this item to OFF to hide it.You can also press (SUBTITLE) on the remote control to show or hide the closed captions.NOTE: This function only works with those discs encoded with closed captions.1.5 Screen saverON: If the image remains motionless on the screen, for example, the disc is paused, stopped, etc. for several minutes, a screen saver will appear on the screen. You can press any key or button to wake it up. OFF Disable the screen saver function.
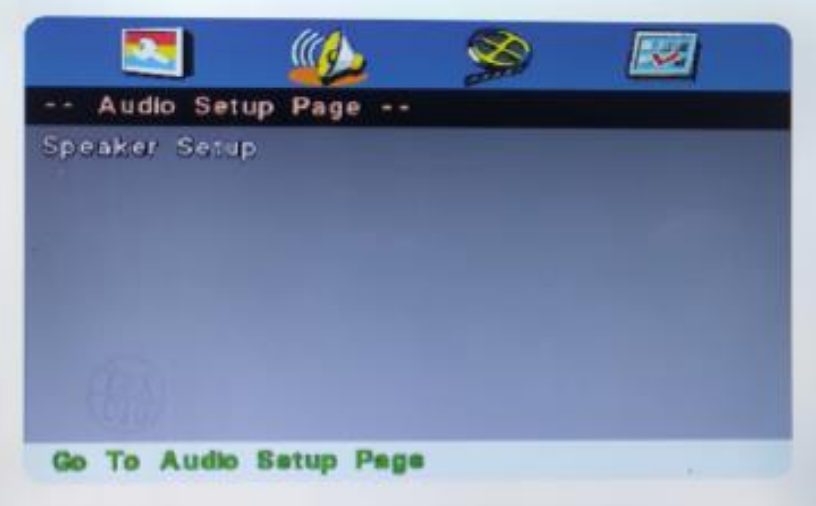
2. Audio Setup PageThis menu is used to set up the Audio.
 |
 |
2.1. Speaker Setup2.1.1 Downmix (LT/RT, Stereo)Used for speaker settings, include left/right channel and Stereo.
3. Panel Quality Setup3.1. SharpnessThere are three options (High, Medium, Low) for you to choose from in this item.
3.2. Brightness, Contrast, Hue, SaturationEnter these items respectively, use the direction key (LEFT) (RIGHT) to adjust the value, then press OK to confirm it.4. Preference Page
 If there is no disc in the disc tray, the disc tray is open or the disc tray is stopped, this item is available.
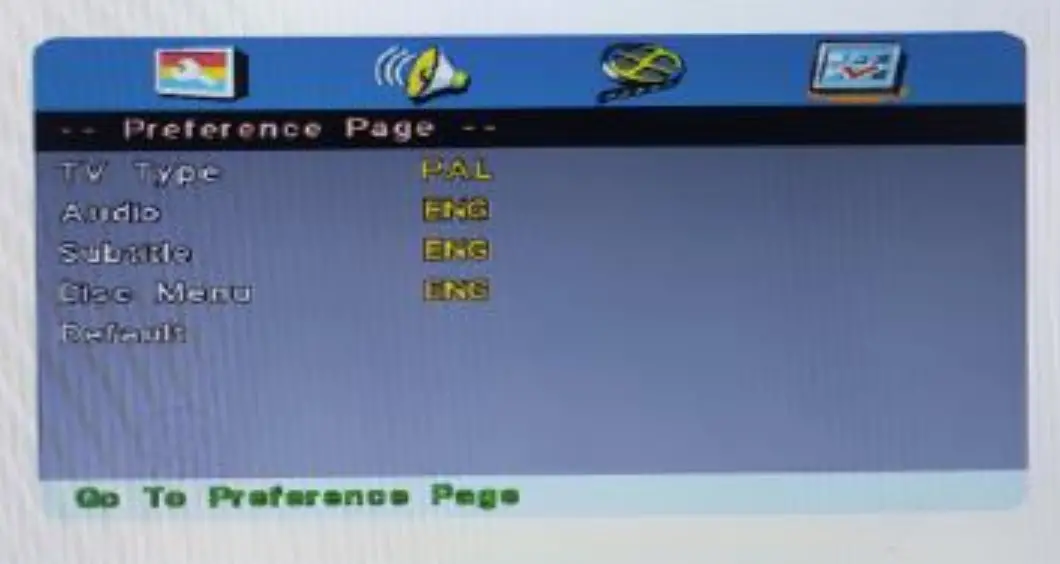
4.1. TV Type (PAL, AUTO, NTSC)Use to select the TV types, include PAL/AUTO/NTSC.
4.2. Audio/Subtitle/Disc MenuSelect a preferred audio language, subtitle language, and disc menu language in these items.You can also change the audio language by pressing (AUDIO) and the subtitle language by pressing (SUBTITLE) on the remote control.NOTE: if the selected languages in these items are not available for the currently playing disc, the disc will be operated on default setting.4.3. DefaultRestore the default settings.
Playback
After all the connections are made correctly, switch the unit on.Loading and Playing a disc
- After connecting power to the unit, set the power switch to the ON position.
- Push (OPEN) the disc tray. Place a disc in it with the label side facing up.
- Close the disc tray. The unit will load the disc and start playing.
MP3/MPEG4 Disc PlaybackAfter the unit loads an MP3/MPEG4 disc, a menu showing the contents of the disc will display on the screen.
- Press the direction key (UP)/(DOWN) to select a file or a folder.
- Press (OK) to enter the selected folder. The file or/and folder in it will be listed instantly.
- Press (OK) to begin to play the selected file.
- When the disc is stopped press (LEFT) to return to the superior menu.
Kodak Picture CD PlaybackPlace a Kodak picture CD in the disc tray, then the unit will load the disc automatically.Press (MENU) to display the menu showing the contents of the disc.In the menu, use the direction keys (UP)/(DOWN) to select a picture, then press (ENTER![]() ) to start the playback from the selected picture.(GOTO): Press this button, then use the digit keys to select a picture. Then the playback from the selectedpicture begins.(
) to start the playback from the selected picture.(GOTO): Press this button, then use the digit keys to select a picture. Then the playback from the selectedpicture begins.(![]() ) Press to pause the playback; press it again or to resume the playback.(
) Press to pause the playback; press it again or to resume the playback.( ![]() ) Press it to begin playback or resume playback.(REPEAT): Press repeatedly to switch the repeat modes (Single-Repeat One – Repeat Folder – Folder – Cancelrepeat).
) Press it to begin playback or resume playback.(REPEAT): Press repeatedly to switch the repeat modes (Single-Repeat One – Repeat Folder – Folder – Cancelrepeat).![]() Press to skip to the previous/next picture during playback. (Left)/(Right) (on the remote control): Press to rotate the picture counterclockwise/clockwise during the playback.(ZOOM): during the playback, press (ZOOM) repeatedly to zoom in/out the picture or return to the original size. When the picture is zoomed in, the direction keys can be used to move the picture.
Press to skip to the previous/next picture during playback. (Left)/(Right) (on the remote control): Press to rotate the picture counterclockwise/clockwise during the playback.(ZOOM): during the playback, press (ZOOM) repeatedly to zoom in/out the picture or return to the original size. When the picture is zoomed in, the direction keys can be used to move the picture.
U-Drive & SD/MMC Card PlaybackInsert a U-drive or a card reader into the USB port. Press (SOURCE SELECT) to select USB mode to play the readable files in it. Insert an SD/MMC card into the SD/MMC card port. Press (SOURCE SELECT) to select MCR mode to play the readable files in it.
DIVX PlaybackDIVX is a video (movies and video) recording format, which is commonly known as AVL.DIVX disc features high quality that is comparable with the DVDs and larger capacity. For example:
| 1.5 movie | In MPEG-1/2 format | In DIVX |
| DVD(MPEG-2) | About 1.5-2GB | About 600-800MB |
| VCD (MPEG-1) | About 800MB-1G | About 600-800MB |
Difference among MPEG 1, MPEG 2 and MPEG 4
| MPEG1 | MPEG2 | MPEG4 | |
| Speed (kb/s) | 1380kb/s(352*288) | 6500kb/s | 8800kb/s(720*576) |
| Quality | Good | Excellent | Perfect |
| Hardware | Low | Medium | High |
Troubleshooting
|
Problem |
Solution |
| No sound or distorted sound | Make sure your DVD is connected properly and all cables are securely inserted into the appropriate jack. |
| Cannot advance through a movie | You cannot advance through the opening credits and warning information that appears at the beginning of movies because the disc is programmed to prohibit that action. |
| The icon appears on the screen | The feature or action cannot be completed at this time because:1. The disc software restricts it2. the disc software does not support the feature3. the feature is not available at the moment |
| Picture is distorted | The disc might be damaged. Try another disc.It is normal for some distortion to appear during forwarding or reverse scans. |
| No forward or reverse action | Some discs have sections that prohibit rapid scanning or title and chapter skip.If you try to skip through the warning information and credits at beginning of a movie it is often programmed to prohibit skipping through it. |
| The player breaks down when a U-drive or memory card is inserted into the player | The connected U-drive or the memory card is probably not of an original version one.The player cannot play any U drive and memory card of non-original version in case the player breaks down, turn it off and unplug it from thepower supply. Then connect it to the power supply and switch it on again. The player will resume the normal status. |
PLUG WIRING (UK & IRELAND)This appliance is supplied with a mains adaptor/charger with BS1363 plug pins.DO NOT use If the socket outlets in your home or office are not suitable for this product’s mains adaptor/ charger plug pins. Attempts to insert the mains adaptor/charger into the wrong socket is likely to cause electric hazard or damage.DO NOT use with any other mains transformer/charger than the one that is supplied with this product.
BATTERIES
- Keep batteries away from children and pets.
- Do not mix used and new batteries.
- Remove the batteries if left for long periods.
- Never dispose of batteries in a fire.
- Battery disposal spent or expired batteries must be properly disposed of and recycled in compliance with local regulations. For detailed information, contact your local authority.
- Follow the battery manufacturer’s safety, usage, and disposal instructions.
 report this ad
DISPOSAL
- Dispose of all packaging, paper, cartons, plastic and plastic bags in accordance with your local recycling regulations.
- At the end of the product’s lifespan please dispose of it at an authorized household WEEE waste recycling center.
| Code&Symbol |  |
 |
 |
 |
 |
 |
 |
| Type of Plastic | PolyethyleneTerephthalate | High-density polyethylene | Polyvinyl Chloride | Low DensityPolyethylene | Polypropylene | Polystyrene | Please Specify(includes ABS,Nylon) |
| Notes | Commonly recycled and collected fromhousehold recycling bins. Check with your local authority | Commonly recycled and collected fromhousehold recyclingbins. Check with your local authority | Not usually collected from householdrecycling bins,Sometimes recycled at local waste managementcenters. | Usually, recyclablesupermarket depositoints. Check other plastic films as any nonpolythene ilm e.g.cling film, crisp packets film lids | Commonly recycled and collected from household recycling bins (packaging tape itself not recyclable but does not interfere with cardboard) | Not commonlyrecycled but waste managementcenters will recycle it. | Not often or widely recycled |
![]() The Enterprise DepartmentHead Office: 11 Bridge StreetBishop’s Stortford, CM23 2JUTel: 0844 482 4400* Fax: 01279 756 595www.coopersofstortford.co.uk*Calls cost 7 pence per minute plus your telephone company’s network access chargePage No. 15
The Enterprise DepartmentHead Office: 11 Bridge StreetBishop’s Stortford, CM23 2JUTel: 0844 482 4400* Fax: 01279 756 595www.coopersofstortford.co.uk*Calls cost 7 pence per minute plus your telephone company’s network access chargePage No. 15
[xyz-ips snippet=”download-snippet”]