BION CX320D Wireless Sensor Cadence / Indoor Bike User Manual
CONTENT
- Rubber

- Magnetless sensor
- Rubber ties × 1


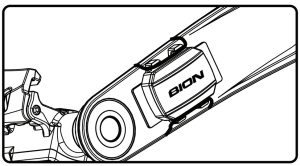
MOUNTING CADENCE / SPEED SENSOR
The sensor should be installed on the non-drive side crank arm as shown below.
- Step 1Place the rubber pad on the inner side of the crank arm, and then place the sensor on the pad.
- Step 2Take the rubber ties.
- Step 3Put the rubber ties in the groove of the sensor, encircle it around the crank arm, and attach it to the other side of the sensor’s groove.
- Step 4Rotate the crank arm and make sure the sensor doesn’t touch any part of the bike nor shoes.
IMPORTANT
- Smartphone’s Bluetooth® or ANT+ are a one by one device. The smartphone must be connected to the sensor’s ID (check “CONTENT” part in this manual) in order to start the training.
- Mind the sensor’s ID and APP match.
- The sleeping mode will start when the sensor and device stop working. If the sensor stops or disconnects during more than 10 seconds, please, synchronize it with the APP again.
WARNING
- Periodically check the relative positions and orientation between the sensor and the crank arm in order to check that they are correctly positioned.
- Periodically check if the sensor is not loose before your training.
NOTICE
- To prevent water from entering the sensor, ensure the battery cover is tightly closed.
SENSOR BATTERY INSTALLMENT
- Step 1. Slide the battery (CR2032) at an angle as illustrated and make sure during battery installation that the battery is first pressed against the side contact (“+” facing up) and then press into the battery compartment. Check if the o-ring is already setted in its battery compartment to ensure its waterproof protection.
- Step 2. Put on the battery cover and turn right to close it with a coin (turn left to open it).

TURN ON THE SENSOR
The sensor is compatible with iPhone 4s or above, iPod Touch (5th or above generation), iPad (3rd or above generation) and Android 4.3 or above smartphones. Also Windows and Mac with Bluetooth® functionallity from 4.2 for SUFFERFEST APP. Some devices are not compatible with ANT+
Please, follow the following steps to wirelessly connect to your smartphone:
- Step 1: Download KINOMAP, ZWIFT, SUFFERFEST or ROUVY from Google Play or Apple App Store.
- Step 2: Turn on Bluetooth® (and “location” at Android smartphones) at your smartphone’s setting area.
- Step 3: Open any of the mentioned fitness APP and let them to automatically pair your smartphone with the sensor or look for it in your APP’s setting. Don’t use the pairing options at your smartphone’s setting menu. In the case of using ROUVY AR APP, at “SENSORS”–>“SPEED SENSOR”, you have to select “other” –> “Deskbike” and select a wheel value.
- Step 4: (If needed) Pair the HR sensor with the fitness APP in its setting.
Note
The way some APPs are setted and compatible is different over time, you could see more information about how to set them in their websites.
REMARK
Every smartphone has its own setting and way to link Bluetooth®, so, in order to know how to link them with this sensor, you should check your smartphone user’s manual.
TROUBLE SHOOTING
- Not being paired with Bluetooth® or ANT+
- Shut down smartphone’s Bluetooth and then turn it on again.
- Check if your device is compatible with ANT+ in case of wanting to use this kind of connection. In the contrary case, you should use Bluetooth®.
- Mind you have GPS on in case of owning an Android smartphone.
- Move the pedals during 10 seconds to try to “wake up” the sensor. If the sensor is correctly assembled at the machine, it will produce a slight light in the bottom zone from the BION logo.
- Extract the battery and wait 10 seconds before of reinstall it. – Mind that you are using the correct sensor’s wireless ID.
- Sensor’s synchronization should be set inside the fitness APP and not at your smartphone’s settings.
- If your sensor was connected by another user, please, turn of that Bluetooth® or ANT+ connection and keep it 10 meters away from another similar devices. After that, reboot the fitness APP and your Bluetooth® or ANT+ connection and try to connect it again with your device.
- Remove the device from the APP’s history and try to synchronize it again.
- Try to walk away from electric lines or another electromagnetic sources.
- No Cadence /Speed data (or “ZERO”) at the screen.
- Make sure the Bluetooth® or ANT+ (and GPS in Android smartphones) are on.
- Check again if the sensor is properly setted in the machine.
- In the case it is, you could check any of the 1st point options.
- Bluetooth® or ANT+ has not signal or are unable to be connected.
- Sometimes some high or strong frequency interferences could appear if the sensor is next to a high-voltage tower, trafic light, adaptor, railway, light rail, cable car, wireless communication products, engines radar station, air station, wireless base station, laptop and another electronic appliances at home. When you are away from those areas, the correct data should display again.
- In the case the sensor is not detected and/or it would not be working correctly, it is recommended to turn the smartphone’s Bluetooth®/ANT+ & GPS off and on, reboot it or change the sensor’s battery for a new one.
- Bluetooth®/ANT+ are only able to connect with a single device at the same time. Make sure your device’s Bluetooth®/ANT+ and the sensor are not already connected to another device.
- If the sensor has been paired from your smartphone’sBluetooth®/ANT+ setting instead of your APPBluetooth®/ANT+’s setting, reboot the smartphone’s Bluetooth®/ANT+ and try to link it from the Bluetooth®/ANT+ APP’s settings.
- The sensor is not able to work if smartphone’s Bluetooth®/ANT+ is already busy
- Wrong measure
- Dead battery / magnetic interferences.
- Wrong weel diameter setting at the APP.
 report this ad
WARNING
- Do not use chemicals to clean the sensor.
- Periodically check that the sensor and magnet are correctly setted.
- Do not unassembly the sensor.
- Any kind of change at the sensor that has not been directly approved by the manufacturer could avoid the user to use this equipment.
- The product complies with the CE directives from its manufacturer:
[xyz-ips snippet=”download-snippet”]