
![]()

Bird Control Australia Outdoor/Indoor Bird Laser Repeller
Set up and installation
Bird Control Australia Outdoor/Indoor Laser can be operated with a 220V or 240V power supply. It comes with a 1m power cord and remote control, mounting hardware (hanging bracket), and an instruction manual. Unpack carefully and be sure that no damage has occurred during shipping. If anything is missing or appears to be damaged, please contact us.Power Connection: This unit has been designed to function on the main power supply of either 220V or 240V and has been supplied with either a 220V or 240V power plug for use with your local voltage. *Use only the plug and power adapter supplied with the unit. Ensure you are using a grounded circuit. Ensure your source voltage matches the required voltage for your Laser before plugging it in. Outdoor electrical connections must be fully waterproofed.
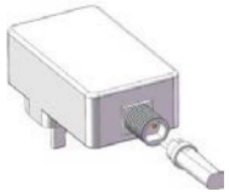
Plug attachment: Firmly attach the plug (supplied separately) to the unit’s power cord by screwing it onto the screw-threaded attachment at the end of the cord — see diagram. When attaching the plug for the first time, make sure the 2 pin plug is the right way round. Match ‘flat’ and ‘keyway’ for proper contact. Check before tightening, as the fit only works in one direction. ** Use only the plug and power adapter supplied with the unit.For remote control use including timer, see below.
Housekeeping is very important! In any good Bird Management Program, the problem area should be cleaned of all evidence of birds. Nests, fledglings, droppings, dead birds, and the residual scent should all be removed. Check the area for unusual incentives. Remove food spillage, garbage, nesting materials and other items that may be appealing to birds.
©Bird Control Australia
In particularly stubborn and/or long-term infestations, it may be necessary to consider a combination approach to further decrease the desirability of the facility to birds. The use of multiple products in synergy or combination will particularly help with long-term infestations. This process has proven to maximize the effectiveness of bird control programs.Installation/Mounting: Screw mounting bracket onto the screw thread of the laser unit. Secure mounting bracket to the desired surface with screws appropriate for the surface (metal, wood, concrete etc.). Adjust the angle as needed. Do not stare into the beam or look into it with any optical instrument. Turn it away from human sightlines. The unit must be properly earthed. Outdoor electrical outlets should be fully waterproof. Use in a well-ventilated area. Do not block any ventilation slots. If desired, block unwanted beams (the beams that would normally point down, for example), by adjusting the thumbscrews on the metal “door” covers on the front aperture.Laser Automatic Cycling: The Laser has been pre-programmed to prevent acclimation of the pests to an unchanging stimulus. This consists of a cycle of ON / OFF operation with intervals varying between 5 and 15 minutes OFF time for every 5 minutes ON. This cycle will be maintained as long as the Laser is in operation.First Time use & Remote Control: The unit operation can be controlled in a number of ways: Direct or Remote Control. The unit may be switched on and off using the remote control provided. The effective receiving distance of the radio frequency remote is about 20m. Pull out the antenna for best results in case of longer distance or intervening obstacles.Timed operation (using the remote control): Insert the battery into the Remote Control unit before first use. For longer life, remove the remote battery when not in use for long periods. NOTE: Remotes are not specific to individual laser units. One remote will operate all lasers within receiving range.To use the timer, press the remote’s TIMER ON button. Unit will flash twice to show it has received the signal. Pressing the TIMER ON button defaults to 2 hours of operation. To select a different duration, press the desired hour button following Timer START. To cancel the timer operation, press the TIMER OFF button. Unit will flash twice to show it has accepted the signal.Use with appliance timer: To do this, turn the unit on at the switch only. (Do not use the remote) and allow the appliance timer to control the ON-OFF times.To prolong the life of the unit, allow 30 minutes of cooling after 6 – 8 hours of operation.CARE/CLEANING: Cleaning frequency depends on the environment. During cleaning (except for mirrors), or when the unit is not in use, close the aperture completely by using the thumbscrews to prevent dust. Unplug the unit. Use a soft cloth to clean the outside casing. To clean mirrors (inside the front aperture) use a cotton swab and rubbing alcohol. Twirl slowly and press gently to avoid damage. Be sure all parts are dry before plugging the unit back in. When unit is not in use for extended periods, turn off. This will reset the unit for next operative cycle as well as providing additional security preventing unauthorized use.
SPECIFICATIONS
Laser Power: < 1milliwattPowerConsumption: 50 wattsLaser Colour: Red + greenNet Weight: 1.5kg Power: AC100-240V,50-60Hz Electric Current: 100mAClassification: CLASS 2Size (mm): L(18.5) *W(14.8) *H(7.0) CMFuse: 2ABeam Divergence: 60° OperatingTemperature: -20 to 40Safe Temperature for Use: 0 to 35 Origin:Made in China
![]()
- COVERAGE/VISUAL DISTRIBUTION PATTERN: Total spatial coverage is dependent on environmental surroundings: more visible in the dark than in the light, more visible in a relatively open area than one with many bushes or trees that would block beams, etc. This laser beam has a maximum range of 100 meters in the dark. Maximum coverage is approximately 900 square meters. Keep in mind that this is unidirectional coverage, with beams emanating from the aperture in the shape of a slice of pie. Angle of spread = 30 degrees maximum either side from center (60 degrees total). Depending on placement, a second unit will offer increased synergistic coverage, therefore multiple units are strongly recommended, especially in stubborn or long-term infestations.
PRECAUTIONS
This laser is Class 2. The power of each laser point is no more than 1 milliwatt.
- Never look directly into laser beams, or into the specular reflection(s) of any beam. Wear safety goggles to protect your eyes when necessary.
- DO NOT point towards other people.
- DO NOT direct laser beam up into the sky AT ANY TIME. Significant disruption to safe airplane operation may result, punishable by law.
- Wear an antistatic wrist strap while servicing to prevent electrostatic damage.
- Do not spill liquids into or onto the unit. If this happens, disconnect the power immediately.
- Power directly off a switched circuit.
- Disconnect unit from main power before inspecting, installing, making any type of connection, or replacing any components.
- While this unit is weather-resistant under normal conditions, avoid exposure to extremes. Do not leave where it may become flooded or immersed. Do not allow to be covered in snow.
- To prevent fire or shock hazards, do not expose this unit to a high temperature or high humidity area. Unplug the unit when not in use.
- Keep combustible materials away. Do not place the unit in or near water. Do not mount while standing in or surrounded by water.
- Indoor – Mount at or above a height of 3 meters. Project beams above eye level. Do not project beams onto specular (reflective) material for example, mirrors.
- For outdoor use, install at ground level or a few inches above the ground.
- Do not project beams at room entrances.
- Do not use near humans or pets.
- Conform to temperature ranges in “specifications”. Diode laser is extremely sensitive to temperature, and output power is indirectly proportional to temperature. If the temperature is too low, the laser may need extra time to warm up to the optimum output. If the temperature is too high, turn up air conditioning. If the temperature remains too high, it can cause damage or degradation to the diode and the long-term performance.
- Refer service to a qualified technician.
www.birdcontrolaustralia.com.au
©Bird Control Australia
References
[xyz-ips snippet=”download-snippet”]