![]() EYES P400NDI® WITH PROFESSIONAL-LEVEL COLOUR CONTROLLERUSER GUIDEPART 2: NDI® INSTRUCTIONS
EYES P400NDI® WITH PROFESSIONAL-LEVEL COLOUR CONTROLLERUSER GUIDEPART 2: NDI® INSTRUCTIONS![]()
WELCOME TO THE FUTURE.
Getting to know your P400
Thanks for purchasing BirdDog Eyes P400. Please take some time to read this document to allow you to get the most out of your purchase and familiarize yourself with the features available in the unit.
Physical connectors
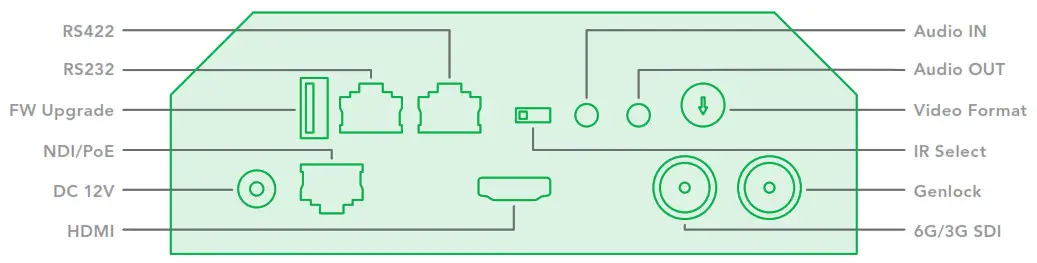
Powering P400P400 is equipped with a sophisticated system allowing power from various sources:PoE+ (Power over Ethernet)PoE+ is a convenient way to power P400 as it allows both data and power to be sent through the same standard Ethernet cable. To take advantage of PoE+, the networkswitch that P400 is directly plugged into must support PoE+ (802.11at).Different network switches are capable of providing different amounts of total power to all connected devices. P400 uses approximately 14 watts in PoE mode.DCLocated at the rear of the P400 is a DC connection port. This power input socket is capable of accepting 12vDC power. P400 should only be powered by the included AC adaptor.Thermal managementP400 has been engineered to be passively cooled. In order to achieve this the entire enclosure of P400 is designed to dissipate heat. The main processor is capable of operating up to 100º C / 212º F.Some factors affect how much heat BirdDog will produce, and it is normal for it to feel warm to the touch.In extreme circumstances (a hot day/direct hot sun) it is advised to power P400 via DC as this produces less heat than PoE.
Booting up your BirdDog P400
Indication of the system boot processAs soon as BirdDog P400 detects a power input signal the lower GREEN led light will illuminate.¹On the ethernet/NDI connector on the rear.After the initial boot-up is complete your P400 unit will be visible as a source on any NDI compatible devices on the SAME ethernet subnet.For further networking architecture instructions including routing please consult either your system administrator or the support page at bird-dog.tv
 Operating P400
Web configuration panelIn this release, the web configuration panel allows you to alter key settings of P400, specifically A/V settings, and video frame rates, restart the video processing engine, change networking parameters, recall PTZ presets, and apply firmware updates.Access via a web browser (URL)To access the web configuration panel please point your computer web browser to: http://birddog-xxxxx.local/“XXXX” is the serial number of the P400, the serial number is printed on the box and on the main unit. Note the web address is case sensitive and should be all lower case. Your computer will need to have ‘Bonjour’ services loaded in order to access the unit via its ‘friendly’ name described above.Apple devices come pre-installed with Bonjour, while Windows devices need a small plugin available here: https://support.apple.com/kb/dl999?locale=en_AUNote: only the last 5 digits are required for accessing the web interface.Accessing P400 on a network without a DHCP serverSome standalone or private networks may not have a DHCP server. After 30 seconds of searching for an automatically assigned IP address P400 will fall back to a default address which is:192.168.100.100In order to access the web configuration panel on a network that is configured to a different subnet, change your computer’s IP address to match the BirdDog unit. Once you gain access to the BirdDog web configuration panel choose your IP address to match the rest of the devices on your network.For instructions on setting your computer’s IP address please consult your computer operating system manual or IT support resources.Accessing P400 via an IP addressP400 is configured to automatically receive a network (IP) address from the computer network via DHCP (Dynamic Host Configuration Protocol). Most corporate, education and home networks have a DHCP server present on the network to allow this to occur. Usually, your Internet Router provides this.If P400 receives an IP address automatically from this server (DHCP) the IP address can be discovered in several ways, including BirdDog Central Lite available from bird-dog.tv/firmware
Password management
Once you direct your web browser to the web configuration panel you will need to log in to change any settings.
Default passwordThe web configuration panel is secured by a user-selectable password. The default password is Birddog (one word, lower case).To change the password simply log in using the default password, navigate to the network tab in the web interface, and select change password.It is recommended to change this password in a network environment where P400 is shared with other users (e.g. not private). By entering this password, the user is granted full access to the P400 configuration settings and could interrupt a live program.
A/V-SETUP
Adjusting Camera image settingsPlease note in the initial release of P400 the image adjustments for the camera are affected by using the camera’s unbuilt OSD (On Screen Display), details of how to access this are available later in this user guide or in Part 1 of the P400 manuals.A Companion application, BirdDog Cam Control is currently available with additional functionality to be made available with regular updates to this application.
A/V Input

Video input formatPlease select the desired camera frame rate and video size from the drop-down menu. This action can take up to 60 seconds to complete if the camera is changing frame rates.Video format options are:UHD Progressive Resolutions: 2160p25, 29.97, 30HD Progressive Resolutions: 1080p25, 29.97, 30, 50, 59.94, 60HD Interlaced Resolutions: 1080i50, 59.94, 60720P Progressive Resolutions: 720p50, 59.94, 60
NDI Encode
Bitrate managementBirdDog P400 allows you to interact with the video bitrate that the NDI encode engine produces. This can have dramatic effects on image quality and network traffic. It is strongly recommended to leave this option on NDI Managed, if Manual is selected this can easily cause issues with receiving hardware and software that is not designed for lower or higher bitrates and should be used with caution. Please ensure you keep HD bitrates n Manual close to 100Mbps and UHD close to 170Mbps.NDI AudioYou are able to select if the audio input on the rear of the P400 is embedded into the NDI Stream by making NDI Audio Active, or Mute to disableOnboard TallyP400 comes equipped with an inbuilt Tally system in the camera head. This tally light automatically communicates with receiver software and will illuminate RED when the Tally position on the receiver is set to Program, and GREEN when the Tally position on the receiver is set to Preview.Onboard Tally can be suppressed with this setting.Failover SourceWithin P400 you are able to nominate a failover source, this means that if a receiver is connected to the P400 and for any reason, the P400 is no longer available the receiver will automatically switch over to the nominated NDI source, this can be any valid NDI signal within your network. Please note to update the list of Available NDI sources you must press the REFRESH button twice in the Web Dashboard, noting the Web Dashboard is designed to be used with Chrome or Firefox browsers.
PTZ
ControlYou are able to save and recall presets from the Web Dashboard using the Select Preset option. To operate this, simply press The preset number you ish to recall or save followed by APPLY PRESET or SAVE PRESETSettingsThe P400 communicates with the camera head via a serial interface, these settings should remain as per default: VISCA ADDRESS: 1 VISCA BAUDRATE: 9600PT Max SpeedWhen controlling the P400 over NDI you can limit the maximum speed of PTZ movements by affecting this option, the higher the number (18) the faster and more sensitive the movements will be on the theP400.OSDIn the initial release of P400, the OSD is very important for adjusting the camera image settings since this is the primary control mechanism. To adjust all cameras settings please press the OSD ON/OFF button to illuminate the OSD.The OSD is visible on both the NDI output and SDI/HDMI and can equally be accessed via the included remote control.Please take note that the PTZ will not operate normally (control of movement) until the OSD menu is closed again.
SYSTEM
System updateThe P400 is updateable via the web interface. Please check the below address regularly to ensure you have the latest firmware available for your device.Having the latest firmware ensures you have all the latest features and performance updates to get the most out of Eyes P400:bird-dog.tv/firmware-updatesAfter downloading the latest firmware release, navigate to the settings tab on the web configuration console and click on Choose file… select the firmware update file and press the update button.
NDI NETWORK SETTINGS
Transmit Preferred MethodTCPTCP is the default transmission method for NDI, it operates well within local networks with predictable latency and limited jitter. BirdDog recommends that TCP be used for typical applications, and only using alternative transports for specific reasons.UDPUDP is recommended for networks where there is extended latency from one end to the other. The nature of UDP means that it does not need to receive a confirmation of each packet being received successfully – vastly improving performance on distance WANs. UDP can have some consequences if there are other issues on the network such as jitter or lost packets as it will not inherently resent a lost packet.MulticastMulticast is especially useful for use-cases that require a single source to be received on multiple receivers simultaneously. Utilizing Multicast offloads the distribution of the NDI A/V data packets from the BirdDog P400 to the network infrastructure. You should take care to ensure your network is specifically configured to support Multicast as using it on an ill-prepared network can create unintended network problems.MultiTCPMultiTCP is a new NDI transport method that allows users to send NDI video over poor network topography such as WAN (Wide Area Networks) without experiencing issues such as packet loss and lost frames. In the past, in order to send NDI video over a WAN, UDP transport was the only option available. UDP solved some issues of WAN applications by allowing the NDI video to travel without dropping masses of the frame but results in dropped packets being missed which could cause unstable video. UDP also places more performance demands on devices sending and receiving the signal.MultiTCP employs a new method of sending TCP packets whereby it opens a mass of TCP connections over the WAN and uses them in a round-robin manner, this allows each individual TCP connection enough time to acknowledge the receiving the packet, confirm nothing is lost, and prepare for the next one before it’s sent the next TCP packet in the round-robin. This is similar to a RAID setup in traditional storage.
NETWORK
 report this ad
Device namingWhen your device is first powered on it defaults to the naming convention as described in the web configuration panel section of this manual.It is possible to change the name along with the network settings to better suit your environment.Configuration methodYou can configure your device to operate on the network with a dynamic (DHCP) IP address or a fixed address. For smaller networks, DHCP networking is generallysuitable, however larger networks with managed operations will often determine each device needs to have a dedicated and static IP address.DHCP IP addressDHCP is set as the network configuration by default for P400.Static IP addressTo enable a static IP address, change the configuration method to static and fill in the details required in Address, Mask, and Gateway. Particular attention should be paid to the Address and Mask fields as incorrect information entered will result in the device not being visible on the network and a factory reset will be required in order to recover the unit.IP address recoveryIn the event that the device is not visible on the network, the network has changed, or the static IP address details have been lost, reset the BirdDog back to its default settings by using the Birddog Neuralyzer application available at bird-dog.tv/firmwareBirdDog nameYou can name each unit with a friendly name that makes sense for each production (Camera 1, Camera 2, etc). This name will appear on any NDI receiver when it looks for the video coming from P400 over the network. The name must not include any special characters and can be any combination of ‘a-z, 1-0, and –‘.Note: no uppercase characters are valid. On NDI receiving devices, the device will present as a source as follows: Birddog-name [CAM] when the unit is set to automatic input.
Receiving NDI streams
There are many applications that support receiving the NDI signal that P400 produces. Each application will vary slightly on how you choose your source.NewTek Studio MonitorNewTek provides a free Studio Monitor application that allows you to monitor many NDI sources on a standard Windows computer. Once Studio Monitor is launched on your computer, simply right-click anywhere in the interface and select your unit from the drop-down list.Once connected to the P400 you will notice a configuration cog appears on the bottom right-hand side of the video display, this is a shortcut to access the P400 web configuration panel.
NewTek TriCaster SeriesNewTek TriCaster series devices allow several NDI sources to be received simultaneously, the amount of simultaneous connections varies by what model TriCaster you have. Consult your TriCaster user manual to determine how many connections are available on your device.To select P400 as a source on your TriCaster, simply click on the configuration cog below your desired source location, this will bring up the Input Setting dialog, select from the drop-down list your P400 source.Once connected to the P400 you will notice a configuration cog appears next to the source drop-down window, this is a shortcut to access the P400 web configuration panel.
References
[xyz-ips snippet=”download-snippet”]