
4K FAMILYIT’S ALL ABOUT CONNECTIONS.
 |
USER GUIDENDI®WELCOME TO THE FUTURE.
GETTING TO KNOW YOUR DEVICE
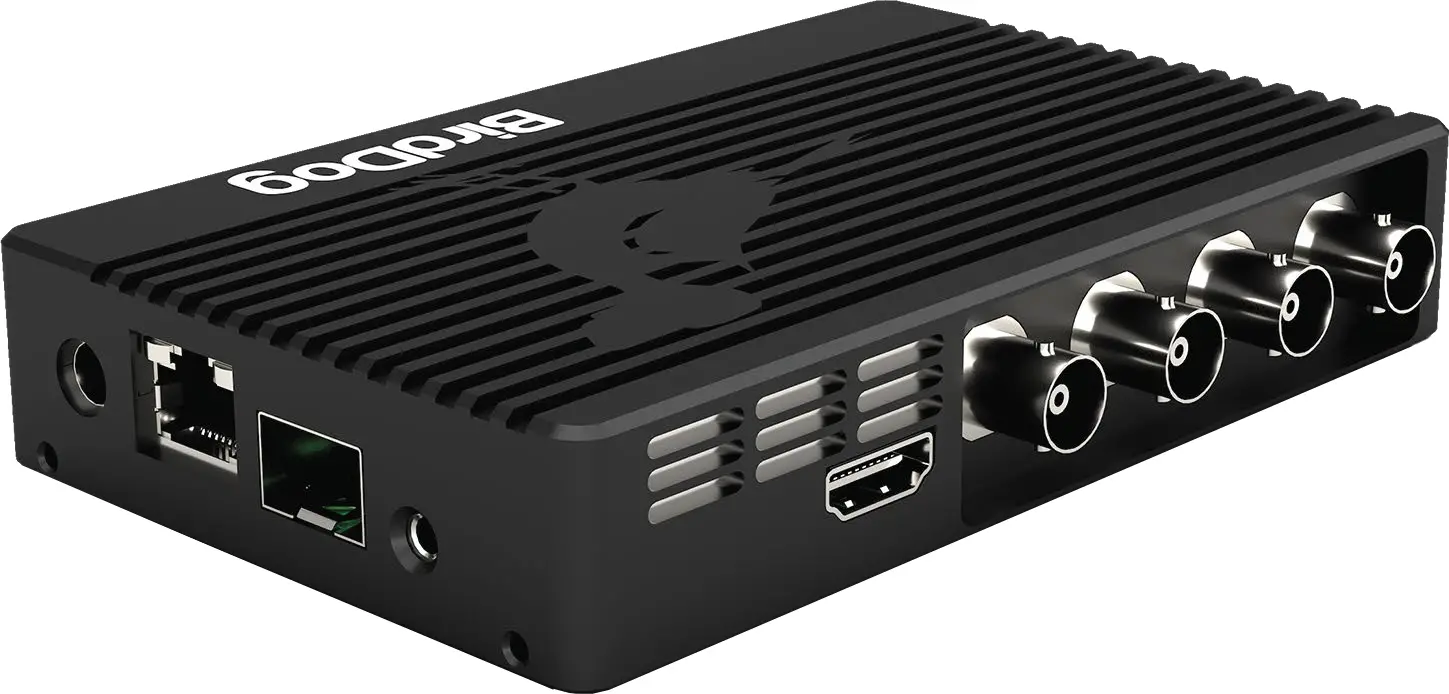
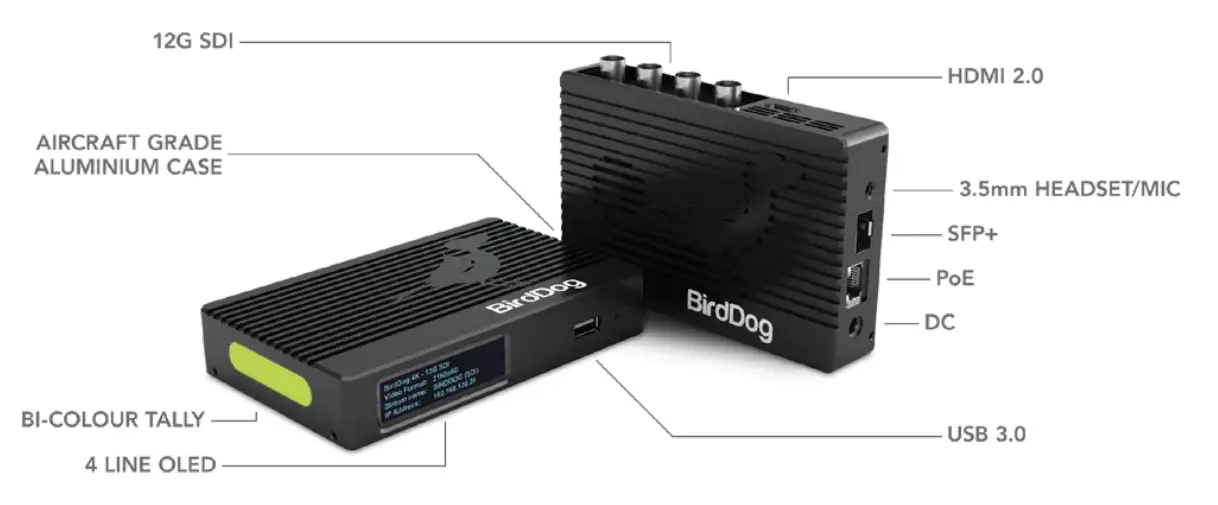
Thanks for purchasing BirdDog 4K Converter. Please take some time to read this document to allow you to get the most out of your purchase and familiarize yourself with the features available in the unit.Physical connectors
Powering your 4K Converter
This converter is equipped with a sophisticated system allowing power from various sources:PoE+ (Power over Ethernet)PoE+ is a convenient way to power this converter as it allows both data and power to be sent through the same standard Ethernet cable. To take advantage of PoE+, the network switch that the converter is directly plugged into must support PoE+ (802.11at).Different network switches are capable of providing different amounts of total power to all connected devices. This 4K converter uses approximately 14 watts in PoE mode.DCLocated at the side of the 4K converter is a DC connection port. This power input socket is capable of accepting 12vDC power. You should only power this device with the included AC adaptor.Thermal managementThis product has been engineered to be actively cooled. In order to achieve the best thermal performance, the entire enclosure of the converter is designed to dissipate heat. The main processor is capable of operating up to 100º C / 212º F.Some factors affect how much heat BirdDog will produce, and it is normal for it to feel warm to the touch.

BOOTING UP YOUR BIRDDOG DEVICE
Indication of the system boot processAs soon as the converter detects a power input the fan will begin to spin. After approximately 20 seconds you will notice the network activity indicator will begin to flash indicating that the device is now able to see the computer network. After a further 20 seconds, the OLED display will illuminate.The OLED display has some important information displayed on it to ensure you can access your converter on the network:BirdDog 4K – MODEL NAMEVideo Format: 2160p60Stream name: BirdDog 4KIP Address: 192.168.100.100The most important detail on the display is the IP address, this is the address you will need to type into your web browser to access the BirdDog device to configure and interact with it.
OPERATING YOUR CONVERTER
Web configuration panelIn this release, the web configuration panel allows you to alter key settings of your converter, specifically A/V settings, and video frame rates, restart the video processing engine, change networking parameters, and apply firmware updates.Access via a web browser (URL)To access the web configuration panel please point your computer web browser to: http://birddog-xxxxx.local/ “xxxxx” is the serial number of the converter, the serial number is printed on the box and on the main unit. Note the web address is case sensitive and should be all lower case. Your computer will need to have ‘Bonjour’ services loaded in order to access the unit via its ‘friendly’ name described above.Apple devices come pre-installed with Bonjour, while Windows devices need a small plugin available here: https://support.apple.com/kb/dl999?locale=en_AUAccessing via an IP addressYour converter is configured to automatically receive a network (IP) address from the computer network via DHCP (Dynamic Host Configuration Protocol). Most corporate, education and home networks have a DHCP server present on the network to allow this to occur. Usually, your Internet Router provides this.If your device receives an IP address automatically from this server (DHCP) the IP address can be discovered in several ways, including BirdDog Central Lite available from bird-dog.tv/firmwareAccessing on a network without a DHCP serverSome standalone or private networks may not have a DHCP server. After 30 seconds of searching for an automatically assigned IP address, the device will fall back to a default address which is: 192.168.100.100 In order to access the web configuration panel on a network that is configured to a different subnet, change your computer’s IP address to match the BirdDog unit’s IP address range. Once you gain access to the BirdDog web configuration panel choose your IP address to match the rest of the devices on your network.For instructions on setting your computer’s IP address please consult your computer operating system manual or IT support resources.
PASSWORD MANAGEMENT
Once you direct your web browser to the web configuration panel you will need to log in to change any settings.
Default passwordThe web configuration panel is secured by a user-selectable password. The default password is Birddog (one word, lower case).To change the password simply log in using the default password, navigate to the network tab in the web interface, and select change password.It is recommended to change this password in a network environment where your device is shared with other users (e.g. not private). By entering this password, the user is granted full access to the configuration settings and could interrupt a live program.
A/V SETUP
NDI ENCODE
Video-Input FormatThis converter is capable of accepting many different video formats to encode to NDI. For the most part, it is recommended to leave the Video Input Format set to AUTO, you can manually override this setting and choose whatever resolution your source device is set to. This can be useful if there is an issue in synchronizing video input resolutions.Chroma Subsample RateThis BirdDog converter is capable of operating in two Chroma Subsample modes, 4:2:2 and 4:2:0. According to the NDI specification, when you are operating in HD videoresolutions the chroma subsampling should be set to 4:2:2 and in 4Kit should be set to 4:2:0.The BirdDog 4K converter line allows you to override these recommendations depending on your own needs, this can result in greater representation of colors in your image or less overall video compression. Generally speaking for video-sourced material in 4Kit is recommended to use 4:2:0, but for computer-generated graphics such as gaming andpresentations your chroma subsampling should be set to 4:2:2.Bit DepthAs with Chroma Subsampling, you are able to select your encoders bit depth. This determines the amount of chroma and luma gradations there are available to represent any particular color in your video material. 10-bit video is very much recommended for digital graphics as it can handle ramps or gradients much more accurately, but for camera-sourced material, 8-bit depth may be sufficient.10-Bit support is unique to the BirdDog family of products, and while the video will still be received and displayed on any NDI-Capable receiver, only BirdDog receivers can decode the full 10-bit signal. Any other device will simply display the 8-bit material that is coded within the NDI stream.NDI Output BandwidthBirddog Devices allow you to set your target NDI output bitrate. This allows you to select a compression ratio that is more efficient on your networking infrastructure (lower bandwidth) or higher image quality for critical footage. The scale allows you to select anywhere from 60mbps to 360mbps.Loop Out TallyIn addition to the on-board Tally light indicating when the device is being used as either a program or preview source on a receiver, you are able to select Loop Out Tally. This will add a red/green border to the loop out of the BirdDog device. This is particularly useful for camera operators who are monitoring the loop out on a video monitor. They will see the color borders and know when the device is being prepared or used for a life purpose.
MISCELLANEOUS

NDI Stream NameWhen your BirdDog converter generates an NDI stream, it can be identified via its name on any NDI-capable receiver. You are able to nominate the NDI stream name here to give you a more descriptive name of the source you are connecting to. This can be particularly useful in multi-channel devices or on networks where there are a large amount of NDI streams.
NETWORK
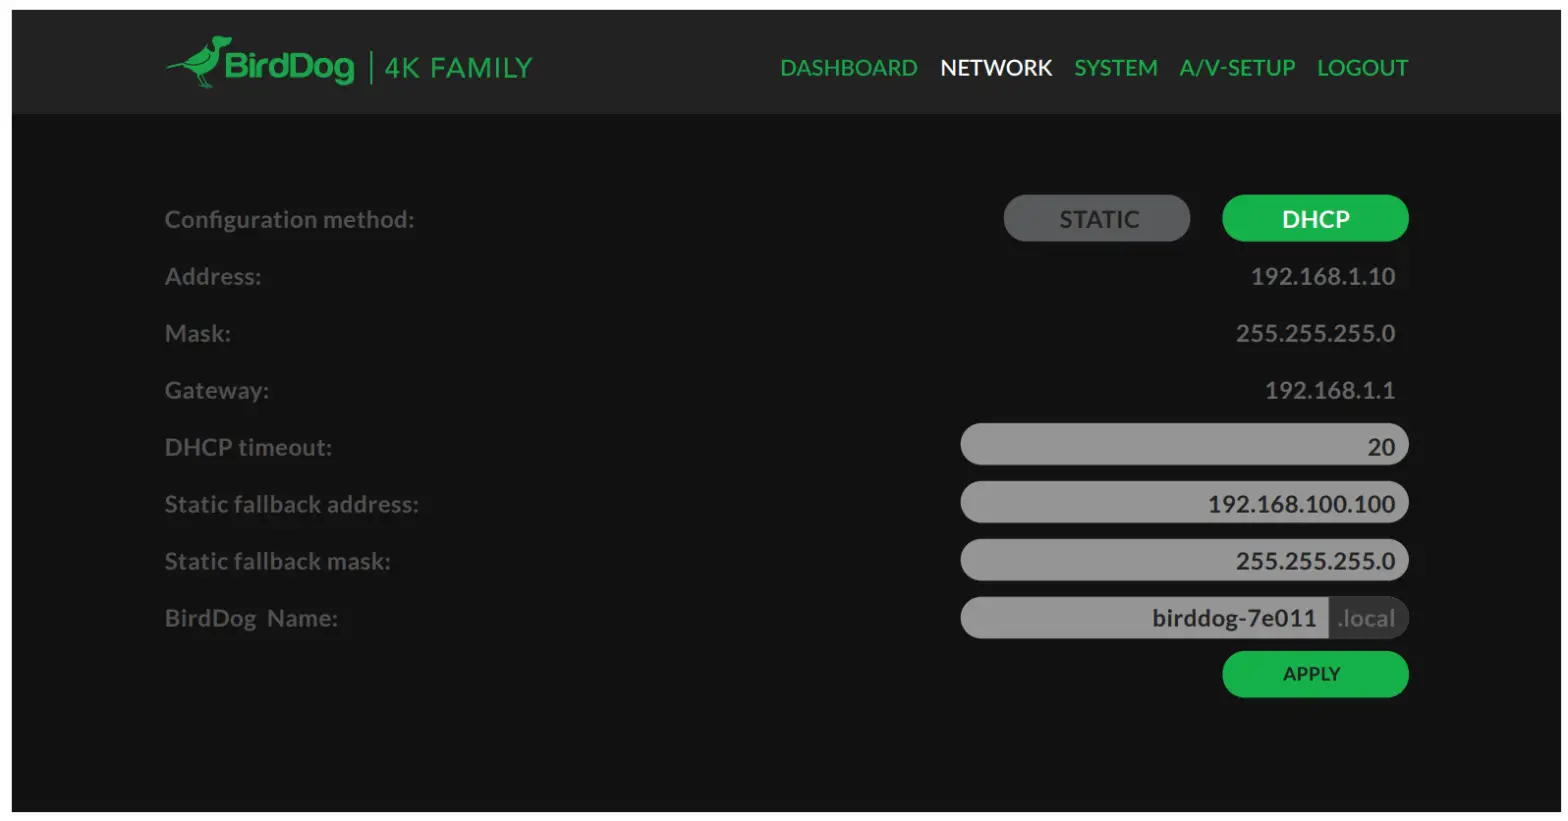
Device namingWhen your device is first powered on it defaults to the naming convention as described in the web configuration panel section of this manual.It is possible to change the name along with the network settings to better suit your environment.IP configuration methodYou can configure your device to operate on the network with a dynamic (DHCP) IP address or a fixed address.For smaller networks DHCP networking is generally suitable, however larger networks with managed operations will often determine each device needs to have a dedicated and static IP address.DHCP IP addressDHCP is set as the network configuration by default for Mini.Static IP addressTo enable a static IP address, change the configuration method to static and fill in the details required in Address, Mask, and Gateway. Particular attention should be paid to the Address and Mask fields as incorrect information entered will result in the device not being visible on the network and a factory reset will be required in order to recover the unit.IP address recoveryIn the event that the device is not visible on the network, the network has changed, or the static IP address details have been lost, reset the BirdDog back to its default settings by following the factory reset procedure.BirdDog nameYou can name each unit with a friendly name that makes sense for each production (Camera 1, Camera 2, etc). This name will appear on any NDI receiver when it looks for the video coming from Mini over the network. The name must not include any special characters and can be any combination of ‘a-z, 1-0, and –‘.Note: no uppercase characters are valid.On NDI receiving devices, the device will present as a source as follows: Birddog-name [HDMI] when the unit is set to automatic input.
FIRMWARE UPDATE
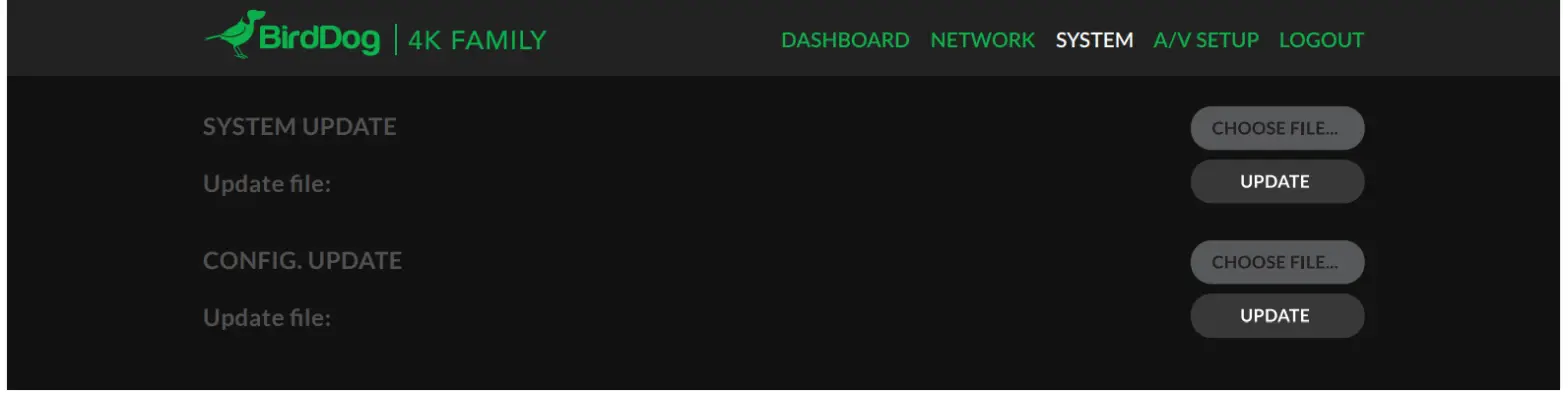
The converter is updateable via the web interface. Please check the below address regularly to ensure you have the latest firmware available for your device.Having the latest firmware ensures you have all the latest features and performance updates to get the most out of 4K Converters:bird-dog.tv/firmware-updatesAfter downloading the latest firmware release, navigate to the settings tab on the web configuration console and click on Choose file… select the firmware update file and press the update button.
report this ad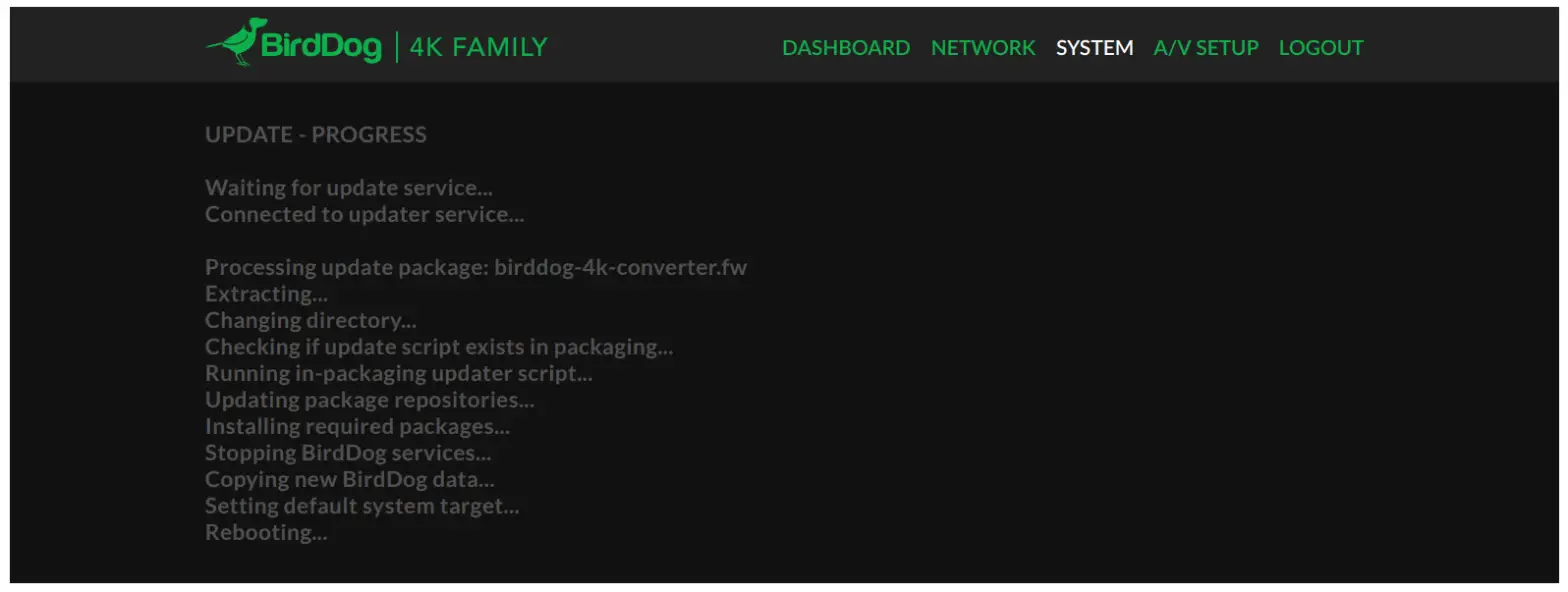
RECEIVING NDI STREAMS
There are many applications that support receiving the NDI signal that the unit produces. Each application will vary slightly on how you choose your source.NewTek Studio MonitorNewTek provides a free Studio Monitor application that allows you to monitor many NDI sources on a standard Windows computer. Once Studio Monitor is launched on your computer, simply right-click anywhere in the interface and select your device from the drop-down list.Once connected to the unit you will notice a configuration cog appears on the bottom right-hand side of the video display, this is a shortcut to access the device web configuration panel.NewTek TriCaster SeriesNewTek TriCaster series devices allow several NDI sources to be received simultaneously, the amount of simultaneous connections varies by what model TriCaster you have. Consult your TriCaster user manual to determine how many connections are available on your device.To select 4K converter as a source on your TriCaster, simply click on the configuration cog below your desired source location, this will bring up the Input Setting dialog, select from the drop-down list your device source.Once connected to the unit you will notice a configuration cog appears next to the source drop-down window, this is a shortcut to access the device web configuration panel.
References
[xyz-ips snippet=”download-snippet”]