V 2.0NDI MULTIVIEW© BirdDog Australia 2021NDI®USER MANUAL
About NDI Multiview
NDI Multiview has been designed to be incredibly powerful and super intuitive to use. Create an NDI Multiview stream in a matter of seconds. Simply select the Multiview layout of your choice, select which NDI® source you want in each window, and select which overlays you wish to see. Toggle on the NDI® switch and you are sending a Multiview window out as a standard NDI® source.
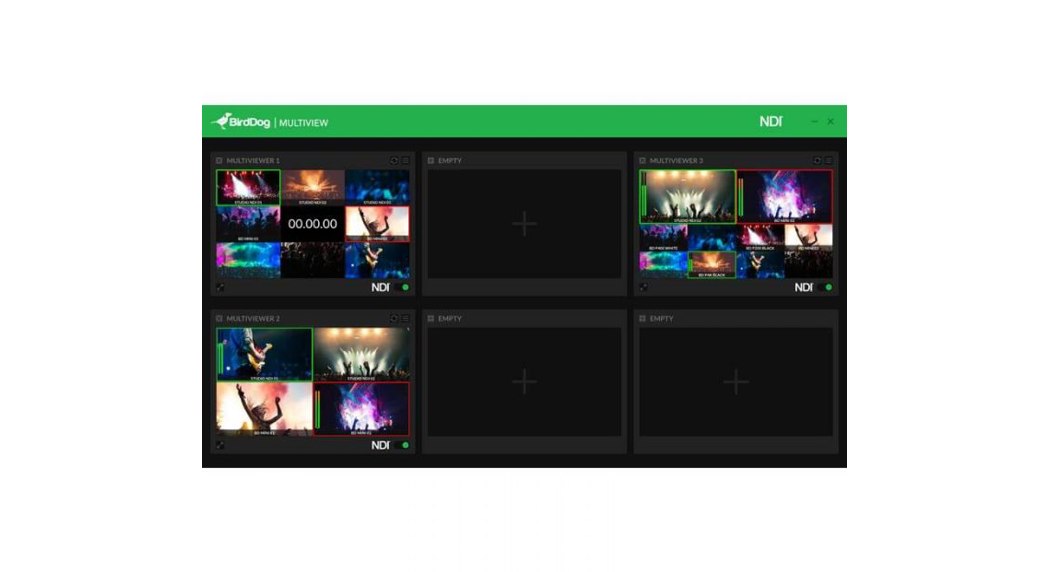
Main View
The Main View is your starting point to create and view Multiviewers. There are six Multiviewers that can be individually configured with NDI sources and various display options. In the top right corner, you can access the App Settings via the floating hamburger icon.
Multiviewer
To create an actual Multiviewer from an empty one, click on either plus sign. A popup appears where you can select a layout to arrange the sources in the Multiviewer. Please note that the Lite version only has access to the one-slot and four-slot layouts, the PRO version additionally has layouts with nine, ten and 16 slots.
After creating a Multiviewer, various new controls appear:
- In the top left corner, there is a delete button next to the Multiviewer name. To prevent accidental deletion, there is a confirmation prompt.
- In the top right corner, there is a refresh button that you can use to rediscover NDI sources in case there is a problem and a menu button where you can access various display and audio settings.
- In the bottom left corner is the fullscreen button to view a single Multiview on the entire screen and be able to monitor its audio.
- Finally, in the bottom right corner you can toggle NDI output of the composed multiview.
- In a newly created Multiviewer, all slots are empty by default. You should start to select NDI sources by clicking on CONFIGURE SOURCES, which leads to the Configure Sources screen.
Configure Sources
On the left you see an overview of the layout. You can click the slots to highlight them and configure a source for each one.On the right-hand side, there are a few options for what to show in the highlighted slot. NONE will just output a blue box for that slot, the two CLOCK options show the local time with white text on a black background in 12- and 24-hour format, respectively. All your available NDI sources will be shown below these options.Please note that there is no preview on this screen, it will always show the layout with blue boxes.
Multiviewer Settings
In the top part there are some general options that affect the entire Multiviewer:
NAMEThe name is shown in the Main View and used as the source name if NDI outout is enabled for the Multiviewer. Leave the name empty to revert to the initial name (MULTIVIEWER #).
NDI RESOLUTIONThis setting affects the resolution at which the incoming NDI sources are received. PROXY usually performs much better, but does affect the quality of the output. Most useful when you have several Multiviewers configured and use a lot of sources. In the layouts with many slots the difference in quality might not even be noticeable, as the images are scaled down a lot anyways.
MULTIVIEW RESOLUTIONHere you can configure the resolution and frame rate of the multiview output.
The lower part has some settings for the individual source slots:
SCREEN SOURCEYou can rename the source for display purposes without affecting what is received. Click on the pen icon that appears when hovering over the name. Leave the name empty to revert to the original source name.
AUDIO METERSShow meters for the incoming audio. Any number of channels is supported, but limited by the available screen space. Screen space depends on the layout and output resolution.
SOURCE NAMEShow the source name with white text on a translucent black bar at the bottom of the slot. Takes into account the changed name from the first column.
TALLY INDICATORSShow tally borders around the slot rectangle. You can also click the AUDIO METERS, SOURCE NAME and TALLY INDICATORS headers to change the respective setting for all sources at once. These settings only apply to incoming NDI sources, empty (NONE) slots and CLOCKs can not be configured.
AUDIO SOURCElets you select one of the incoming sources to use as the audio of the NDI output of the Multiviewer. The audio is passed through unmodified with all channels intact.
The PRO version also includes recording of the incoming NDI sources. RECORDING DIRECTORY specifies where to save the recordings, please manually create the directory before entering it here. ISO RECORDING switches between recording individual sources on demand or recording several sources in a synchronized manner.
Fullscreen
When in fullscreen, there are two buttons in the top right corner of the screen:
- One to leave fullscreen and return to the Main View. You can also press ESC to leave fullscreen.
- The floating hamburger icon that opens the Multiviewer Settings while in fullscreen.
Audio Monitoring
Each layout slot that shows an NDI source has controls for audio monitoring in its bottom left corner.The monitor speaker icon toggles monitoring for that slot’s audio. One slot can be monitored at any time, the Multiviewer’s audio source (if one is selected) is preselected for monitoring when entering fullscreen. Active monitoring is indicated by a green icon. You can also turn off monitoring entirely by clicking that green icon.
Monitoring does not affect the NDI output.The monitor output is always downmixed to stereo, playing the first two channels by default. When monitoring is enabled on a source, there is a mixer icon next to the monitor speaker, which pops out the monitoring mixer. In this matrix you can mix each incoming channel to either the left or right monitor channel or take it out of the mix entirely. Any number of channels can be mixed at any time. While the active monitoring slot is not persisted, the mixing matrix is.
Recording
When a recording directory is configured on the Multiviewer, recording controls depending on the ISO RECORDING setting show up.
With ISO RECORDING off, each layout slot has a record button in its lower right corner. Just click it to start and stop recording the respective source. While recording, the recording duration is shown there.
With ISO RECORDING on, there is just one big record button in the top right corner of the screen. It opens a popup where you can select the sources to record, and then start recording them together. As with individual recording, the recording duration is shown by the button and you can also stop the recording again here.
App Settings
DISPLAYChoose which display NDI Multiview is on.
report this adAUDIO PLAYBACK DEVICESelect the audio device used for monitoring.
DEACTIVATE LICENSEClick here if you want to transfer your license key to a different machine or change to a different one. There is a confirmation prompt before the license is actually deactivated. After deactivating, you will be prompted to enter a license key and the previous key is free to be used elsewhere. You can also just put the same key right back in.
For help and any questions please contact [email protected]
WELCOME TO THE FUTURE.
References
[xyz-ips snippet=”download-snippet”]