BirdDog NDI Flex 4K Family User Guide

WELCOME TO THE FUTURE.
THE SMALLEST 4K NDI ON THE PLANET
GETTING TO KNOW YOUR DEVICE
Thanks for purchasing BirdDog Flex 4K Converter. Please take some time to read this document to allow you to get the most out of your purchase and familiarize yourself with the features available in the unit.
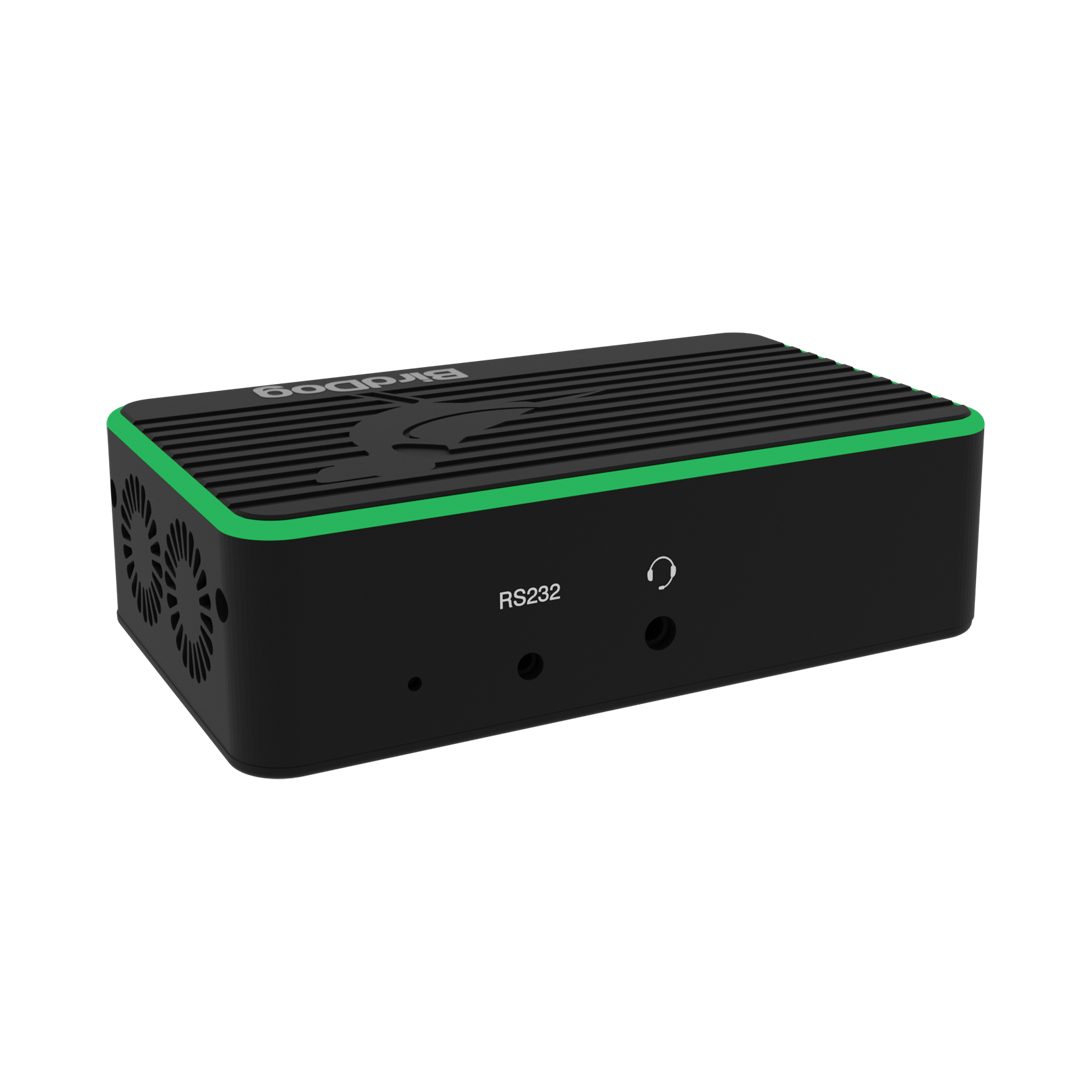
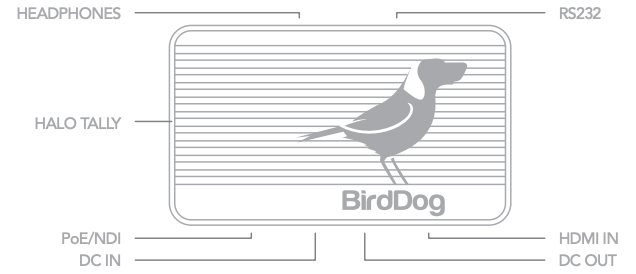
Physical connectors
Powering your 4K Converter
This converter is equipped with a sophisticated system allowing power from various sources:
PoE+ (Power over Ethernet)
PoE+ is a convenient way to power this converter as it allows both data and power to be sent through the same standard Ethernet cable. To take advantage of PoE+, the network switch that the converter is directly plugged into must support PoE+ (802.11at).
Different network switches are capable of providing differing amounts of total power to all connected devices. This Flex 4K converter uses approximately 14 watts in PoE+ mode to operate on its own, and up to 30w when powering additional equipment.
DC IN
Located at the side of the Flex 4K converter is a DC In connection port. This power input socket is capable of accepting 12vDC power. You should only power this device by the included AC adaptor.
DC OUT
Located at the side of the Flex 4K converter is a DC Out connection port. This power outlet socket is capable of delivering 12vDC power at up to 15w to power external equipment. Please note that if your external equipment draws more than 15w the Flex 4K unit will power off automatically.
NP-Style Battery plate (Flex 4K Backpack only)
The BirdDog Flex 4K Backpack features a NP-Style battery plate that allows you to mount the BirdDog Flex Backpack to another piece of equipment. The NP-Style plate is designed to work with most equipment but may not be physically possible to connect to all devices owing to physical constraints.
Please note the NP-Style DV output voltage is 12vDC
IMPORTANT NOTE WHEN POWERING EXTERNAL DEVICES
BirdDog Flex 4K and Flex 4K Backpack deliver 12v DC outputs which can be used for various purposes from powering cameras to screens to external recorders. No warranty is given for the use of this feature with regards to the suitability of your third-party equipment. It is advised that you should carefully check the user guide of the equipment you wish to power to ensure it is capable of accepting 12v DC input and if there are any warranty implications for using 3rd party power sources.
Thermal management
This product has been engineered to be actively cooled. In order to achieve best thermal performance the fan assembly has been carefully designed to provide optimum cooling while remaining extremely quiet. It is normal for warm air to pass through the vent outlets. The main processor is capable of operating up to 100º C / 212º F.

BOOTING UP YOUR BIRDDOG DEVICE
Indication of system boot process
As soon as the converter detects a power input the fan will begin to spin. After approximately 3 seconds the Halo Tally light will illuminate orange and you will notice the network activity indicator will begin to flash indicating that the device is now able to see the computer network. After a further 20 seconds the Halo Tally will flash Green and Red indicating the unit is completely booted and ready for operation.

OPERATING YOUR CONVERTER
Web configuration panel
In this release, the web configuration panel allows you to alter key settings of your converter, specifically A/V settings, and video frame rates, restarting the video processing engine, changing networking parameters and applying firmware updates.
Access via web browser (URL)
To access the web configuration panel please point your computer web browser to: http://birddog-xxxxx.local/ “xxxxx” is the serial number of the converter, the serial number is printed on the box and on the main unit. Note the web address is case sensitive and should be all lower case. Your computer will need to have ‘Bonjour’ services loaded in order to access the unit via it’s ‘friendly’ name described above.
Apple devices come pre-installed with Bonjour, while Windows devices need a small plugin available here: https://support.apple.com/kb/dl999?locale=en_AU
Accessing via an IP address
Your converter is configured to automatically receive a network (IP) address from the computer network via DHCP (Dynamic Host Configuration Protocol). Most corporate, education and home networks have a DHCP server present on the network to allow this to occur. Usually your Internet Router provides this.
If your device receives an IP address automatically from this server (DHCP) the IP address can be discovered in several ways, including BirdDog Central Lite available from: bird-dog.tv/firmware
Accessing on a network without a DHCP server
Some standalone or private networks may not have a DHCP server. After 30 seconds of searching for an automatically assigned IP address the device will fall back to a default address which is: 192.168.100.100
In order to access the web configuration panel on a network which is configured to a different subnet, change your computers IP address to match the BirdDog unit’s IP address range. Once you gain access to the BirdDog web configuration panel choose your IP address to match the rest of the devices on your network.
For instructions on setting your computers IP address please consult your computer operating system manual or IT support resources.
PASSWORD MANAGEMENT
Once you direct your web browser to the web configuration panel you will need to log in to change any settings.

Default password
The web configuration panel is secured by a user-selectable password. The default password is:
birddog (one word, lower case).
To change the password simply login using the default password, navigate to the network tab in the web interface, and select change password.
It is recommended to change this password in a network environment where your device is shared with other users (e.g. not private). By entering this password, the user is granted full access to the configuration settings and could interrupt a live program.
A/V SETUP
Video Mode
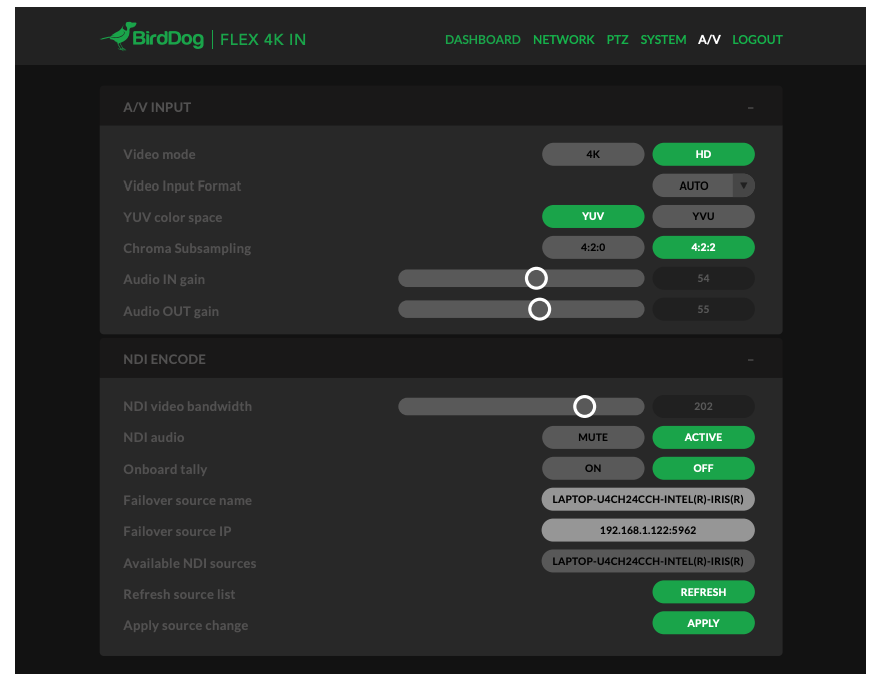
This setting allows you to set the underlying video input mode of the BirdDog Flex unit. By selecting 4K, the unit will look and operate with incoming sources in the 4K (UHD) video format, selecting HD will place the unit into HD mode. Supported video formats include:
4K
UHD 2160p23.98, 25, 29.97, 30fps
HD
1080p23.98,25,29.97,30,50,59.94,60720p50,59.94,601600×1024 @ 60hz1400×1050 @ 60hz1366×768 @ 60hz1360×768 @ 60hz1280×1024 @ 60hz1280×960 @ 60hz1280×800 @ 60hz1280×768 @ 60hz1152×864 @ 60hz1024×768 @ 60hz
*Note PC resolutions were tested on nVidia GEFORCE GPU with driver v451 loaded. Different sources may provide different timing data.
Video Input Format
This converter is capable of accepting many different video formats to encode to NDI. For the most part it is recommended to leave Video Input Format set to AUTO, you can manually override this setting and choose whatever resolution your source device is set to. This can be useful if there is an issue in synchronising video input resolutions.
YUV Colour Space
Built into BirdDog Flex is colour space conversion, some HDMI computer sources provide video in RGB or YUV colour space while others provide the source as YVU colour space, notably Apple Mac machines output YVU. If you experience inverted colours on your computer-based input swap YUV for YVU colour space.
Chroma Subsample Rate
This BirdDog converter is capable of operating in tow Chroma Subsample modes, 4:2:2 and 4:2:0. According to the NDI specification, when you are operating in HD video resolutions the chroma subsampling should be set to 4:2:2 and in 4K is should be set to 4:2:0.
The BirdDog 4K converter line allows you to override these recommendations depending on your own needs, this can result in greater representation of colours in your image or less overall video compression. Generally speaking for video-sourced material in 4K it is recommended to use 4:2:0, but for computer generated graphics such as gaming and presentations your chroma subsampling should be set to 4:2:2.
NDI ENCODE
NDI Output Bandwidth
BirdDog Devices allow you to set your target NDI output bitrate. This allows you to select a compression ratio that is more efficient on your networking infrastructure (lower bandwidth) or higher image quality for critical footage. The scale allows you to select anywhere from 60mbps to 360mbps.
NDI Audio
By default any audio incoming from the HDMI source will be encoded and sent over the NDI stream. You can disable this by selecting MUTE.
Onboard Tally
The BirdDog Flex 4K and Flex 4K Backpacks feature a unique ‘Halo’ tally light. The Tally light illuminates green when the BirdDog device is selected on a receiver’s Preview bus, and illuminates red when selected on a receivers Program bus.
By turning on the Onboard Tally, the light will operate as per the above description, when turned off, the tally light will remain inactive.
Failover Source
BirdDog Flex In and Flex 4K can inform any receiving device of a failover scheme. This means if the BirdDog Flex NDI stream is interrupted for any reason the receiver can automatically switch to a pre-determined alternative NDI stream. This is particularly useful for live ‘on air’ productions where there can be no risk of still frames or black being broadcast should any source no longer be available. Select an available NDI source for the failover function from the dropdown list in ‘Available NDI sources’. You can update this list by pressing Refresh source list in either Chrome or Firefox web browsers.
NETWORK
Device naming
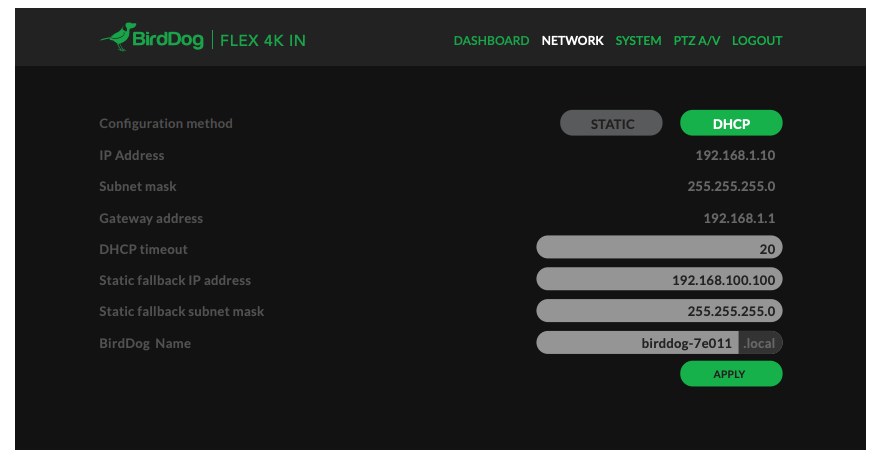
When your device is first powered on it defaults to the naming convention as described in the web configuration panel section of this manual.
It is possible to change the name along with the network settings to better suit your environment.
Configuration method
You can configure your device to operate on the network with a dynamic (DHCP) IP address or a fixed address. For smaller networks DHCP networking is generally suitable, however larger networks with managed operations will often determine each device needs to have a dedicated and static IP address.
DHCP IP address
DHCP is set as the network configuration by default for Mini.
Static IP address
To enable a static IP address, change configuration method to static and fill in the details required in Address, Mask and Gateway. Particular attention should be paid to the Address and Mask fields as incorrect information entered will result in device not being visible on the network and a factory reset will be required in order to recover the unit.
IP address recovery
In the event that the device is not visible on the network, the network has changed, or the static IP address details have been lost, reset the BirdDog back to its default settings by following the factory reset procedure.
BirdDog name You can name each unit with a friendly name that makes sense for each production (Camera 1, Camera 2, etc). This name will appear on any NDI receiver when it looks for video coming from Mini over the network. The name must not include any special characters and can be any combination of ‘a-z, 1-0, and –‘.
Note: no uppercase characters are valid.
On NDI receiving devices, the device will present as a source as follows:birddog-name [HDMI] when the unit is set to automatic input.
SYSTEM
System update
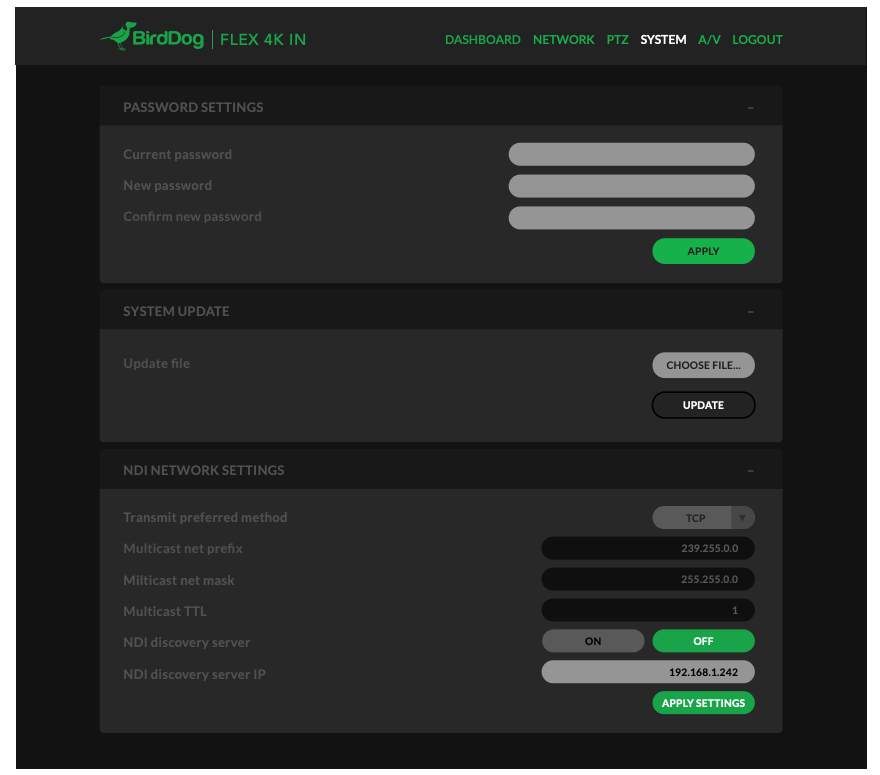
The converter is updateable via the web interface. Please check the below address regularly to ensure you have the latest firmware available for your device.
Having the latest firmware ensures you have all the latest features and performance updates to get the most out of Flex 4K Converters:
bird-dog.tv/firmware-updates
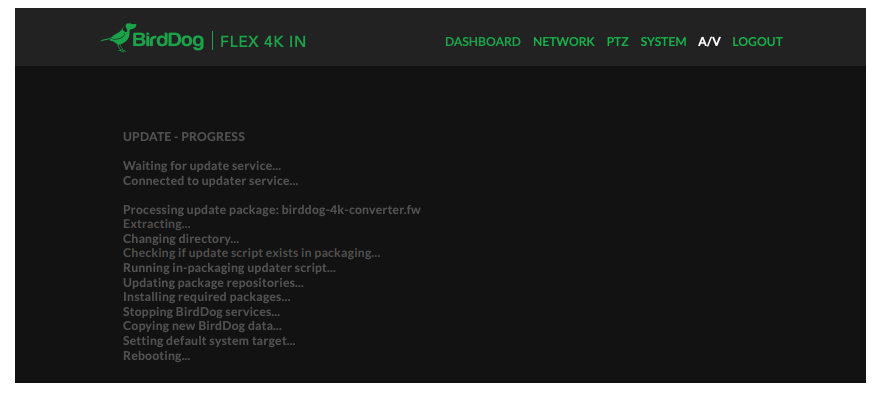
After downloading the latest firmware release, navigate to the settings tab on the web configuration console and click on Choose file… select the firmware update file and press the update button.
NDI NETWORK SETTINGS
Transmit Preferred Method
TCP
TCP is the default transmission method for NDI, it operates well within local networks with predictable latency and limited jitter. BirdDog recommends that TCP be used for typical applications, and only using alternative transports for specific reasons.
UDP
UDP is recommended for networks where there is extended latency from one end to the other. The nature of UDP means that it does not need to receive a confirmation of each packet being received successfully – vastly improving performance on distance WANs. UDP can have some consequences f there are other issues on the network such as jitter or lost packets as it will not inherently re-sent a lost packet.
Multicast
Multicast is especially useful for use-cases that require a single source to be received on multiple receivers simultaneously. Utilising Muliticast offloads the distribution of the NDI A/V packets from the BirdDog Flex 4K to the network infrastructure. You should take care to ensure your network is specifically configured to support Multicast as using it on an ill-prepared network can create unintended network problems.
MultiTCP
MultiTCP is a new NDI transport method that allows users to send NDI video over poor network topography such as WAN (Wide Area Networks) without experiencing issues such as packet loss and lost frames. In the past in order to send NDI video over a WAN the UDP transport was the only option available. UDP solved some issues of WAN applications by allowing the NDI video to travel without dropping masses of frames but results in dropped packets being missed which could cause unstable video. UDP also places more performance demands on devices sending and receiving the signal.
MultiTCP employs a new method of sending TCP packets whereby it opens a mass of TCP connections over the WAN and uses them in a ‘round robin’ manner, this allows each individual TCP connection enough time to acknowledge the receiving packet, confirm nothing is lost and prepare for the next one before it’s sent the next TCP packet in the round robin. This is similar to a RAID setup in traditional storage.
PTZ
PTZ Control
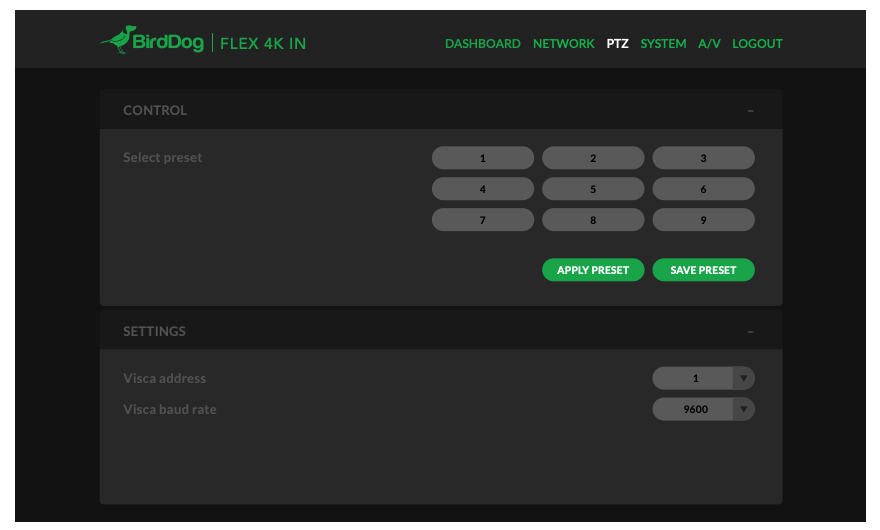
BirdDog Flex 4K and Flex 4K Backpack can control external PTZ cameras via Sony VISCA protocol operating via an RS-232 serial port control cable (sold separately).
When this cable is connected the settings in the PTZ control setting allow you to recall and save presets.
Under settings, please set your cameras VISCA address and Baud Rate accordingly.
Once these settings are correct you can control your external PTZ camera within any PTZ-aware NDI control application as if it was a native NDI PTZ camera.
OPERATION
Factory resetting your unit
If you have lost any network settings or cannot find your Birddog Flex device on the network, you can perform a network factory reset.
Simply depress the reset button located next to the RS-232 port for 5 seconds until the Halo tally illuminates flashing red. The unit will be accessible as per factory settings approximately 10 second later.
RECEIVING NDI STREAMS
There are many applications that support receiving the NDI signal that the unit produces. Each application will vary slightly on how you choose your source.
NewTek Studio Monitor
NewTek provide a free Studio Monitor application that allows you to monitor many NDI sources on a standard Windows computer. Once Studio Monitor is launched on your computer, simply right click anywhere in the interface and select your device from the drop-down list.
Once connected to the unit you will notice a configuration cog appears on the bottom right-hand side of the video display, this is a shortcut to access the device web configuration panel.
NewTek TriCaster Series
NewTek TriCaster series devices allow several NDI sources to be received simultaneously, the amount of simultaneous connections varies by what model TriCaster you have. Consult your TriCaster user manual to determine how many connections are available on your device.
To select 4K converter as a source on your TriCaster, simply click on the configuration cog below your desired source location, this will bring up the Input Setting dialog, select from the drop-down list your device source.Once connected to the unit you will notice a configuration cog appears next to the source drop down window, this is a shortcut to access the device web configuration panel.
bird-dog.tv
References
[xyz-ips snippet=”download-snippet”]

