Bissell 2685 Series Power Steamer Heavy Duty Steam MOP
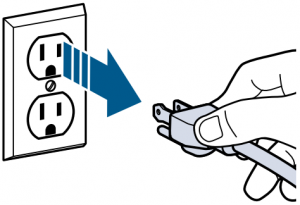
READ ALL INSTRUCTIONS BEFORE USING YOUR STEAM MOP.When using an electrical appliance, basic precautions should be observed, including the following:Always connect to a polarized outlet (left slot is wider than right). Unplug from outlet when not in use and before conducting maintenance.
![]() WARNING: TO REDUCE THE RISK OF FIRE, ELECTRIC SHOCK OR INJURY:
WARNING: TO REDUCE THE RISK OF FIRE, ELECTRIC SHOCK OR INJURY:
- This appliance can be used by children 8 years old and above, and persons with reduced physical, sensory and mental capabilities or lack of experience and knowledge if they have been given supervision or instruction concerning use of the appliance in a safe way and understand the hazards involved. Cleaning and user maintenance shall not be made by children without supervision.
- Children should be supervised to ensure that they do not play with the appliance.
- If the cord is damaged, it must be replaced by the manufacturer, its service agent or similarly qualified persons in order to avoid a hazard.
- Use extra care when cleaning on stairs.
- Do not use with damaged cord or plug.
- Do not expose this product to rain or moisture. Store indoors when not in use.
- Always turn OFF this appliance before connecting or disconnecting the nozzle. Do not direct steam at people, animals, or at electrical outlets.
- Unplug from outlet when not in use and before conducting maintenance or troubleshooting.
- Do not leave steam cleaner unattended.
- Do not expose hair, loose clothing, fingers or body parts to openings or moving parts.
- Do not service steam cleaner when it is plugged in.
- Do not handle steam cleaner with wet hands.
- Do not use steam cleaner if it has been dropped, damaged, left outdoors or dropped into water, return it to a service center.
- Do not pull or carry by cord, use cord as a handle, close door on cord, pull cord around sharp corners or edges, or expose cord to heated surfaces.
- Do not unplug by pulling on cord.
- Do not use appliance in an enclosed space filled with vapor given off by oil-based paint, paint thinner, some moth-proofing substances, flammable dust, or other explosive or toxic vapors.
- Do not allow to be used as a toy.
- Do not use on leather, wax polished furniture or floors, synthetic fabrics, velvet or other delicate, steam sensitive materials.
- Do not immerse in water or liquid.
- Not for space heating purposes.
- Do not use for any purpose other than described in this user guide.
- Use only manufacturer’s recommended attachments– use of attachments not provided or sold by BISSELL® may cause fire, electric shock or injury.
- Never put descaling, aromatic, alcoholic, detergent or vinegar products into the steam cleaner, as this may damage it or make it unsafe for use.
- Unplug by grasping the plug, not the cord.
- Close attention is necessary when used by or near children.
- Keep the appliance out of reach of children when it is energized or cooling down.
- The foot surfaces are liable to get hot during use.
- Do not open the aperture during use.
- Extension cords (or longer detachable power-supply cords) are available and may be used if care is exercised in their use.
- If an extension cord (or a long detachable power-supply cord) is used:1. The marked electrical rating of the detachable power supply cord or extension cord should be at least as great as the electrical rating of the appliance.2. If the appliance is of the grounded type, the extension cord should be a grounding-type 3-wire cord.3. The longer cord should be arranged so that it will not drape over the countertop or tabletop where it can be tripped over, snagged, or pulled on unintentionally (especially by children).
- Plastic film can be dangerous. To avoid danger of suffocation, keep away from children.
- To reduce the risk of a leaking condition, do not store where freezing may occur. Damage to internal components may result.
- Keep appliance on a level surface.
- Always connect to a properly earthed electrical socket. Do not modify earthed plug.
![]() WARNING: Surface may be hot. Avoid contact.
WARNING: Surface may be hot. Avoid contact.
![]() HESE SYMBOLS MEAN WARNING: Any use of steam has the potential danger of scalding.
HESE SYMBOLS MEAN WARNING: Any use of steam has the potential danger of scalding.
SAVE THESE INSTRUCTIONS FOR FUTURE USEThis model is for household use only. Commercial use of this unit voids the manufacturer’s warranty
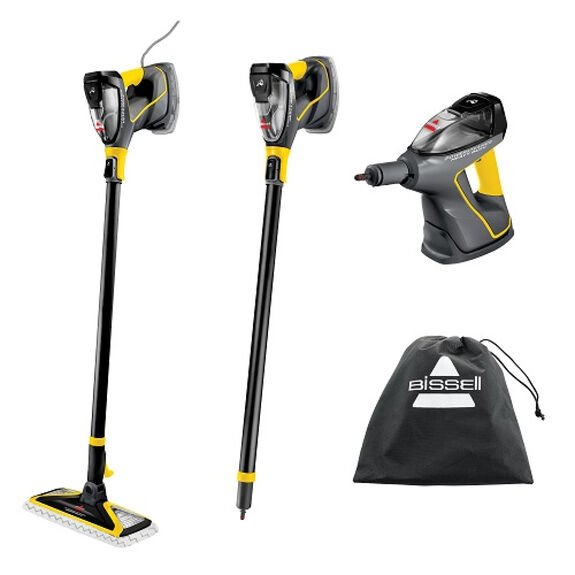
What’s In The Box?
Product View
- SmartSet Steam Control
- Easy Fill Water Tank
- Handheld Pod Release Button
- Power Cord with Wrap Strap
- Extension Wand
- Handheld Pod
- Steam Trigger
- Wall Mount Storage Clip Area
- Extension Wand Release Pedal
- Mop Pad Foot
- Wall Mount
- Tool Box

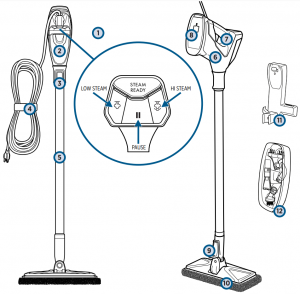
NOTE: Tool Box stores Black Bristle Brush, Angle Concentrator Tool, Grout Tool, and Flat Scraper Tool.
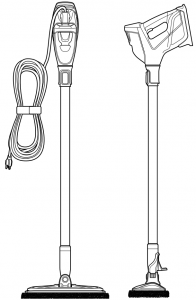
Assembly
![]() WARNING: Do not plug in your PowerSteamer® Heavy Duty Steam Mop until you are familiar with all instructions and operating procedures.
WARNING: Do not plug in your PowerSteamer® Heavy Duty Steam Mop until you are familiar with all instructions and operating procedures.
Your BISSELL® PowerSteamer® Heavy Duty Steam Mop assembles quickly and easily . It is packaged with the following items:
- Handheld Pod
- Extension Wand
- Mop Pad Foot
- Attach the Extension Wand to the Mop Pad Foot by snapping it into place.
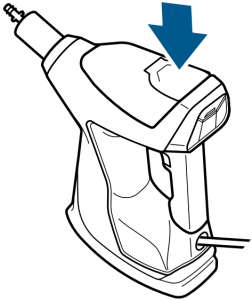
- Then, insert the Handheld Pod to the Extension Wand until it clicks into place.
- Attach the Tool Box to the Handheld Pod by aligning the clip on the back side of the Tool Box to the opening on the bottom of the Handheld Pod and slide down into place.
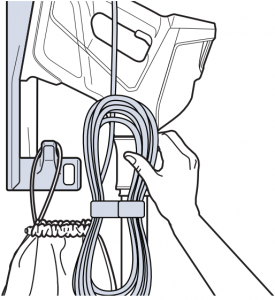
- Wrap the cord around the palm of your hand into a circle . Then, place the wrap strap around the cord and back onto itself to secure.


NOTE: For instructions on attaching the Wall Mount and Storage, check down below .
Operations
Filling Your Water Tank
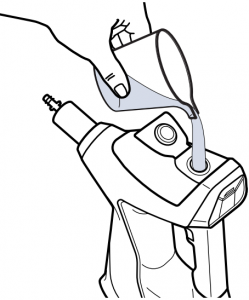
- The Clean Water Tank is located on the top of the Handheld Pod.
- Pull the water tank cap straight up to open.
- Use Water Cup provided and fill with distilled or demineralized water (recommended in place of tap water).Close the water tank cap after filling.
A few notes about filling the Easy Fill Water Tank:
- The tank’s capacity is 350 mL (12 oz).
- Do not use chemicals in the Easy Fill Water Tank of your PowerSteamer® Heavy Duty Steam Mop. Other solutions may harm the machine and void the warranty.
NOTE: Use of distilled water or demineralized water is recommended to prolong the life of your steam mop. To add a fresh scent as you clean, try BISSELL® demineralized waters in various scents like Citrus, Eucalyptus Mint and Spring Breeze.
Attaching Microfiber Mop Pads
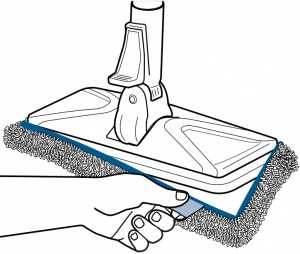
- Your PowerSteamer® Heavy Duty Steam Mop comes with two Scrubby Mop Pads to clean sealed hard floor surfaces.
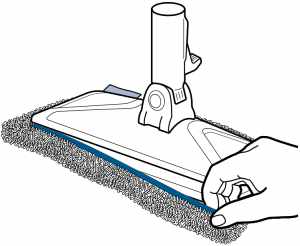
- To attach mop pad, wrap pad around the bottom of the foot, making sure the gray stitching is located on the front of the foot and the quick grip release tab is located on the back.

Using SmartSet Steam Control
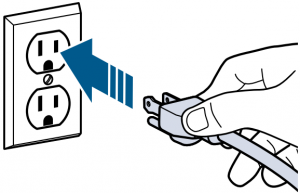
- Plug machine into a properly grounded outlet.
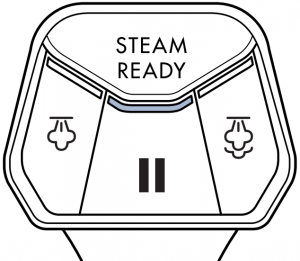
- When the unit is plugged in the STEAM READY light will start to blink.
- After 30 seconds, the STEAM READY light will turn to a solid light. This means the steam mop is heated and ready to use.
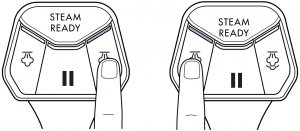
- Now, select a desired steam level based on your cleaning needs.Push the HI STEAM button once to turn ON. Use HI STEAM when cleaning durable surfaces, tough stains and stuck-on or sticky messes.Push the LOW STEAM button once to turn ON. Use LOW STEAM for cleaning more delicate surfaces and lighter, everyday messes.
- To turn steam OFF, press the PAUSE button once.

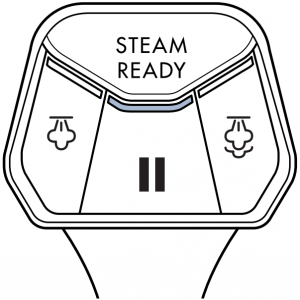

NOTE: You must wait until the STEAM READY light is a solid color before selecting your desired steam level. Upon the first use of your steam mop or first use after refilling the Easy Fill Water Tank, the pump may make a “knocking” sound. This is normal and will diminish after a few seconds.
Cleaning Hard Floors
NOTE: Before you clean, thoroughly sweep or vacuum floor prior to cleaning with the PowerSteamer® Heavy Duty Steam Mop.Your steam mop is designed to clean hard flooring such as ceramic tile, laminate, marble, stone, and sealed hardwood floors. Use of your steam mop on waxed or some unwaxed floors may result in a diminished glossiness. The steam mop is not for use on unsealed floors. For best results, test in an inconspicuous area and check the care instructions from your flooring manufacturer.
- Plug machine into a properly grounded outlet.
- Make sure the STEAM READY light is solid before selecting the appropriate steam level based on your hard floor cleaning needs.
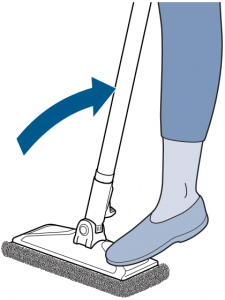
- Step on the side of the foot to recline the body of the machine to begin cleaning.NOTE: Your Steam Mop may have already come assembled with a mop pad on the foot. If not, refer to instructions above in the “Attaching Microfiber Mop Pads” section to learn how to attach the mop pad.
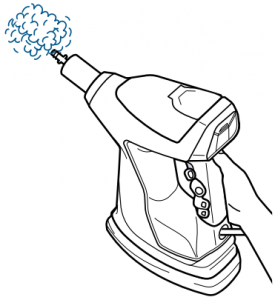
- Push the Steam Trigger underneath the handle of the Handheld Pod to release steam.
- To easily maneuver and clean tight spaces, take advantage of the swivel steering.
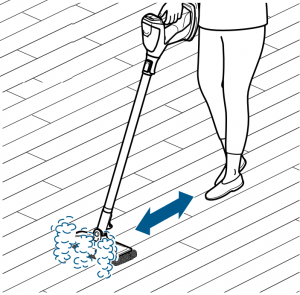
- For best results to sanitize an area of your floor, use the microfiber mop pads and slowly and evenly move your steam mop back and forth at least three times over the area using continuous steam. Remove the pad after use and wash.
- When finished cleaning, turn OFF the machine by pressing the PAUSE button and unplugging the unit.
 NOTE: Your Steam Mop may have already come assembled with a mop pad on the foot. If not, refer to instructions above in the “Attaching Microfiber Mop Pads” section to learn how to attach the mop pad.
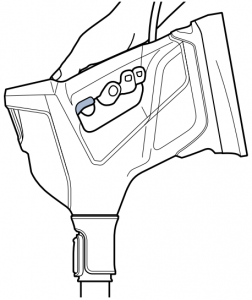


Cleaning with Accessories
 Before changing from mopping to the handheld feature or disconnecting a tool from the Handheld Pod or Extension Wand, make sure steam is no longer coming from the nozzle by releasing the trigger and pressing the PAUSE button.
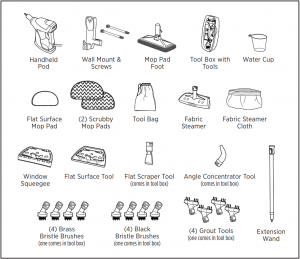
Choose Your Desired Tool
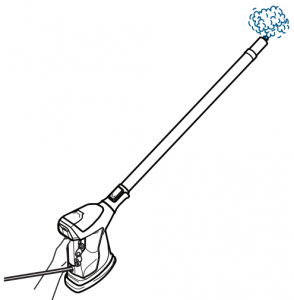
Extension WandConnects to the Handheld Pod. Use with the Mop Pad Foot to clean sealed hard floor surfaces or with attachments to clean high, low and hard-to-reach areas.![]()
Mop Pad FootConnects to the Extension Wand.Use with the Scrubby Mop Pad to clean sealed hard floor surfaces.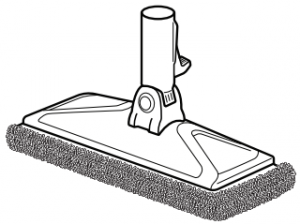
Scrubby Mop PadAttaches to the Mop Pad Foot. Made of microfiber material and machine washable.
Flat Surface Mop PadAttaches to the Flat Surface Tool. Machine washable.
Black Bristle BrushConnects to the Extension Wand or Handheld Pod. Provides scrubbing power.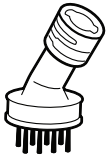
Brass Bristle BrushConnects to the Extension Wand or Handheld Pod. Provides heavy duty scrubbing power on durable surfaces.
Grout ToolConnects to the Extension Wand or Handheld Pod. Provides focused scrubbing power for grout.
Flat Scraper ToolConnects to the Extension Wand or Handheld Pod. Use to scrape off stuck-on messes.
Angle Concentrator ToolConnects to the Extension Wand or Handheld Pod.Designed to focus steam in odd angles or areas.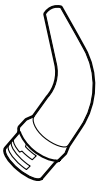
Fabric Steamer and ClothConnects to the Extension Wand or Handheld Pod. Use with the Fabric Steamer Cloth to clean and refresh clothing, drapes and upholstered surfaces. Fabric Steamer Cloth is machine washable.
Flat Surface ToolConnects to the Extension Wand or Handheld Pod. Attaches to the Fabric Steamer (no Fabric Steamer Cloth attached). Use with the Flat Surface Mop Pad to clean large, flat surfaces.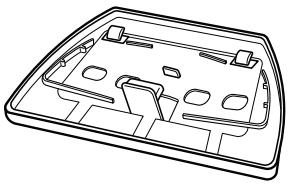
Window SqueegeeConnects to the Extension Wand or Handheld Pod. Attaches to the Fabric Steamer (no Fabric Steamer Cloth attached). Use to clean windows, glass and mirrors.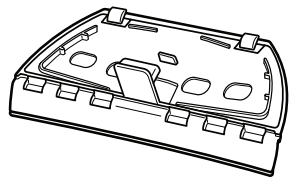
*Test in a small, hidden area before use to ensure the surface with not damage with heavy duty scrubbing. If surface is not durable enough, do not use.
Cleaning with the Extension Wand
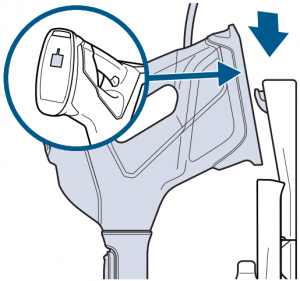
- To clean using the Extension Wand, step down on the pedal located on the back of the steam mop and lift up to release the wand.
- Cleaning Without Tools:Be sure the desired steam setting is selected, then push the trigger under the handle of the Handheld Pod to release steam.
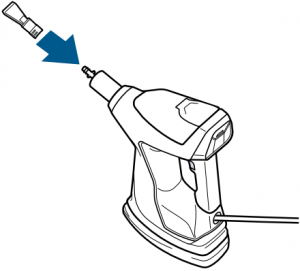
- Cleaning With Tools:Attach desired tool to the end of the Extension Wand to clean above floor surfaces and hard-to-reach areas such as ceilings, showers, baseboards, and sliding door tracks.
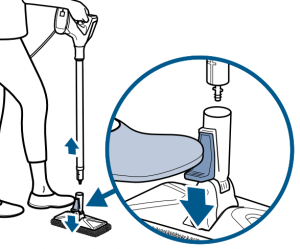

NOTE: Do not step on the back pedal to recline the unit. When removing the Extension Wand from the foot, lift away from your body as the bottom of the wand may release steam.
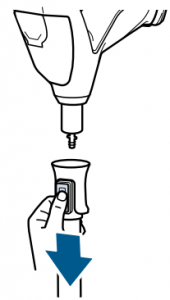
Cleaning as a Handheld Steamer
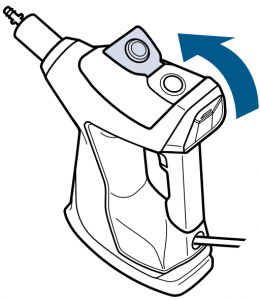
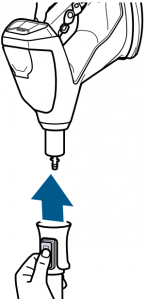
- To convert the steam mop into a handheld steamer, push the release button on the top of the Extension Wand and lift up to detach the Handheld Pod from the Extension Wand.
- Cleaning Without Tools:Push the trigger located under the handle of the Handheld Pod to release steam from the end of the Handheld Pod.
- Cleaning With Tools:Make sure steam is no longer coming from the nozzle by releasing the trigger and pressing the pause button. Then connect the desired tool.
Removing Tools
- When finished cleaning, turn OFF the machine by pressing the PAUSE button and unplugging the unit.
- Wait for the steam to stop, then remove tools from the Extension Wand and/or Handheld Pod before reassembling your machine.
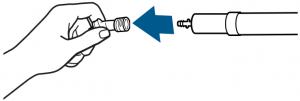

CAUTION: Let steam cool down before removing tools. The end of the Extension Wand or Handheld Pod will be hot.
Maintenance & Care
Cleaning Your Steam Mop
![]() WARNING: To reduce the risk of fire, electric shock or injury, turn power OFF and disconnect plug from electrical outlet before performing maintenance or troubleshooting.
WARNING: To reduce the risk of fire, electric shock or injury, turn power OFF and disconnect plug from electrical outlet before performing maintenance or troubleshooting.
- Turn machine OFF and unplug from the grounded outlet.
- Carefully remove mop pad using the quick grip release tab from the mop head.NOTE: Mop pad and lower assembly may be hot.
- Mop pads can be machine washed in warm water. Use only nonbleach liquid detergents.Do not use fabric softeners or bleach. For best results, air dry.
- Wrap the cord around the palm of your hand into a circle. Then, place the wrap strap around the cord and back onto itself to secure.
- Store in a protected, dry area on the secured wall mount. Store with dry pads as wet mop pads may damage wood and other delicate hard floors.

 NOTE: Mop pad and lower assembly may be hot.
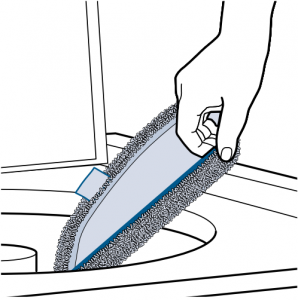

NOTE: Unit does not stand up on its own. If you are not using the Wall Mount, make sure your steam mop is stored in a safe place, in the upright position against a firm surface to prevent from falling over.
Setting Up the Wall Mount
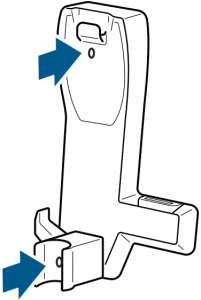
A Phillips-head Screwdriver is needed to install the Wall Mount . If installing onto drywall, use plastic anchors with provided screws. ![]()
- Place the Wall Mount against the wall in the area where you would like to store your machine
- Place each screw through the two holes in the wall mount . Use a screwdriver or drill to attach to the wall
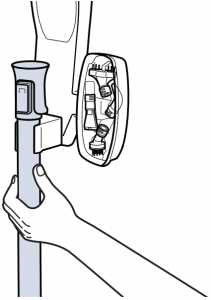
- Find the clip on the back of the Tool Box and hook it into the right side of the Wall Mount


Using the Wall Mount Storage
Your BISSELL® PowerSteamer® Heavy Duty Steam Mop can be stored in 2 different ways using the Wall Mount.
OPTION 1:
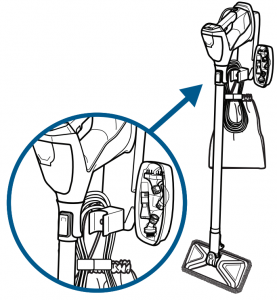
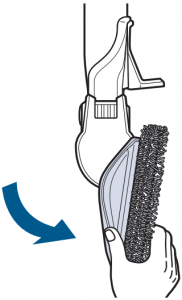
- Find the opening on the back of the Handheld Pod and hook it onto the top lip of the Wall Mount.
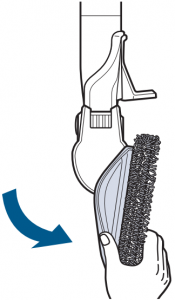
- Bend the Mop Pad Foot downward in a slanted position.
- Hang the power cord and Tool Bag on the left-side hook.
OPTION 2:
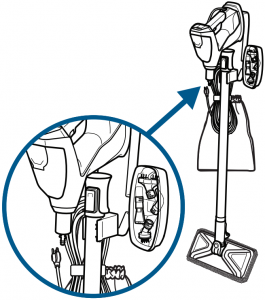
- Detach the Extension Wand from Handheld Pod.
- Clip the Extension Wand into the holder.
- Bend the Mop Pad Foot downward in a slanted position.
- Find the opening on the back of the Handheld Pod and hook it onto the top lip of the Wall Mount.
- Hang the power cord and Tool Bag on the left side hook

Troubleshooting
| Problem | Possible causes | Remedies |
|
Reduced steam OR no steam |
Easy Fill Water Tank empty. | Refill tank. |
| Steam level not selected. | Select steam level by pushing steam level button. | |
| Wand not installed properly. | Push the wand all the way into the Handheld Pod until you hear a click. | |
| Foot not installed properly. | Insert the Extension Wand into foot until you hear a click. | |
| PAUSE button is pressed. | Once STEAM READY light is solid, select desired steam level (HI or LO) then push the trigger under the handle of the Handheld Pod to release steam. | |
|
Streaking |
Dirty mop pad. | Remove and wash pad per instructions. |
| Use on waxed or oiled floor. | If you have used floor polishes or wax on your floors, steam products may decrease glossiness. Refer to the wax or polish manufacturer. If you don’t wax or polish your floors, check the floorcare instructions from your flooring manufacturer. | |
|
Leaking |
Mop pad is too wet. | Remove and replace with dry mop pad and intermittently press the steam trigger for less steam. |
| Steam level is too high. | Lower the steam level. | |
| Crack in unit or Easy Fill Water Tank. | Check to see if there are any cracks on the unit or tank and check to make sure the rubber gasket on the tank is still attached and seated properly in the unit. | |
|
Knocking noise |
First use or Easy Fill Water Tank is empty. | Fill tank and knocking will diminish after a few seconds. |
| Metal tube cannot reach water. | Shake the pod to let the tube reach the water level. |
Warranty
This warranty gives you specific legal rights, and you may also have other rights which may vary from state to state. If you need additional instruction regarding this warranty or have questions regarding what it may cover, please contact BISSELL Consumer Care by E-mail or telephone as described below.
It may be necessary to obtain some of your personal information, such as a mailing address, to fulfill terms of this warranty. Any personal data will be handled pursuant to BISSELL’s Privacy Policy, which can be found online at www.BISSELL.com/privacy-policy.
Limited Two-Year WarrantySubject to the *Exceptions and Exclusions from the Terms of the Limited Warranty, upon receipt of the product BISSELL will repair or replace (with new, refurbished, lightly used, or remanufactured components or products), at BISSELL’s option, free of charge from the date of purchase by the original purchaser, for two years, any defective or malfunctioning part.
See information below on “If your BISSELL product should require service”.
This warranty applies to product used for personal, and not commercial or rental, service. This warranty does not apply to fans or routine maintenance components such as filters, belts or brushes. Damage or malfunction caused by negligence, abuse, neglect, unauthorized repair, or any other use not in accordance with the user guide is not covered. This warranty will only be valid if the product is used in the same country in which it was sold.
BISSELL is not liable for incidental or consequential damages of any nature associated with the use of this product.BISSELL’s liability will not exceed the purchase price of the product.
Some states do not allow the exclusion or limitation of incidental or consequential damages, so the above limitation or exclusion may not apply to you.
*Exceptions and Exclusions from the Terms of the Limited WarrantyThis warranty is exclusive and in lieu of any other warranties, either oral or written. Any implied warranties, which may arise by operation of law, including the implied warranties of merchantability and fitness for a particular purpose, are limited to the two-year duration from the date of purchase as described above.Some states do not allow limitations on how long an implied warranty lasts, so the above limitation may not apply to you.
NOTE: Please keep your original sales receipt. It provides proof of date of purchase in the event of a warranty claim.
Service
Please do not return this product to the store.Other maintenance or service not included in the manual should be performed by an authorized service representative.
If your BISSELL® product should require service:Contact BISSELL Consumer Care to locate a BISSELL Authorized Service Center in your area. If you need information about repairs or replacement parts, or if you have questions about your warranty, contact BISSELL Consumer Care.
Website:www.BISSELL.com/service-centers
E-mail:www.BISSELL.com/email-us
Call:BISSELL Consumer Care 1-800-237-7691
Bissell 2685 Series Power Steamer Heavy Duty Steam MOP User Guide – Bissell 2685 Series Power Steamer Heavy Duty Steam MOP User Guide –
[xyz-ips snippet=”download-snippet”]