
CLEANVIEW® CONNECT
ROBOTIC VACUUMMODEL 2908F
More of a video person?Find additional resources like tips and troubleshooting, videos, product registration, parts, and more on the BISSELL Connect App.
IMPORTANT SAFETY INSTRUCTIONS
WARNING Read all safety warnings and instructions before using this robotic vacuum cleaner. Failure to follow the warnings and instructions may result in electric shock, fire and/or serious injury.
![]() WARNING
WARNING
TO REDUCE THE RISK OF FIRE, ELECTRIC SHOCK OR INJURY:
» Do not use outdoors or on wet surfaces.» Do not allow to be used as a toy. Close attention is necessary when used by or near children. Battery pack usage by children should be supervised.» Do not use for any purpose other than described in this user guide. Use only manufacturer’s recommended attachments.» Do not charge with damaged docking station or plug. If appliance is not working as it should, has been dropped, damaged, left outdoors, or dropped into water, have it repaired by a qualified technician.» Do not close a door on cord or plug, or pull cord or plug around sharp edges or corners. Do not run appliance over cord or plug. Keep plug and docking station (including the charger) away from heated surfaces.» Do not unplug by pulling on cord. To unplug, grasp the charger, not the cord.» Do not handle charger, contact points, docking station, or robotic vacuum cleaner with wet hands.» Do not put any object into openings. Do not use with any opening blocked; keep openings free of dust, lint, hair, and anything that may reduce air flow.» Keep hair, loose clothing, fingers, and all parts of body away from openings and moving parts.» Do not use to pick up flammable or combustible materials (lighter fluid, gasoline, kerosene, etc.) or use in areas where they may be present.» Do not use in an enclosed space filled with vapors given off by oil-based paint, paint thinner, some moth-proofing substances, flammable dust, or other explosive or toxic vapors.» Do not use to pick up toxic material (chlorine bleach, ammonia, drain cleaner, etc.).» Do not pick up anything that is burning or smoking, such as cigarettes, matches or hot ashes.» Do not use without filter in place.» Keep appliance on a level surface.» Do not carry the robotic vacuum cleaner while it is running.» Remove the cords from other corded products out of the area to be cleaned.» Do not operate the vacuum in a room where an infant or child is sleeping.» Do not operate the vacuum in an area where there are lit candles or fragile objects on the floor.» Do not operate the vacuum in a room that has lit candles and/or fragile objects on furniture that the vacuum may accidentally hit or bump.» Do not allow children to sit on the vacuum.» Prevent unintentional starting. Ensure the ON/OFF switch is in the OFF position before connecting to battery pack, picking up or carrying the appliance. Do not carry the appliance with your finger on the switch.» Turn OFF all controls, including the power switch and disconnect charger from electrical outlet before making any adjustments, performing maintenance, troubleshooting, changing accessories or storing appliance. Such preventive safety measures reduce the risk of starting the appliance accidentally.» Recharge only with the charger specified by the manufacturer. A charger that is suitable for one type of battery pack may create a risk of fire when used with another battery pack.» Do not use any battery pack which is not designed for use with the vacuum. Use of any other battery packs may create a risk of injury and fire.» Remove the battery pack from the equipment when not in use. Do not short-circuit battery pack. Do not store haphazardly in a box or drawer where they may be short-circuited by other metal objects. Shorting the battery terminals together may cause burns or a fire.» Under abusive conditions, liquid may be ejected from the battery; avoid contact. If contact accidentally occurs, flush with water. If liquid contacts eyes, additionally seek medical help. Liquid ejected from the battery may cause irritation or burns.» Do not use a battery pack or appliance that is damaged or modified. Damaged or modified batteries may exhibit unpredictable behavior resulting in fire, explosion or risk of injury.» Do not expose a battery pack or appliance to fire or excessive temperature. Exposure to fire or temperature above 130° C may cause explosion.» For use only with charger model GSCU0600S019V12E/SAW12-190-0600UD or ZD012M190060US.» For use only with battery pack model INR18650 M26-4S1P.» Have servicing performed by a qualified repair person using only identical replacement parts. This will ensure that the safety of the product is maintained.» Do not modify or attempt to repair the appliance or the battery pack.» Do not charge the machine outdoors.» Do not position docking station near stairs or cliff edges.» Follow all charging instructions. Keep the temperature range between 40-104°F when charging battery, storing machine or during use. Charging improperly or at temperatures outside of the specified range may damage the battery and increase the risk of fire.» Do not incinerate the appliance even if it is severely damaged. The batteries can explode in a fire. Do not dismantle, open or shred battery pack. Do not subject battery pack to mechanical shock. Dispose of used batteries promptly and properly.» Do not remove battery pack from its original packaging until required for use.» Do not pick up hard or sharp objects such as glass, nails, screws, coins, etc.» This product contains a wireless device. Refer to website for regulatory information.» Observe the plus (+) and minus (–) marks on the battery pack and equipment and ensure correct use.» Seek medical advice immediately if battery pack or parts of the battery pack has been swallowed.» Wipe the battery terminals with a clean dry cloth if they become dirty.» Do not leave battery pack on prolonged charge when not in use.» After extended periods of storage, it may be necessary to charge and discharge the battery pack several times to obtain maximum performance.» Remove the battery pack from the equipment when not in use.» Keep battery pack clean and dry.» Battery pack needs to be charged before use. Refer to the manufacturer’s instructions for proper charging instructions.» Avoid storage in direct sunlight.
SAVE THESE INSTRUCTIONSThis model is for household use only.
IMPORTANT INFORMATION
» Do not plug in your robotic vacuum cleaner UNTIL you are familiar with all instructions and operating procedures.» Plastic film can be dangerous. To avoid danger of suffocation, keep away from children.
Thanks for buying a BISSELL® CleanView® Connect Robotic Vacuum
We love to clean and we’re excited to share one of our innovative products with you. We want your robotic vacuum to work like new for the years to come, so this guide has tips on how to use, maintain and, if there’s a problem, troubleshoot.
Your robotic vacuum needs a little setup before getting to work, so flip to the “Setting Up Your Robot” section and let’s get started!
What’s in the Box?
 |
|
|
 |
|
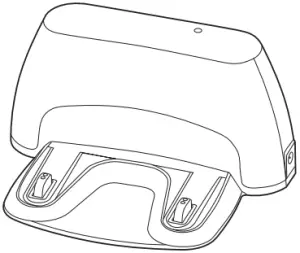
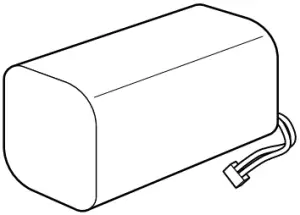
| BISSELL® CleanView® Connect | Docking Station | Power Adapter (charger) | Edge Cleaning Brushes | Rechargeable Li-Ion Battery (pre-installed) |
|
 |
 |
 |
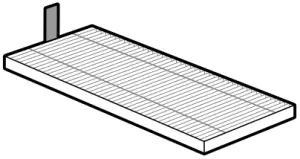
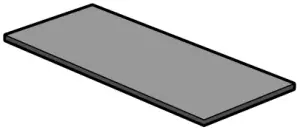
| Dirt Bin (pre-installed) | Pleated Filter | Foam Filter | Cleaning Tool |
Product View
WARNINGDo not plug in your robot until you are familiar with all instructions and operating procedures.
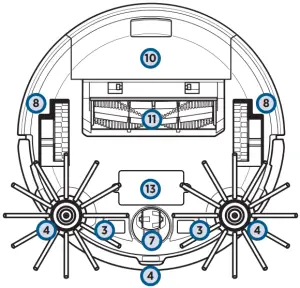
- Power Switch
- Start/Pause Button
- Contact Points (for automatic charging)
- Cliff Sensors
- Bumper
- Edge Cleaning Brushes
- Front Wheel
- Rear Wheels
- Dirt Bin Release Button
- Dirt Bin (filters inside)
- Brush Roll
- DC Port
- Removable Battery
- LED Light Ring
Setting Up Your Robot ![]()
[1]
 Place the back of docking station firmly against a wall. Ensure there are at least 40 inches to one side, 40 inches to the opposing side and no obstructions in front of the docking station.
[2]
Insert the docking station power adapter plug into the port on the side of the docking station and then plug the other end into the wall outlet. Turn the robot’s power switch ON and put on the docking station. The first charge will take 4-5 hours.
Connecting to the App
Downloading the BISSELL Connect App means you can change your robot’s cleaning mode, start, pause, or stop your robot, schedule cleanings, view notifications, track your cleaning history, and troubleshoot all from the palm of your hand.
[1]
In the App or Google Play Store search “BISSELL Connect” and download.
[2]
Once downloaded, open the app and sign in or create a new login.
[3]
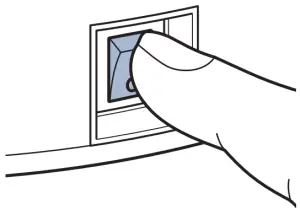 Make sure you’re near your WiFi router before turning the robot ON (I).
[4]
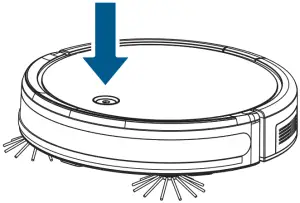 To put the robot in pairing mode, press and hold the start/pause button for 5 seconds until you hear a single beep.
[5]
 From the app, select “Have a BISSELL Connected Product? Connect it now.” Then choose your product from the menu. Note: Be sure the device is near your WiFi router and the robot is fully charged or in the dock during the pairing process.
[6]
The QR code needed for setup can be found by removing the dirt bin and turning the robot over.
[7]
 Once you locate and scan the QR code, follow the instructions in the app to pair.
Manual Cleaning
[1]
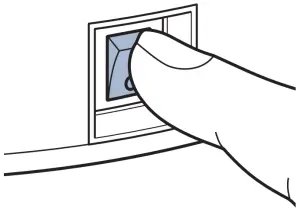 Press the power switch to the ON (I) position.
[2]
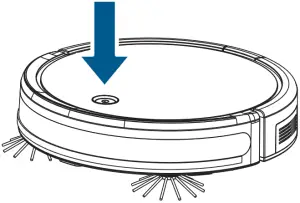 Press the start/pause button on the top of the robot to start cleaning.When finished, press the start/pause button again to stop the robot.
[3]
To return the robot to the dock, press the start/pause button twice. The button will flash white as it finds its way back to the dock.
Automatic Cleaning
You can designate a day and time for your robot to run automatically using the BISSELL Connect App. Once the robot is connected to the app, go to the Schedule tab and follow the on-screen prompts.
Activating Low Power Mode
[1]
Send the robot back to the dock.
[2]
Press and hold the start/pause button for 15 seconds until you hear 2 beeps. Release the button to activate low power mode.
Cleaning the Dirt Bin ![]()
[1]
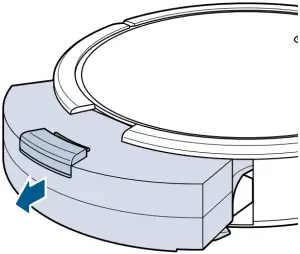 Press the button on top of the dirt bin and pull to remove.
[2]
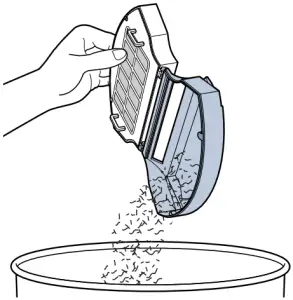 Open filter door by pulling both sides apart. Empty the debris from the dirt bin.
[3]
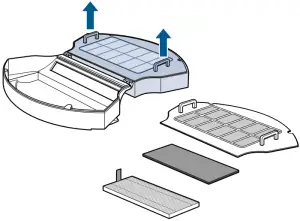 Remove the filter cover, then the foam and pleated filters.
[4]
Use the cleaning tool to brush the filter cover and filters. Do not wash the filters.
[5]
With filters removed, rinse the dirt bin with tap water. Ensure dirt bin is completely dry before reinstalling. It is not necessary to wash every time. Do not machine wash the dirt bin.
[6]
Once clean, reinstall the filters and filter cover, close and push back into the machine.
Cleaning the Brush Roll ![]()
WARNINGTo reduce the risk of electric shock, turn power switch OFF and disconnect plug from electrical outlet before performing maintenance or troubleshooting checks.
[1]
 Pinch the tabs on the brush guard inward and pull to remove.
[2]
Lift to remove the brush roll.
[3]
Clean the brush roll with the cleaning tool.
[4]
 Replace the brush roll and brush guard.NOTE: The brush roll has two different end pieces. Ensure the square-shaped end piece is inserted into the square shaped port.
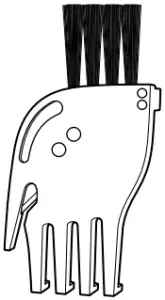
Replacing the Edge Cleaning Brushes ![]()
A Phillips-head screwdriver is required for this task. ![]()
[1]
 Use a Phillips-head screwdriver to remove the screw. Pull up on the base of the brush.
[2]
Push the brush directly onto the holder. Replace the screws with a Phillips-head screwdriver.
NOTE: After being used for a period of time, the Edge Cleaning Brushes need to be cleaned to work more effectively. Once removed, the Edge Cleaning Brushes can be rinsed or soaked in water. Be sure they are completely dry before returning to the machine.
Cleaning the Sensors ![]()
WARNINGTo reduce the risk of electric shock, turn power switch OFF and disconnect plug from electrical outlet before performing maintenance or troubleshooting checks.

After repeated use, debris can accumulate on the sensors of the robot and the robot’s performance could be affected.
To ensure the best efficiency, the sensors should be cleaned off periodically by brushing any debris from them.
Before cleaning the sensors, ensure the power switch on the robot is in the OFF (O) position.
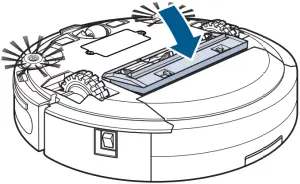
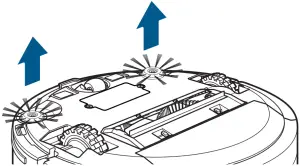
Replacing the Battery
A Phillips-head screwdriver is required for this task. ![]()
DO NOT REMOVE THE PLASTIC SHRINK SLEEVE FROM THE BATTERY PACK.
[1]
 Turn the power switch OFF. Use a Phillips-head screwdriver to remove the two screws and battery cover.
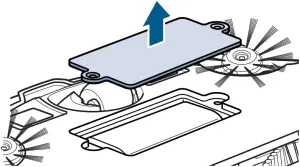
[2]
Remove the battery and disconnect.
[3]
Connect the new battery and install into battery compartment.
[4]
Use a Phillips-head screwdriver to replace the battery cover.
Storing Your Robot
Store your robotic vacuum cleaner safely indoors where it is unlikely to be damaged.
Troubleshooting
This guide has everything you need to get ready for first use, including setting up, using and maintaining your machine, but online you’ll find additional resources like tips and troubleshooting, videos, product registration, parts, and more. For a comprehensive walk through of your product and support tips use the BISSELL Connect App.
Status and Error Notifications
Status Notifications
| Status | Button Light State | Light Ring | Sound |
| Power ON | Pulse Once > Blink > On | Pulse Once | Activation Sound |
| Cleaning | Blink > Fade In > On | Pulse Once > Fade In > 30 seconds > Fade Out | Activation Sound |
| Charging | Breathing | Pulse Once > Breathing for 30 seconds > Off | 1 Beep |
| Pairing Mode | Blink | Off | 1 Beep |
| Paired | On | Solid for 5 Seconds > Fade Out | 3 Beeps |
| Low Battery | Blinking White | Off | 2 Beeps |
Error Notifications
| Error | Button Light State | Sound | Remedies |
| Robot is Trapped, Lifted, or Cliff Sensors are Dirty | Flashing Red | 1 Beep | Place robot on floor away from objects and resume cleaning. If error persists, use a dry cloth to clean the 3 cliff sensors on the bottom of the robot. |
| Front Caster Wheel Sensor is Blocked | Flashing Red | 3 Beeps | Remove front caster wheel assembly, clear debris from assembly housing, reinstall wheel. |
| Left or Right Wheel is Stuck | Flashing Red > Solid Red | 1 Beep | Turn robot OFF and remove hair and debris from wheels. |
| Edge Cleaning Brushes are Stuck | Flashing Red > Solid Red | 2 Beeps | Turn OFF the robot and remove hair and debris from Edge Cleaning Brushes. |
| Brush Roll is Stuck | Flashing Red > Solid Red | 3 Beeps | Turn OFF the robot and remove hair and debris from brush roll. |
| Bumper is Stuck or Robot is Trapped | Flashing White | 2 Beeps | Turn OFF the robot and tap the bumper several times to release any debris that may have accumulated. |
Warranty
This warranty gives you specific legal rights, in addition to rights you may have under the Australian Consumer Law. If you need additional instruction regarding this warranty or have questions regarding what it may cover, please contact your local BISSELL Consumer Care on the details set out below.
It may be necessary to obtain some of your personal information, such as a mailing address, to fulfill terms of this warranty. Any personal data will be handled pursuant to BISSELL’s Privacy Policy, which can be found at global.BISSELL.com/privacy-policy.
BISSELL® One-Year Warranty
Subject to the *conditions identified below, BISSELL will repair or replace (with new, refurbished, lightly used, or remanufactured components or products), at BISSELL’s option, free of charge from the date of purchase by the original purchaser, for one year, any defective or malfunctioning part due to manufacturer defect. This warranty applies to product used for personal purposes, and not commercial or rental service. This warranty does not apply to fans or routine maintenance or consumable components such as filters, belts, brush rolls, etc., damage or malfunction caused by negligence, abuse, neglect, unauthorized repair, or any other use not in accordance with the user guide. BISSELL recommends that the original packaging be kept for the duration of the warranty period in case such need arises within the warranty period that the item needs repacking and transportation.
*CONDITIONS OF WARRANTY
Subject to whether such loss is reasonably foreseeable, BISSELL and its in-country distributors are not liable for incidental or consequential damages of any nature associated with the use of this product.This warranty is in addition to other rights or remedies under law. Nothing in this warranty excludes, limits or modifies any liability of BISSELL which is imposed by law, or limits or modifies any remedy available to the consumer which is granted by law. To make a claim under this warranty contact BISSELL Australia PTY LTD (details below). Contact BISSELL prior to returning any goods. Where agreed, BISSELL will reimburse reasonable postage / handling costs (if any) for returning goods to BISSELL. To claim expenses incurred in making a claim under this warranty please provide BISSELL with a copy of the receipt of the expenses by email or post.
For Australian Consumers Only: Our goods come with guarantees that cannot be excluded under the Australian Consumer Law. You are entitled to a replacement or refund for a major failure and compensation for any other reasonably foreseeable loss or damage. You are also entitled to have the goods repaired or replaced if the goods fail to be of acceptable quality and the failure does not amount to a major failure.
NOTE: Please keep your original sales receipt. It provides proof of the date of purchase in the event of a warranty claim. See warranty for details.
Consumer Care
If your BISSELL product should require service or to claim under our limited warranty, please contact us as follows:AustraliaTelephone: 1300 247 735Website: www.BISSELL.com.auNew ZealandTelephone: 0800 247 735Website: www.BISSELL.co.nz
report this ad©2021 BISSELL Inc. All rights reserved.Part Number 1624721 01/21 RevA
References
[xyz-ips snippet=”download-snippet”]