
ProHeat Pro-Tech™
Thanks for buying a BISSELL ProHeat Pro-Tech
We’re glad you purchased a BISSELL ProHeat Pro-Tech heated formula deep cleaner. Everything we know about floor care went into the design and construction of this complete, high-tech home cleaning system.Your ProHeat Pro-Tech is well made, and we back it with a limited two-year warranty. We also stand behind it with a knowledgeable, dedicated Consumer Services department, so, should you ever have a problem, you’ll receive fast, considerate assistance.My great-grandfather invented the floor sweeper in 1876. Today, BISSELL is a global leader in the design, manufacture, and service of high quality homecare products like your ProHeat Pro-Tech.
IMPORTANT SAFETY INSTRUCTIONS
When using an electrical appliance, basic precautions should be observed, including the following:Read all instructions before using your PROHEAT PRO-TECH.™
To reduce the risk of fire, electric shock, or injury:
- Do not immerse.
- Use only on surfaces moistened by cleaning process.
- Always connect to a properly grounded outlet.
- See Grounding Instructions.
- Unplug from outlet when not in use and before conducting maintenance or troubleshooting.
- Do not leave machine when it is plugged in
- Do not service machine when it is plugged in
- Do not use with damaged cord or plug
- If appliance is not working as it should, has been dropped, damaged, left outdoors, or dropped in to water, have it repaired at an authorized Service Center
- Do not expose to rain, store indoors
- Do not pull or carry by cord, use cord as a han-dle, close door on cord, pull cord around sharp corners or edges, run appliance over cord, or expose cord to heated surfaces
- Do not carry the appliance while in use
- Do not unplug by pulling on cord. Unplug by grasping the plug, not the cord
- Do not handle plug or appliance with wet hands
- Do not put any object into appliance openings, use with blocked opening, or restrict air flow
- Do not pick up hot or burning objects
- Do not pick up flammable or combustible materials (lighter fluid,gasoline,kerosene,etc.) or use in the presence of explosive liquids or vapor
- Do not use appliance in an enclosed space filled with vapors given off by oil base paint,paint thinner, some moth proofing sub stances,flammable dust, or other explosive or toxic vapors
- Do not pick up toxic material (chlorine bleach, ammonia, drain cleaner, gasoline, etc.)
- Do not modify the 3-prong grounded plug
- Do not allow to be used as a toy
- Do not use for any purpose other than described in this User’s Guide
- Do not operate the appliance unless the belt door is securely assembled in the location provided
- Do not expose hair, loose clothing, fingers or body parts to openings or moving parts
- Use only manufacturer’s recommended attachments
- Use only cleaning products formulated by BISSELL for use in this appliance
- Keep openings free of dust, lint, hair, etc.
- Do not point attachment nozzle at people or animals.
- Keep appliance on a level surface
- Turn off all controls before unplugging
- Unplug before attaching the Turbo Brush™
- Be extra careful when cleaning stairs
- Close attention is necessary when used by or near children
SAVE THESE INSTRUCTIONS
THIS MODEL IS FOR HOUSEHOLD USE ONLY. Commercial use of this unit voids the manufacturer’s warranty.
GROUNDING INSTRUCTIONS
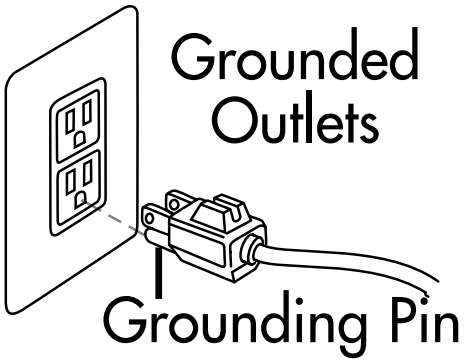
This appliance must be connected to a grounded wiring system. If it should malfunction or break down, grounding provides a safe path of least resistance for electrical current, reducing the risk of electrical shock. The cord for this appliance has an equipment-grounding conductor and a grounding plug. It must only be plugged into an outlet that is properly installed and grounded in accordance with all local codes and ordinances.
WARNING: Improper connection of the equipment-grounding conductor can result in a risk of electrical shock. Check with a qualified electrician or service person if you aren’t sure if the outlet is properly grounded. DO NOT MODIFY THE PLUG. If it will not fit the outlet, have a proper outlet installed by a qualified electrician. This appliance is designed for use on a nominal 120-volt circuit, and has a grounding attachment plug that looks like the plug in the drawing above. Make cer-tain that the appliance is connected to an outlet having the same configuration as the plug. No plug adapter should be used with this appliance.
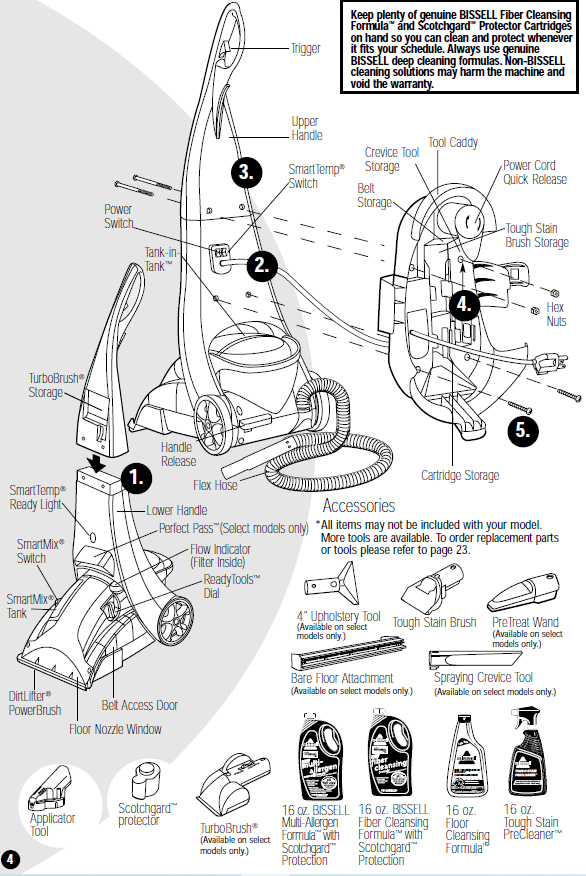
Product View
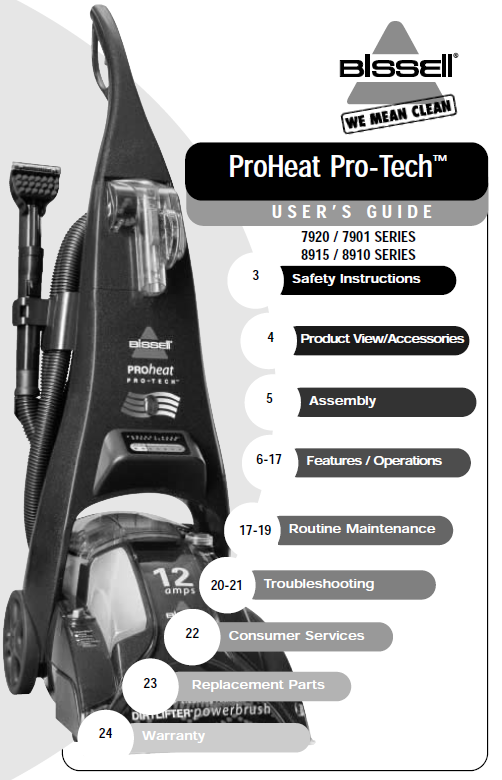
How to use this guide
This User’s Guide has been designed to help you get the utmost satisfaction from your BISSELL ProHeat Pro-Tech. You’ll find assembly and operating instructions, safety precautions, as well as maintenance and troubleshooting instructions. Please read this Guide thoroughly before assembling your deep cleaner.Pay particular attention to the product diagram, assembly instructions, and part names. Locate and organize all parts before assembly. Familiarize yourself with the parts and where they go. Following this User’s Guide will greatly enhance your ability to get the most performance from your BISSELL ProHeat Pro-Tech for many years. Your ProHeat Pro-Tech comes in 3, easy to assemble components.The only tool you will need to assemble your cleaner is a Phillips head screwdriver.
- Upper Handle
- Lower Handle
- Tool Caddy
WARNING: Do Not plug in your cleaner until you have completely assembled it per the following instructions and are familiar with all instructions and operating procedures.
How To Put It Together
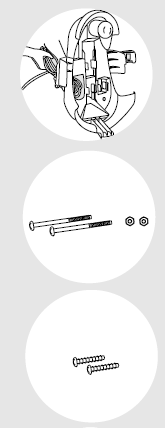
- Slide upper handle onto lower handle.
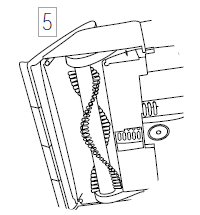
- Feed bundled power cord through Tool Caddy from caddy’s flat side.
- Align upper handle holes and Tool Caddy holes.
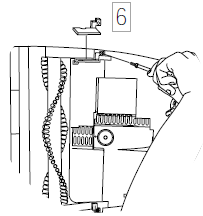
- Place hex nut into back of Tool Caddy and hold in place. Insert bolt from front to back turning into the hex nut until snug. Do not over tighten. Repeat for the second bolt and hex nut.
- Insert 2 screws into lower 2 holes. Turn until snug.
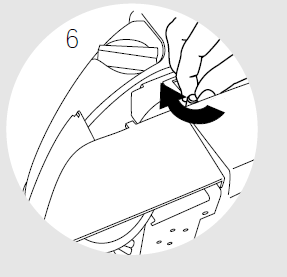
- Snap tools into Storage on the Tool Caddy as shown in figure 6.
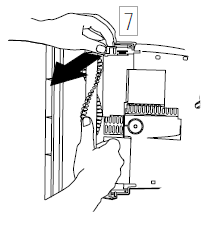
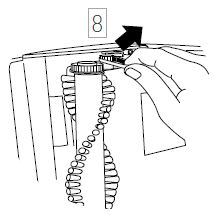
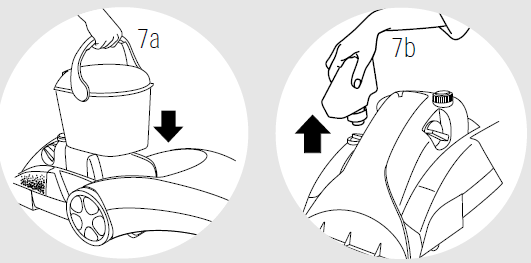
- Wrap Power Cord and Flex Hose as shown in figure 7. ProHeat Pro-Tech assembly is now complete.

Special Features of your BISSELL ProHeat Pro-Tech
The ProHeat Pro-Tech is a home cleaning system that automatically mixes hot tap water with Fiber Cleansing Formula and heats the solution as it is applied to the carpet. The combination of heated cleaning solution, powered brush and suction provide a safe and effective method of cleaning.
SmartTemp®
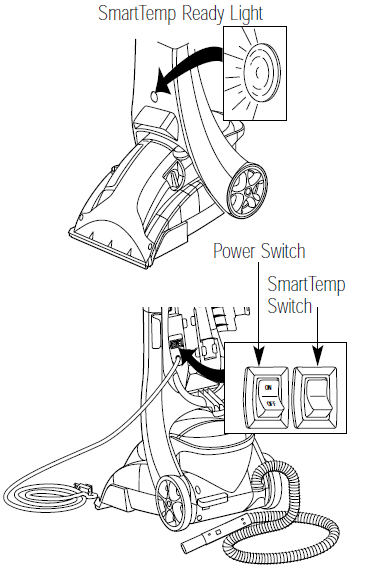
Temperature control automatically heats the cleaning solution as it is being applied to the carpet (*) to safely optimize cleaning effectiveness.
- The Power Switch controls power to the machine; both switches must be ON for SmartTemp to work.
- The SmartTemp Switch is found on the back of the handle next to the Power Switch. You may choose not to use the SmartTemp feature if you are cleaning delicate wool or oriental rugs.
- The SmartTemp Ready Light indicates when the heater is ON. The heater should be turned on two minutes before cleaning, to become fully warmed up and ready to clean. It is found on the front of the handle where it is easy to see while you clean.
- SmartTemp increases the water temperature approximately 25° and will not allow it to exceed 180.°
*SmartTemp heats the cleaning solution for carpet and bare floor application only. It does not heat solution sprayed through the accessory tools.
SmartMix®
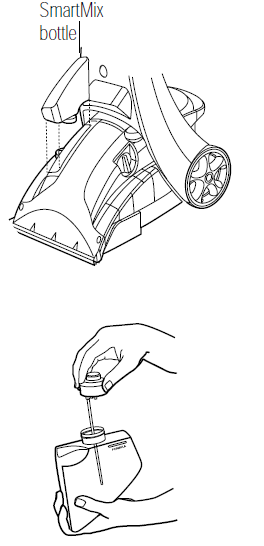
Provides custom control for each cleaning job.
- Lift the SmartMix concentrate bottle up and out of the machine base.
- Turn the bottle over so that the valve cap is in an upward position. Unscrew the valve cap and fill the bottle to the mark with BISSELL Fiber Cleansing Formula.
- Replace the valve cap turning until snug.
- Choose the SmartMix setting that fits the cleaning job.
- Replace SmartMix concentrate bottle.
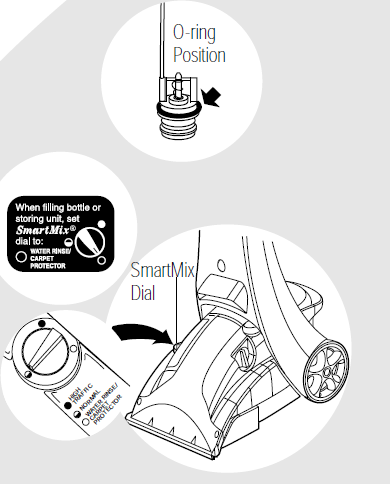
Water Rinse / Carpet Protector – use for gentle cleaning or for the final rinse after cleaning. This setting must also be used when applying the carpet protectant through the applicator, to prevent the pump from temporarily losing its prime.Normal- automatically provides the best mix of water and concentrate for most cleaning jobs.High Traffic- automatically mixes the right amount of water and concentrate to dissolve tough grime and heavy soil. Note: Residual cleaning materials left in carpet from other products may cause excessive foaming when picked up. If foam is overflowing tank, move SmartMix dial to “Water Only” position until the condition stops.Note: Both the SmartMix Bottle and the clean water tank must have liquid in them in order for the machine to spray. If one tank is empty, the machine will temporarily lose its prime and not apply either cleaning solution or water only.
WARNING: To reduce the risk of fire, use only BISSELL Deep Cleaning Formula for full size machines in your ProHeat Pro-Tech. Use of cleaning formulas which contain lemon or pine oil may damage this appliance and voidwarranty. Chemical spot cleaners or solvent based soil removers should not be used. These products may react with the plastic materials used in your ProHeat Pro-Tech, causing cracking or pitting.
DirtLifter® PowerBrush
The powered brush roll at the floor nozzle is designed to enhance cleaning performance. The bristle pattern lifts out the deep down dirt while gently grooming carpet fibers. The floating suspension self-adjusts to all carpet heights and protects your carpet if you leave the power switch ON. When the machine handle is in the fully upright position, Carpet Saver™ automatically raises the brush off the carpet.
Tank-in-Tank™
Our Tank-in-Tank system is designed with a bladder inside for clean water. As you clean, the bladder will empty. Dirty water collects in the tank outside the bladder.
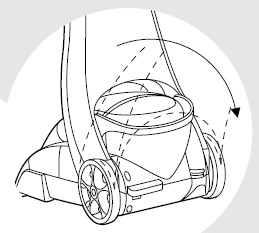
- Step on handle release to lay the machine handle down out of the way.
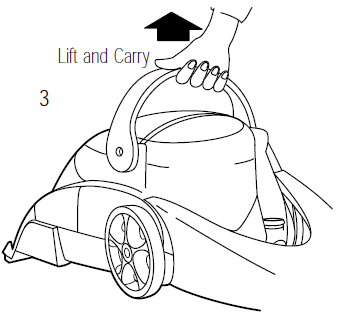
- Lift the Tank-in-Tank handle. The handle locks the lid in place.
- Carry it like a bucket to fill at the sink.Note: You may notice hair and debris deposits on the carpet that were loosened by the brushing action (especially with newer carpets that have never been deep cleaned before). This debris should be picked up and thrown away. Debris that deposits in the Brush Belt should be cleaned between uses to keep the Belts running free.
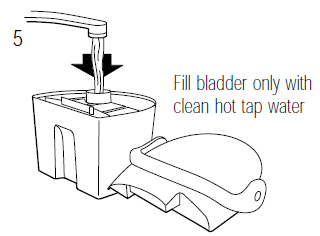
- Set the tank down and rotate the handle forward to unlatch the lid. Lift off and set the lid aside.
- Find the mouth of the Bladder and fill to the bottom of the neck with clean hot tap water. *Do not boil or microwave water as it can destroy the Bladder.Note: Fill the Bladder with clean hot tap water only.
- Replace the tank lid matching the lid and tank edges. Handle must be in the forward position to reinstall.
- Rotate the handle to the carrying position to re-latch the lid.
- Replace tank in machine base, seating firmly in place.
- Rotate handle back down to the latched position.Note: Both the SmartMix Bottle and the clean water tank must have liquid in them in order for the machine to spray. If one tank is empty the machine will not apply either cleaning solution or water only.
 Note: You may notice hair and debris deposits on the carpet that were loosened by the brushing action (especially with newer carpets that have never been deep cleaned before). This debris should be picked up and thrown away. Debris that deposits in the Brush Belt should be cleaned between uses to keep the Belts running free.
 Note: Fill the Bladder with clean hot tap water only.
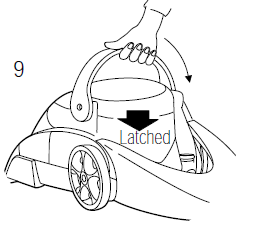 Note: Both the SmartMix Bottle and the clean water tank must have liquid in them in order for the machine to spray. If one tank is empty the machine will not apply either cleaning solution or water only.
When It’s Time to Empty Tank-in-Tank
- Remove the Tank-in-Tank – follow steps 1 and 2 on page 7 and 8.
- Carry the Tank-in-Tank, like a bucket, to the sink where you will dispose of the dirty water.
- Remove Tank Lid by rotating handle forward to unlatch lid and lifting lid off tank.
- Pour out dirty water.
- After each use, remove and rinse the lint screen located on the tank lid.A. Remove tank assembly from unit.B. Remove tank lid.C. Remove any debris caught in lint screen.D. Reinsert lint screen on tank lid. The screen will click into placeE. Replace tank lid.F. Reinsert tank assembly into unit.
- Refill with clean tap water as above, steps 5 through 9 on page 8, and refill the SmartMix bottle with BISSELL Cleansing Formula as necessary.
- When the cleaning job is complete, rinse out the Tank-in-Tank by rinsing clean water between the bladder and tank.
- Return Tank-in-Tank to the machine, following steps 6 through 9 on page 8.
- Refer to the Maintenance section, pg. 17 for the final cleanup.
Tip: A special red float device in the tank will cause the cleaner to stop removing solution from the carpet and the motor sound will rise in pitch to let you know the dirty water tank is full.
The Flow Indicator
The Flow Indicator is located on the machine base. It spins when the trigger is pressed to indicate that the machine is applying cleaning solution to the floor. It will stop spinning to indicate that the SmartMix bottle or bladder needs to be refilled, or when the trigger is released. Flow Indicator does not spin when set to Tool setting.
ReadyTools Dial
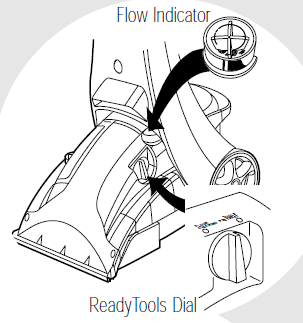
This provides above floor cleaning with the flip of a switch. Just choose the cleaning tool or protector applicator, attach to the flex hose and ProHeat Pro-Tech is ready to clean upholstery, stairs or apply extra protection against dirt and tough stains when using the Scotchgard protector applicator.*
* Set the dial to Floor Cleaning when cleaning carpets or bare floors or set it to Tools/PreTreat when using the flex hose attachments or for pre-treating floors, or when applying the Scotchgard protector applicator.* SmartTemp heats the cleaning solution for carpet and bare floor application only. It does not heat solution sprayed through the accessory tools.
Operations
Before You Clean Carpets

- Plan activities to give carpet time to dry.
- Remove easily moved furniture from the room (chairs, lamps, coffee tables, etc).
- Vacuum thoroughly to pick up loose debris and pet hair before using the ProHeat Pro-Tech.
- Plan your cleaning route to leave an exit path. It is best to begin cleaning in the corner farthest from your exit.
Machine Preparation
- Set up the machine following instructions in The Features section, pages 6-9.
- Use Fiber Cleansing Formula in the SmartMix tank when cleaning carpets, stairs or upholstery. Use clean water in the SmartMix tank for gentle cleaning, rinsing, or when applying carpet protectant.
- Choose the SmartMix setting to match the cleaning job.
- Set the ReadyTools switch to either Tools/PreTreat or Floor Cleaning.
PreTreating

Pretreating is recommended to improve cleaning effectiveness for heavily soiled carpet, high traffic areas such as entryways and hallways, or stairs.
- Set the SmartMix dial to High Traffic.
- Set ReadyTools dial to PreTreat.
- Plug into a proper outlet and turn ON both the Power and SmartTemp switches.
- While pressing the trigger, slowly make several passes over the area to be cleaned. Caution: Do not overwet.
- Turn the machine Power switches OFF and let BISSELL Deep Cleaning Formula dissolve the tough soil for 1-2 minutes before continuing.
Carpet Cleaning
- Plug into a proper outlet and turn the Power and the SmartTemp switches ON. Wait two minutes for the heater to warm up before beginning to clean.
- While pressing the trigger, make one slow forward wet pass and another one back. Let the SmartTemp heated formula and DirtLifter Powerbrush do the work for you.Caution: Do not overwet.Note: Take care not to run over loose objects or edges of area rugs. Stalling brush may result in premature belt failure.
- Release the trigger and make one slow forward and back pass over the same area to remove any residual dirty water.
- Repeat cleaning passes until solution being pulled up appears clean.
- Continue passes without pressing the trigger until you can’t see any more water being pulled up.Note: Both the SmartMix and the clean water tank must have liquid in them in order for the machine to spray. If one tank is empty the machine will not apply either cleaning solution or water only.
- After cleaning, you may want to turn the SmartMix dial to the Water Rinse/Carpet Protector setting to give your carpeting a final rinse. This will ensure thorough removal of embedded dirt loosened by the Advanced Deep Cleaning Formula. BISSELL Advanced Cleansing Formulas contains an anti-resoiling agent that helps your carpets repel dirt and keeps them looking good longer.
- When the cleaning job is complete refer to the Maintenance section for machine cleanup and storage instructions on page 17-19.
ATTENTION BERBER CARPET OWNERS: Some Berber Carpets have a tendency to fuzz with wear. Repeated strokes in the same area with an ordinary vacuum or deep cleaner may aggravate this condition. Please see Stain Removal instructions on page 12.
Stain Removal
Do Not Delay! Failure to attend to an accident soon after it occurs may cause it to set and become permanent.Before treating any stain, follow these pre-treatment steps:
- Blot up liquids with an absorbent cloth or paper towels. White materials are recommended because certain dyes may bleed and make the stain worse.
- Gently scrape up semi-solids with a spoon or spatula. Do not use a knife or other utensil with sharp edges because it could damage the carpet or upholstery.
- If the area has dried, remove the remaining semi-solids and residue with a sweeper or vacuum.
- Be sure to pre-test any spot removal solutions or chemicals on an inconspicuous area first. This is extremely important; different dyes and materials could be damaged or discolored by a cleaning solution. If such a change should occur, try a different solution or call a professional. If cleaning on Berber Carpet gently run your machine over a hidden area. If no fuzzing occurs, continue cleaning in soiled area.
- Using BISSELL Tough Stain Precleaner™, generously spray the area with the formula. Gently work the solution with a clean cloth or towel into the area using light strokes from the edges of the stain to the center. When your cloth reaches the center of the stain, gently pinch it in an upward motion. Make sure to turn and change your cloth frequently and do not rub the stain. You may repeat this process several times.orUse your BISSELL deep cleaner as a Precleaner. With one of the tools attached to hose, set the Ready Tools dial to Pretreat and the Smart Mix dial to the High Traffic setting. Spray the area with solution and allow the Deep Cleaning formula to penetrate for 3-5 minutes.
- Once the Precleaning is complete, use the attached tool to gently scrub the stain with back and forth strokes.
- Allow to dry. Some difficult stains may require a second treatment.
Perfect Pass (Available on select models only)
The Perfect Pass feature is designed to help you achieve the best cleaning results when deep cleaning.
Apply smooth even strokes when deep cleaning your carpets. An upright deep cleaner should not be used at the same speed as an ordinary vacuum. That is too fast for optimum cleaning results.The Perfect Pass indicator displays a red light which tells you if you are in the range of Best Cleaning or if you are going Too Fast. If you notice consistently that the indicator light is in the Too Fast area, slow down until the light is in the Best Cleaning range. This will ensure you are getting the best cleaning results.
TurboBrush®
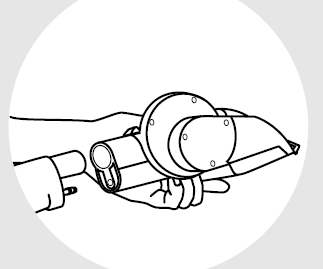
(Available on select models only) Unplug cleaner from the outlet before attaching TurboBrush. Attach TurboBrush to the flex hose by pressing tool onto the grip/trigger until button snaps into hole. Make certain tool is securely in place.
Use
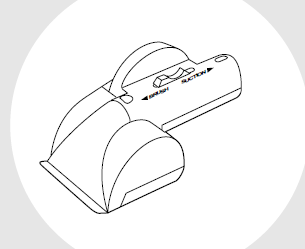
- Move the TurboBrush switch to the “BRUSH” position. This activates the brush when the unit is running.
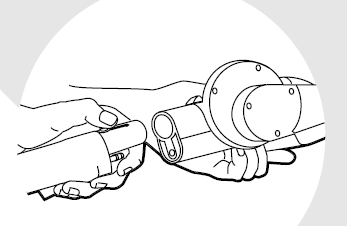
- Place the tool directly on the soiled surface. Apply downward pressure on the tool and pull towards you while pulling trigger to spray cleaning solution.
- Release the spray trigger and move the switch to the “SUCTION” position. Vacuum the area until no more cleaning solution can be removed.
- Repeat steps 1-3 until no more dirt can be removed. Caution: Do not overwet.
When You’re Done
- Disconnect the TurboBrush from the flex hose by pushing down on the button lock and pulling straight off.
- Once removed from the flex hose, the TurboBrush can be cleaned.A) Move the switch to the “SUCTION” positionB) Rinse under running water.C) Check spray nozzle for dirt. If necessary, clean with a soft bristle brush.D) Replace TurboBrush in its special storage location on the handle front. (on select models only
Scotchgard Protector Applicator (Optional)
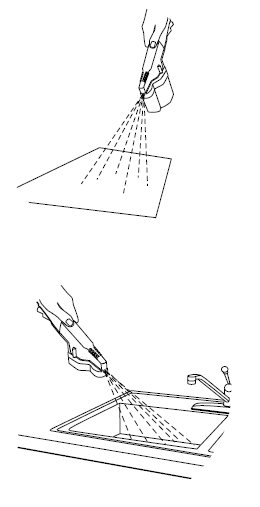
The Scotchgard protector applicator (with formula included) can be used to help retain the carpet cleanliness you achieve with your ProHeat Pro-Tech machine. For best results the post cleaning treatment should be applied while the carpet is still wet or damp. It is recommended that the Scotchgard Protector is applied every 12 months in all carpeted areas, and after every deep cleaning for high traffic areas such as entryways and stairs.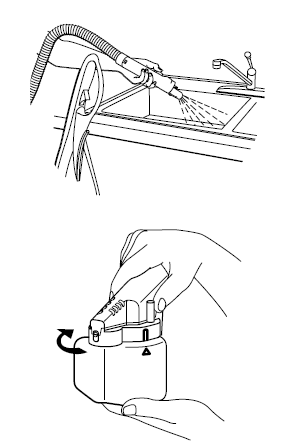
- Immediately after cleaning and rinsing your carpets, empty the Tank-in-Tank and refill the bladder with clean hot tap water. (See page 7 & 8 for instructions.)
- Fill the SmartMix bottle with clean tap water.
- Set the ReadyTools dial to Tools/Pretreat.
- Purge the hose to eliminate cleaning solution from the tube by spraying water through the hose without attachments into a sink for 15-30 seconds.
- Attach cartridge to the applicator tool, following instructions on cartridge.
- Turn the SmartMix dial to the Water Rinse/Carpet Protectant Setting.
- Place the Scotchgard protector applicator onto the end of the Flex Hose. The water from the Tank-in-Tank will automatically mix with the concentrated protectant formula contained in the cartridge.
- Before applying Scotchgard protector, test a small, hidden area for colorfastness. Examine area when dry. If color is affected, do not use. For upholstery look for manufacturer’s cleanability code tag. Use on fabrics coded “W” or “WS”. If coded “S” or “X” do not use. Not recommended for use on velvet, silk vinyl, leather or 100% cotton upholstery.
- Plan your route to leave an exit path. It is best to begin protect-ing in the corner farthest from your exit.
- Apply Scotchgard protector in a slow sweeping motion with a slight overlap of the treated area. For best coverage, follow the guide on the cartridge.
- One 8 oz. cartridge protects 200 square feet (18.6 square meters). This is equal to two average size rooms (each at 10 x 10 feet or 3 x 3 meters. Periodically check the product level in the bottle to ensure best coverage.
- Be careful not to spray the protector onto furniture or fabric that has not been tested for colorfastness. If this does occur, wipe off the protector.
- Remove bottle from spraying tool. If concentrate is left, put the cap on and store for later use at room temperature.
- With applicator tool still on the end of flex hose, spray clean hot water into sink to avoid any future clogging.
- Store tool on the back of unit in the caddy.
How to Clean Upholstery and Small Areas
Important – Check Upholstery Tags:
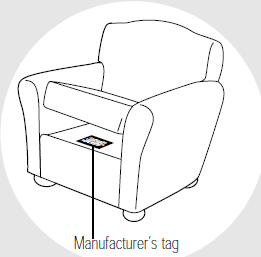
- Check manufacturer’s tag before cleaning. “W” or “WS” on the tag means you can use your ProHeat Pro-Tech. If the tag is coded with “X” or “S” (with a diagonal strike through), or says “Dry Clean Only,” do not proceed. The Scotchgard™ protectant is not recommended for use on velvet, silk, 100% cotton upholstery, vinyl or leather. If manufacturer’s tag is missing or not coded, check with your furniture dealer.
- Check for colorfastness in an inconspicuous place.
- If possible, check upholstery stuffing. Colored stuffing may bleed through fabric when wet.
- Plan activities to give upholstery time to dry.
- Vacuum thoroughly to pick up loose debris and pet hair. Use a vacuum with a brush attachment and a crevice tool to clean in fabric folds and tufts.
WARNING: To reduce the risk of injury, be extra careful when cleaning stairs. Make sure machine is secure and level.
Machine Preparation
- Set up the machine following instructions in The Features section, pages 6-9.
- Use Fiber Cleansing Formula in SmartMix tank.
- Set the ReadyTools dial to Tools or PreTreat.* SmartTemp heats the cleaning solution for carpet and bare floor application only. It does not heat solution sprayed through the accessory tools.
- Set SmartMix Dial to Normal.
Tip: Use the BISSELL Pet Odor and Soil Removalâ„¢ Formula to deep clean pet odor and soil.
Cleaning Technique
- Choose the 4” Small Area Tool, the Tough Stain Brush, or the Spraying Crevice Tool and connect to the flex hose.
- Plug into a proper outlet and turn Power Switch ON.
- While pressing the trigger, slowly move the spraying tool back and forth over the soiled surface. Release the trigger to suction soiled water.
- Continue to clean soiled area, working in small sections, until no more dirt can be removed.Caution: Do not overwet.
- When the cleaning job is complete refer to the Maintenance section for machine cleanup and storage instructions on page 17-20.
Cleaning Bare Floors
The Bare Floor Tool (available with select models only) provides effective cleaning for linoleum, vinyl, and tile floors.Caution: Do not use on hardwood floors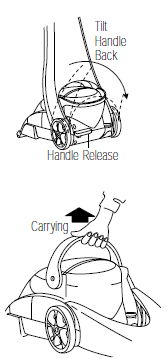
- Use BISSELL Floor Cleansing Formula.
- Vacuum or sweep thoroughly to pick up loose debris and pet hair.
- Remove easily moved furniture from the room, (chairs, tables, etc.)
- Plan your cleaning route to leave an exit path.
- Plan activities to allow 30 minutes for the floor to dry completely.
Attach the Bare Floor Tool
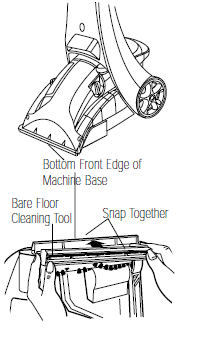
- Step on the handle release to lay the machine handle down.
- Remove the Tank-in Tank from the machine base.
- Lift the machine base to expose the underside of the nozzle.
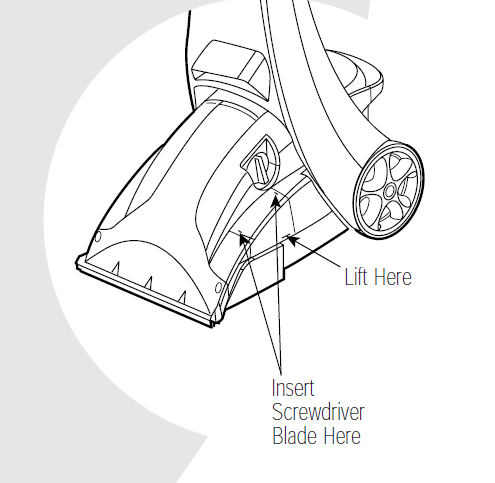
- Attach Bare Floor Tool to nozzle with long tab to the right side (ReadyTools side) of the nozzle.
- First attach left side (short Tab) catching tab over nozzle edge.
- Gently bend long tab (right side) outward to easily snap over edge of clear nozzle on left.
Machine Preparation
- Set up machine following instructions in the Features section, pages 6-9. Be sure to thoroughly rinse out any remaining Fiber Cleansing Formula from the SmartMix bottle to prevent slippery linoleum, vinyl, and tile floors. Use BISSELL Floor Cleansing Formula in the SmartMix tank.
- Check ReadyTools dial – it should be set on Floor Cleaning.
- Choose the SmartMix setting to match the cleaning job.
- Plug into a proper outlet and turn Power Switch ON. Turn SmartTemp switch ON. The SmartTemp Ready Light illuminates and the ProHeat Pro-Tech is ready to clean.
Bare Floor Cleaning Technique
- Slowly move the machine nozzle with Bare Floor Tool forward and back over soiled surface one time while pressing the trigger.Caution: Do not over wet.
- Repeat the motion without pressing the trigger using the Bare Floor Tool to squeegee and suction up the dirty water.
- Repeat steps 1 and 2 backing along the exit path.
- Allow about 30 minutes for the floor to dry completely.
- When the cleaning job is complete refer to the Maintenance/Storage section on page 17-20.
- To remove Bare Floor Tool gently bend long tab (right side) outward and pull tool down away from nozzle. Rinse thoroughly, dry and store
WARNING: To reduce the risk of fire, electric shock or injury unplug from outlet before servicing.
Routine Maintenance
- Turn Power and SmartTemp switches OFF.
- Unplug power cord from the outlet and coil around Power Cord Quick Release.
- Remove and rinse tools in clean, running water, dry and replace tool caddy.
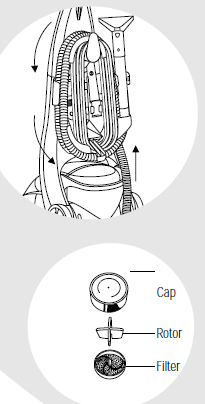
- Coil flex hose around storage brackets on tool caddy.
- Remove Tank-In-Tank, dispose of dirty water. See Features section, Page 7-9.
- Rinse out Tank-In-Tank and replace on the machine; Clean out lint trap.
- Clean out the Flow Indicator Filter each time it is used to ensure best cleaning performance. Unscrew the Flow Indicator Cap, lift out the red rotor and white filter. Rinse all three parts in tap water. Replace the filter and rotor. Replace the Flow Indicator Cap; turn until snug, do not over-tighten.
- Wipe all exterior surface with a soft cloth.
- Store cleaner upright in a protected, dry area.Note: ProHeat Pro-Tech uses water and must not be stored where there is a danger of freezing. Freezing will damage internal components and void the warranty.
- When carpet is dry, vacuum again to remove hair and fuzz that the ProHeat Pro-Tech may have loosened.
Pump Belt Replacement
- Turn the machine off and unplug from the wall outlet.
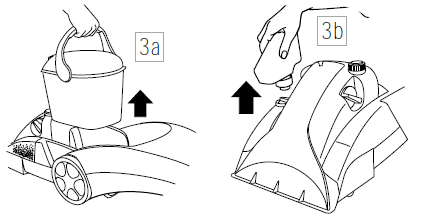
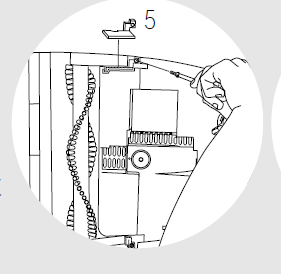
- Step on the release pedal and recline the handle down onto floor. (see illustration).
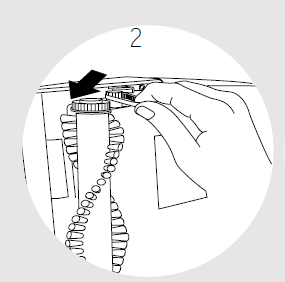
- Remove Tank-In-Tank and SmartMix tanks. Set them aside (see illustration).
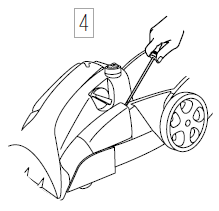
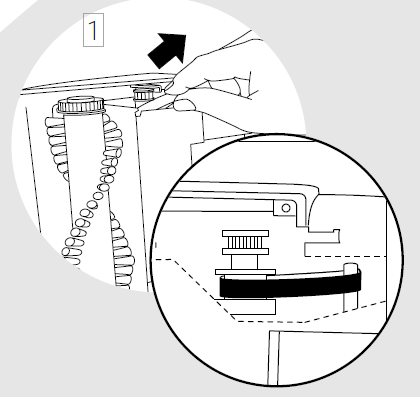
- Remove Belt Access Door located near the Floor Cleaning/Tools switch by inserting a flat head screwdriver into the slot nearest to the handle and gently prying the access door off (see illustration).
- Turn the machine onto its side so the belt access area is facing upward (see illustration).
- On the bottom of the machine, near the belt access area, is a red retainer plate that holds the black brush arm and brush in place. Using a Phillips head screwdriver remove the screw that holds the red retainer plate in place. Set red retainer plate and Phillips head screw aside (see illustration).
- Remove the black brush arm that holds the brush in place. Set the black brush arm aside (see illustration).
- Remove the “toothed” brush belt from the brush then from the red pump pulley. Set the “toothed” brush belt and brush aside.
- Locate and remove broken pump belt.

To Install the Replacement Pump Belt
- With the unit still on its side, loop one end of the replacement pump belt around the red pump pulley and then the other end around the silver motor shaft (see illustration). Do not twist the replacement pump belt.
- Re-install the toothed brush belt first onto the red pump pulley and then onto the toothed end of the brush (see illustration).
- Re-Install the brush into the base of unit.
- Place the black brush arm onto the brush and slide black brush arm into base of unit. The black brush arm and brush should slide easily into original position(see illustration).
- Re-install the red retainer plate and Phillips head screw (see illustration).
- Using your finger, gently spin the replacement pump belt on the silver motor shaft. If assembled correctly, the replacement pump belt should rotate freely around the silver motor shaft and drive pulley without obstruction. The brush should also rotate freely when the silver motor shaft is turned.
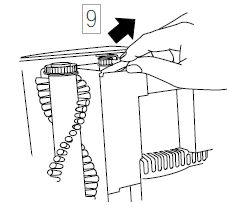
- Turn the machine right side up and replace the Tank-In-Tank, SmartMix tank and belt access door (see illustration).)
- Assembly is now complete. If you have any questions, or are having trouble installing your replacement pump belt, please call BISSELL Consumer Services at 1-800-237-7691.

Troubleshooting
WARNING: To reduce the risk of fire, electric shock or injury unplug from outlet before servicing.
SmartTemp Ready Light does not illuminate.
Possible Causes
- The SmartTemp switch is not turned ON.
- The machine Power Switch is not turned ON.
Remedies
- Turn on the SmartTemp switch.
- Both switches must be ON to activate the SmartTemp Ready Light.
Possible Causes
- Bladder may be empty.
- SmartMix bottle may be empty.
- The filter may be clogged.
- Tanks may not be seated properly.
- Pump may have lost prime.
- The Pump Belt may be broken.
Remedies
- Refill bladder with hot tap water.
- Fill with BISSELL Advanced Cleaning Formula for cleaning or water if rinsing,or using the Scotchgard protector applicator.
- Clean out Flow Indicator Filter, page 17.
- Turn power OFF; remove & reseat tanks. Inspect for presence of seals.
- Turn power OFF; after 1 minute turn ON and depress trigger.
- Turn the machine OFF and unplug from the outlet. To check if a Pump Belt has broken, you will need a flat head screwdriver. Insert the blade end into the lower slot of the Belt Access door to release the lower snap. If necessary, insert the blade end into the upper slot to release the upper snap. Examine the belt for breakage. You should be able to see the Pump Belt looped around the motor shaft. If it is broken or missing, please refer to Replacement Parts on pg.23 before calling Consumer Services. Complete installation instructions will accompany the replacement belt.
BISSELL Consumer Services
For information about repairs or replacement parts, or questions about your warranty, call: BISSELL Consumer Services 1-800-237-7691
Monday – Friday 8 a.m. — 9 p.m. EST Saturday 9 a.m. — 5 p.m. EST
Or write: BISSELL Homecare, Inc. POBox 3606
Grand Rapids MI 49501 ATTN: Consumer Services
Or visit the BISSELL website –www.bissell.com
Replacement parts – BISSELL ProHeat Pro-Tech

Part Name
- 4” Small Area Tool
- 6” Stair Tool
- Spraying Crevice Tool
- TurboBrush®
- Bare Floor Tool
- PreTreat Wand
- Tough Stain Brush
- Tank Assembly Complete (Includes Lid Assembly)
- Tank Lid Assembly
- Tank Bottom (Assembly)
- SmartMix® Bottle (Includes Cap Assembly)
- SmartMix® Cap Assembly
- Flow Indicator Cap
- Flow Indicator O-Ring
- Flow Indicator Rotor
- Flow Indicator Filter
- Window Gasket
- Floor Nozzle Window and Gasket
- Replacement Pump Belt (With Instructions)
- Replacement Brush Belt (With Instructions)
- Lint Screen
- Scotchgard™ Protector Cartridge
- Applicator Tool
About Your Warranty
This warranty gives you specific legal rights, and you may also have other rights which may vary from state to state. If you need additional instruction regarding this warranty or have questions regarding what it may cover, please contact BISSELL Consumer Services by E-mail, telephone, or regular mail as described below.
Limited Two Year Warranty
Subject to the *EXCEPTIONS AND EXCLUSIONS identified below, upon receipt of the product BISSELL Homecare, Inc. will repair or replace (with new or remanufactured components or products), at BISSELL’s option, free of charge from the date of purchase by the original purchaser, for two years any defective or malfunctioning part.See information below on “If your BISSELL product should require service”.This warranty applies to product used for personal, and not commercial or rental service. This warranty does not apply to fans or routine maintenance components such as filters, belts, or brushes. Damage or malfunction caused by negligence, abuse, neglect, unauthorized repair, or any other use not in accordance with the User’s Guide is not covered.
If your BISSELL product should require service:
Call BISSELL Consumer Services at the number below or visit the BISSELL website –www.bissell.com to locate a BISSELL Authorized Service Center in your area. If there are no authorized BISSELL Service Centers in your area, select the “Customer Service” tab, and follow the instructions for contacting us via email. A BISSELL Representative will issue you a Return Authorization Number and a pre-paid mailing label to return the unit to BISSELL for warranty repair.The machine should be returned with a photocopy of your proof of purchase. (Your dated sales receipt is your proof of date of purchase in the event of a warranty claim -do not send original.)If you need information about repairs or replacement parts, or if you have questions about your warranty, select the “Customer Service” tab on our website and follow the instructions for contacting us by e-mail.Or call: BISSELL Consumer Services 1-800-237-7691Monday – Friday 8 a.m. – 9 p.m. EST Saturday 9 a.m. – 5 p.m. .ESTOr write: BISSELL HOMECARE, INC.PO Box 3606Grand Rapids MI 49501ATTN: Consumer Services
BISSELL HOMECARE, INC. IS NOT LIABLE FOR INCIDENTAL OR CONSEQUENTIAL DAMAGES OF ANY NATURE ASSOCIATED WITH THE USE OF THIS PRODUCT. BISSELL’S LIABILITY WILL NOT EXCEED THE PURCHASE PRICE OF THE PRODUCT.Some states do not allow the exclusion or limitation of incidental or consequential damages, so the above limitation or exclusion may not apply to you.*EXCEPTIONS AND EXCLUSIONS FROM THE TERMS OF THE LIMITED WARRANTYTHIS WARRANTY IS EXCLUSIVE AND IN LIEU OF ANY OTHER WARRANTIES EITHER ORAL OR WRITTEN. ANY IMPLIED WARRANTIES WHICH MAY ARISE BY OPERATION OF LAW, INCLUDING THE IMPLIED WARRANTIES OF MERCHANTABILITY AND FITNESS FOR A PARTICULAR PURPOSE, ARE LIMITED TO THE TWO YEAR DURATION FROM THE DATE OF PURCHASE AS DESCRIBED ABOVE.Some states do not allow limitations on how long an implied warranty lasts, so the above limitation may not apply to you.
Bissell 7920/ 7901/ 8915/ 8910 Series ProHeat Pro-Tech User’s Guide – Bissell 7920/ 7901/ 8915/ 8910 Series ProHeat Pro-Tech User’s Guide –
[xyz-ips snippet=”download-snippet”]