Bissell CLEANVIEW Pet Slim Cordless User Manual

Product Overview
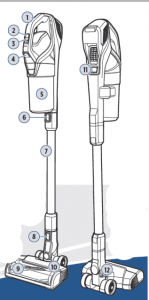
- Hand Vacuum
- Power Button
- Cleaning Mode Button
- Tank Release Button
- Dirt Tank
- Hand Vacuum Release Button
- Extension Wand
- Foot Release Button
- Tangle-Free Brush Roll
- Motorized Floor Cleaning Foot
- Charging Port
- Foot Hose
Go online for a comprehensive walkthrough of your new purchase!
This guide has everything you need to get ready for first use, including setting up, using and maintaining your machine, but online you’ll find additional resources like tips and troubleshooting, videos, product registration, parts, and more. Go to support.BISSELL.com.
IMPORTANT SAFETY INSTRUCTIONS
READ ALL INSTRUCTIONS BEFORE USING YOUR APPLIANCE.When using an electrical appliance, basic precautions should be observed, including the following:
WARNING
TO REDUCE THE RISK OF FIRE, ELECTRIC SHOCK OR INJURY:
» Keep hair, loose clothing, fingers, and all parts of body away from openings and moving parts. Brush Roll continues to rotate when in use.» Brush Roll continues to turn while product is turned ON and handle is in use. To avoid damage to carpet, rugs, furniture, and flooring, avoidtipping cleaner or setting it on furniture, fringed area rugs or carpeted stairs during tool use.» With Brush Roll on, do not allow cleaner to sit in one location for an extended period of time, as damage to floor can result.» Do not expose to rain. Store indoors.» Do not use on wet surfaces.» Do not allow to be used as a toy.» Close attention is necessary when used by or near children.» Children should be supervised to ensure that they do not play with the appliance.» Plastic film can be dangerous. To avoid danger of suffocation, keep away from children.» Do not use for any purpose other than described in this user guide.» Use only manufacturer’s recommended attachments.» Do not charge the machine outdoors.» Do not incinerate the appliance even if it severely damaged. The batteries can explode in a fire.» Do not put any object into opening.» Do not use with any opening blocked.» Keep openings free of dust, lint, hair, and anything that may reduce airflow.» Use extra care when cleaning stairs.» Do not pick up flammable materials (lighter fluid, gasoline, kerosene, etc.) or use in the presence of explosive liquids or vapors.» Always turn OFF this appliance before connecting or disconnecting the motorized nozzle.» Do not pick up toxic material (chlorine bleach, ammonia, drain cleaner, etc.).» Do not use vacuum cleaner in an enclosed space filled with vapors given off by oil-based paint, paint thinner, some moth-proofing substances, flammable dust, or other explosive or toxic vapors.» Do not pick up hard or sharp objects such as glass, nails, screws, coins, etc.» Do not pick up anything that is burning or smoking, such as cigarettes, matches or hot ashes.» Do not use without Dirt Tank or filters in place.» Keep appliance on a level surface.» If the charger supply cord is damaged, it must be replaced by the manufacturer, its service agent or similarly qualified person in order to avoid a hazard.» Do not pull or carry charger by cord, use cord as a handle, close door on cord, or pull cord around sharp edges or corners.» Keep charger cord away from heated surfaces.» To unplug, grasp the charger plug, not the cord.» Battery pack, charging port on the hand vac and charger output are not to be short-circuited.» The appliance must be disconnected from the battery charger when removing the battery.» The battery is to be disposed of safely.» Do not recharge, disassemble, heat above 60°C/140°F, or incinerate.» Keep batteries out of reach of children.» Dispose of used batteries promptly.» This appliance contains batteries that are only replaceable by skilled persons.» Prevent unintentional starting. Ensure the switch is in the OFF- position before picking up or carrying the appliance. Carrying the appliance with your finger on the switch or energizing appliance that have the switch on invites accidents.» Under abusive conditions, liquid may be ejected from the battery; avoid contact. If contact accidentally occurs, flush with water. If liquid contacts eyes, additionally seek medical help. Liquid ejected from the battery may cause irritation or burns.» Do not use appliance that is damaged or modified. Damaged or modified batteries may exhibit unpredictable behavior resulting in fire, explosion or risk of injury.» Do not expose appliance to fire or excessive temperature. Exposure to fire or temperature above 130°C/266°F may cause explosion.» Follow all charging instructions and do not charge the appliance outside of the temperature range specified in the instructions.Charging improperly or at temperatures outside of the specified range may damage the battery and increase the risk of fire.» Have servicing performed by a qualified repair person using only identical replacement parts. This will ensure that the safety of the product is maintained.» Do not modify or attempt to repair the appliance except as indicated in the instructions for use and care.» Keep the temperature range of between 4-40°C/40-104°F when charging battery, storing machine or during use.» Use only with MASSPOWER charger, model S018-1B262060HU.» Recharge only with the charger specified by the manufacturer. A charger that is suitable for one type of battery pack may create a risk of fire when used with another battery pack.» Unplug charger from electrical socket when not in use, before cleaning, maintaining or servicing the appliance, and if your appliance has an accessory tool with a moving brush, before connecting or disconnecting the tool.» This appliance contains batteries that are non-replaceable.» The battery must be removed from the appliance before it is scrapped.» Do not use with damaged cord or charger. If appliance is not working as it should, has been dropped, damaged, left outdoors, or dropped into water, have it repaired at a service center.» Turn OFF all controls before unplugging.
SAVE THESE INSTRUCTIONSTHIS MODEL IS FOR HOUSEHOLD USE ONLY.
 WARNINGThis product contains Lithium-Ion rechargeable batteries. DO NOT mix Lithium-Ion batteries with general household waste.According to Federal and State regulations, removal and proper disposal of Lithium-Ion batteries is required.For specific battery disposal instructions please contact Call2Recycle at 877-723-1297 or visit www.call2recycle.org.For full instructions on battery removal for recycling visit support.BISSELL.com.
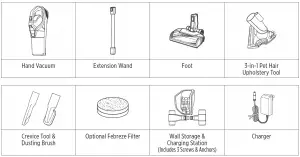
What’s in the Box?Standard accessories may vary by model. To identify what should be included with your purchase, please refer to the “Carton Contents” list located on the underside of the insert inside the carton.
AssemblyGo to support.BISSELL.com for assembly videos.
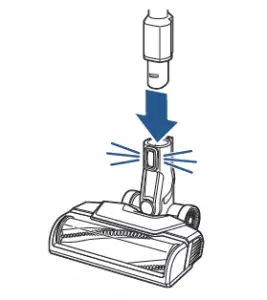
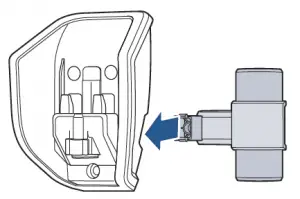
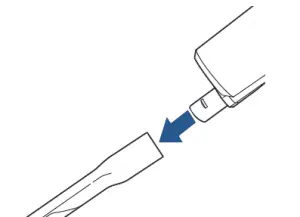
- Connect the Extension Wand to Motorized Floor Cleaning Foot. You’ll hear a “click” when they’re connected.
- Connect the Hand Vacuum to the Extension Wand. You’ll hear a “click” when they’re connected.
- Make sure to charge your stick vacuum before first use. Refer to page 5, “Charging the Battery” for instructions

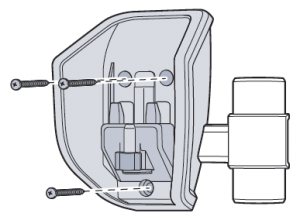
Installing the Wall Storage & Charging StationGo to support.BISSELL.com for more tips and video instructions.
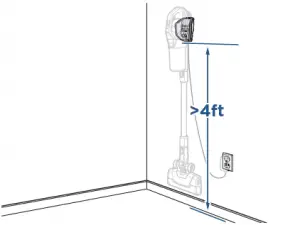
- Install your Wall Storage & Charging Station at least 4 feet to allow the machine to hang comfortably.
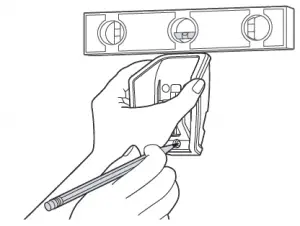
- Using a level, mark the screw hole locations on the wall with a pencil.
- Insert tool holder on the side of the wall mount.
- Screw the wall mount into a wall. Ensure the mount is high enough up off the ground for the vacuum to hang comfortably. Screwing into a wall stud will provide best support.
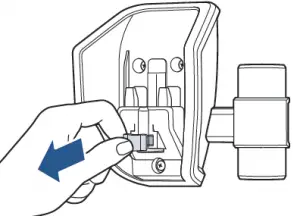
- To install the charging cord, remove the power cable clip from the Wall Storage & Charging Station.
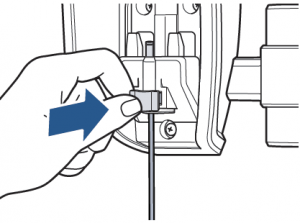
- Insert the charging cord.
- Secure the cable with the charging cable clip.
- Hang the vacuum on the center storage piece and insert tools on the tool holder provided. Plug the power adapter into the wall and place the machine on the Wall Storage & Charging Station for charging.

Charging the BatteryGo to support.BISSELL.com for for additional how-to videos.
Charging with the Hand Vacuum
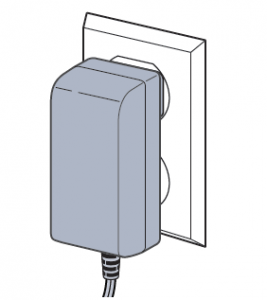
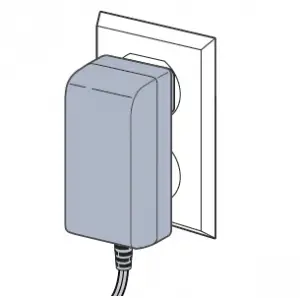
- Before first use, make sure to fully charge your stick vacuum. Plug the battery charger into the wall.
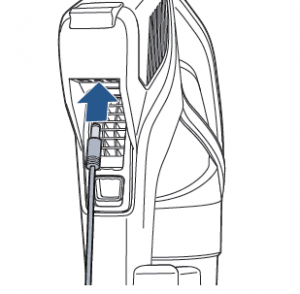
- Plug the charger into the charging port on the back of the hand vacuum.
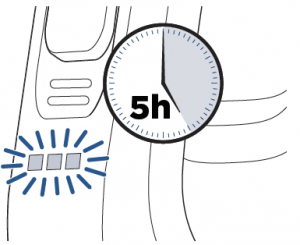
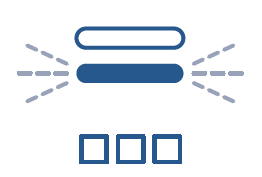
- Let the Hand Vacuum charge for 5 hours or until all three sections of the battery charge icon are illuminated and flashing.
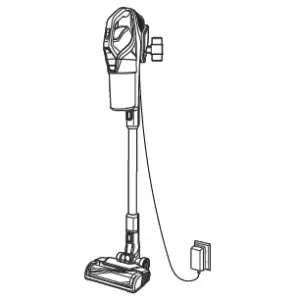
Charging with the Wall Storage & Charging Station
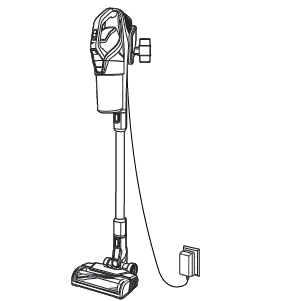
- Follow instructions for installing the Wall Storage & Charging Station. Once installed, hang the machine onto the station.
- Let the Hand Vacuum charge for 5 hours or until all three sections of the battery charge icon are illuminated and flashing.

Using the VacuumLooking for more guidance? Go to support.BISSELL.com for tips and 24-7 support.
CleanView® Pet Slim Cordless can be used as a stick vacuum, hand vacuum or as an extended reach vacuum with the Hand Vacuum and Extension Wand.
- Press the Power Button to begin cleaning and to turn OFF the machine when finished cleaning.
- With the machine powered ON, press the Cleaning ModeButton to toggle between the two modes:Carpet Cleaning ModeRecommended for maximum suction providing the mostpowerful clean for your carpets. This is the default mode whenthe vacuum is turned ON.Hard Floor ModeRecommended to achieve the longest run time. It’s great forhard floors, low pile carpets and area rugs.

 Button to toggle between the two modes:Carpet Cleaning ModeRecommended for maximum suction providing the mostpowerful clean for your carpets. This is the default mode whenthe vacuum is turned ON.Hard Floor ModeRecommended to achieve the longest run time. It’s great forhard floors, low pile carpets and area rugs.
Attaching Tools for Hand Vac UseGo to support.BISSELL.com for tips on above floor cleaning tools.
Clean stairs or furniture easily with the tools provided. Pair your desired tool with the Hand Vacuum or Extension Wand. Note: Ensure the vacuum is OFF when connecting tools.
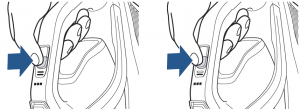
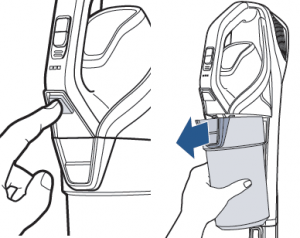
- To use as a Hand Vacuum, press the release button to disconnect it from the Extension Wand.
- Attach your chosen tool
- Use the tool to clean furniture, stairs or other surfaces in your home.


Emptying the Dirt TankMore of a video person? Go to support.BISSELL.com for additional how-to videos.
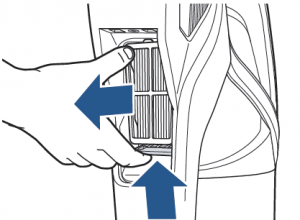
- Turn OFF your machine. Remove the Dirt Tank from the Hand Vacuum by pressing the Tank Release Button on the front of the tank.
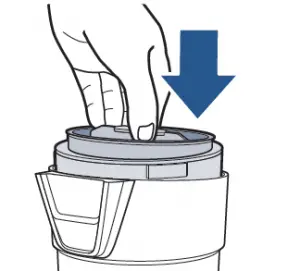
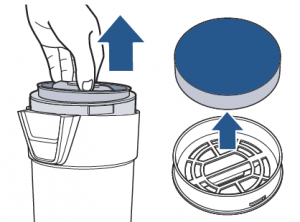
- Grab the middle grip of the filter and pull up. This will activate a wiping feature to remove debris from the mesh filter screen. Twisting the grip will remove the filter only.
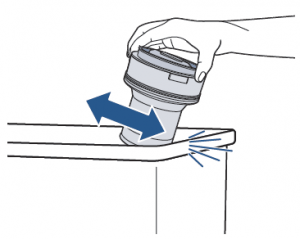
- Fully remove the separator from the tank and tap the mesh screen on the side of the trash bin.
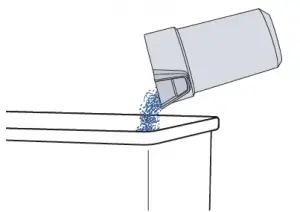
- Dump dirt from the tank into the trash bin.
- Slide the separator back into the tank, ensuring the notch is seated into the tank correctly.
- Reattach tank by guiding the bottom into the hook on the hand vacuum. Push into place.


WARNING Before using your vacuum, make sure that the Dirt Tank is in locked position and that the filter is in place. DO NOT operate your vacuum without the filter.
Cleaning & Replacing the FiltersGo to support.BISSELL.com for tips on maintaining and replacing your vacuum filter.
Pre-Motor Filter
- For best cleaning performance, always clean your filter after each use. Turn machine OFF. Remove Dirt Tank by pressing the Tank Release Button and sliding the tank out.
- Twist top to remove filter frame from the separator. Remove the filter from the filter frame housing. Tap the filter against the side of a trash bin to remove dust and debris.
- Rinse under warm water and squeeze to remove dirt. Lay out for 24 hours until completely dry. Reinsert filter into the frame with the tag side touching the frame.Post-Motor Filter
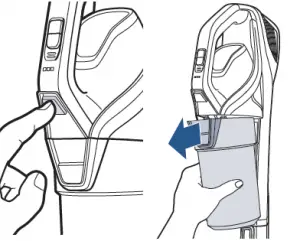
- To clean the post-motor filter located on the back of the hand vac, turn OFF machine. Pinch the latch on the filter cover to remove.
- Press up on the bottom tab to pull filter out.
- If there’s debris on the filter, tap it on a trash bin and rinse under warm water. Let dry for at least 24 hours before putting it back in the vacuum and replacing the filter cover.
 Post-Motor Filter

 WARNING Before using your vacuum, make sure that the Dirt Tank is in locked position and that the filter is in place. DO NOT operate your vacuum without the filter.
Maintaining the Brush RollGo to support.BISSELL.com for tips on maintaining and replacing your vacuum.
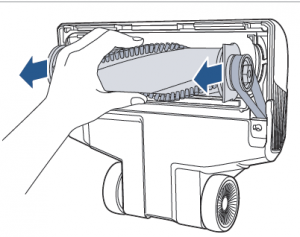
- Turn the machine OFF and press the Foot Release Button to disconnect the Motorized Cleaning Foot.
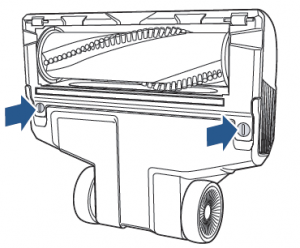
- Use a flathead screwdriver or coin to twist the bottom screws counter-clockwise and release the Brush Roll side covers.
- Remove the brush and clear any debris from brush, brush housing and the air suction channel.
- Reattach Brush Roll by inserting into the belt and pressing in to place.
- Attach and secure Brush Roll cover by using flathead screwdriver or coin to twist the screws clockwise.


Troubleshooting
Below are some of the issues you may run into. If you don’t see the issue you’re experiencing below, visit support.BISSELL.com.
| Problem | Possible Cause | Remedies |
|
Vacuum won’t pick up dirt |
Filters are dirty. | Remove and rinse pre- and post-Motor filters. Allow enough time for them to dry completely before reinserting. |
| There is a clog in the vacuum. | Remove the Foot and Extension Wand from the Hand Vacuum. Check for debris buildup or clogs in each of these sections. Clear any debris or clogs before reassembling. | |
| Dirt Tank is not seated correctly. | Remove the tank and reseat properly. | |
|
Dirt is escaping from the vacuum |
Dirt Tank is full. | Empty the tank. |
| Filters are missing or dirty. | Check to see if the pre- and post-motor filters are in place and clean. Clean filters if necessary. | |
| There is a clog in the vacuum. | Remove the Foot and Extension Wand from the Hand Vacuum. Check for debris buildup or clogs in each of these sections. Clear any debris or clogs before reassembling. | |
|
Vacuum won’t charge |
Wrong charger is being used. | Use only the charger that comes with the machine. |
| Charger is not plugged into the machine properly. | Remove the charger and reinstall to the hand vacuum. |
Errors
 |
|
|
|
| Behavior: 3 flashes, then solid.
Cause: Suction motor fault. Remedy: Turn machine OFF. Check and clean filters. Check for and clear any clogs. |
Behavior: 3 flashes, then solid.
Cause: Brush Roll stall. Remedy: Turn machine OFF. Check and clean filters. Clear debris or clogs from Brush Roll. |
Behavior: Flashing.
Cause: Charger issue. Remedy: Turn machine OFF. Unplug the charging cord from the wall and check for cord damage. If charging cord is damaged please contact Consumer Care. |
Behavior: 3 flashes, then solid.
Cause: Battery issue. Remedy: Turn machine OFF and remove the charger. Contact Consumer Care. |


If the remedies do not solve the problems, contact Consumer Care at 1-800-237-7691.
Warranty
2-Year limited warranty, may vary by state. Visit support.BISSELL.com or call 1-800-237-7691 for complete warranty information.
WARNING
To reduce the risk of fire, electric shock or injury, turn power OFF and disconnect plug from electrical outlet before performing maintenance or troubleshooting. Other maintenance or service not included in the manual should be performed by an authorized service representative.
Read More About This Manual & Download PDF:
References
[xyz-ips snippet=”download-snippet”]