Bissell Powerclean Drum Vacuum User Guide
IMPORTANT SAFETY INSTRUCTIONS
READ ALL INSTRUCTIONS BEFORE USING YOUR CANISTER VACUUM. Unplug from outlet when not in use and before conducting maintenance. When using an electrical appliance, basic precautions should be observed, including the following:
WARNING
INSTRUCTIONSWARNINGTO REDUCE THE RISK OF FIRE, ELECTRIC SHOCK, OR INJURY:
- Connect to a properly grounded outlet only. See grounding instructions. Do not modify the 3-prong grounded plug.
- Do not leave vacuum cleaner when it is plugged in.
- Unplug from outlet when not in use and before servicing
- Do not expose to rain, store indoors.» Intended primarily for indoor use and occasional outdoor use.
- Do not freeze.» Do not allow to be used as a toy. Close attention is necessary when used by or near children.
- Plastic film can be dangerous. To avoid danger of suffocation, keep away from children.
- Do not use for any purpose other than described in this User’s Guide. Use only manufacturer’s recommended attachments.
- Do not plug in your vacuum cleaner until you are familiar with all instructions and operating procedures.
- To reduce the risk of electrical shock, turn power switch off and disconnect polarized plug from electrical outlet before performing maintenance or troubleshooting checks
- Do not use with damaged cord or plug. If appliance is not working as it should, has been dropped, damaged, left outdoors, or dropped into water, have it repaired at an authorized service center
- Do not pull or carry by cord, use cord as a handle, close a door on cord, or pull cord around sharp edges or corners.
- Do not run appliance over cord. Keep cord away from heated surfaces.» Do not unplug by pulling on cord. To unplug, grasp the plug, not the cord.
- Do not handle plug or vacuum cleaner with wet hands.» Do not put any object into openings. Do not use with any opening blocked; keep openings free of dust, lint, hair, and anything that may reduce air flow.» Keep hair, loose clothing, fingers, and all parts of body away from openings and moving parts
- Turn off all controls before plugging or unplugging vacuum cleaner
- Use extra care when cleaning on stairs.
- Do not use to pick up flammable or combustible materials (lighter fluid, gasoline, kerosene, etc.) or use in areas where they may be present
- Do not use vacuum cleaner in an enclosed space filled with vapors given off by oil base paint, paint thinner, some moth proofing substances, flammable dust, or other explosive or toxic vapors.» Do not use to pick up toxic material (chlorine bleach, ammonia, drain cleaner, etc.).» Do not pick up anything that is burning or smoking, such as cigarettes, matches, or hot ashes
- Do not pick up hard or sharp objects such as glass, nails, screws, coins, etc
- Keep appliance on a level surface.» Do not carry the appliance while in use
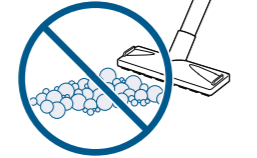
- This product should not be used with detergents or to pick up foaming wet messes to prevent internal component damage.
- Do not immerse. Use only on surfaces moistened by the cleaning process.» Do not use without filters in place
- Always install float before any wet pick-up operation.
Thanks for buying a BISSELL® vacuum!
We love to clean and we’re excited to share one of our innovative products with you. We want to make sure your vacuum works as well in two years as it does today, so this guide has tips on using (page 7), maintaining (pages 8-9), and if there is a problem, troubleshooting (page 10).In just a few simple assembly steps, you’ll be ready to vacuum. Flip to page 5 and let’s get started!.
What’s In The Box?
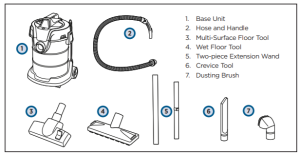
NOTE: Standard accessories may vary by model. To identify what should be included with your purchase, please refer to the “Carton Contents” list located on the carton top flap.
Safety Instructions. 2Product View.4Assembly . 5-6Operations7Maintenance & Care 8-9Troubleshooting.10Warranty .11Service.11Product Registration 12Parts & Supplies 121
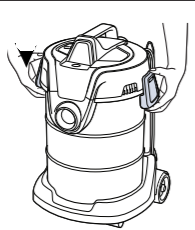
View Parking
![]() WARNINGD not plug in your vacuum until you are familiar with all instructions and operating procedures.
WARNINGD not plug in your vacuum until you are familiar with all instructions and operating procedures.![]() WARNING Plastic film can be dangerous. To avoid danger of suffocation, keep away from children.
WARNING Plastic film can be dangerous. To avoid danger of suffocation, keep away from children.
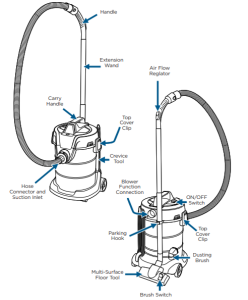
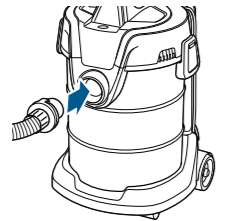
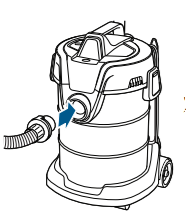
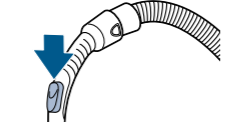
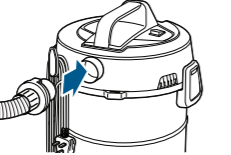
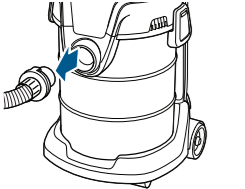
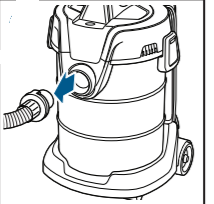
- Unlock the clips on the Top Cover to remove the Hose. Locate the Hose Connector on end of hose and line up the tab with the arrow on the Suction Inlet. Insert the hose and turn clockwise to secure.
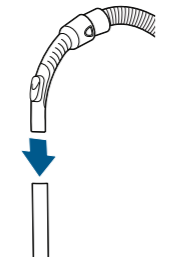
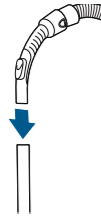
- Connect Hose Handle to the end of the Extention Wand and twist slightly to tighten.
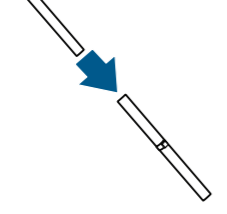
- Connect Extensions Wands together with the Parking Hook on the lower half.
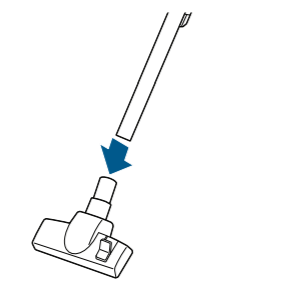
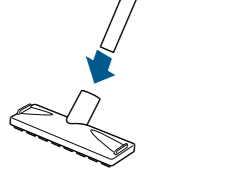
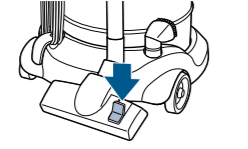
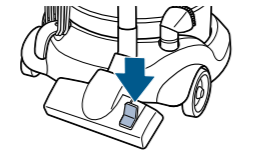
- Connect the Multi-Surface Floor Tool to end of the Extension Wand and twist slightly to tighten.Once assembled, you can store your vacuum by inserting the Parking Hook (located on the Extension Wand) into the storage slot on the rear of the vacuum.
 Once assembled, you can store your vacuum by inserting the Parking Hook (located on the Extension Wand) into the storage slot on the rear of the vacuum.
Assembly (Wet Cleaning)
![]() WARNING Do not plug in your vacuum until you are familiar with all instructions and operating procedures.
WARNING Do not plug in your vacuum until you are familiar with all instructions and operating procedures.
- Locate the Hose Connector on end of hose and line up the tab with the notch on the Suction Inlet, then insert hose end into base.
- Connect Hose Handle to the end of the extention wand and twist slightly to tighten.
- Connect Extensions Wands together with the Parking Hook on the lower half.
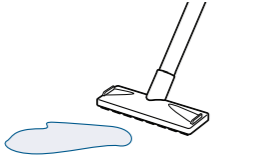
- Attach the Wet Cleaning Foot to the end of the Extension Wands and twist slightly to tighten.

Tools
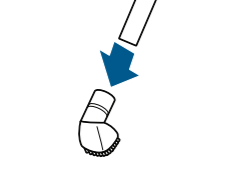
Use the Crevice Tool to reach in tight, narrow spaces. The Crevice Tool can also be used to pick up wet messes.
Use the Dusting Brush to clean curtains, draperies, and side tables and window ledges.
Operating The Product
![]() WARNING Before using your vacuum, make sure the Dirt Container is in locked position and the filter is in place. DO NOT operate your vacuum without a filter.
WARNING Before using your vacuum, make sure the Dirt Container is in locked position and the filter is in place. DO NOT operate your vacuum without a filter.
- Turn the power ON or OFF by switching the power switch to the ON (I) or OFF (O)position.
- For full suction power, close the Air Flow Regulator by sliding the regulator down to the closed position. Open the Air Flow Regulator to reduce suction power for vacuuming delicate fabrics.
- To vacuum carpets and rugs, push the Brush Switch to the carpet position to pull the brushes up into the Floor Nozzle.
- To vacuum bare floors, push the Brush Switch to the bare floor position to extend the brushes down from the Floor Nozzle.
- For wet cleaning, use the Wet Cleaning Foot to vacuum up spills.
- This product should not be used with detergents or to pick up foaming wet messes.
- For above floor cleaning, disconnect the floor tool from the end of the Extension Wand and attach desired accessory.
- To use the Blower function, insert the hose with the notch facing upward and twist clockwise to lock in place.


Emptying the Dirt Container NOTE:
WARNING To reduce the risk of electrical shock, turn power switch OFF and disconnect polarized plug from electrical outlet before performing maintenance or troubleshooting checks.
- Unplug the vacuum from the electrical outlet and disconnect the Hose.
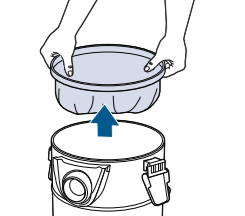
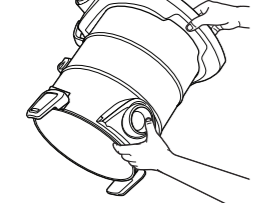
- Undo the clips on both sides of the Top Cover and lift up to remove.
- Remove the Large Fabric Filter by pulling up holding both sides and then setting it to the side.
- Hold the unit by the base and handle above Hose Inlet and tip dirt out into a trash can for dry messes and outside or in a sink for wet messes.NOTE: If you suffer from allergies, place a plastic bag over top of Dirt Container and tip upside down to empty. Wait for dust to settle, remove bag and discard.
- Return filter, ensuring its seal covers the top of the wall of the Dirt Container all the way around.
- Replace vacuum Top Cover and close clips.

 NOTE: If you suffer from allergies, place a plastic bag over top of Dirt Container and tip upside down to empty. Wait for dust to settle, remove bag and discard.
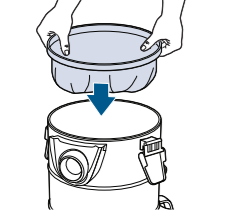
Cleaning the Filters
WARNING To reduce the risk of electrical shock, turn power switch OFF and disconnect polarized plug from electrical outlet before performing maintenance or troubleshooting checks.
WARNING Do not operate vacuum with a damp or wet fi lter, or without fi lter or the Dirt Container in place. Allow components to dry before reassembling the Dirt Container.
- Unplug the vacuum from the electrical outlet and disconnect the Hose.
- Undo the clips on both sides of the Top Cover.
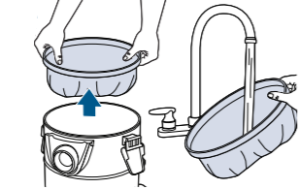
- Remove the Large Fabric Filter and hand wash in cold water with mild detergent. Rinse well and air dry for 24 hours.
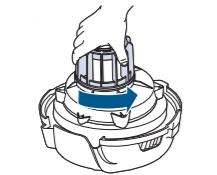
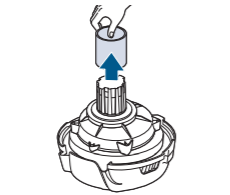
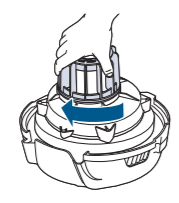
- Remove the Top Cover of drum vacuum and grasp the plastic Filter Cage, turning counter-clockwise to unlock.
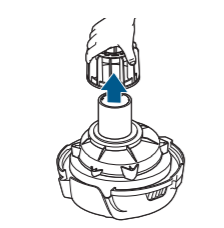
- Then pull up to remove.
- Remove the Foam Filter and rinse to clean. Allow the filter to fully dry before reinstalling.
- 1Once completely dry, return Filter to the Dirt Container. Ensure the Filter basket is installed and surrounding entire tank wall. Turn clockwise to seal.
- Return the dry Large Fabric Filter, place vacuum Top Cover and close clips.
Troubleshooting
![]() WARNING To reduce the risk of electric shock, turn power switch OFF and disconnect plug from electrical outlet before performing maintenance or troubleshooting checks.
WARNING To reduce the risk of electric shock, turn power switch OFF and disconnect plug from electrical outlet before performing maintenance or troubleshooting checks.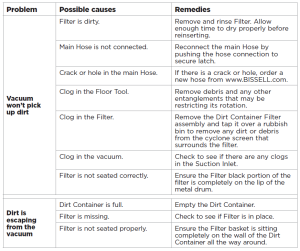
Warranty
If you need additional instruction regarding this warranty or have questions regarding what it may cover, please contact BISSELL® Consumer Care by E-mail or telephone as described below.It may be necessary to obtain some of your personal information, such as a mailing address, to fulfill terms of this warranty. Any personal data will be handled pursuant to BISSELL’s Privacy Policy, which can be found online at www.BISSELL.ca/privacy-policy.
Limited Two-Year WarrantySubject to the *EXCEPTIONS AND EXCLUSIONS identified below, upon receipt of the product BISSELL will repair or replace (with new, refurbished, lightly used, or remanufactured components or products), at BISSELL’s option, free of charge from the date of purchase by the original purchaser, for two years, any defective or malfunctioning part.See information below on “If your BISSELL product should require service.”This warranty applies to product used for personal, and not commercial or rental, service. This warranty does not apply to fans or routine maintenance components such as filters, belts, or brushes. Damage or malfunction caused by negligence, abuse, neglect, unauthorized repair, or any other use not in accordance with the User’s Guide is not covered. This warranty will only be valid if the product is used in the same country in which it was sold.BISSELL is not liable for incidental or consequential damages of any nature associated with the use of this product. BISSELL’s liability will not exceed the purchase price of the product.*Exceptions and Exclusions from the Terms of the Limited WarrantyThis warranty is exclusive and in lieu of any other warranties either oral or written. Any implied warranties which may arise by operation of law, including the implied warranties of merchantability and fitness for a particular purpose, are limited to the two-year duration from the date of purchase as described above.
NOTE: Please keep your original sales receipt. It provides proof of date of purchase in the event of a warranty claim.
Service
Please do not return this product to the store.Other maintenance or service not included in the manual should be performed by an authorized service representative.
If your BISSELL® product should require service:Contact BISSELL Consumer Care to locate a BISSELL Authorized Service Center in your area. If you need information about repairs or replacement parts, or if you have questions about your warranty, contact BISSELL Consumer Care.
Register Your Product
Registering is quick, easy and offers you benefits over the lifetime of your product. You’ll receive: Faster Service Supplying your information now saves you time should you need to contact us with questions regarding your product. Product Support Reminders and Alerts We’ll contact you with any important product maintenance reminders and alerts.
Promotions Optional:Register your email to receive notice of offers, contests, cleaning tips, and more!
Visit BISSELL.ca/registration!
Parts & Supplies Register
For Parts and Supplies, go to BISSELL.ca and enter your model number in the search field.
We’re Waggin’ Our Tails!BISSELL® proudly supports BISSELL Pet Foundation® and its mission to help save homeless pets. When you buy a BISSELL product, you help save pets, too. We’re proud to design products that help make pet messes, odours and pet homelessness disappear.Visit BISSELLsavespets.ca to learn more.
Love 5your BISSELL® product?
Don’t keep it a secret. Let us, and millions of others, know what you think! Leave your star-rating on BISSELL.ca.

Read More About This Manual & Download PDF:
References
[xyz-ips snippet=”download-snippet”]