
SMARTCLEAN® USER GUIDE2229F
![]() More of a video person? Find instructional videos for all sections with this icon at www.BISSELL.com/videos
More of a video person? Find instructional videos for all sections with this icon at www.BISSELL.com/videos
IMPORTANT SAFETY INSTRUCTIONS
READ ALL INSTRUCTIONS BEFORE USING YOUR APPLIANCE.When using an electrical appliance, basic precautions should be observed, including the following:
![]() WARNING
WARNING
TO REDUCE THE RISK OF FIRE, ELECTRIC SHOCK, OR INJURY:» This appliance can be used by children aged from 8 years and above and persons with reduced physical, sensory or mental capabilities or lack of experience and knowledge if they have been given supervision or instruction concerning use of the appliance in a safe way and understand the hazards involved. Cleaning and user maintenance shall not be made by children without supervision.» Children should be supervised to ensure that they do not play with the appliance.» Unplug from the electrical socket when not in use, before cleaning, maintaining, or servicing the appliance, and if your appliance has an accessory tool with a moving brush, before connecting or disconnecting the tool. » Do not immerse in water or liquid.» Keep hair, loose clothing, fingers, and all parts of body away from openings and moving parts of the appliance and its accessories.» Do not use to suck up water. » Do not immerse in water for cleaning.» The hose should be checked regularly and must not be used if damaged.» Always turn OFF this appliance before connecting or disconnecting either hose or motorized nozzle.» If the supply cable is damaged, it must be replaced by the manufacturer, its service agent, or similarly qualified person in order to avoid a hazard.» Do not run appliance over cable. » Do not use with damaged cable or plug.» Keep the cable away from heated surfaces.» Do not pull or carry by cable, use the cable as a handle, close door on cable, or pull cable around sharp edges or corners.» If the appliance has a hand-held accessory like pet brush, motor driven head, etc., the user shall avoid entrapment.» Do not leave appliance when plugged in. » To unplug, grasp the plug, not the cable.» Do not handle plug or appliance with wet hands.» Turn OFF all controls before unplugging.» The hose contains electrical wires. Do not use when damaged, cut, or punctured. Avoid picking up sharp objects.» Plastic film can be dangerous. To avoid the danger of suffocation, keep away from children.» Use only as described in this user guide. » Use only manufacturer’s recommended attachments.» If the appliance is not working as it should, has been dropped, damaged, left outdoors, or dropped into water; do not attempt to operate it and have it repaired at an authorized service center.» Do not put any object into openings.» Do not use with any opening blocked; keep free of dust, lint, hair, and anything that may reduce airflow.» Use extra care when cleaning on stairs.» Do not use to pick up flammable or combustible liquids, such as petroleum, or use in areas where they may be present.» Do not pick up toxic material (chlorine bleach, ammonia, drain cleaner, etc.).» Do not use the appliance in an enclosed space filled with vapors given off by oil-based paint, paint thinner, some moth-proofing substances, flammable dust, or other explosive or toxic vapors.» Do not pick up hard or sharp objects such as glass, nails, screws, coins, etc.» Do not pick up anything that is burning or smoking, such as cigarettes, matches, or hot ashes.» Do not use without filters in place.» Do not use outdoors or on wet surfaces.» CAUTION: In order to avoid a hazard due to inadvertent resetting of the thermal cut-out, this appliance must not be supplied through an external switching device, such as a timer, or connected to a circuit that is regularly switched on and off by the utility.» The vacuum cleaner, handle, wand, hose, and foot each contain electrical connections and are no serviceable parts. » This appliance is provided with double insulation. Use only identical replacement parts.
SAVE THESE INSTRUCTIONS
ORIGINAL INSTRUCTIONS.FOR OPERATION ON A 220-240 VOLT A.C. 50-60 HZ POWER SUPPLY ONLY.THIS MODEL IS FOR HOUSEHOLD USE ONLY. IMPORTANT INFORMATION» Keep appliance on a level surface.» If your appliance has a motorized Brush Roll, do not leave the machine running in the same spot without the handle fully upright.
Thanks for buying a BISSELL® vacuum!
We love to clean and we’re excited to share one of our innovative products with you. We want your vacuum to work like new for the years to come, so this guide has tips on how to use, maintain, and, if there’s a problem, troubleshoot.Your vacuum needs a little assembly before getting to work, so flip to the “Assembly” section and let’s get started!
What’s in the Box?
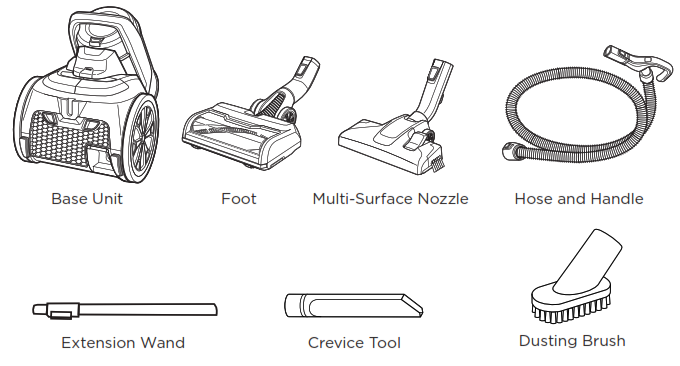
NOTE: Not all accessories come with every model. Be sure to check the carton for additional tools.
Product View

- 2-Position Handle
- Extension Wand
- Foot
- Motorized Nozzle with Tangle-Free Brush Roll
- Dirt Tank
- Base Unit
- Hose Connector
Assembly

Push Hose Connector into Base Unit and secure with a click. Push Handle end into the top of Extension Wand and secure with a click.
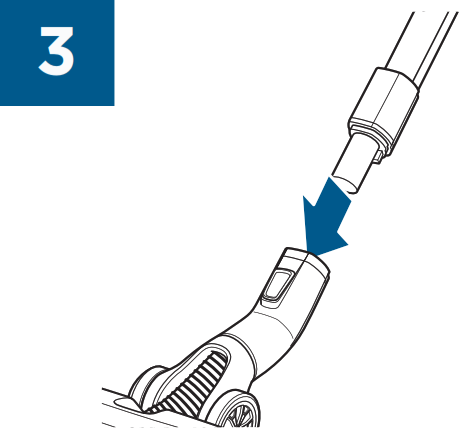 Push bottom of Extension Wand into Foot and secure with a click.
 Press button on Extension Wand to adjust height.
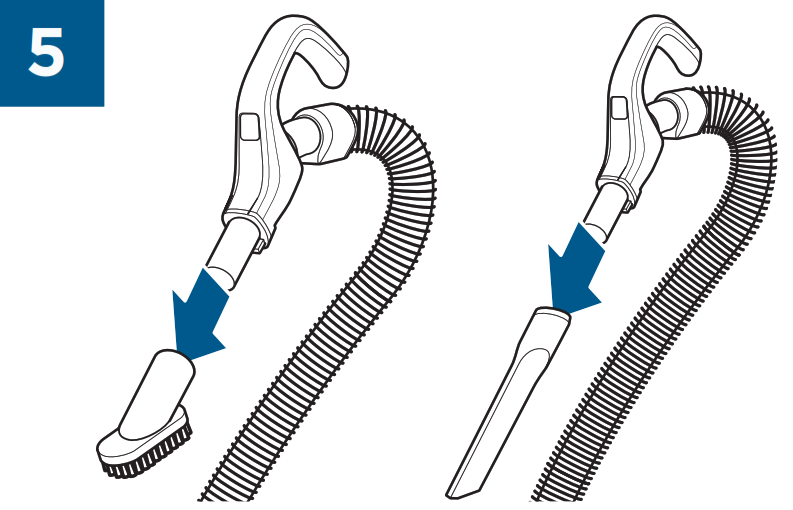 Connect desired tool to handle.
Using Your SmartClean®
 WARNINGTo reduce the risk of injury from moving parts while the vacuum is turned ON, always move the vacuum via the rolling wheels by using the upper handle at the back of the vacuum. Do not carry the vacuum while it is running. Always place the vacuum on the floor with the handle in an upright position when using tools.
 Press the button on the back left side of the unit to power the unit ON and OFF.
 Press Auto Button on back of unit for automatic floor type sensing. The SmartClean canister will detect your floor type and adjust suction as necessary.
  Adjust suction power by pressing the buttons with the plus (+) or minus (-) symbol on them depending on the level of power you want.
Emptying the Dirt Tank
WARNING To reduce the risk of electric shock, turn Power Switch OFF and disconnect the polarized plug from the electrical outlet before performing maintenance or troubleshooting checks.![]() Press Dirt Tank Release Button to remove the tank from the unit.
Press Dirt Tank Release Button to remove the tank from the unit.![]()
Hold tank over a trash bin and press the button on the bottom of the tank to release the tank door.
Cleaning the Filters
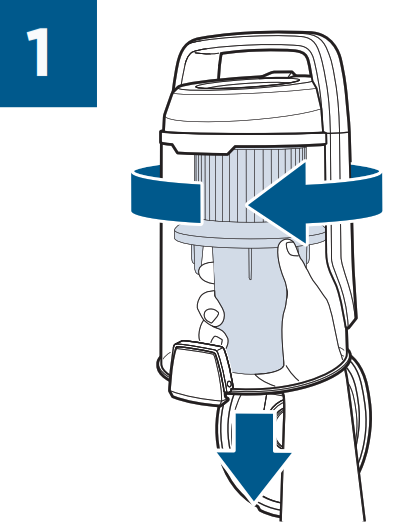
WARNING To reduce the risk of electric shock, turn Power Switch OFF and disconnect the plug from the electrical outlet before performing maintenance or troubleshooting checks. Do not operate vacuum with damp or wet filters or without all filters in place.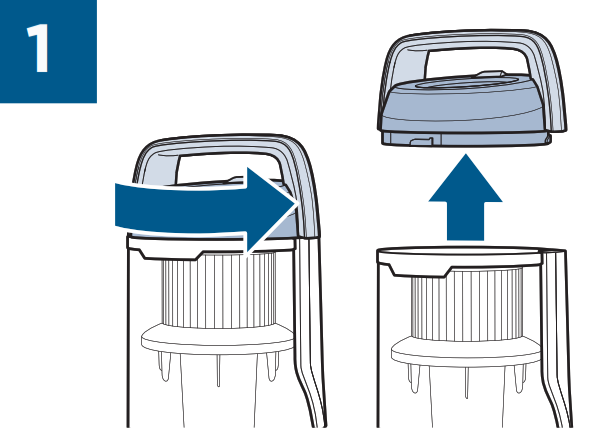 With Dirt Tank removed twist the top counter-clockwise and pull up to remove.
 Remove foam filter from the tank lid.
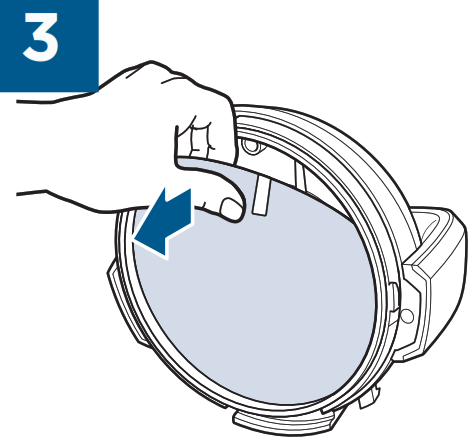
Remove flat filter from the tank lid.

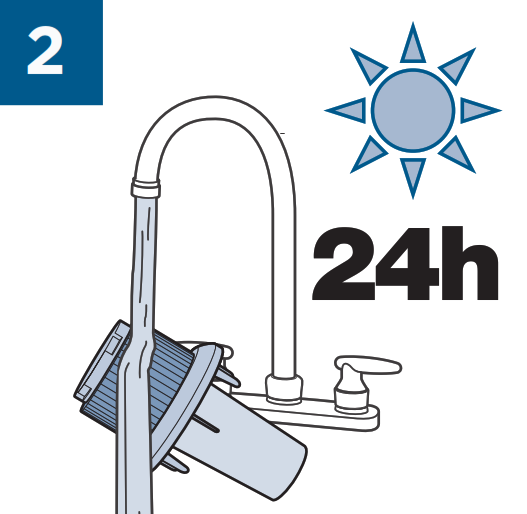
Both filters can be rinsed to clean. Leave to dry for 24 hours before replacing.

Replace both filters making sure the flat felt filter is inserted first.
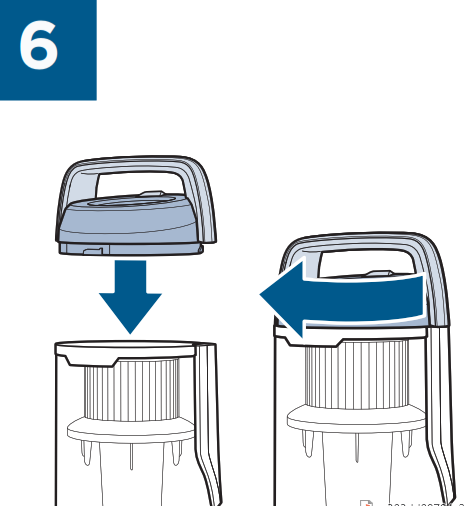
Replace lid and turn clockwise to lock in place.

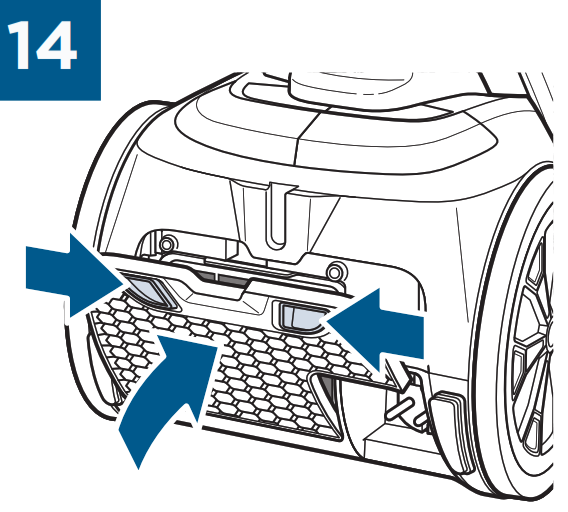
Push tabs inward and pull out to remove back cover.
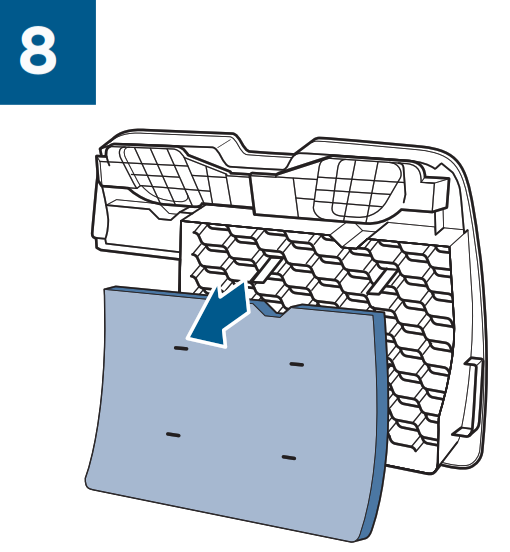
Remove mesh filter from back cover.

Mesh filter can be rinsed to clean. Let dry for 24 hours before replacing.
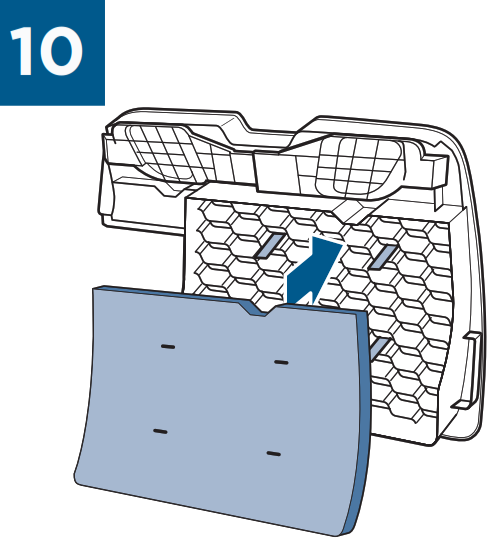
Replace mesh filter in back cover. Make sure all 4 tabs are aligned with their slots in the filter.

Remove pleated filter from back of unit.

Pleated filter can be rinsed to clean. Let dry for 24 hours before replacing.

Replace pleated filter.
Replace back cover of the unit by pressing the tabs inward to lock in place.
Cleaning the Cyclonic System
![]() WARNING To reduce the risk of electric shock, turn Power Switch OFF and disconnect plug from the electrical outlet before performing maintenance or troubleshooting checks.
WARNING To reduce the risk of electric shock, turn Power Switch OFF and disconnect plug from the electrical outlet before performing maintenance or troubleshooting checks.
Turn cyclonic system counter-clockwise to release and remove from the tank.
Cyclonic system can be rinsed to clean. Let dry for 24 hours before replacing.

Replace cyclonic system and turn clockwise to lock in place.
Maintaining the Brush Roll
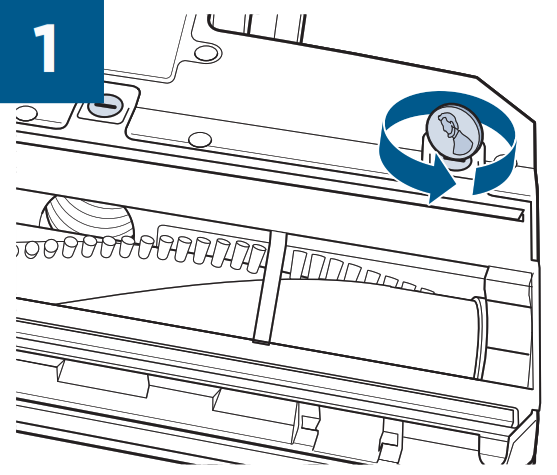
Use a coin to turn screws counter-clockwise to remove the sole plate.
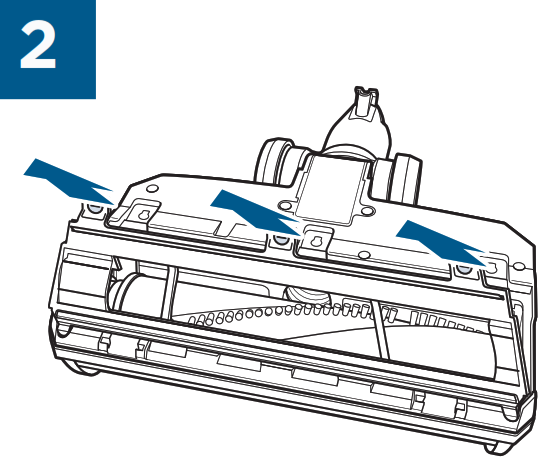
Once screws are unlocked, lift off sole plate.

Remove Brush Roll from Foot.
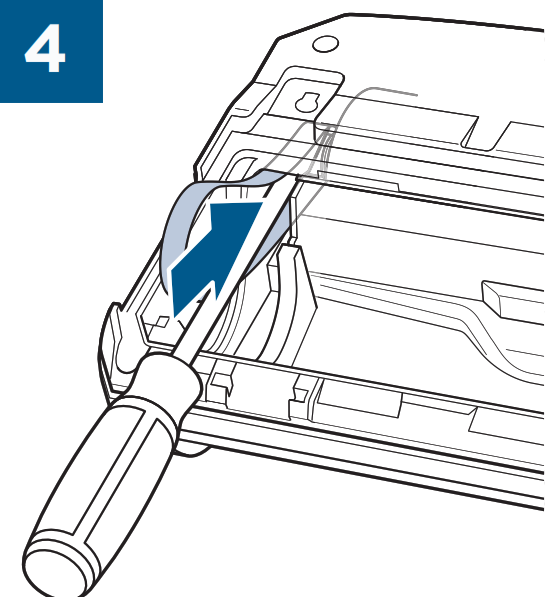
Use a flat head screwdriver to fit the belt over the gear.

To replace the Brush Roll to the foot, place the left side of the Brush Roll under the belt before pushing down into place.

Replace sole plate to the foot. Use coin to turn them to lock into place.
Clearing a Clog
![]()
If there is a lack of suctionturn OFF the unit and lift up to access the plug on the bottom of the unit. Press tabs inward to remove the plug.
![]()
Use the handle of a broomstick or a similar shaped object to push out debris and unclog the unit.
![]()
Insert plug back into the unit and press tabs inward until you hear a “click”.
Storing the Vacuum
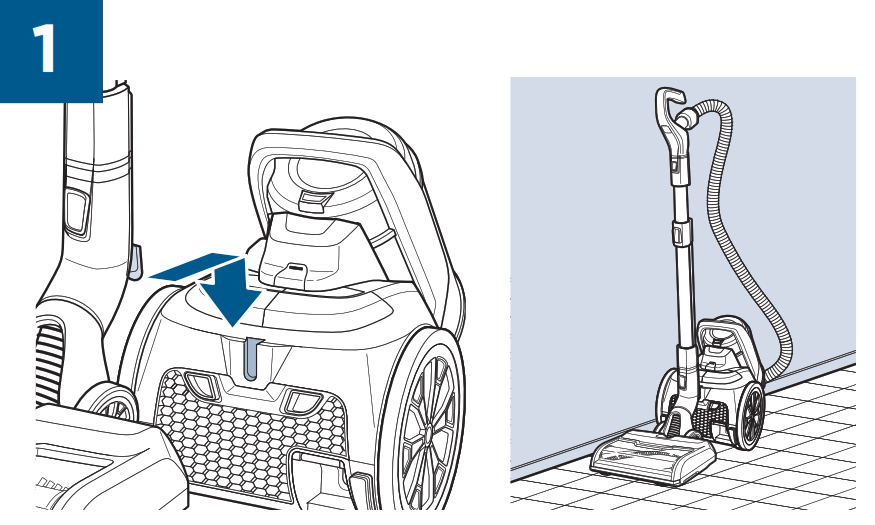
Connect the T-shaped hook on the Foot to the T-shaped slot on the unit for in-use storage positioning.

Connect T-shaped hook on the Foot to the T-shaped slot on the bottom of the unit for long term storage positioning.
Troubleshooting
WARNING To reduce the risk of electric shock, turn Power Switch OFF and disconnect plug from electrical outlet before performing maintenance or troubleshooting checks.
| Problem | Possible | Remedies |
| Brush Roll doesn’trotate | Brush Roll Button is turned OFF. | Press the Brush Roll Power Button on the handle. |
| Auto Button is turned OFF. | Turn Auto Button ON. | |
| Brush Roll has an obstruction keeping it from rotating. | Power OFF unit and unplug to reset brush motor, remove the brush and remove debris before reinstalling. | |
| Vacuumwon’t pick up dirt | Filters are dirty. | Remove and wash the filters. Let them dry for 24 hours before reinstalling. |
| Multi- Cyclonic system is dirty. | Remove the separator from the Dirt Tank and rinse to clean. Let it dry for 24 hours before reinstalling. | |
| There is a clog in the vacuum. | Power OFF and unplug unit. Remove the cleanout cover on the bottom of the vacuum and check for debris. Use a broom handle to push debris through. Do the same for the hose. | |
| Dirt Tank is not seated correctly. | Press the Tank Release Button to release the Dirt Tank and align the tank properly. | |
| Hose is not connected. | Push the hose connector in the port on the canister until it “clicks” in place. | |
| Hair wrapped around Brush Roll. | Run vacuum back and forth on clean carpet several times to release wrapped hair. | |
| There is a crack or hole in the hose. | If there is a crack or hole, order a new hose from BISSELL.com.au. | |
| Dirt is escaping from the vacuum | Dirt Tank is full. | Empty the tank. |
| Filters are missing or dirty. | Check to see if filters in the tank and filters under the filter door at the back of the canister are installed and clean. | |
| Vacuum Is hard to push or pull | Suction is set too high. | Open the Suction Control located under the handle or use the Variable Suction Controls on the canister. |
| Power OFF and unplug Disconnect hose from the canister to check for clogs or debris. Follow instructions for clean a clog above. | ||
| High-pitched noise. | There is a clog in the vacuum. | |
| There is a clog in the pleated filter. | Power OFF and unplug. Remove pleated filter from the back of the vacuum and rinse to clean, see page 7. Let it dry for 24 hours before reinstalling. |
Consumer Guarantee
This guarantee gives you specific legal rights, in addition to rights you may have under the Australian Consumer Law. If you need additional instruction regarding this guarantee or have questions regarding what it may cover, please contact your local BISSELL Consumer Services on the details set out below.Limited 2 Year Guarantee(from the date of purchase by original purchaser) Subject to the *CONDITIONS identified below, BISSELL will repair or replace (with new, refurbished, lightly used, or remanufactured components or products), at BISSELL’s option, free of charge, any defective or malfunctioning part due to manufacturer defect. This guarantee applies to products used for personal purposes, and not commercial or rental service. This guarantee does not apply to fans or routine maintenance or consumable components such as filters, belts, brush rolls, etc., damage or malfunction caused by negligence, abuse, neglect, unauthorised repair, or any other use not in accordance with the user guide. BISSELL recommends that the original packaging be kept for the duration of the guarantee period in case such need arises within the guarantee period that the item needs re-packing and transportation. It may be necessary to obtain some of your personal information, such as a mailing address, to fulfill terms of this guarantee. Any personal data will be handled pursuant to BISSELL’s Privacy Policy, which can be found at www.BISSELL.eu.*CONDITIONS OF THE GUARANTEESubject to whether such loss is reasonably foreseeable, BISSELL and its in-country distributors are not liable for incidental or consequential damages of any nature associated with the use of this product.FOR AUSTRALIAN CONSUMERS ONLY:OUR GOODS COME WITH GUARANTEES THAT CANNOT BE EXCLUDED UNDER THE AUSTRALIAN CONSUMER LAW. YOU ARE ENTITLED TO A REPLACEMENT OR REFUND FOR A MAJOR FAILURE AND FOR COMPENSATION FOR ANY OTHER REASONABLY FORESEEABLE LOSS OR DAMAGE. YOU ARE ALSO ENTITLED TO HAVE THE GOODS REPAIRED OR REPLACED IF THE GOODS FAIL TO BE OF ACCEPTABLE QUALITY AND THE FAILURE DOES NOT AMOUNT TO A MAJOR FAILURE.THIS GUARANTEE IS IN ADDITION TO OTHER RIGHTS OR REMEDIES UNDER LAW. NOTHING IN THIS GUARANTEE EXCLUDES, LIMITS, OR MODIFIES ANY LIABILITY OF BISSELL WHICH IS IMPOSED BY LAW, OR LIMITS OR MODIFIES ANY REMEDY AVAILABLE TO THE CONSUMER WHICH IS GRANTED BY LAW. TO MAKE A CLAIM UNDER THIS GUARANTEE CONTACT BISSELL AUSTRALIA PTY LTD (DETAILS BELOW). CONTACT BISSELL PRIOR TO RETURNING ANY GOODS. WHERE AGREED, BISSELL WILL REIMBUSE REASONABLE POSTAGE / HANDLING COSTS (IF ANY) FOR RETURNING GOODS TO BISSELL. TO CLAIM EXPENSES INCURRED IN MAKING A CLAIM UNDER THIS GUARANTEE PLEASE PROVIDE BISSELL WITH A COPY OF THE RECEIPT OF THE EXPENSES BY EMAIL OR POST.
Consumer Care
If your BISSELL® product should require service or to claim under our limited guarantee, please contact us as follows:
Website and Email: www.BISSELL.com.auwww.BISSELL.co.nz
Write:BISSELL AUSTRALIA PTY LIMITED42 Rocco Dr.Scoresby 3179VictoriaAustralia
Telephone:Australia: 1300-247-735New Zealand: 0800-247-735
Replacement parts and accessories are available for purchase. To purchase visit www.BISSELL.com.au.
Visit the BISSELL website: www.BISSELL.com.auWhen contacting BISSELL, have model number of cleaner available.Please record your Model Number: ________Please record your Purchase Date: __________NOTE: Please keep your original sales receipt. It provides proof of the date of purchase in the event of a guarantee claim. See guarantee for details.
©2019 BISSELL Inc.All rights reserved. Printed in ChinaPart Number 161-9130 06/19
References
[xyz-ips snippet=”download-snippet”]