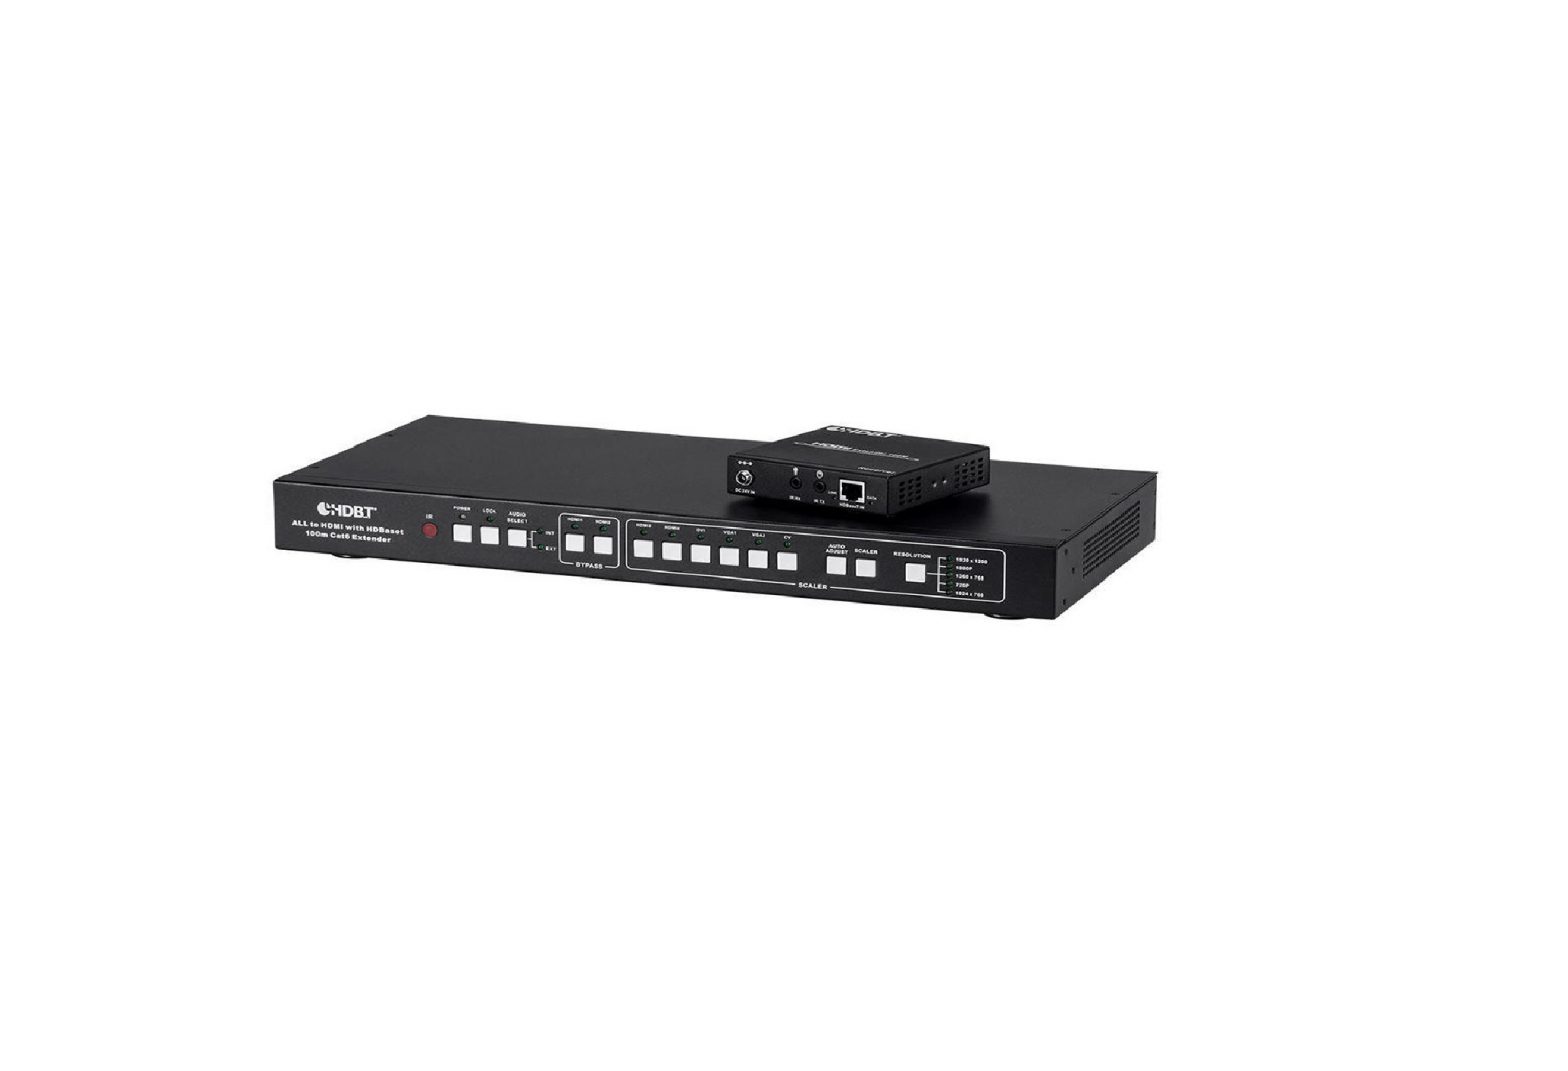
BLACK BIRD All to HDMI Converter with HDBaseT Extender User Guide
INTRODUCTION
This Blackbird TM device can be controlled by a computer using an RS-232 serial connection and by issuing commands using RS-232 control software.
CONNECTION
This device includes a DB-9 male to female RS-232 serial cable, which is used to connect your PC to the converter. If your PC lacks a DB-9 serial port, you will need to use a USB to Serial adapter cable (available separately P/N 3726). In addition to controlling the converter, you can also issue control commands to a device connected to the HDBaseTTM receiver. No extra RS-232 cable or connectors are included, so you will need to obtain the connectors and build a cable. The following image displays the pin connections for each connector

RS-232 GUI CONTROL
This device includes software, which allows you to directly control it using either an Ethernet or RS-232 connection. Simply copy SwitcherController.exe to your PC and double-click the file to launch it.
General Screen
Perform the following steps to connect your PC to the converter.
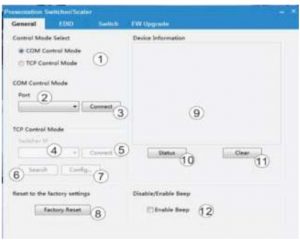
- Click the radio button to the left of COM control mode (1).
- Use the pull-down list box to select the COM Port used (2).
- Click the Connect button (3) to make the connection.
- Click the Status button (10) to display Device Information (9).
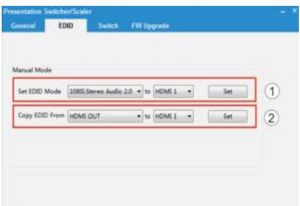
EDID Screen
The EDID screen allows you to directly set a specific EDID® set from the built-in EDID table or copy the EDID from a device connected to one of the outputs.
Switch Screen

- Click one of these two buttons to select a non-scalable input.
- Click one of these seven buttons to select a scalable input.
- Click one of these five buttons to set the output video resolution.
- When one of the VGA inputs is selected, these buttons can be used. Click AUTO ADJUST to automatically adjust the output picture. Click either the YPbPr or RGBHV buttons to set the input signal type.
- Click the INT button to select audio from digital or click the EXT button to select audio from analog when switched to the HDMI® or DVITM input.
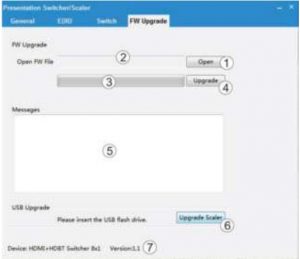
FW Upgrade Screen
In the event that updated firmware or scaler software is available, you can apply them on the FW Upgrade screen. Perform the following steps to upgrade your firmware and scaler software.
- Open your web browser and type www.monoprice.com into the address bar.
- Enter 15746 in the search bar on the MonopriceTM website to get to the product
- Scroll to the bottom of the page and locate the Support Files section. Download the updated firmware or scaler software zip file.
- Extract the firmware or scaler software file from the zip file.
- If updating the firmware, click the Open button (1) to open the file browser. Locateand select the firmware file. The file path is displayed in area to the left of the Open button (2)
- .If updating the firmware, click the Upgrade button (4). The upgrade progress is displayed in the area to the left of the button (3).
- If updating the scaler software, copy the scaler software to a USB flash drive, then insert the drive into the UPDATE port on the rear panel.
- If updating the scaler software, click the Upgrade Scaler button (6).
SOFTWARE
Rather than GUI control, you can also issue direct commands using a third party RS-232 control software package, such as CommWatch.exe, whose interface is depicted below.
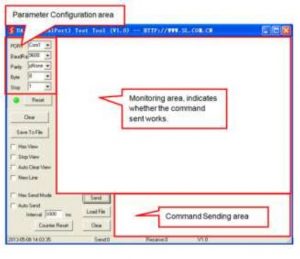 Set the communications parameters to the following:
| Baud Rate | 115200 |
| Data Bits | 8 |
| Stop Bits | 1 |
| Parity Bits | None |
RS-232 COMMANDS
The following commands are in hex, not ascii, so you should select the Hex Send Mode option in your command software before issuing commands. Note that each command is 13 bytes long.
Checksum
Many of the following commands require that a checksum be included as part of the command. This ensures that command is input correctly. The checksums must be calculated in hex mode. We suggest you use a calculator with a hex mode option. Calculate the checksum using the following formula:Checksum = 0x100 (0xa5+0x5b+0x02+0x03+input port+0x00+output port+0x00+0x00+0x00+0x00+0x00)
Input Select
The following command allows you to select the input source.
0xa5+0x5b+0x02+0x03+ Input index(1~8)+0x00+0x01+0x00+0x00+0x00+0x00+0x00+checksum
The following table lists the Input Index:
| Input Index | Input |
| 1 | HDMI® 1 |
| 2 | HDMI 2 |
| 3 | HDMI® 3 |
| 4 | HDMI 4 |
| 5 | DVI™ |
| 6 | VGA 1 |
| 7 | VGA 2 |
| 8 | CV |
Input Query
Issue the following command to display the selected input.
Send Package:A5 5B 02 01 01 00 00 00 00 00 00 00 checksum
Receive Package:A5 5B 02 01 01 00 Input index(1~8) 00 00 00 00 00 checksum
VGA Set
The following commands set various VGA modes.
Auto Adjust: 0xa5+0x5b+0x0A+0x0E+ 0x00+0x00+0x01+0x00+0x00+0x00+0x00+0x00+checksum
Set Scaler: 0xa5+0x5b+0x0A+0x0F+ 0x00+0x00+0x01+0x00+0x00+0x00+0x00+0x00+checksum
Set RGBHV: 0xa5+0x5b+0x0A+0x01+ 0x02+0x00+ Input index(6~7) +0x00+0x00+0x00+0x00+0x00+checksum
Set YPbPr: 0xa5+0x5b+0x0A+0x01+ 0x05+0x00+ Input index(6~7) +0x00+0x00+0x00+0x00+0x00+checksum
VGA Query
Issue the following command to display the VGA signal type:
Send Package:A5 5B 90 01 00 00 Input index(6~7) 00 00 00 00 00 checksum
Receive Package:A5 5B 90 01 VGA index(1~2) 00 Input index(6~7) 00 00 00 00 00 checksum
The following table lists the VGA Index:
| VGA Index | VGA Type |
| 1 | RGBHV |
| 2 | YPbPr |
Audio Select
The following command allows you to select the audio when an HDMI® or DVITM source is selected.
0xa5+0x5b+0x0A+0x0C+Audio Select index(1~2)+0x00+0x01+0x00+0x00+0x00+0x00+0x00+checksum
The following table displays the Audio Select Index options.
| Audio Select | Index Audio Type |
| 1 | INT |
| 2 | EXT |
Audio Query
Issue the following command to display the selected audio type.
Send Package: A5 5B 90 0C 00 00 Input index(1~5) 00 00 00 00 00 checksumReceive Package: A5 5B 90 0C Audio Select index(1~2) 00 Input index(1~5) 00 00 00 00 00 checksum
Resolution Set
The following command allows you to set the output video resolution.
0xa5+0x5b+0x0A+0x06+ Resolution index(1~5)+0x00+0x01+0x00+0x00+0x00+0x00+0x00+checksum
The following table displays the Resolution Index options.
| Resolution Index | Resolution |
| 1 | 1920×1200 |
| 2 | 1080p |
| 3 | 1360×768 |
| 4 | 720p |
| 5 | 1024×768 |
Resolution Query
Issue the following command to display the resolution.
Send Package:A5 5B 90 06 00 00 01 00 00 00 00 00 checksum
Receive Package:A5 5B 90 06 Resolution index(1~5) 00 01 00 00 00 00 00 checksum
EDID Set
The following command sets the EDID® to one of EDID sets in the built-in EDID table.
0xa5+0x5b+0x03+0x02+Edid index(1~15)+0x00+HDMI port(1~2)+0x00+0x00+0x00+0x00+0x00+checksum
The following table lists the EDID Index options:
| EDID Index | EDID Set |
| 1 | SE_1080I_20 |
| 2 | SE_1080I_51 |
| 3 | SE_1080I_71 |
| 4 | SE_1080P_20 |
| 5 | SE_1080P_51 |
| 6 | SE_1080P_71 |
| 7 | SE_3D_20 |
| 8 | SE_3D_51 |
| 9 | SE_3D_71 |
| 10 | SE_4K2K_20 |
| 11 | SE_4K2K_51 |
| 12 | SE_4K2K_71 |
| 13 | SE_DVI_1024_768 |
| 14 | SE_DVI_1920_1080 |
| 15 | SE_DVI_1920_1200 |
EDID Copy
The following commands copy the EDID of the device connected to either the HDMI® output or the HDBaseTTM output.
HDMI: 0xa5+0x5b+0x03+0x04+0x01 (1~2)+0x00+0x01(1~2)+0x00+0x00+0x00+0x00+0x00+checksum
HD BaseT: 0xa5+0x5b+0x03+0x03+0x02 (1~2)+0x00+0x02(1~2)+0x00+0x00+0x00+0x00+0x00+checksum
Beep Set
The following command allows you to turn on or off the beep that sounds when a front panel button is pressed.0xa5+0x5b+0x06+0x01+Beep onoff(0x0f:ON; 0xf0:OFF)+0x00+0x00+0x00+0x00+0x00+0x00+0x00+checksum
Beep Query
Issue the following command to display the status of the beep that sounds when a front panel button is pressed.Send Package:A5 5B 01 0B 00 00 00 00 00 00 00 00 F4Receive Package:A5 5B 01 0B 00 00 FF 00 00 00 00 00 F5The blue FF in the Receive Package indicates that the beep is off. It will change to 00 if the beep is on
References
[xyz-ips snippet=”download-snippet”]