
![]()
![]()
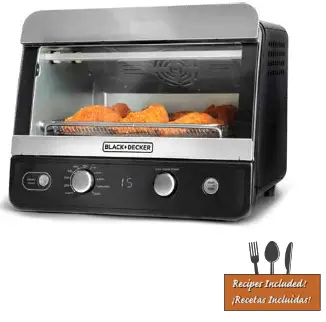
AIR FRY TOASTER OVENHORNO TOSTADOR CON FREIDORA DE AIREuse and care manualmanual de uso y cuidado
TOD6020B
Please Read and Save this Use and Care Book.
IMPORTANT SAFEGUARDS
When using electrical appliances, basic safety precautions should always be followed to reduce the risk of fire, electric shock, and/or injury, including the following:
- READ ALL INSTRUCTIONS BEFORE USING.
- Do not touch hot surfaces. Use handles or knobs.
- To protect against electrical shock, do not immerse the cord, plug, or appliance in water or other liquid.
- Close supervision is necessary when any appliance is used by or near children.
- Unplug from outlet when not in use and before cleaning. Allow time to cool before putting on or taking off parts.
- Do not operate any appliance with a damaged cord or plug, or if the appliance malfunctions or has been damaged in any manner. Contact consumer support at the toll-free number listed in the warranty section.
- The use of accessory attachments not recommended by the appliance manufacturer may cause injuries.
- Do not use outdoors.
- Do not let the cord hang over edge of the table or counter, or touch hot surfaces.
- Do not place on or near a hot gas or electric burner, or in a heated oven.
- Extreme caution must be used when moving an appliance containing hot oil or other hot liquids.
- If the unit is on standby (the start/stop icon is flashing or completely off), unplug from wall outlet. If the unit is powered on (the start/stop icon is illuminated solid), press the Start/Stop button to turn the unit off. Then unplug from the wall outlet.
- Do not use appliances for other than intended use.
- Use caution when removing the tray or disposing of hot grease.
- Do not clean the oven with metal scouring pads. Pieces can break off the pad and touch electrical parts, causing a risk of electric shock.
- Do not attempt to clean the heating elements.
- Oversized foods or metal utensils must not be inserted in a toaster oven, as they may create fire or risk electric shock.
- A fire may occur if the toaster oven is covered or touching flammable materials including curtains, draperies, walls, and the like, when in operation. Do not store any item on top of the unit while in operation.
- Extreme caution should be exercised when using containers constructed of other than metal or glass.
- Do not store any material, other than the manufacturer’s recommended accessories, in this oven when not in use.
- Do not place any of the following materials in the oven: paper, cardboard, plastic, and other items not onstructed of oven-safe metal and glass pans.
- This appliance is not intended for use by persons (including children) with reduced physical, sensory or mental capabilities, or lack of experience and knowledge unless they have been given supervision or instructions concerning the use of the appliance by a person responsible for their safety.
- Children should be supervised to ensure that they do not play with the appliance.
- The appliance is not intended to be operated by means of an external timer or separate remote-control system.
- Do not leave unattended while in operation. Food ignition may occur. If this happens, unplug the unit, but DO NOT open the door. To reduce the risk of fire, keep the oven interior completely clean and free of food residues, oil, grease, and other combustible materials.
SAVE THESE INSTRUCTIONS
This product is for household use only.
GROUNDED PLUGAs a safety feature, this product is equipped with a grounded plug, which will only fit into a three-prong outlet. Do not attempt to defeat this safety feature. Improper connection of the grounding conductor may result in the risk of electric shock. Consult a qualified electrician if you are in doubt as to whether the outlet is properly grounded.
TAMPER-RESISTANT SCREWWarning: This appliance is equipped with a tamper-resistant screw to prevent the removal of the outer cover. To reduce the risk of fire or electric shock, do not attempt to remove the outer cover. There are no user-serviceable parts inside. Repair should be done only by authorized service personnel.
ELECTRICAL CORDa) A short power-supply cord is provided to reduce the risks resulting from becoming entangled in or tripping over a longer cord.b) Extension cords are available and may be used if care is exercised in their use.c) If an extension cord is used:
- The marked electrical rating of the extension cord should be at least as great as the electrical rating of the appliance;
- If the appliance is of the grounded type, the extension cord should be a grounding-type 3-wire cord; and
- The cord should be arranged so that it will not drape over the countertop or tabletop where it can be pulled on by children or tripped over.Note: If the power cord is damaged, please contact the warranty department listed in these instructions.
CAUTIONTHIS OVEN GETS HOT.WHEN IN USE, ALWAYS USE OVEN MITTS OR POT HOLDERS WHEN TOUCHING ANY OUTER OR INNER SURFACE OF THE OVEN. |
GETTING TO KNOW YOUR AIR FRY TOASTER OVEN

- Door handle
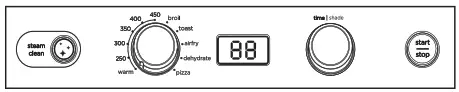
- Steam Clean button
- Function/Temperature dial
- Digital display
- Time/Toast shade knob
- Start/Stop button (Turns unit ON or OFF)
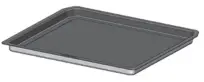
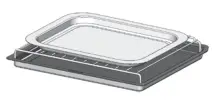
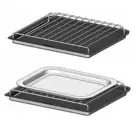
- Baking pan (Part# TOD6020-04)
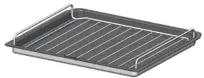
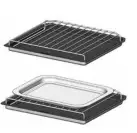
- Wirerack (Part# TOD6020-01)
- Crumb/steam tray (Part# TOD6020-02)
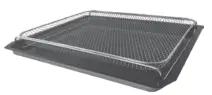
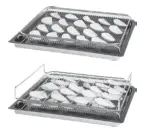
- Mesh cooking basket (Part# TOD6020-03)
- Extra accessories can be tucked under the oven. To do so, lift the front of the unit up and slide extra racks under.
Product may vary slightly from what is illustrated.
Crumb/steam trayThe crumb/steam tray must be installed above the heating elements to protect them from crumbs. Place the wire rack or mesh cooking basket on the crumb/steam tray.Note: Do not attempt to cook directly on this tray. The food will burn.• This tray is also used to pour soapy water into the Steam Clean cycle.
Wire rack (up position)Use for most functions. Always use on top of the crumb/steam tray with bake/ broil label facing up.

Mesh cooking basketUse for air frying and dehydrating functions. Always use on top of the crumb/steam tray.
Removing FoodTo easily remove food, use a utensil or oven mitts to pull the front edge of the crumb/ steam tray outwards. This allows the tray to catch any food debris or crumbs.

Wire rack (down position)Use for toast function or for taller food items such as a whole chicken. Always use on top of the crumb/steam tray with the toast label facing up.
Baking panUse for bake or broil cooking functions. Place on top of a wire rack in the up position, resting on the crumb/steam tray.
GETTING STARTEDThis appliance is intended for household use only.
- Remove all packing material, any stickers, and the elastic band around the power plug.
- Remove and save literature.
- Please go to www.prodprotect.com/blackanddecker to register your warranty.
- Wash all removable parts as instructed in Care and Cleaning Section.
- Select a location where this unit is to be used, allowing enough space from the back of the unit and wall (at least 4 inches) to allow heat to flow without damage to cabinets and walls.
- Ensure that the crumb/steam tray is in place before use.
- When removing food from the oven you may slide the crumb/steam tray towards you by fitting tongs or other utensils in the pull slot on the front edge of the crumb/steam tray. Protect your hands with oven mitts or potholders.
- Unplug appliance when not in use.
- This oven has unique cleaning capabilities. Please see the Care and Cleaning section for more details.
- The crumb/steam tray is non-stick for easy cleaning. Do not cover the crumb/steam tray or any part of this oven with metal foil. This oven has been designed to operate without foil. Using metal foil will negatively impact the cooking performance of your oven.
Important information about using your oven
- This oven gets hot. When in use, always use oven mitts or potholders when touching any outer or inner surface of the oven.
- When using the oven for the first time, you may notice smoke or a slight odor during the first few minutes. This is normal.
- Many factors influence cook times such as altitude, humidity and variations in electrical grids. For best results, monitor the end of the cook cycle.
- Cooking Containers: Metal, ovenproof glass or ceramic bakeware up to standard 9″ x 13″ size pans (without handles) can be used in your oven. Follow the manufacturer’s instructions.
- Be sure food or baking pan does not come within 1 ½ inches (3.8 cm) of the top heating elements. If you have tall food items or cooking containers, use the wire rack in the down position.
STANDBY/POWER ONSleep Mode: When not in use, the timer display and start/stop icon are not illuminated. If the unit is not in use and the controls are not touched for 5 minutes, the unit will go to sleep.
Standby Mode: When you press any of the buttons or turn any of the dials, the timer display illuminates solid and the start/stop icon flashes. This indicates the oven is ready to be started. If you turn the timer to 00, the start/stop icon will remain off and you’ll need to put time on the oven before starting the oven.
Power On: When you have selected your desired cook time and press the start/ stop button, the oven will power on and the start/stop icon will illuminate solid. After 30 seconds, the heating elements will glow. During operation, the heating elements will cycle on and off to maintain the desired temperature.
Add Time: To add time without stopping and starting the unit again while it is running, turn the time/shade knob to add more time.
Stay On: If you would like the oven to stay on, turn the timer knob counterclockwise past 0 until the display shows “on” and then press the start/stop button. You will then need to press the start/stop button again to end the cooking cycle.
BAKENote: For best results, when baking or cooking, preheat the oven for at least 5 minutes at the desired temperature setting. While the oven is preheating, the timer display will flash “PH” every 3 seconds.
Note: This oven has been designed to cook rapidly. Please inspect your items earlier than the prescribedthe cook time for a conventional oven to ensure that they do not get overcooked.
- Open oven door and place rack in the up position on the crumb/steam tray. With the rack in this position, you should be able to read the “bake/broil” label on the rack.
- Place items to be baked directly on the wire rack or place the pan on the wire rack.
- Set the Function/Temperature dial to the desired temperature.
- Turn the Time knob to adjust cook time on the digital display if you want a different time than the 15-minute default.
- Press the Start/Stop button to begin baking. The Start/Stop light illuminates solid. The digital display counts down while cooking, showing the time remaining.
- There are 2 beeps when the baking cycle is complete. The Start/Stop light turns off. The digital display reads “00”.
BROILNote: It is not necessary to preheat the oven for broiling.
- Open oven door and place rack in the up position on the crumb/steam tray. With the rack in this positionyou should be able to read the “bake/broil” label.
- Place items to be broiled directly on wire rack, or in the baking pan on top of the wire rack.
- Set the Function/Temperature dial to the Broil position.
- Turn the Time knob to adjust cook time on digital display if you want a different time than the 10 minute default.
- Press the Start/Stop button to begin broiling. The Start/Stop light illuminatessolid. The digital display counts down while cooking, showing the time remaining.
 Note: For best results when broiling meat, turn over the meat halfway through broiling.
 - There are 2 beeps when the broiling cycle is complete. The Start/Stop light turns off. The digital display reads “00”.
TOASTIt is not necessary to preheat the oven for toasting.Note: It is important to use the rack in the down position for adequate toasting on the bottom side of your bread. With the rack in this position, you should be able to read the “toast” label. The down rack position putsyour bread at the correct distance to the bottom heating elements. Do not toast in the upper rack position
- Open the oven door and place the rack in the down position on the crumb/steam tray. The toaster will hold a maximum of 6 slices of bread, placed in a single layer.
- Place items to be toasted directly on the rack and close the door.
- Set the Function/Temperature dial to the Toast position.
- Use the Time/Toast shade knob to select desired toast shade on a digital display, with 1 being the lightest and 7 being the darkest. Shade 4 is the default.
- Press the Start/Stop button to begin toasting. The Start/Stop light illuminates solid. The display will show the toast shade while toasting and a three-dash countdown timer image while toasting. Each dash represents 1/3 of the toasting cycle.
- There are 2 beeps when the toasting cycle is complete. The Start/Stop light turns off.
- Open the oven door. The crumb/steam tray will be hot so use oven mitts or a utensil to slide out the crumb/steam tray and remove the toast.
AIR FRYAir Fry Technology uses high-intensity hot air to bake, brown, and crisp your favorite fried foods with little to no oil.
This mode operates the oven at 425°F. Use the cooktimes listed in the recipes in this booklet or follow the food package recommendations for baking. Adjust the cook time as needed to achieve your preferred crispiness.Note: It is not necessary to preheat the oven for air frying.Note: Arrange your food in a single layer on the mesh rack for optimal air frying results.
- .Place food on mesh cooking basket.
- Open door and place mesh cooking basket on the crumb/steam tray.
- Set the Function/Temperature dial to the Air Fry position.
- Turn the Time knob to adjust cook time on digital display if you want a different time than the 20 minute default.
- Press the Start/Stop button to begin cooking. The Start/Stop light illuminates solid. The digital display counts down while cooking, showing the time remaining.
- There are 2 beeps when the cooking cycle is complete. The Start/Stop light turns off. The digital display reads “00”.
- To turn off the oven during a cooking cycle, press the Start/Stop button.
DEHYDRATEThis mode operates the oven at 165°F.Note: Cut the food to even size and thickness.Note: Arrange your food in a single layer on the mesh rack for optimal dehydrating results.
- Place food on mesh cooking basket.
- Open door and place mesh cooking basket on the crumb/steam tray. For an additional dehydrating layer, carefully place the wire rack in the down position on top of the mesh cooking basket.
- Set the Function/Temperature dial to the Dehydrate position.
- Turn the Time knob to adjust cook time on digital display if you want a different time than the 8 hours default. Turn the Time knob to adjust dehydration time on the digital display. The display shows the dehydration time in hours.
- Press the Start/Stop button to begin cooking. The Start/Stop light illuminates solid. The digital display counts down while cooking, showing the time remaining. It will show the time in hours and cycle between showing the time and the text “Hr”. Once the time reaches 60 minutes remaining, the display willcount down in minutes instead of hours.
- There are 2 beeps when the dehydrating cycle is complete. The Start/Stop light turns off. The digital display reads “00”.
- Open the oven door. Using oven mitts or potholders remove mesh cooking basket.
- To turn off the oven during a cooking cycle, press the Start/Stop button.
 Place food on mesh cooking basket.
PIZZAThe pizza function is designed to produce the best pizza crust and evenness of cooking. It utilizes an intermittent convection fan and operates the oven at 425°F. It then reduces the oven temperature at the end of the cooking cycle for optimal results. Monitor the pizza near the end of the cooking cycle to prevent overcooking.
 Note: It is not necessary to preheat the oven for the pizza function.
- Open oven door and place rack in the up position on the crumb/steam tray.
- Place frozen pizza to be cooked directly on wire rack, or fresh pizza in the baking pan on top of the wire rack. Follow recipe or package instructions
- Set the Function/Temperature dial to the Pizza position.
- Turn the Time knob to adjust cook time on digital display if you want a different time than the 20 minute default.
- Press the Start/Stop button to begin cooking. The Start/Stop light illuminates solid. The digital display counts down while cooking, showing the time remaining.
- There are 2 beeps when the cooking cycle is complete. The Start/Stop light turns off. The digital display reads “00”.
KEEP WARMNote: This function operates the oven at 150 F° and is only designed to keep warm food that is already cooked. Do not use this function for cooking. Do not keep foods on the keep warm setting for more than 4 hours.
- Set Temp selector knob to Warm position.
- Turn the Time knob to adjust keep warm time on digital display if you want a different time than the 30 minute default.
- Press the Start/Stop button to begin the keep warm function. The Start/Stop light illuminates solid. The digital display counts down while warming, showing the time remaining.
- There are 2 beeps when the keep warm cycle is complete. The Start/Stop light turns off. The digital display reads “00”.
- To turn off the oven during the keep warm cycle, press the Start/Stop button.
CARE AND CLEANINGThis product contains no user-serviceable parts. Refer to qualified service personnel.
- Wire rack, mesh cooking basket and crumb/steam tray are dishwasher safe. We recommend washing the bake pan by hand in hot water with dish soap.
- The top surface of the crumb tray has a (PTFE and PFOA free) non-stick ceramic coating. Do not use metal scouring pad to clean the tray as it will damage the coating.
- Do not use aerosol or spray oven cleaners.
STEAM CLEANING YOUR OVENUse the Steam Clean function for a quick cleanup of your oven.Note: For best results, clean regularly based on your frequency of usage. The function works best whenfood residue does not build up.Important: Do not steam clean immediately after cooking. Let the oven cool down.
- .Mix one drop of dish soap and 1/2 cup water. Use distilled water if possible.
- Pour the soapy water onto the crumb tray. Spread the water around the tray. Make sure the tray is in its normal position.
- Close the door and press the steam clean button. This will illuminate the steam clean icon and change thedisplay to show “SC”.
- Press the start/stop button to begin the steam clean cycle. The display will cycle between showing the time remaining and “SC”.
- The steam clean cycle runs for 5 minutes. This includes time for the oven to cool down. Once the cycle is complete, the oven will beep twice and the display will show “00”.
- Open the oven door and use a towel, paper towel, or sponge to wipe down the interior surfaces and glass door. For best results wipe down right after the cycle as condensation helps the cleaning. If significant time has passed and water condensation is no longer visible on glass door or walls, re-run the cycle for best cleaning results.
- There will be some residual water left on the tray. When wiping the back of the oven or sides, use caution as the oven may be warm.
- After you have wiped down the oven, use oven mitts or towel to carefully remove the crumb/steam tray and bring it to the sink. Empty the residual water from the tray and rinse off the crumb tray. The tray may require some additional scrubbing to remove any stubborn baked-on food. You can also place the crumbtray in the dishwasher if desired.Note: Use steam cleaning setting for cleaning only. This setting is not designed to steam cook foods.Note: Make sure soap is added to the water. Using soap ensures the proper condensation of water.Note: For very stubborn baked-on food or grease, see Deep Clean Tips section.
- Wipe the outside of the oven with a damp cloth or sponge. Do not use a spray cleaner. Dry thoroughly.
- Do not attempt to clean the heating elements. Any food that comes into contact with the elements will burn off on its own.
DEEP CLEANING YOUR OVENAfter using your oven for an extended period of time, it may be necessary todeep clean your oven to remove baked-on stains or grease.
- Ensure the crumb tray is in place but other accessories are removed.
- Create a mixture of 3 parts baking soda and 1 part water. This will create a baking soda cleaning paste, but it should not be too thick
- Apply some of the paste to a paper towel, sponge, or nylon pad.
- Scrub the stained areas with the baking soda paste with medium pressure. Continue scrubbing until the surfaces are clean.
- Using a moist sponge, wipe away the remaining soda paste. Clean up any bakingsoda paste that may have fallen onto the crumb tray during the cleaning process.
AIR FRYING AIR FRYING GUIDE GUIDE
| FOOD | TIME* |
| Frozen Food* | |
| Chicken Nuggets | 13-16 min. or until crisp and golden brown |
| Chicken Strips | 25-28 min. or until crisp and golden brown |
| Fish Sticks | 10-12 min. or until crisp and golden brown |
| Breaded Onion Rings | 10-12 min. or until breading is crisp |
| Breaded Mushrooms | 16-20 min. or until breading is crisp |
| Mozzarella Sticks | 10-12 min. or until breading is crisp |
| Jalapeño Poppers | 14-16 min. or until breading is crisp |
| Corn Dogs | 23-25 min. Rotate front to back halfway through cooking |
| Potato Skins | 13-15 min. or until hot and cheese is melted |
| Straight or Crinkle Cut Fries | 18-24 min. or until golden brown |
| Thick Steak Fries | 20-25 min. or until golden brown |
| Thin Shoestring Fries | 14-18 min. or until golden brown |
| Seasoned Potato Nuggets | 20-25 min. or until golden brown |
| Broccoli (Frozen) | 18-20 min. Spray florets with a little pan spray. Season with salt and pepper |
| Cauliflower (Frozen) | 18-20 min. Spray florets with a little pan spray. Season with salt and pepper |
| Fresh Vegetables | |
| Potato Wedge/Fries | 20-25 min. or until golden brown |
| Broccoli | 10 min. Toss florets in 1-2 Tbsp. of oil. Season with salt and pepper. |
| Cauliflower | 15-17 min. Toss florets in 1-2 Tbsp. of oil. Season with salt and pepper. |
| Poultry | |
| Chicken Wings
(Thawed/Fresh) |
20-25 min. or until internal temp is 165°F / 75°C |
| Chicken Drumsticks
(Thawed/Fresh) |
20-30 min. or until internal temp is 165°F / 75°C |
*Note: For these and other foods, please review the manufacturer suggested cook times.Note: Do not air fry frozen raw meats (i.e. burgers, steaks)
TROUBLESHOOTING
| PROBLEM | SOLUTION |
| Unit won’t turn on. | • Make sure the unit is plugged in. Select a cooking function or bake temperature and ensure there is time on the timer display. Press the start/stop button. If the start/stop icon is illuminated solid, your oven is powered on and heating. |
| Heating elements are not glowing. | • Check that the start/stop icon is illuminated solid which indicates unit is powered on. The heating elements should glow red after 1 minute of heating up. During operation, they cycle on and off. |
| The fan is not operating during air fry mode. | • Check that the function/temp knob is set to air fry function. When the oven is in air fry mode, you should hear the fan humming. |
| The bottom of the bread is not toasting. | • Make sure the wire rack is used in the down position with the “toast” label facing up. The cross wires should be close to the steam/crumb tray.
• Clean the crumb/steam tray to remove food residue. • Do not use foil on the crumb/steam tray |
| Smoke is coming out of the unit.
The unit may smoke upon the initial start-up. |
• The oven may create smoke when high-fat or greasy foods drip on the crumb/steam tray. Cook these kinds of food in the baking pan or other bakeware placed on top of the wire rack.
• Run steam clean cycle and thoroughly wipe down the interior and clean the crumb/steam tray. • Ensure there is no food debris in the bottom of the oven underneath the crumb/steam tray. • If the smoke issue persists, use the bake function at a lower temperature. |
| Food was burned. | • Make sure you are not cooking directly on the crumb/ steam tray.
• See page 5 for the best cooking support for your food. • In air fry mode, gently shake the food halfway through the cycle to get more even cooking. • Next time adjust the temperature lower in the baking mode or cook time shorter in other modes. |
| Food is not crispy in air fry mode. | • Use the mesh basket and ensure the food is arranged in a single layer without any overlap.
• If using a baking pan instead of a mesh basket for high-fat or greasy foods, the food will not be as crispy. • Clean the crumb/steam tray to remove any residue. • Do not use foil on the crumb/steam tray |
| Cooking too slowly. | • In bake mode, increase the cooking temperature.
• Clean the crumb/steam tray to remove any residue. |
| PROBLEM | SOLUTION |
| Steam is coming from the unit during cooking or toasting. | • This is normal for foods with high moisture content, including some bread types during toasting.
• Ensure there is no residual water on the crumb/steam tray. |
| During steam cleaning: steam is not building up on the glass door or walls inside the oven. | • Allow the unit to cool before running steam clean.
• Use 1/2 cup of soapy water spread out on the crumb/ steam tray. • Press the Steam Clean button. Then press Start/Stop. • Make sure the start/stop icon is solid during the steam clean cycle. • Ensure the door is closed during the steam clean cycle |
| Steam Clean function did not completely clean the oven. | • Refer to “Deep Cleaning Your Oven” to take care of more stubborn baked-on foods.
• Use the steam clean function regularly and immediately after cooking messy food items to prevent build-up. |
| Water is dripping onto the control panel. | • Note: If this occurs it will not damage your oven since the control panel is designed to prevent water ingress.
• Do not cook with water in the crumb/steam tray. • Do not run the steam clean cycle two times in a row. |
| Water accidentally spilled onto the bottom of the oven. | • Note: If water is spilled onto the bottom of the oven it will not damage the oven, as the oven will contain the water and drain it out the back of the oven.
• Ensure the unit is not powered on by checking that the start/stop icon is either off or flashing. Unplug oven. Use a towel to dry the bottom of your oven and be careful not to damage the heating elements. Move your oven from its position on the countertop and dry any water on the counter. Wait 24 hours for any moisture to evaporate and then you can use your oven again. |
| There is food debris stuck on the crumb/steam tray. | • Run the steam clean cycle.
• Use a nylon pad to scrub the crumb/steam tray. Do not use a metal scouring pad as this will damage the coating. • Run tray through a dishwasher cycle. • Refer to steps in Deep Cleaning Your Oven and use the baking soda paste to clean your tray. • If the stain still persists, it will not affect the cooking performance of your oven. |
If additional assistance is needed,please contact our consumer service team at1-800-465-6070.
Recipes
Breakfast Egg RollsPrep Time: 10 minutes Cook Time: 10 minutes Total Time: 20 minutesServings: 5 egg rolls Serving Size: 1 egg rollIngredients:1 tsp. unsalted butter4 eggs1 tsp. minced garlicSalt and pepper to taste4 slices of bacon (or meat of yourchoice) cooked, and crumbled½ cup cheddar cheese, shredded5 egg roll wrappersA small bowl of waterPan spray
Directions:
- Add the butter to a medium frying pan, over medium heat. Crack the eggs into a small bowl and scramble. Stir in garlic, salt and pepper. Pour into the frying pan.
- Sprinkle the bacon and cheese on top of the eggs and stir to incorporate until the eggs are cooked through.
- Lay an egg roll wrapper on a flat surface so that one point is facing you (think diamond). Brush the edges with water. Place 3 tablespoons of the egg mixture onto the center of the wrapper. Fold the sides in to the center and then fold the point closest to you over the egg mixture. Roll tightly away from you and seal the top point with more water to help seal the egg roll.
- Over a sink spray the air fry basket with pan spray and then place the egg rolls on the basket. Insert basket into oven.
- Turn oven to air fry, set the time to 10 minutes, and press start.
- Serve warm.
Garlic and Parmesan Green Bean Frieswith Cajun RemouladePrep Time: 15 minutes Cook Time: 15 minutes Total Time: 20 minutesServings: 6 Serving Size: 2-3 fries
Ingredients:1-pound fresh green beans1 cup panko breadcrumbs½ cup shredded parmesan1 Tbsp. granulated garlic1 tsp. smoked paprika1 tsp. dried parsley2 eggs½ cup flour1 tsp. salt½ tsp. ground black pepper
Remoulade Sauce:½ cup mayonnaise1 Tbsp. whole grain mustard½ tsp. pickle juice1 tsp. minced garlic1 tsp. Cajun seasoning½ tsp. hot sauce½ tsp. kosher salt
Directions:
- Rinse the green beans and snap off the stem end.
- Place flour in a small bowl, add salt and pepper. Stir to combine. Set aside.
- In another bowl, place the eggs and whisk them. Set aside.
- In a medium bowl, mix the panko breadcrumbs, parmesan cheese, garlic powder, paprika, and dried parsley.
- Line a rimmed baking pan with either parchment paper, foil, or plastic wrap. Sprinkle some of the breadcrumb mixtures on it to help keep the green beans from sticking. Set aside.
- Line up your bowls on the counter, with the flour bowl first, then the eggs, and lastly the bowl with the breadcrumbs.
- Start by dredging the green beans in the seasoned flour, then dipping in the eggs, and lastly dredging in the breadcrumbs. Place on the prepared baking pan. Repeat the process until the beans are all coated.
- Transfer the coated green beans into the air fry basket for the toaster oven. Leave a little space between the beans to allow for airflow. Place in the oven and turn the dial to air fry. Set the timer to 5 minutes and push start. Air fry until the green beans are golden brown. Repeat until all the green beans are cooked.
Make the Remoulade Sauce: While the green beans are cooking combine the ingredients in a small bowl and stir until blended. Taste and adjust seasonings if desired. Set aside. Use this as a dip for the green beans.
Air Fried Potato Wedgeswith Fry SaucePrep Time: 10 minutes Cook Time: 25 minutes Total Time: 35 minutesServings: 4 Serving Size: 3-4 wedgesIngredients:1 lb. russet potatoes cut into wedges2 Tbsp. olive oil2 tsp. saltFry Sauce:1 tsp ground pepper½ cup mayonnaise¼ cup ketchup½ tsp. garlic powder½ tsp. smoked paprika¼ tsp. salt½ tsp. ground yellow mustard½ tsp. dill pickle juice¼ tsp. ground black pepperDirections:
- Whisk together oil, salt, and pepper in a large bowl. Add the potatoes wedges and stir to coat. Transfer the potatoes to the air fry basket and spread them around so the wedges are not touching.
- Slide the air fry basket into the oven. Turn the function knob to air fry. Turn the time dial to 25 minutes and press start.
- Potato wedges are done when they start to brown. If the wedges are thicker it may take them a little longer than 25 minutes to air fry.
- While the potatoes are cooking make the fry sauce.
- In a medium bowl combine all the ingredients and whisk together. Cover and refrigerate until ready to serve.
BBQ Chicken Flatbread PizzaPrep Time: 20 minutes Cook Time: 14–18 min. Total Time: 34–38 min.Servings: 4 Serving Size: 1 egg rollIngredients:4 Naan flatbreads1 cup barbeque sauce1 cup mozzarella cheese1 cup pizza cheese blend8 ounces cooked shredded chicken½ cup sliced red onion1 Tbsp. oil¼ cup chopped cilantroDirections:
- In a medium frying pan over low heat, add 1 tbsp. oil. Add the red onion and a pinch of salt. Cook over low heat for about 10 minutes, stirring occasionally, until the onion is caramelized. Set aside until ready toassemble the pizzas. Note: this can be done a day before if desired. Refrigerate the caramelized onions until ready to use.
- On a cookie sheet place 2 of the Naan flatbreads. Spread about 3 tbsp of barbeque sauce on each flatbread. Sprinkle ¼ cup of pizza cheese blend over the sauce.
- Sprinkle ¼ cup (2 oz) of cooked shredded chicken over the cheese. Sprinkle with caramelized onion and add ¼ cup of mozzarella cheese evenly over the top. Repeat Steps 2 and 3 until all the Naan flatbread has been used.
- Place one flatbread pizza on the wire rack, in the up position in the oven. Turn the function dial to pizza and set the timer to 14 minutes. Press start. Bake until the cheese is melted and bubbly. Carefully remove the finished pizza from the oven and place on the cookie sheet. Put the next pizza in the oven, set the time and press start. Cut the flatbread pizza into desired pieces and sprinkle with desired amount of cilantro and enjoy.
Nashville Hot Chicken TendersPrep Time: 20 minutes Cook Time: 20 minutes Total Time: 40 minutesServings: 8 Serving Size: 2 tendersIngredients:2 cups panko breadcrumbs2 lbs. boneless chicken breast tenders1 tsp salt½ tsp coarsely ground black pepper2 tsp granulated garlic2 tbsp. hot sauce2 tbsp pickle juice½ cup flour1 large egg½ cup buttermilkSauce:2 tbsp cayenne pepper2 tbsp brown sugar1 tsp chili powder1 tsp garlic powder1 tsp paprika½ cup olive oilDirections:
- Combine the hot sauce, pickle juice, egg, and buttermilk in a medium bowl.Set aside.
- Combine the flour, salt, black pepper, and granulated garlic in another medium bowl. Set aside.
- Put the panko crumbs in a medium bowl.
- Using a baking sheet pan, line it with either parchment paper, foil, or plastic wrap and place it on the counter.
- Set the 3 bowls in a row starting with the flour mixture, then the buttermilk mixture and last have the panko breadcrumbs. The baking sheet pan should be next to the panko breadcrumbs. Pro tip: Sprinkle some panko crumbs on the sheet pan- it will help to keep the tenders from sticking to the sheet pan.
- Taking one chicken tender at a time, dredge it first in the flour mixture, then dip it in the buttermilk mixture and lastly dredge it in the panko crumbs. Set in the prepared sheet pan. Repeat this process until all the tenders are coated. Set aside while you make the sauce. Pro tip: there’s no easy way to stay clean while dredging the chicken tenders, I do try to keep one hand as my ‘wet’ hand and one hand as my ‘dry’ hand. Usually it is my right hand that I use to dredge the chicken in the flour (I pick up the chicken tenderwith my left). I use my right hand to place the tender in the buttermilk but use my left hand to coat the tender. I then use my left hand to lift the tender out of the buttermilk and place the tender in the panko. I use my right hand to coat the tender in the panko and then place the finished tender on the sheet pan. Set aside while you make the sauce.
- Make the sauce: Whisk together all the ingredients in a small bowl until evenly combined or put all ingredients in a mason jar, cover with the lid and shake until all ingredients are mixed. Set aside until tenders are cooked.
- Turn on the toaster oven and set it to Air Fry. Transfer some of the chicken tenders to the air fry basket, spritz with pan spray, and put it in the oven. Cook for 20 minutes, or until chicken is 165F.
- Place the chicken tenders on a plate or a serving platter and immediately pour some of the sauce over the top (you will need to re-whisk or shake if using a mason jar before pouring).
- Repeat until all the tenders are cooked and have the sauce poured over them. Serve immediately with pickle slices.
Simple Roasted BroccoliPrep Time: 5 minutes Cook Time: 20 minutes Total Time: 25 minutesServings: 4 servings Serving Size:1/3 cupIngredients:1 (10 oz.) bag broccoli florets (frozen);cut larger pieces so florets are asuniform as possible4 Tbsp. olive oil1 tsp. salt½ tsp. pepper½ large fresh lemon, juiced2 Tbsp. shredded parmesan cheeseDirections:
- In a large bowl, add broccoli, oil, salt and pepper. Toss to coat.
- Place broccoli in the air fry basket. Insert into the oven.
- Turn to air fry function, set the time for 18-20 minutes, press the start button, and fry until florets are crispy.
- Carefully remove the air fry basket and return the broccoli to the large bowl. Toss with lemon juice and parmesan cheese. Serve immediately.
Cauliflower ‘Rice’ Casserolewith BroccoliPrep Time: 10 minutes Cook Time: 30 minutes Total Time: 40 minutesServings: 10-12 Serving Size: ½ cup
Ingredients:2 heads of broccoli cut into florets1 (12oz) pkg of cauliflower rice, thawedif frozen1 cup sour cream8 oz of cream cheese, softened¼ cup of milk, heavy cream, half andhalf, or nut milk¼ tsp. black pepper1 tsp. salt1 tsp. onion powder1 tsp. granulated garlic1 cup shredded Colby cheese1 cup shredded triple cheddar cheese3 Tbsp. chopped fresh parsley8 slices of bacon, cooked and chopped, optionalPanko topping:1 cup panko breading4 Tbsp. butter, melted½ tsp. granulated garlic½ tsp. paprika1 tsp. dried parsley
Directions:
- In a large bowl, combine the sour cream, cream cheese, milk, black pepper, salt, onion powder, and granulated garlic. Stir until cream cheese chunks are smoothed out. You may need to add more milk.
- Add the parsley and cheeses to the sour cream mixture, stir to combine. Add the broccoli and cauliflower rice. Stir to coat with cheese mixture.Note: if using bacon add at this time.
- Pour the mixture into a lightly greased 9×13 pan (without handles). Spread it evenly into the pan and set aside while making the panko topping.
- Panko topping: in a small bowl combine the panko crumbs, garlic, paprika and parsley. Stir to combine.
- Pour the melted butter over the breadcrumbs and stir until the crumbs are coated with the butter. Sprinkle the crumbs evenly over the broccoli mixture in the pan.
- Place the pan on the wire rack in the up position in the oven. Close the door, turn the function dial to 350°F and set the timer to 30 minutes. Press start. Once done, let the casserole cool for about 5 minutes before serving.
 report this ad
NEED HELP?For service, repair or any questions regarding your appliance, please call our Customer Service Line at 1-800-465-6070. Please DO NOT return the product to the place of purchase. Also, please DO NOT mail product back to the manufacturer, nor bring it to a service center. You may also want to consult the website listed in this pamphlet.Warranty Information(Applies only in the United States and Canada)What does it cover?• Any defect in material or workmanship provided; however, Spectrum Brands’ liability will not exceed the purchase price of the product.For how long?• Two years from the date of the original purchase with proof of suchpurchase.What will we do to help you?• Provide you with a reasonably similar replacement product that is either new or factory refurbished.How do you get service?
- Save your receipt as proof of date of sale.
- Visit the online service website at www.prodprotect.com/blackanddecker,or call toll-free 1-800-465-6070, for general warranty service.
- If you need parts or accessories, please call 1-800-738-0245.How does state law relate to this warranty?
- This warranty gives you specific legal rights. You may also have other rights that vary from state to state or province to province.What does your warranty not cover?
- Damage from commercial use
- Damage from misuse, abuse or neglect
- Products that have been modified in any way
- Products used or serviced outside the country of purchase
- Glass parts and other accessory items that are packed with the unit
- Shipping and handling costs associated with the replacement of the unit
- Consequential or incidental damages (Please note, however, that somestates do not allow the exclusion or limitation of consequential or incidental damages, so this limitation may not apply to you.)Are there additional warranty exclusions?
- This warranty shall not be valid where it is contrary to the U.S. and other applicable laws, or where the warranty would be prohibited under any economic sanctions, export control laws, embargos, or other restrictive trade measures enforced by the United States or other applicable jurisdictions. This includes, without limitation, any warranty claims implicating parties from, or otherwise located in, Cuba, Iran, North Korea, Syria, and the disputed Crimea region.
References
[xyz-ips snippet=”download-snippet”]