
![]()
Indoor Wireless Remote Control OutletsINSTRUCTION MANUALCATALOG NUMBERSBDXPA0004
![]()
Thank you for choosing BLACK+DECKER!PLEASE READ BEFORE RETURNING THIS PRODUCT FOR ANY REASON.If you have a question or experience a problem with your BLACK+DECKER purchase, go to http://www.blackanddeckerelectrical.com If you can’t find the answer or do not have access to the Internet, call 1-844-746-6688 from 9 a.m. to 5 p.m. EST Mon.-Fri. to speak with an agent. Please have the catalog number available when you call.SAVE THIS MANUAL FOR FUTURE REFERENCE.
Important Safety Guidelines
SAVE THESE INSTRUCTIONS FOR FUTURE REFERENCE.Definitions: Safety Alert Symbols and WordsThis instruction manual uses the following safety alert symbols and words to alert you to hazardous situations and your risk of personal injury or property damage.![]() DANGER: Indicates an imminently hazardous situation that, if not avoided, will result in death or serious injury.
DANGER: Indicates an imminently hazardous situation that, if not avoided, will result in death or serious injury.![]() WARNING: Indicates a potentially hazardous situation that, if not avoided, could result in death or serious injury.
WARNING: Indicates a potentially hazardous situation that, if not avoided, could result in death or serious injury.![]() CAUTION: Indicates a potentially hazardous situation that, if not avoided, may result in minor or moderate injury. (Used without a word) Indicates a safety-related message.
CAUTION: Indicates a potentially hazardous situation that, if not avoided, may result in minor or moderate injury. (Used without a word) Indicates a safety-related message.![]() NOTICE: Indicates a practice not related to personal injury which, if not avoided, may result in property damage.
NOTICE: Indicates a practice not related to personal injury which, if not avoided, may result in property damage.![]() WARNING: PLEASE READ THIS INSTRUCTION MANUAL THOROUGHLY AND COMPLETELY BEFORE INSTALLATION & USE. FAILURE TO DO SO COULD CAUSE DAMAGE TO PROPERTY, SERIOUS INJURY OR DEATH, AND VOID YOUR WARRANTY.
WARNING: PLEASE READ THIS INSTRUCTION MANUAL THOROUGHLY AND COMPLETELY BEFORE INSTALLATION & USE. FAILURE TO DO SO COULD CAUSE DAMAGE TO PROPERTY, SERIOUS INJURY OR DEATH, AND VOID YOUR WARRANTY.
![]() WARNING: Cancer and Reproductive Harm www.P65Warnings.ca.gov.
WARNING: Cancer and Reproductive Harm www.P65Warnings.ca.gov.![]() AVERTISSEMENT: Cancer et Troubles de l’appareil reproducteur www.P65Warnings.ca.gov.
AVERTISSEMENT: Cancer et Troubles de l’appareil reproducteur www.P65Warnings.ca.gov.![]() ADVERTENCIA: Cáncer y Daño Reproductivo www.P65Warnings.ca.gov.For California residents
ADVERTENCIA: Cáncer y Daño Reproductivo www.P65Warnings.ca.gov.For California residents
Indoor Wireless Remote Control Outlets
![]() WARNING: Danger of explosion if the battery is incorrectly replaced. When replacing the battery, replace it with the same or equivalent type CR2032. Observe correct polarity (+ and ) when replacing batteries. Do not store or carry batteries so that metal objects can contact exposed battery terminals.
WARNING: Danger of explosion if the battery is incorrectly replaced. When replacing the battery, replace it with the same or equivalent type CR2032. Observe correct polarity (+ and ) when replacing batteries. Do not store or carry batteries so that metal objects can contact exposed battery terminals.![]() DANGER: DO NOT INGEST BATTERY; CHEMICAL BURN HAZARD. This product contains a coin/button cell battery. If the coin/button cell battery is swallowed, it can cause severe internal burns in just 2 hours and can lead to death. Keep new and used batteries away from children. If the battery compartment does not close securely, stop using the product and keep it away from children. If you think batteries might have been swallowed or placed inside any part of the body, seek immediate medical attention.
DANGER: DO NOT INGEST BATTERY; CHEMICAL BURN HAZARD. This product contains a coin/button cell battery. If the coin/button cell battery is swallowed, it can cause severe internal burns in just 2 hours and can lead to death. Keep new and used batteries away from children. If the battery compartment does not close securely, stop using the product and keep it away from children. If you think batteries might have been swallowed or placed inside any part of the body, seek immediate medical attention.![]() WARNING: Please do not plug anything in the receiver that should not be left unattended.Note: Regardless of whether the light is ON or OFF when the random mode is selected the light will turn OFF.
WARNING: Please do not plug anything in the receiver that should not be left unattended.Note: Regardless of whether the light is ON or OFF when the random mode is selected the light will turn OFF.
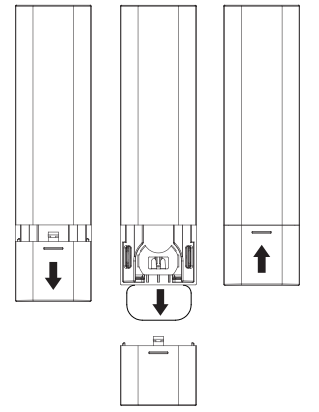
- Step A: Locate the battery compartment on the back of the remote. Push down and away to slide the compartment cover off.Step B: Remove the plastic battery tab from the battery compartment in the back of the remote control to activate the pre-installed battery.Step C: Slide the compartment cover on the remote and click securely into place. Your remote is now ready to use.

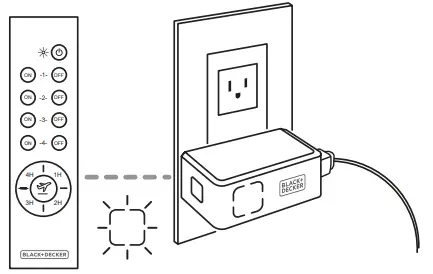
- Plug the receiver into a standard AC electrical wall socket.Plug the appliance into the receiver outlet.
- Before using the outlet with remote control, please pair as follows:A. Plug the outlet into the wall socket. When the receiver indicator light begins flashing, press any ON or OFF button to pair the outlet to a corresponding number on the remote control.B. When first using and pairing outlets to the remote control, please plug in and pair one outlet at a time.C. If successfully paired, but you wish to unpair and tie the outlet to another button on the remote, long-press the receiver button on the left side of the outlet [shown in figure under step 3] until the indicator light starts flashing [approximately 4 seconds]. You may then press any new ON or OFF button on the remote control. When the new pairing is successful, the indicator light on the outlet will stop flashing.
- To turn all outlets ON or OFF at the same time, press the power button located at the top right corner of the remote. To manually turn ON or OFF one outlet, press the ON or OFF button on the remote control for numbers 1-4. To ON -1- OFF utilize countdown timer mode, manually press 1H/2H/3H ON -2- OFF or 4H. The light indicator will flash softly to indicate the ON -3- OFF ON -4- OFF light is on countdown timer mode and the chosen duration. The remote can control all receivers’ countdown timer mode together at the same time. To override countdown timer mode, simply press the manual ON/OFF button linked to the outlet. The countdown timer mode will only shut down the connected device after the time selected is up. To utilize random mode, manually press the airplane logo button in the center of the remote. The light indicator will flash softly and the outlet will turn ON randomly within 4-8 hours for 15 – 45 minutes each cycle. The remote can control all receivers’ random modes together at the same time. To override, simply press the manual ON/OFF button linked to the outlet.

Specifications:
Power input: 125V/60Hz Power output: 1875W/15A (Max.) Transmitter frequency: 433.92MHz Remote transmitter battery: DC CR2032, 3V battery 1pc Transmission range: up to 100ft
Remote Battery Replacement:
If the operation of the receiver units becomes erratic, it may be necessary to replace the battery in the hand-held remote unit. To do this, first, remove the battery compartment cover. Press the tray release button on the back of the remote. Next, remove the depleted battery and discard it according to local ordinances. Be sure to correctly install the new battery. Replace battery compartment cover and test by using it to control the Indoor Remote Outlets.
![]() CAUTION:
CAUTION:
- Appliances to be connected to the remote control socket MUST NOT exceed the voltage and current ratings as in “Specifications”.
- Operation is subject to the following two conditions:(1) this appliance may not cause harmful interference, (2) this appliance must accept any interference received, including interference that may cause undesired operation.
- Only for indoor use and storage.
- Low transmitter battery may lower the distance between the transmitter and the receiver.
Grounding Instructions
In the event of malfunction or breakdown, grounding provides a path of least resistance for electric current to reduce the risk of electric shock. The remote control outlet must be connected to a cord having an equipment-grounding conductor and a grounding plug. The plug must be plugged into an appropriate outlet that is properly installed and grounded in accordance with all local codes and ordinances.![]() DANGER: Improper connection of the equipment-grounding conductor can result in a risk of electric shock. The conductor with insulation having an outer surface that is green with or without yellow stripes is the equipment grounding conductor. If repair or replacement of the cord or plug is necessary, do not connect the equipment-grounding conductor to a live terminal. Check with a qualified electrician or service person if the grounding instructions are not completely understood, or if in doubt as to whether the remote control outlet is properly grounded. Do not modify the plug connected to the remote control outlet if it will not fit the outlet, have a proper outlet installed by a qualified electrician.FOR GROUNDED, CORD-CONNECTED REMOTE CONTROL OUTLET RATED LESS THAN 15A AND INTENDED FOR USE ON A NOMINAL 125V SUPPLY CIRCUITThe remote control outlet is for use on a nominal 125V circuit and should be connected to a grounding outlet that looks like that illustrated in sketch a. A temporary adaptor, which looks like the adaptor illustrated in sketch b, may be used to connect this plug to a 2-pole receptacle as shown in sketch b if a properly grounded outlet is not available. The temporary adaptor should be used only until a properly grounded outlet can be installed by a qualified electrician. The green-colored rigid ear, lug, and the like, extending from the adaptor must be connected to a permanent ground such as a properly grounded outlet box cover. Whenever the adaptor is used, it must be held in place by the metal screw.
DANGER: Improper connection of the equipment-grounding conductor can result in a risk of electric shock. The conductor with insulation having an outer surface that is green with or without yellow stripes is the equipment grounding conductor. If repair or replacement of the cord or plug is necessary, do not connect the equipment-grounding conductor to a live terminal. Check with a qualified electrician or service person if the grounding instructions are not completely understood, or if in doubt as to whether the remote control outlet is properly grounded. Do not modify the plug connected to the remote control outlet if it will not fit the outlet, have a proper outlet installed by a qualified electrician.FOR GROUNDED, CORD-CONNECTED REMOTE CONTROL OUTLET RATED LESS THAN 15A AND INTENDED FOR USE ON A NOMINAL 125V SUPPLY CIRCUITThe remote control outlet is for use on a nominal 125V circuit and should be connected to a grounding outlet that looks like that illustrated in sketch a. A temporary adaptor, which looks like the adaptor illustrated in sketch b, may be used to connect this plug to a 2-pole receptacle as shown in sketch b if a properly grounded outlet is not available. The temporary adaptor should be used only until a properly grounded outlet can be installed by a qualified electrician. The green-colored rigid ear, lug, and the like, extending from the adaptor must be connected to a permanent ground such as a properly grounded outlet box cover. Whenever the adaptor is used, it must be held in place by the metal screw.
 NOTE: IN CANADA, THE USE OF A TEMPORARY ADAPTOR IS NOT PERMITTED BY THE CANADIAN ELECTRICAL CODE. Ensure that the remote control outlet is connected to an outlet having the same configuration as the plug.
1 YEAR LIMITED WARRANTY
IMPORTANT: Proof of Purchase is required to obtain warranty service.Paragon Group USA Inc. warrants to the original owner that our products will be free from defects in workmanship and material for a period of ONE YEAR from the date of purchase. Should any unit(s) prove to be defective during this period, Paragon Group USA Inc. will be responsible for the replacement of the defective unit(s) only. Paragon Group USA Inc. is not responsible for labor charges or any incidental or consequential expenses.Not Covered Batteries are not covered by this warranty. Repair service, adjustment, and calibration due to misuse, abuse, or negligence are not covered by this warranty. Unauthorized service or modification to this product or of any furnished components will void this warranty in its entirety. This warranty does not include reimbursement for inconvenience, installation, set-up time, loss of use, postage, unauthorized service, or other products used in conjunction with BLACK+DECKER products.
Copyright C 2021 Black&DeckerBLACK+DECKER and the BLACK+DECKER logo are trademarks of Stanley Black Decker, Inc. or an affiliate thereof and are used under license.Ph: 1-844-746-6688 www.blackanddeckerelectrical.com E-mail: [email protected] Imported by: Paragon Group USA, Englewood, NJ, 07631 USA
References
[xyz-ips snippet=”download-snippet”]