5-IN-1 DIGITAL MULTI-FUNCTION KITCHEN SYSTEMuse and care manualBL1275BGFP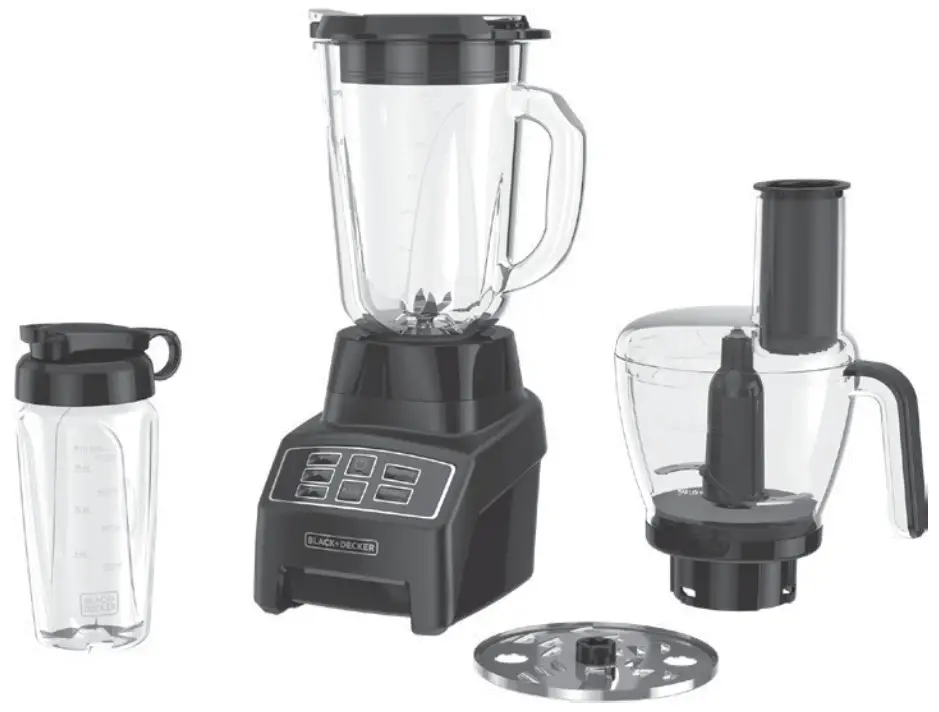
PLEASE READ AND SAVE THIS USE AND CARE BOOK.
IMPORTANT SAFEGUARDS.
When using electrical appliances, always follow basic safety precautions to reduce the risk of fire, electric shock, and/or injury, including the following:
- Read all instructions.
- To protect against risk of electrical shock, do not put an appliance base, cord, or plug in water or other liquid.
- Close supervision is necessary when any appliance is used by or near children.
- Turn the appliance OFF, then unplug from the outlet when not in use, before assembling or disassembling parts, and before cleaning. To unplug, grasp the plug and pull from the outlet. Never pull from the power cord.
- Avoid contacting moving parts.
- Do not operate any appliance with a damaged cord or plug or after the appliance malfunctions or is dropped or damaged in any manner. Contact Customer Service for examination, repair or electrical or mechanical adjustment by calling the appropriate toll-free number listed in this manual. This appliance has important markings on the plug blade. The attachment plug or entire cord set (if the plug is molded onto the cord) is not suitable for replacement. If damaged, the appliance must be replaced.
- The use of attachments, including canning jars, not recommended or sold by the appliance manufacturer may cause a risk of injury to persons.
- Do not use outdoors.
- Do not let cord hang over the edge of the table or counter, or touch hot surfaces.
- Keep hands and utensils out of containers while operating appliances to reduce the risk of severe injury to persons or damage to the appliance. A scraper may be used, but must be used only when the appliance is not running.
- Blades are sharp. Handle carefully.
- To reduce the risk of injury, never place the blades or disc on the base without the blending jar, single-serve blender jar, or work bowl properly attached.
- When blending, always operate the appliance with the dual opening lid in place on the blending jar.
- Risk of thermal burn injury: do not blend hot liquids.
- Do not use appliances for other than intended use.
- This appliance is not intended for use by persons (including children) with reduced physical, sensory or mental capabilities, or lack of experience and knowledge unless they have been given supervision or instruction concerning use of the appliance by a person responsible for their safety.
- Children should be supervised to ensure that they do not play with the appliance.
- Do not place on or near a hot gas or electric burner or in a heated oven.
- Do not operate with damaged blades.
- Be certain the work bowl cover is securely locked in place on the work bowl before operating the appliance as a food processor.
- This appliance has a protection system. The unit will not operate as a food processor unless the work bowl is on the base and the work bowl cover is securely locked onto the work bowl.
- When operating the appliance as a food processor, never feed food by hand. Always use food pusher.
- Do not attempt to defeat the work bowl cover interlock mechanism.
- Do not fill the work bowl above the marked maximum fill line to avoid risk of injury due to damage to the cover or bowl.
- Do not open workbowl cover until blade or disc stops completely.
- Note: Processing items with low moisture content may dull the finish of the workbowl.
SAVE THESE INSTRUCTIONS.This product is for household use only.
POLARIZED PLUG
This appliance has a polarized plug (one blade is wider than the other). To reduce the risk of electric shock, this plug is intended to fit into a polarized outlet only one way. If the plug does not fit fully into the outlet, reverse the plug. If it still does not fit, contact a qualified electrician. Do not attempt to modify the plug in any way.
TAMPER-RESISTANT SCREW
Warning: This appliance is equipped with a tamper-resistant screw to prevent removal of the outer cover. To reduce the risk of fire or electric shock, do not attempt to remove the outer cover. There are no user-serviceable parts inside. Repair should be done only by authorized service personnel.
ELECTRICAL CORD
- A short power-supply cord is provided to reduce the risk resulting from becoming entangled in or tripping over a longer cord.
- Extension cords are available and may be used if care is exercised in their use.
- If an extension cord is used,a) The marked electrical rating of the extension cord should be at least as great as the electrical rating of the appliance,b) If the appliance is of the grounded type, the extension cord should be a grounding-type 3-wire cord, andc) The cord should be arranged so that it will not drape over the countertop or tabletop where it can be pulled on by children or tripped over.
Note: If the power cord is damaged, please call our Customer Service line listed in these instructions.
GETTING TO KNOW YOUR POWERCRUSH™5-IN-1 DIGITAL MULTI-FUNCTION KITCHEN SYSTEM
| 1. Dual-opening lid (Part# BL1275-01 ) | 11. Single serve jar (Part# BL1275-05) |
| 2. Pour Spout | 12. Food pusher (Part # BL1275-06) |
| 3. Ingredient Slot | 13. Feed chute |
| 4. Blending jar (Part# BL1275-02) | 14. Workbowl cover (Part # BL1275-07) |
| 5. Blade assembly (Part# BL1400-01) | 15. Slicing/shredding disc (Part # BL1275-08) |
| 6. Jar base (Part# BL1275-03) | 16. Chopping blade (Part # BL1275-09) |
| 7. Base | 17. Workbowl (Part # BL1275-10) |
| 8. Digital Control Panel | 18. Center shaft/workbowl base assembly(Part # BL1275-11) |
| 9. Cord storage (under base) | |
| 10. Single serve jar travel lid (Part# BL1275-04) |
Product may vary slightly from what is illustrated.
HOW TO USE
This product is for household use only.
GETTING STARTED
- Remove all packing material, any stickers, and the plastic band around the power plug.
- Remove and save literature.
- Please visit www.prodprotect.com/blackanddecker to register your warranty.
- Wash all removable parts as instructed in CARE AND CLEANING section of this manual.
BLENDING JAR ASSEMBLY
- Turn blending jar upside down and place flat on countertop or work surface.
- Place the blade assembly in the bottom opening of the jar with blades down. (A)Caution: Blades are sharp. Handle carefully.
- Place the jar base onto the blending jar and rotate clockwise until tight. It is important to tighten to avoid leaking while blending.
- Turn assembled jar right side up.
- Place the dual-opening lid on blender jar.
- Uncoil power cord from storage area under the blender base.
- Place the jar assembly on blender base. (B).
- Blender is now ready for use.
USING THE BLENDER
Important: Appliance should always have lid in place when in use.Caution: Do not place blender jar onto base when motor is running.
- Make sure appliance is OFF.
- Place ingredients to be blended into jar. For best results, add ingredients in the following order:a. Liquidsb. Powdersc. Soft foodsd. Hard foodse. Ice cubes lastTip: When using frozen fruits it is not necessary to also add ice.
- Place lid on jar; make sure the pour spout and ingredient slot are closed.
- Plug power cord into outlet. Press ON/OFF button. LED should turn a solid color to signify the blender is in standby mode. After 2 ½ minutes the unit will automatically power off if no buttons are pressed.Note: When in use, do not leave blender unattended. When using hard foods, such as ice or cheese, keep one hand on the lid to keep blender in place.
- Select the speed that best suits your desired task. (See SPEED CHART)Important: Do not hold speed button. Simply press the desired speed, watch, and press
 (ON/OFF) when the desired consistency is achieved. Holding the button for longer than 30 seconds will cause the blender to shut off. Unit must be shut off to reset.
 - When blending thick mixtures, such as smoothies and milkshakes, use the PULSE/Ice Crush button for several seconds, then release. Repeat to mix ingredients and then run continuously until food has reached desired consistency. Releasing pulse stops the blending and the unit returns to STANDBY. You may use a spatula or utensil to move ingredients and thick mixtures around in the blender jar, but only after stopping the blender. Turn the blender OFF before using a utensil.
- Open the ingredient slot to add ingredients while the blenderis running. Drop ingredients through the opening. (C).Important: Do not remove the lid while the blender is running.
- When finished, press (ON/OFF) to stop blending. Make sure blades have completely stopped before attempting to remove the blending jar from the base (refer to TROUBLESHOOTING for any issues).
- Press (ON/OFF) to power off and unplug the blender.
- To remove the jar, grasp the handle and lift up.
- Open pour spout to serve.Note: Unit will auto shutoff after 2 ½ minutes without use.
- Always unplug the appliance when not in use.
USING THE PREPROGRAMMED FUNCTIONS
- Fill the assembled blender jar with the desired ingredients.
- Place the dual-opening lid on the jar.
- Place the jar on the base.
- Press desired preprogrammed button. The blender will automatically mix and blend the following recipes with the press of a button:– Smoothie: 30 seconds to blend fruits and vegetables to a smooth consistency.– Icy drinks: Perfect for classic icy drinks like Margaritas with small ice crystals.
USING THE SINGLE SERVE BLENDER JAR
Note: Do not blend hot liquids in the single serve jar.
- Place the single serve blender jar on a flat surface with the open end facing up. Fill the jar with ingredients. Do not fill ingredients past the Max fill line.Note: For best results, add ingredients in the following order:a. Liquidsb. Icec. Hard Foodsd. Soft Foodse. Powders
- Place blade assembly in the jar opening with blades down.
- Place jar base onto jar and rotate clockwise until it is tight. It is important to tighten to prevent leaking during blending.
- Turn single serve jar upside down and place on the blender base.
- Select speed 1 or use PULSE/Ice Crush to blend to desired consistency.While blending, keep one hand holding the single serve jar.
- Once blending has finished, remove the single serve jar by lifting off the base. Turn the jar over and place it on a flat surface.Note: Always make sure blades have stopped moving before removing jar.Important: If the jar gets stuck on the blending base or begins to loosen from the jar base, follow these steps:a. Unplug the unitb. Turn the jar clockwise to tighten jar onto the jar base
- Remove the jar base from the single serve jar by turning counterclockwise. Then carefully remove blade assembly
- Place the single serve jar drinking lid on the single serve jar and enjoy your delicious drinks on-the-go.Caution: Blades are sharp. Handle carefully.
BLENDING TIPS AND TECHNIQUES
- Cut food into pieces no larger than ¾” for use in the blender.
- When preparing foods that have several different kinds of ingredients, always add liquid ingredients first.
- When ingredients splatter onto the sides of the jar or the mixture is very thick, press the (ON/OFF) button to turn appliance off. Remove the lid and use a rubber spatula to scrape down the sides of the jar and to redistribute the food, pushing food toward the blades. Replace the lid and continue blending.
- When making bread crumbs or blending dry goods, make sure blending jar and blade assembly are completely dry.
- The PULSE/ICE CRUSH function is helpful when short bursts of power are needed, such as when preparing thick smoothies or milkshakes. Do not use pulse for more than 10 seconds at a time. Release the PULSE/ICECRUSH button regularly, allow the blender to rest briefly, then continue.
- Do not run blender for longer than 1 ½ minutes at a time.
- Do not use if blender jar is chipped or cracked.
- It is helpful to begin the blending process on the lowest speed and then increase to a higher speed, if necessary.
- To stop blending at any time, press the (ON/OFF) button.
- Always operate the blender with the lid on the jar.
- Do not store foods in the blending jar.
- Do not overfill the blender (the blender is more efficient with less rather than more).
DO NOT USE BLENDER TO BLEND:
- Large pieces of frozen foods
- Tough foods such as raw turnips, sweet potatoes and potatoes
- Bones
- Hard salami, pepperoni
- Boiling liquids (cool for 5 minutes before place in blending jar)
- Egg whites
- Dough
- Meats
SPEED AND FUNCTION CHART
| Function | Food Type | Speed Setting |
| 1 | StirMixCrumb | Prepare salad dressings.Mix ingredients for baked goods.Make crumbs: cookie, cereal, bread.Blend in the single serve jar. |
| 2 | ChopWhipBlend | Chop fruits, vegetables.Whip whipped cream or butter.Blend smoothies, sauces |
| 3 | DressingsBattersDips | Puree fruits and vegetables.Blend milkshakes and malts.Grind hard cheeses and coconut. |
| Pulse/Ice Crush | PulseIce | Pulse to desired consistency.Crush ice to snow texture. |
| 30 SecondSmoothie | Smoothies | Preset function |
| Icy Drinks | MargaritasDaiquiris | Preset function |
ASSEMBLING THE FOOD PROCESSOR ATTACHMENT
Important: Always make sure the base of the appliance is unplugged and placed on a flat, level surface before starting to assemble.Important: For your protection this appliance has an interlock system. The appliance will not operate as a food processor unless the cover is properly locked in place.
- Lower workbowl over center shaft/workbowl’s base assembly and rotate bowl clockwise to lock the two parts together.
- Place either the chopping blade or the slicing/ shredding disc onto center shaft.
- Place cover on work bowl with the latch closest to the feed chute counter clockwise from the latch to the right of the workbowl’s handle. Line up the pin on the lid with the pin on the center shaft.
- Gently press down the lid to depress the lower pin and rotate the cover clockwise until cover locks into place.
- Place workbowl onto base and twist clockwise to lock.
GENERAL TIPS FORUSING THE FOOD PROCESSOR ATTACHMENT
- Organize processing tasks to avoid multiple cleanups of the bowl; process dry before wet.
- Do not process foods that are so frozen or hard that the tip of a knife cannot be inserted into the food.
- If a piece of hard food, such as a carrot, becomes wedged or stuck on the blade, stop the appliance and unplug, then remove the blade. Gently remove food from the blade.
- Meat and cheese should be well chilled before slicing or shredding.
- Insert a funnel into the feed chute when adding ingredients such as, oil, flour and sugar.
- Do not use the food processor attachment to:– Grind coffee beans, bones, grains or hard spices– Slice or chop warm meat
TIPS FOR USING THE CHOPPING BLADE
- The chopping blade works very quickly. Watch carefully to avoid overprocessing foods.
- For best results, process foods that are about the same size.
- The appliance will be more efficient if workbowl filled no more than 1/2 to 2/3 full.
- Processing nuts or other hard foods may scratch the surface finish on the inside of the workbowl.
- Never walk away from the appliance while it is on.
- Use hot, but never boiling liquids.
- The PULSE feature offers the best control.
TIPS FOR SLICING OR SHREDDING
- Before slicing round fruits and vegetables with the disc, cut a thin slice from the bottom so food will be more stable. Place food cut side down in the feed chute.
- Always remove seeds, core and pits before processing
- Select foods that are firm and not over ripe.
- When slicing thinner vegetables cut them just short of the length of the feed chute; stand them vertically in the feed chute so they are solidly packed and cannot turn or tilt.
- Soft and semi hard cheeses should be well chilled before shredding.
- Do not let the food accumulate too high (over 2/3 full); stop and empty the workbowl.
WHAT SPEED TO USE
CARE AND CLEANING
This product contains no user serviceable parts. Refer service to qualified service personnel.
- Before cleaning, turn off and unplug the appliance.
- If using blending jar, lift the blending jar by the handle off the base.
- Remove jar base by turning it counterclockwise until loose.
- Remove the blade assembly.Caution: Blades are sharp. Handle carefully.
- Remove lid.
- Wash removable parts by hand or in the dishwasher. Place the jar on the bottom rack and the rest of the parts on the top rack only.• Rinse removable parts immediately after using appliance for easier cleaning.• Completely disassemble blender or food processor attachment parts before washing.• All removable parts can be washed by hand in hot water with dish soap or in the dishwasher, top rack only. Hand-washing of plastic parts will help to maintain the appliance’s appearance.• Do not use rough scouring pads or cleansers on any plastic or metal parts to clean.• Do not allow blade or disc to soak in water for long periods of time.• Remember to clean the internal shaft of the chopping blade. Use a brush to remove any residual food particles.
Important:
- Do not place the parts in boiling liquids.
- Do not immerse the base in liquid. Wipe the base with a damp cloth and dry thoroughly.
- Remove stubborn spots by rubbing with a damp cloth and nonabrasive cleaner.Note: If liquids spill onto the base, wipe with a damp cloth and dry thoroughly.Do not use rough scouring pads or cleansers on parts or finish.
TROUBLESHOOTING
| Problem | Possible Cause | Solution |
| Blender is having difficulty blending | Mixture is too thick or air bubble has formed between mixture and blade. | Turn blender off. Use rubber spatula to scrape down sides of jar and redistribute, pushing food towards blades. Add more liquid. |
| Blender stops/goes into STANDBY mode | Blending time exceeds 2.5 minutes. | Re-select appropriate speed setting to start blender. |
RECIPES
CLASSIC SMOOTHIE
4 cups apple juice4 medium bananas, cut into 2 pieces4 cups frozen whole strawberriesPlace ingredients in blender in order shown above. Cover and blend for 15 seconds, or until smooth.Makes 6 (1 cup) servingsTip: Substitute orange juice for apple juice
EASY FROZEN MARGARITA
½ cup orange flavored liquor1 cup tequila1 (6 oz.) can frozen limeade mix4 cups ice cubesPlace ingredients in blender with liquids first and ice last; cover. Blend on AUTO setting ICE DRINK. Serve with lime wedges if desired.Makes 6 servings
SIMPLE SALSA
Total Time: 5 minutesServings: makes 2 cups
Ingredients
| 2 medium fresh tomatoes, quartered | 2 Tbsp. fresh lime juice |
| 1/3 cup loosely packed cilantro | 1/2 tsp. salt |
| 1/ 3 cup diced tomatoes and green chilies* | 1/2 tsp. sugar |
| 1/4 small yellow onion | 1/ 2 jalapeño, stem and seeds removed (optional) |
| 1 tsp. minced garlic |
Directions
- Place the tomatoes into the food processor attachment workbowl with the chopping blade and pulse 4 to 5 times to chop.
- Add the remaining ingredients into the bowl with the chopped tomatoes and process on Low (speed 1) for about 30 seconds, or until desired consistency is reached.
- Serve with tortilla chips.*Look for cans of diced tomatoes with green chilies in the Mexican or International section of the grocery store.
BLACK BEAN HUMMUS
Total Time: 5 minutesServings: 7Serving Size: 1/4 cup
Ingredients
| 1 (15 oz) can black beans, drained andrinsed | 2 tsp. cumin |
| 2 Tbsp. fresh lime juice | 1/2 tsp. chili powder |
| 1/4 cup tahini | 2 Tbsp. cilantro |
| 1/4 cup olive oil | 1/2 tsp. salt |
| 1 Tbsp. minced garlic | 1/8 tsp. pepper |
| 1/2 small yellow onion |
Directions
- Add all ingredients into the food processor attachment workbowl with the chopping blade. Process on High (speed 3) for about 1 minute until the hummus is a smoothconsistency.
- Serve with your favorite chips or crackers.
JALAPEÑO PEPPER DIP
Prep Time: 5 minutesTotal Time: 20–25 minutesServings: makes 3 1/2 cups
Ingredients
| 2 jalapeño peppers, stems and seeds removed | 1/2 tsp. salt |
| 16 oz. cream cheese, softened | 8 slices cooked bacon, chopped |
| 1/2 cup sour cream | 2 1/4 cups shredded pepper jack cheese, divided |
| 1 Tbsp. minced garlic |
Directions
- Preheat oven or toaster oven to 350°F.
- In the food processor attachment workbowl with the chopping blade, place the seeded jalapeño in and pulse 3 to 4 times to dice.
- Put the remaining ingredients, and 1 3/4 cup of the shredded cheese into the bowl with the diced jalapeño. Process on High for about 30 seconds to reach a smooth consistency.
- Pour the mixture into an oven safe dish and smooth out. Top with the remaining 1/2 cup shredded cheese.
- Bake for 15–20 minutes until the cheese is bubbly.
- Serve with tortilla chips or crackers.
NEED HELP?
For service, repair or any questions regarding your appliance, please call our Customer Service Line at 1-800-465-6070. Please DO NOT return the product to the place of purchase. Also, please DO NOT mail product back to manufacturer, nor bring it to a service center. You may also want to consult the website listed in this pamphlet.
Warranty Information(Applies only in the United States and Canada)What does it cover?• Any defect in material or workmanship provided; however, Spectrum Brands’ liability will not exceed the purchase price of product.For how long?• Two years from the date of original purchase with proof of such purchase.What will we do to help you?• Provide you with a reasonably similar replacement product that is either new or factory refurbished.How do you get service?• Save your receipt as proof of date of sale.• Visit the online service website at www.prodprotect.com/blackanddecker, or call toll-free 1-800-465-6070, for general warranty service.• If you need parts or accessories, please call 1-800-738-0245.
How does state law relate to this warranty?• This warranty gives you specific legal rights. You may also have other rights that vary from state to state or province to province.
 report this ad
What does your warranty not cover?
- Damage from commercial use
- Damage from misuse, abuse or neglect
- Products that have been modified in any way
- Products used or serviced outside the country of purchase
- Glass parts and other accessory items that are packed with the unit
- Shipping and handling costs associated with the replacement of the unit
- Consequential or incidental damages (Please note, however, that some states do not allow the exclusion or limitation of consequential or incidental damages, so this limitation may not apply to you.)
Are there additional warranty exclusions?
- This warranty shall not be valid where it is contrary to U.S. and other applicable laws, or where the warranty would be prohibited under any economic sanctions, export control laws, embargos, or other restrictive trade measures enforced by the United States or other applicable jurisdictions. This includes, without limitation, any warranty claims implicating parties from, or otherwise located in, Cuba, Iran, North Korea, Syria and the disputed Crimea region.
Note: The maximum rating is based on the blending jar attachment, which draws the greatesload (power or current). Other recommended attachments may draw significantly less poweror current.
BLACK+DECKER and the BLACK+DECKER logos are trademarks of The Black & Decker Corporation, used under license by Spectrum Brands, Inc. for its manufacturing and sale of this product. All rightsreserved.
At the end of this product’s life, you can mail it to Spectrum Brands at 507 Stokely Drive, Deforest, WI 53532 marked “Product Takeback: Please Recycle!”
© 2021 The Black & Decker Corporation and Spectrum Brands, Inc., Middleton, WI 53562 All rights reserved.
References
[xyz-ips snippet=”download-snippet”]