Black Decker Digital Multicooker Instruction Manual
DIGITAL MULTICOOKER, 7QUARTS OLLA MULTICOCCIÓN, 6.5L

Please Read and Save this Use and Care Book.
IMPORTANT SAFEGUARDS.
When using electrical appliances, basic safety precautions should always be followed to reduce the risk of fire, electric shock, and/or injury, including the following:
- Read all instructions.
- Do not use appliance for other than intended use.
- Do not touch hot surfaces. Use handles or knobs.
- To protect against electrical shock do not immerse cord, plugs or appliance in water or other liquids.
- Close supervision is necessary when any appliance is used by or near children.
- Unplug from outlet when not in use and before cleaning. Allow to cool before putting on or taking off parts.
- It is recommended to regularly inspect the appliance. Do not operate any appliance with a damaged cord or plug, or after the appliance malfunctions or has been damaged in anymanner. For any questions regarding your appliance, please call our Customer Service Line listed in the warranty section.
- The use of accessory attachments not recommended by the appliance manufacturer may cause injuries.
- Do not use outdoors.
- Do not let cord hang over edge of table or counter, or touch hot surfaces.
- Do not place on or near a hot gas or electric burner, or in a heated oven.
- Extreme caution must be used when moving an appliance containing hot oil or other hot liquids.
- To disconnect, press the Start/Stop button to turn off the heat, then remove plug from wall outlet.
- When using the appliance, provide adequate air space above and on all sides for circulation. Do not operate if the appliance is covered or touching flammable materials, includingcurtains, draperies, walls and the like, when in operation.
- Do not store any item on top of the appliance while in operation.
- Do not store any materials, other than the manufacturer’s recommended accessories, in this appliance when not in use.
- Do not place any of the following materials in the appliance: paper, cardboard, plastic and other flammable materials.
- This appliance is not intended for use by persons (including children) with reduced physical, sensory or mental capabilities, or lack of experience and knowledge, unless theyhave been given supervision or instruction concerning use of the appliance by a person responsible for their safety.
- Children should be supervised to ensure that they do not play with the appliance.
- The appliance is not intended to be operated by means of an external timer or separate remote control system.
- Do not use this appliance on an unstable surface.
- Do not attempt to heat or cook non-food items in this appliance.
- This appliance is not intended for deep frying foods.
- Intended for countertop use only.
WARNING:Spilled food can cause serious burns. Keep appliance and cord away from children. Never drape cord over edge of counter, never use outlet below counter, and never usewith an extension cord.
Additional Safeguards:
- This appliance generates heat and escaping steam during use. Proper precautions must be taken to prevent the risk of burns, fires, or other injury to persons or damage to property.
- Avoid sudden temperature changes, such as adding frozen foods into a heated cooking pot or placing hot cooking pot directly on a countertop.
- To prevent damage or shock hazard, do not cook directly in cooking base. Cook only in cooking pot provided.
- Lift off glass lid carefully to allow water to drip into cooking pot.
- Never use the cooking pot on a gas or electric cooktop or over an open flame.
SAVE THESE INSTRUCTIONS.
This product is for household use only.
POLARIZED PLUG
This appliance has a polarized plug (one blade is wider than the other). To reduce the risk of electric shock, this plug is intended to fit into a polarized outlet only one way. If the plug does not fit fully into the outlet, reverse the plug. If it still does not fit, contact a qualified electrician. Do not attempt to modify the plug in any way.
TAMPER-RESISTANT SCREW
Warning:This appliance is equipped with a tamper-resistant screw to prevent removal of the outer cover. To reduce the risk of fire or electric shock, do not attempt to remove the outer cover. There are no user-serviceable parts inside. Repair should be done only by authorized service personnel.
ELECTRICAL CORD
A short power-supply cord is provided to reduce the risks resulting from children grabbing the cord or someone becoming entangled in or tripping over a longer cord.Note: If the power cord is damaged, please contact the warranty department listed in these instructions.
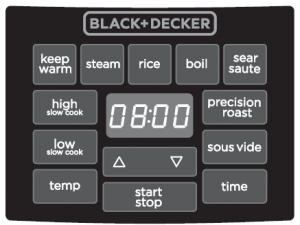
PARTS AND FEATURES
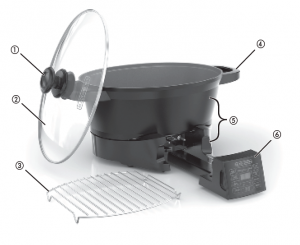
- Lid handle (Part# MC900-01)
- Tempered glass lid (Part# MC900-02)
- Steaming/roasting rack (Part# MC900-04)
- Side handle
- Cooking pot/base unit (Part# MC900-03)
- Removable control panel
GETTING STARTED
This appliance is intended for household use only.
- Remove all packing material, any stickers, and the plastic band around the power plug.
- Go to www.prodprotect.com/blackanddecker to register your product.
- Wash and dry all removable parts as instructed in CARE AND CLEANING. After cleaning, see ASSEMBLY section to put the unit together.
- Select a location where the Multicooker is to be used. Place the unit on a stable, heat resistant surface, free from cloth, liquids and any other flammable materials. Ensure that the unit has enough space all the way around and above it to allow heat to flow without damage to cabinets or walls.
- See the recipes starting on page 17.
IMPORTANT INFORMATION ABOUT YOUR MULTICOOKER
- The glass and metal parts of the lid and the cooking pot get hot. When in use, always use oven mitts or potholders when touching any outer or inner surface of the appliance.
- To switch back and forth between °F and °C hold the Temp button for 3 seconds.
- If there is a power outage, the Multicooker will turn off. If this is discovered quickly, continue cooking when the power is restored. If you are not sure how long the Multicooker has been off, discard the food.
- During first few minutes of use you may notice smoke and a slight odor. This is caused by oil that may have been used during manufacturing of the unit and will not impact the performance.
- Always use heatproof plastic, nylon, or wood utensils. Do not cut foods directly in the cooking pot and do not use metal utensils in this appliance; both actions could damage the cooking pot surface.
- Unplug the appliance when not in use and always allow the cooker to completely cool before cleaning.
ASSEMBLY
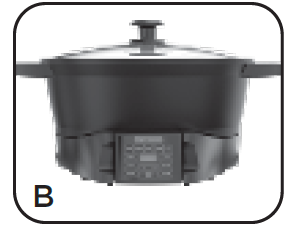
- . After cleaning and drying the removable parts as instructed in CARE AND CLEANING, place the center of the cooking base over the removable control panel (the cooking pot will guide itself to the correct resting position). (A)
- Push removable control panel into the unit completely. The back of the panel will align with the pot in the back. (B)
- Place glass lid onto the cooking pot.
- The unit is ready to be plugged in and used

CHOOSE A FUNCTION FOR YOUR MEAL
Slow Cook (Low or High) – Make your favorite soups, stews, and combinations of meats and vegetables.Keep Warm – Keep cooked food warm until you are ready to eat.Steam – Steam to infuse moisture, seal in flavor, and maintain perfect texture of your food.Rice – Prepare delicious, fluffy rice. Can also be used for grains, lentils, oats.Boil – Boil eggs, potatoes, or corn on the cob.Sear/Sauté – Quickly sear meats with a hot temperature. Sauté vegetables to build flavor.Sear/Sauté – Quickly sear meats with a hot temperature. Sauté vegetables to build flavor.Precision Roast – Cook vegetables and meat more quickly in a minimal amount of fat over relatively high heat to build flavor.Sous Vide – Cook meat or fish in a plastic pouch in a water bath, at a low temperature for a long time, to retain moisture and tenderness without overcooking. Then remove food from the bag and sear over high heat.
SLOW COOK
- Add ingredients to the cooking pot and cover with glass lid.
- Plug in the appliance. The default display (—-) will flash on the screen.
- Click the Low Slow Cook (or High Slow Cook) button once.
- The display will show a flashing default time. For low slow cooking the default time is 8 hours (08:00) and for high slow cooking the default is 4 hours (04:00). To adjust the cooking time, click or hold down the arrows to increase or decrease . The maximum time is 20 hours (20:00).
- Once the time is selected or if the default time is selected, press the Start/Stop button and the unit will beep once. At this point, the time on the display will no longer flash. The only flashing will be the colon between the 2nd and 3rd digit.
- When the Start/Stop button is pressed, the power will turn on to 175°F for Low Slow Cook (195°F for High Slow Cook). The unit will regulate at that temperature for the duration of the set cook time. Keep the lid on.NOTE: After Start/Stop is pressed, the time will stop flashing, but cook time can still be adjusted during the cooking cycle. To do this, use the up and down arrows. Three seconds after the up and down arrows cease being pressed the time will stop flashing and will become the new set time. Only the colon between the 2nd and 3rd digits will flash.
- When the time is up the unit will beep three times. After the cooking cycle is complete the unit will automatically switch to Keep Warm. The display will start counting up from zero to 4 hours (00:00 to 04:00).
- When the timer reaches 4 hours of being on Keep Warm, the unit will turn the power off and return to the default display of flashing dashes (—-).NOTE: Do not hold foods on Keep Warm for more than 4 hours.
KEEP WARM
NOTE: Do not use the Keep Warm setting to cook. Only use it to keep warm cooked food that is already hot.
- Start with already cooked and hot ingredients in the cooking pot, covered with the glass lid.
- Plug in the appliance. The default display (—-) will flash on the screen.
- Click the Keep Warm button once.
- A default time of 2:00 should appear on the display. The maximum time of the keep warm cycle is 4 hours. (04:00) To adjust the time, click or hold down the arrows to increase or decrease . The keep warm button, the arrow buttons, the time button should all be illuminated.
- Press the Start/Stop button. The unit will beep one time as the timer starts and the power is triggered. The keep warm button, arrow buttons, time button, and the start stop button should be illuminated.
- After the timer has counted down or the start/stop button is pressed, the unit will emit 3 beeps and the display will return to the default display, flashing dashes (—-).NOTE: Do not hold food on Keep Warm for more than 4 hours.
STEAM
- Place steaming rack in the cooking pot.
- Add about an inch of water to the bottom but don’t let the top of the rack get submerged.
- Add ingredients such as fresh vegetables cut to a uniform size to the cooking pot and cover with glass lid.
- Plug in the appliance. The default display (—-) will flash on the screen.
- Click the Steam button once.
- After Steam is selected the display will show a default time of 30 minutes. (00:30) This display will be flashing as it is not yet the set time. To adjust the cooking time press the arrows to increase or decrease .
- Once the time is selected or if the default time is selected, press the Start/Stop button and the unit will beep once. The time (all digits and colon) will read solid (not flashing). The unit is now warming up.
- When the temperature of the unit reaches 212°F the time on the display will begin to count down. The only item flashing will be the colon between the 2nd and 3rd digit. The unit will beep twice to signal that the steaming temperature has been reached.NOTE: Keep an eye on fresh vegetables and don’t overcook. Aim for brightly colored and slightly softened but not limp. Refer to your recipe for precise times.
- When the cooking cycle ends the unit will beep three times, turn the power off, and return to the default display of flashing dashes (—-).
RICE
- Rinse your rice in water and strain with a wire strainer before cooking. This will make it less likely that the water will boil or froth over the top.
- Add rice (or other grain) and water (or broth) to the cooking pot and cover with glass lid.
- Plug in the appliance. The default display (—-) will flash on the screen.
- Click the Rice button once. The display will turn solid. (—-)
- Press Start/Stop button. The unit will beep once. The display will cycle through dashes. (- . . . ) , (. – . .), (. . – .), (. . . -). This will continue to run through the entire cooking cycle.NOTE: Keep the lid closed until the end o f the cooking cycle to ensure that the heat stays in and the rice gets cooked.
- After the cooking cycle is complete the unit will beep three times and automatically switch to Keep Warm. The display will start counting up from zero to 4 hours (00:00 to 04:00).
- When the timer reaches 4 hours of being on Keep Warm, the unit will turn the power off and return to the default display of flashing dashes (—-).
NOTE: Do not hold foods on Keep Warm for more than 4 hours.If desired, add seasonings and oil or butter with rice before adding water. Allow rice to rest on warm at least 15 minutes before serving.
RICE COOKING CHART
AMOUNT OF RICE |
AMOUNT OF WATER |
APPROX. COOKINGTIME |
YIELD (standard 8 oz. cups) |
FOR WHITE LONG GRAIN, JASMINE, BASMATI, YELLOW, OR MEDIUM GRAIN RICE |
|||
| 2 cups rice | 3 cups | 23 to 26 minutes | 6 cups |
| 4 cups rice | 6 cups | 27 to 30 minutes | 9 cups |
| 6 cups rice | 9 cups | 31 to 34 minutes | 12 cups |
| FOR BROWN RICE | |||
| 2 cups rice | 3 cups | 55 minutes | 7 ½ cups |
| 4 cups rice | 6 cups | 55 minutes | 11 cups |
| 6 cups rice | 9 cups | 60 minutes | 14 cups |
NOTE: For this chart, when measuring uncooked rice and water use a standard 1 cup (8 fluid oz.) measuring cup.
For other types of grains not listed in the cooking chart or when in doubt, follow package directions.
BOIL
- If making pasta, wait until the water is boiling to add the pasta.
- Add water and ingredients (depending on recipe) to the cooking pot and cover with glass lid.
- Plug in the appliance. The default display (—-) will flash on the screen.
- Click the Boil button once.
- After Boil is selected the display will show a default time of 30 minutes. (00:30) This display will be flashing as it is not yet the set time. To adjust the cooking time press the arrows to increase or decrease .
- Once the time is selected or if the default time is selected, press the Start/ Stop button and the unit will beep once. The time (all digits and colon) will read solid (not flashing). The unit is now warming up.
- When the temperature of the unit reaches 212°F the time on the display will begin to count down. The only item flashing will be the colon between the 2nd and 3rd digit. The unit will beep twice to signal that the boiling temperature has been reached.
PRECISION ROAST
- Place roasting rack in the cooking vessel.
- Place seasoned cuts of meat and/or cut up vegetables on the roasting rack in the cooking pot and cover with glass lid.
- Plug in the appliance. The default display (—-) will flash on the screen.
- Click the Precision Roast button once. The display will change to a flashing reading of 400°F, the default temperature. To adjust the temperature, click or hold down the arrows to increase or decrease The Temperature will have a range of 150°F to 420°F in this function. During the temperature selection the display remains flashing.
- The default cooking time is 1 hour and 30 minutes (01:30). To adjust, press the Time button then click or hold down the arrows to increase or decrease . The maximum time is 20 hours (20:00).
- Once the time is selected or if the default time is selected, press the Start/Stop button and the unit will beep once. At this point, the time on the display will no longer flash. The only item flashing will be the colon between the 2nd and 3rd digit.
- When the time is up the unit will beep three times. After the cooking cycle is complete the unit will automatically switch to Keep Warm. The display will start counting up from zero to 4 hours (00:00 to 04:00).
- When the timer reaches 4 hours of being on Keep Warm, the unit will turn the power off and return to the default display of flashing dashes (—-).NOTE: Do not hold foods on Keep Warm for more than 4 hours.
SEAR/SAUTÉ
- Plug in the appliance. The default display (—-) will flash on the screen.
- Click the Sear/Sauté button once.
- After Sear Saute is selected the display will show a default time of 30 minutes. (00:30) This display will be flashing as it is not yet the set time. To adjust the cooking time press the arrows to increase or decrease . The maximum time is 1 hour (01:00).
- Once the time is selected or if the default time is selected, press the Start/Stop button and the unit will beep once. The time (all digits and colon) will read solid (not flashing). The unit is now warming up.NOTE: After Start/Stop is pressed, the time will stop flashing but cook time can still be adjusted during the cooking cycle. Use the up and down arrows that will allow the time to change as it did when originally selecting it.
- When the temperature of the unit reaches 425°F the time on the display will begin to count down. The only item flashing will be the colon between the 2nd and 3rd digit. The unit will beep twice when the set temperature is reached.
- Add butter or oil. When the oil or butter is hot, sear or sauté as you would on a stove top. Stir ingredients during the cooking process. Flip the food halfway through to sear on both sides or stir while sautéing.
- Refer to your recipe for precise times.
- When the cooking cycle has ended the unit will beep three times and turn off. Or you can press the Start/Stop button to turn off the heat. Remove food or keep it in the pot to cook with another function (i.e. if searing prior to slow cooking).
SOUS VIDE
Compared to conventional cooking, sous vide cooking is a relatively lowtemperature long-time method. Food is placed in a food-grade plastic bag. Then all the air is expelled and the bag sealed. The food is fully immersed in a precisely heated water bath to slowly and evenly cook to tender deliciousness, usually from 1 to 6 hours. It can be held, after finishing cooking,at that temperature for an additional hour or so without overcooking. When it’s time to eat, remove the food from the bag, sear it quickly over high heat to brown, and enjoy!
- Add hot water to cooking pot, filling to approximately half full.Note: Hot tap water is a good start for most sous vide cooking. Do not use cold water. Cold water can take up to 2 hours to heat to cooking temperature. Toensure that water heats as quickly as possible, do not remove lid while heating.
- Plug in the appliance. The main control display will blink (—-). This indicates that the heat is off and the appliance is ready to be set for cooking.
- Season the food with salt and pepper or fresh herbs: Season lightly the first time because sous vide cooking intensifies added flavors. There’s no reason to add oil to bags containing meat.
- Put food in bag, remove air from bag, and seal it. If you have a vacuum sealer this is a great use for it. Expel all air from bags and seal.How to expel air with the immersion method:Mostly seal the bag with food in it, except for one corner. Using a separate container of cool water, slowly push the bag into the water, expelling as much of the air as possible, until you almost get to the opening. (C) Seal it all the way closed, being careful not to get water into the bag.
- Put bag(s) into the water, making sure bags are fully submerged and there is plenty of space between bags. You can put the rack on top of the bags to keep them submerged. Add additional hot water if needed.
- Cover with glass lid.
- Press the Sous Vide button. The display will change to a flashing reading of 135°F, the default temperature.
- The default cooking temperature is set at 135°F. To adjust the temperature, click or hold down the arrows to increase or decrease . The available range is 100°F to 205°F in this function. During the temperature selection the display remains flashing.
- After Sous Vide is selected, the display will show a default time of 1 hour. (01:00) This display will be flashing as it is not yet the set time. To adjust the cooking time press the arrows to increase or decrease . The maximum time is 20 hours (20:00).
- Once the time is selected or if the default time is selected, press the Start/Stop button and the unit will beep once. At this point, the time on the display will no longer flash. The only flashing will be the colon between the 2nd and 3rd digit.
Note: At this point the water will start heating up to the target temperature. The amount of time that takes varies. The bagged food can stay in the water during the heating up time as long as the set temperature is 130°F or above. The cooking cycle timer will only begin to count down once the water has reached the target temperature.
End of cooking cycle: When time is up, the unit will beep three times and automatically switch the heat off. Remove the food bags from the water at this time.As an indication to show how long the unit has been cooling, the light for “time” will go on and the numbers will start counting up from zero (00:00) to 4 hours (04:00) and then return to the default screen (—-).
FINISH/SEAR THE FOOD
Food cooked in the sous vide is moist and edible straight from the packet but meat is more delicious after a quick, hot searing.
- Unplug unit. Carefully empty out water from the cooking pot.
- Follow the directions in the SEAR/SAUTÉ section. Add olive or avocado oil to pot. Sear meat to your preferred brown up to 2 minutes per side.
- You can alternatively use a broiler or a grill. Just keep in mind that the food is already done and you are only searing the outside.
NOTES ON COOKING TIMES AND FOOD SAFETY
In order to make sure the food is safe to eat, sous vide cooking depends on the combination of the superior heat transfer of water, precise temperature,and a longer length of time cooking.
- Do not take meat out of the sous vide early. Let it cook at least for the minimum length of time on the chart at the correct temperature.
- It is OK to leave meat in the sous vide longer than the minimum time range. (Fish is the exception to this rule. Fish will get mushy if overcooked in the sous vide.)
- Remove meat at or before the maximum time for food safety and to preserve texture.
- If you are using thinner cuts than those we specified in the charts, cook only to the minimum amount of time and remove from the water bath to maintain texture
- Do not stack multiple pieces of meat in one bag. Put them side-by-side in a single layer. (D)
SOUS VIDE COOKING CHART
Food |
Temperature |
Cooking Time* |
Notes |
| Beef steaks- (NY Strip; sirloin, tenderloin, ribeye, T-Bone) | Rare: 118°F – 130°F(48 – 55 °C) Medium: 130°F – 150°F (55 – 65 °C) Well Done: 150°F – 160°F (65 – 70 °C) | Rare: 1 hour – 2 ½ hrs.Medium: 1 ½ hrs. – 3 ½ hrs. Well Done: 2 – 4 hrs. | Be aware that ifyou want to cook your steak rare then do not leave it in the water for longer than 2 hours. Bacterial growth occurs after 2 hours and your risk of illness increases. |
| Pork Chops orLamb chops- bonein and boneless(Ribeye, loin) | Rare:118°F – 130°F(48 – 55 °C) Medium: 130°F – 150°F (55 – 65 °C) Well Done:150°F – 160°F(65 – 70 °C) | Rare:1 hour – 2 ½ hrs.Medium:1 ½ hrs. – 3 ½ hrs.Well Done:2 – 4 hrs. | We recommendcooking yourchops to 135Fthismakes a verytender and juicychop. |
| Chicken partsbone-in or boneless(breast, leg, wing,thigh) | Medium:130°F – 150°F(55 – 65 °C)Well Done:150°F – 160°F(65 – 70 °C) | Medium:2 – 4 hrs.Well done:3 – 5 hrs. | Boneless chickenwill cook fasterthan bone-in. |
| Salmon: 4 oz.or larger | 115°F (46°C) | Thin Fillets:30-45 minutesThick Fillets:45-60 minutes | Longer cooktimes can resultin mushy texture.Remove immediatelyafter cookingis finished. |
*Cooking time will start after the water has reached cooking temperature.
SERVING IN THE MULTICOOKER
- After desired cooking cycle is complete, make sure the unit is off and unplug the unit.
- Remove control/power probe from the cooking vessel.
- Prepare serving area (put down hot pad if desired).
- Using the plastic handles (and oven mitts if desired) move the cooking vessel to the serving location.
- Use heatproof plastic, nylon, or wood serving utensils.
CARE AND CLEANING
This product contains no user serviceable parts. Refer service to qualified service personnel.
IMPORTANT: Never immerse control panel in water or other liquids.
- Always unplug and allow to cool completely before cleaning.
- Remove the glass lid.
- Remove control panel from the cooking pot/base unit.
- Place cooking pot and glass lid into the dishwasher to clean or handwash with warm water and dish detergent.NOTE: Do not use abrasive cleaners on the cooking pot.
- To clean the removable control panel, wipe with a dampened cloth. Dry thoroughly
IMPORTANT:Never use abrasive cleaners or scouring pads to clean the unit as they may damage the surfaces.
STORING
Make sure that the appliance is thoroughly cool and dry. Never wrap the cord tightly around the appliance; keep it loosely coiled. Placing the lid on upsidedownfor storage can help save space.
HELPFUL HINTS AND TIPS RICE
• If rice or other foods start to boil over, remove the lid and stir a coupleof minutes. Leaving the lid off for a short period of time will allow someof the liquids to boil off and for the mixture to slightly cool. Place the lidback on the rice cooker and repeat if needed.
ROASTING
- The approximate maximum capacity for roasting is a 4–5 lb. chicken or a 3–4 lb. roast.
- If you desire the deeper flavor of browned meat use the Sear/Sauté function before roasting.
- Always roast with lid on. Open the lid as little as possible to ensure even cooking and to keep heat from escaping.
- Using a meat thermometer can help significantly improve results; you will want to remove the meat or poultry from the roaster when the reading is 5 to 10 degrees (Fahrenheit) below the desired temperature. The internal temperature will continue to rise as the meat is resting after it has been removed.
SLOW COOKING
- The cooking pot should always be filled from ½ to 3⁄4 full, to avoid over and under cooking.
- Always slow cook with the lid on. – Open the lid as little as possible to assure even cooking. Every time the lid is removed, the cooking time increases by 15–20 minutes.
- Most recipes can be cooked on either High or Low. Many recipes will give the time for both. – Low: Normally used for longer cook times and less tender cuts of meat,8 to 10 hours– High: Used to shorten cook time. One hour on High is equal to about2 hours on Low.
SLOW COOKING INGREDIENT TIPS SEASONINGS
- Fresh herbs should be added at the end of the cooking cycle. If cooked too long they lose their color and flavor.
- Dried herbs work well in the slow cooker and can be added at the beginning. They can become stronger on longer cooking; begin with less and add at end, if needed.
MEATS
- The higher the fat content, the less liquid is needed. Also, place thickly sliced onions under fattier meat to keep the meat above the drippings.
- Browning before cooking on the slow cooker settings is not necessary. However, lightly coating meat with flour and browning it, gives more body and flavor to sauces. This works for ground meat as well.
- Make sure the top of the meat does not touch the lid.
- Cooking times will vary depending upon the size and cut of the meat. Meat with bone-in will take longer to cook. Lean meats and poultry will cook faster.
- Meats slow cooked in liquids develop great flavor with a minimum of effort.
- Use High for more tender cuts of meat; use Low for tougher cuts.
- Always thoroughly thaw meats before slow cooking them.
VEGETABLES
- Place vegetables such as carrots, potatoes, turnips, and beets at the very bottom of the cooking pot and always cover them with liquids. They usually take longer to cook than most meat.
- Vegetables cook well; they develop better flavor and don’t break down as they would in an oven.
TROUBLESHOOTING
PROBLEM |
POSSIBLE CAUSE |
SOLUTION |
| Food is undercooked |
|
|
| Food is overcooked |
|
|
| The meat was done but the vegetableswere under-cooked while slow cooking |
|
|
| Rice boils over. |
|
|
If additional assistance is needed, please contact our consumer service team at1-800-465-6070.
Orzo with Spinach, Tomato, and Zucchini
Prep Time: 10 minutes Servings: 8Cook Time: 20 minutes, divided Serving Size: ½ cupTotal Time: 30 minutes
Ingredients:
1 ½ cups uncooked orzo pasta (looks like rice) 2 handfuls of spinach4 ½ cups of vegetable stock or water or mixture 1 Tbsp. minced garlic1 medium onion, diced 2 Tbsp. olive oil1 zucchini, diced 2 tsp. Italian seasoning Salt and pepper to taste2 Roma tomatoes, diced ½ cup grated Parmesan cheese
Directions:
- Place 4 cups of the stock in the multicooker and use the Boil function. Once the stock starts to boil, add the orzo pasta. Put the cover on the unit and let the orzo cook. It will take about 10 minutes to cook the orzo to al dente. If the water starts to bubble up too much, you may need to occasionally turn the lid to the side to let the steam escape and then after a minute or two, put the lid back on. Drain the orzo once it is cooked- you can leave it in the colander while you finish the rest of the recipe. Set it aside.
- Replace the multicooker on the control panel, add the oil and turn on the Sear/Sauté function. After a minute or two, add the onion, zucchini, and tomato to the multicooker. Stir occasionally for about 2-3 minutes.
- Add the garlic, Italian seasoning, salt and pepper to the multicooker, stir to combine. Sauté for about a minute. Add the spinach. Stir to combine. The spinach will wilt down considerably.
- Once the spinach has cooked down, add in the cooked orzo and stir to combine. Add in the rest of the vegetable stock to keep the orzo from drying out. Turn off the multicooker and stir in the Parmesan cheese. Enjoy immediately with Lemon Herb Salmon.
Lemon Herb Steamed Salmon
Prep Time: 5 minutes Total Time: 11-14 minutesCook Time: 6-9 minutes, depends on Servings: 4thickness of the filet Serving Size: One 4 oz filet
Ingredients:
4 (4 ounce) salmon filets 1 tsp. seasoned salt2 tsp. dried dillweed 1 tsp. lemon pepper2 tsp. onion powder 1 tsp. garlic powder1 tsp. dried parsley Lemon slices for garnish, optional¼ tsp. smoked paprika
Directions:
- In the multicooker, place about ½ inch of water on the bottom. Set the baking rack inside to see if you have the right amount of liquid. You do notwant the water to touch the rack. Leave the rack inside the unit once you have the right amount of liquid.
- In a small bowl, combine the spices.
- Set the filets on a work surface and sprinkle the spices over the filets.
- Set the seasoned filets on the rack in the multicooker. Turn on the Steam function and put the lid on the multicooker.
- Let steam until the internal temperature of the salmon reaches 145F as indicated on a cooking thermometer, about 6 minutes. If the filets are thin, then it will take less time. If the water starts to boil rapidly before the salmon is cooked, turn the lid so some of the steam releases. After a minute or two you can put the lid back on.
- Set salmon on a plate and place a sliced lemon, if desired, on top of the filet. Serve with Orzo with Spinach, Tomato and Zucchini for a complete meal.
Garlic Rosemary Pork Loin
Prep Time: 10 minutes Servings: 8Cook Time: 90 minutes Serving Size: 2 slicesTotal Time: 100 minutes
Ingredients:
1 boneless pork loin, trimmed of fat 1 tsp. dried thyme or 1 Tbsp. fresh thyme1 head of garlic, peeled and cloves left whole 2 tsp. salt2 Tbsp. oil 1 tsp. black pepper1 tsp. crushed rosemary or 1 Tbsp. fresh rosemary ½ tsp. smoked paprika
Directions:
- In the multicooker, place the baking rack. Pour about a cup of water on the bottom of the pan. You should have about an inch of water on the bottom.
- Set the pork loin on the baking rack.
- In a blender or small food processor place the garlic cloves, oil, rosemary, thyme, salt and pepper. Process until smooth and looks like a thick paste. You may need to adjust the amount of oil to get the right consistency. It should be thick so that it stays on the pork loin.
- Slather the paste over the top of the pork loin and then sprinkle the paprika over the top for added color.
- Put the lid on the multicooker and set to Precision Roast. Let cook for about 90 minutes or until the internal temperature of the pork reaches 160F as indicated on a cooking thermometer.
- Take roast out of the multicooker and place on a cutting board. Let rest for about 10 minutes. Slice and serve immediately.
Turkey Chili
Prep Time: 15 minutes Total Time: 3 to 5 hours + 15 minutesCook Time: 3 to 5 hours Servings: 8-10
Ingredients:
1 Tbsp. olive oil 2 cans of low sodium dark red kidney1 medium onion, diced beans, not drained 2 Tbsp. garlic powder1-1/2 lb. ground turkey 2 Tbsp. onion powder2 tbsp minced garlic 2 Tbsp. chili powder2 (14.5 oz) can fire roasted diced tomatoes, not drained 1 Tbsp. ground cumin2 Tbsp. tomato paste 2 tsp ground coriander2 (15 oz) tomato sauce 2 tsp. salt2 (14.5 oz) can low sodium black beans, rinsed and drained 1 tsp. black pepper2 cups frozen corn or 2 cans of corn, low sodium, Optional Garnishes: Cheese, avocado, sour creamrinsed and drained
Directions:
- Using the Sear/Sauté function heat the oil in the cooking pot. Once oil is heated, about 1-2 minutes, add the diced onions. Sauté until tender-crisp, about 3-4 minutes. Add the ground turkey and garlic, and continue to cook until browned, about 5 minutes.
- Add the rest of the ingredients. Stir to combine.
- Place the lid on the multi cooker and cook using the High Slow Cook function for 3-5 hours. Stir occasionally.
- Once cooked, place chili in bowls, top with cheese, avocado, and sour cream if desired.
Beef Pot Roast
Prep Time: 10 minutes Total Time: 6 hours 10 minutesCook Time: 6 hours Servings: 4-6
Ingredients:
6 medium carrots, cut in 2 1/2 inch pieces (about 2 cups) 1/2 tsp. salt4 large cloves garlic, chopped 1 cup beef broth1 bag (20 oz.) frozen pearl onions 1 1/2 tsp. herbs de Provence4 medium potatoes, quartered 1 envelope beef onion soup mix4 lb. boneless bottom round roast 1/2 tsp. dried thyme1/4 tsp. coarsely ground pepper
Directions:
- Place half of the vegetables on bottom the cooking pot. Season beef with salt and pepper. Place on top of vegetables.
- Add remaining vegetables. Spread around roast.
- In measuring cup or bowl, combine remaining ingredients; stir to blend. Pour over beef. Cover with glass lid.
- Cook with the Low Slow Cook function for 6 hours, until beef is tende
NEED HELP?
For service, repair or any questions regarding your appliance, please call our Customer Service Line at 1-800-465-6070. Please DO NOT return the product to the place of purchase. Also, please DO NOT mail product back to manufacturer, nor bring it to a service center. You may also want to consult the website listed in this pamphlet.
Warranty Information (Applies only in the United States and Canada)
What does it cover?
- Any defect in material or workmanship provided; however, Spectrum Brands’ liability will not exceed the purchase price of product.For how long?Two years from the date of original purchase with proof of such purchase.What will we do to help you?
- Provide you with a reasonably similar replacement product that is either new or factory refurbished.How do you get service?
- Save your receipt as proof of date of sale.
- Visit the online service website at www.prodprotect.com/blackanddecker, or call toll-free 1-800-465-6070, for general warranty service.
- If you need parts or accessories, please call 1-800-738-0245.How does state law relate to this warranty?
- This warranty gives you legal rights. You may also have other rights that vary from state to state or province to province.
What does your warranty not cover?
- Damage from commercial use
- Damage from misuse, abuse or neglect
- Products that have been modified in any way
- Products used or serviced outside the country of purchase
- Glass parts and other accessory items that are packed with the unit
- Shipping and handling costs associated with the replacement of the unit
- Consequential or incidental damages (Please note, however, that some states do not allow the exclusion or limitation of consequential or incidental damages, so this limitation may not apply to you.)
Are there additional warranty exclusions?
- This warranty shall not be valid where it is contrary to U.S. and other applicable laws, or where the warranty would be prohibited under any economic sanctions, export control laws, embargos, or other restrictive trade measures enforced by the United States or other applicable jurisdictions. This includes, without limitation, any warranty claims implicating parties from, or otherwise located in, Cuba, Iran, North Korea, Syria and the disputed Crimea region.
Read More About This Manual & Download PDF:
References
[xyz-ips snippet=”download-snippet”]