
BLACK DECKER HGS350 Series Advanced Handheld Steamer

IMPORTANT SAFETY INSTRUCTIONS
When using your steamer, basic safety precautions should always be followed, including the following:
- READ ALL INSTRUCTIONS BEFORE USING.
- To reduce the risk of contact with hot water emitting from steam vents, check appliance before each use by holding it away from body and operating steam button.
- Only use steamer for intended use.
- To reduce the risk of electric shock, do not immerse the steamer in water or other liquids.
- Never pull on the cord to disconnect from the electrical outlet; instead grasp plug and pull to disconnect. .
- Do not allow cord to touch hot surfaces. Let steamer cool completely before putting away. Loop cord loosely together and secure with provided Velcro strap when storing.
- Always turn the steamer off by pressing and holding the power button for 3 seconds, until the blue indicator light turns off, and then unplug from the electric outlet before filling with water, emptying, or cleaning, and when not in use.
- Do not operate the steamer with a damaged cord, or if the appliance has been dropped or damaged, or if it is leaking. To reduce the risk of electric shock, do not disassemble or attempt to repair the steamer; take it to a qualified service person for examination and repair, or call the appropriate toll-free number in this manual. Incorrect reassembly or repair can cause a risk of fire, electric shock, or injury to persons when the steamer is used.
- Close supervision is necessary for any appliance being used by or near children. Do not leave the steamer unattended while connected.
- Burns can occur from touching hot metal parts, hot water, or steam. Use care when you turn a steam appliance upside down – there may be hot water in the reservoir. Avoid rapid movement of steamer to minimize hot water spillage.
- To reduce the likelihood of circuit overload, do not operate another high wattage appliance on the same circuit.
- If an extension cord is absolutely necessary, a minimum 13- ampere cord should be used. Cords rated for less amperage can result in a risk of fire or electrical shock due to overheating. Care should be taken to arrange the cord so that it cannot be pulled or tripped over.
- Do not use outdoors.
- Do not use anything other than water in the steamer while in use or during cleaning.
- Never steam clothing while on a body.
- Never aim the steam directly towards people, animals or plants. The steam is very hot and can results in burns. Burns can occur from touching hot parts (including the steamer head and frames), hot water, or steam.
- Never hold the steam head down while at rest or tilt it in a backward position as this may result in hot water discharge and possibly injury.
- This appliance is not intended for use by persons (including children) with reduced physical, sensory, or mental capabilities, or lack of experience and knowledge, unless they have been given supervision or instruction concerning use of the appliances by a person responsible for their safety.
- To avoid burns, when putting on or taking off attachments, be sure the unit is off and no steam is being emitted.
- Children should be supervised to ensure that they do not play with the appliance.
- The steamer must be used and rested on a stable surface.
This product is for household use only.
POLARIZED PLUG (120V models only)To reduce the risk of electric shock, this appliance has a polarized plug (one blade is wider than the other). This plug will fit in a polarized outlet only one way. If the plug does not fit fully into the outlet, reverse the plug. If it still does not fit, contact a qualified electrician to install the proper outlet. Do not attempt to modify the plug in any way.
TAMPER-RESISTANT SCREWWarning: This appliance is equipped with a tamper-resistant screw to prevent removal of the outer cover. To reduce the risk of fire or electrical shock, do not attempt to remove the outer cover. There are no user-serviceable parts inside. Repair should be done only by authorized service personnel.Note: If the power supply cord is damaged, in order to avoid a hazard, it should be replaced by qualified personnel.
GETTING TO KNOW YOUR STEAMER
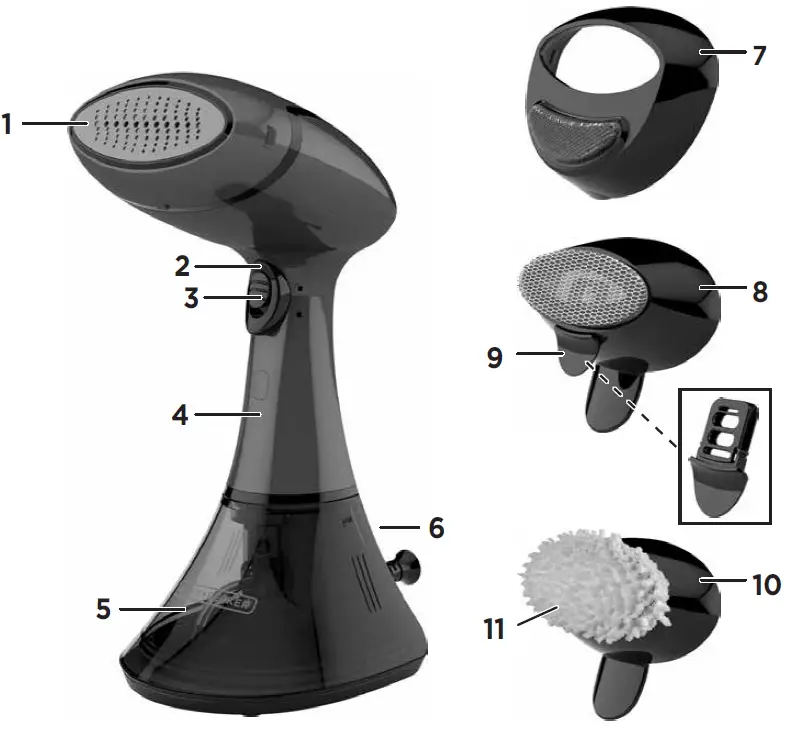
- Heated pressing plate
- Steam trigger
- Continuous steam switch
- Comfort grip handle
- Removable water tank (Part # HGS350-01)
- Power button (not shown)
- Lint frame* (Part # HGS350-02)
- Delicate fabric frame(Part # HGS350-03)
- Scent attachment (Part # HGS350-04)Scent insert (used within scent attachment) (Part # HGS350-07)
- Upholstery frame(Part # HGS350-05)
- Upholstery frame cover(Part # HGS350-06)
Product may vary slightly from what is illustrated.Lint frame included in select models only.
HOW TO USEThis product is for household use only.
GETTING STARTED
- Remove all labels, tags and stickers attached to the body, or cord of the steamer and the plastic band around the power plug.
- Remove and save literature.
- Read all the instructions before using your steamer.
IMPORTANT NOTES
- Using distilled, purified, or filtered water is highly recommended to maintain optimal performance. Tap water contains minerals that build up over time.
- Any water droplets visible inside the tank are from individual quality control tests done to ensure every steamer meets our high standards for product performance.
- Do not put perfumes, oils, or other additives in the water tank.
- Always review the garment manufacturer’s care label instructions before steaming, and always test fabrics for colorfastness in inconspicuous areas (such as an inseam). Steamers are not recommended for use on leather, suede, vinyl, plastic, or other steam sensitive fabrics.
- During use the steamer and accessories will become hot. Avoid attaching or removing frames while still hot.
- After preheating, prime water pump by holding the steam trigger until steam forms.
- It is normal to feel or hear the water pump in the handle.
- The water pump may become louder when the water level in the tank is low. Check and refill tank, as needed.
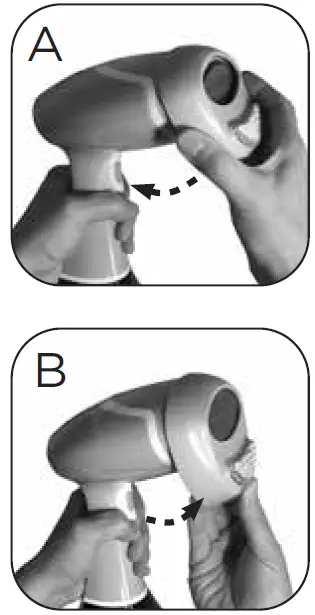
ATTACHING FRAMESThe steamer comes with three optional-use attachment frames recommended for use with a variety of fabrics and upholstery.
1. Select the proper frame using the following chart.2. While the frame and steamer are cool, gently attach the top of the frame over the top the steamer head and then click the bottom of the frame into place. (A)Note: Frame tab points down when in correct position.3. Allow steamer to cool prior to removing frame. Gently pull on the tab. (B)Note: Be careful when removing frames as condensation may build up during use.
| Frame | Usage |
 |
Garment Care Label: For any garments that call for medium to high heat and allow for use of steam.
Tip: Frame helps remove lint, hair, and animal fur. |
 |
Garment Care Label: For any garments that call for low heat and allow for use of steam.
Tip: For items with embellishment, turn the garment inside out to better remove wrinkles and avoid damage to sensitive areas. See how to use scent attachment below. |
 |
Upholstered Fabrics: Great for refreshing bedding, mattresses, curtains, plush toys, furniture, and hard surfaces (such as counters or desks that are not heat sensitive).
Tip: Always test for colorfastness and heat sensitivity on an inconspicuous area. |
USING THE DELICATE FABRIC FRAME WITH SCENT ATTACHMENTThe delicate fabric frame is most efficient with the scent attachment inserted. You may use the scent attachment with or without the foam pad inside. Adding scent is optional and at your discretion.
- To use the scent attachment as a diffuser, pull it from the delicate fabric frame and put 4 to 8 drops or sprays of perfume or essential oil on the small foam pad. (C)
- Insert the scent attachment inside the delicate fabric frame (D) and attach delicate fabric frame to the steamer. Activate steam to diffuse the scent over the fabric.

Note: Only put scent on the foam pad and not on any other part of the fabric frame or in the water tank. Do not use other substances on the scent attachment.Caution: Keep perfume and essential oils away from eyes and mucous membranes. Only use fragrance in a ventilated room. Do not use fragrance in the presence of pregnant women, children under 8 years old, or anyone with allergies, asthma, or a lung disease.
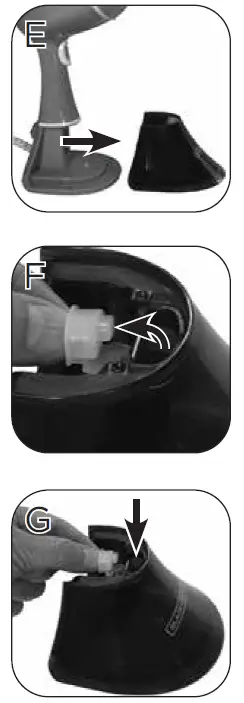
FILLING THE WATER TANK
- Place the steamer on its base on a stable surface.
- Hold the handle to stabilize and pull out the removable water tank with the other hand. (E)
- Gently pull out the rubber water tank cover at the top of the tank. (F)Tip: Using distilled, purified, or filtered water is highly recommended and will reduce mineral buildup. Do not use oils, perfumes, or scented additives.
- Using a clean measuring cup, pour water into opening until water reaches the “MAX” level mark on the top of the tank. (G) Do not overfill. Close the rubber cover securely.
- Dry off any excess water from the tank. Push water tank back into the steamer base; click into place.
- To refill at any time during use, turn steamer off by pressing the power button until the blue indicator light is off, unplug from outlet, and follow the above procedure.
Tip: After refilling, allow to reheat for 45 seconds and then prime pump by holding steam trigger until steam forms.
USING THE HANDHELD STEAMER
- Read the manufacturer’s fabric label to make sure the fabrics are suitable for steaming.
- If you see “do not iron” attach the delicate fabric frame and make sure to test on an inconspicuous area prior to steaming the entire garment.
- If you see “do not steam” do not steam the garment.
- Refer to the “Attaching Frames” section for determining whether to use a frame. Attach or remove frames while the steamer and frames are cool.
- Hang the garment in an area that will not be impacted by the heat and steam, such as on a shower rod.
- Plug the steamer into an outlet and then press the power button. (H) The power button light will slowly blink, indicating that the steamer is heating.
- After about 45 seconds the power light will stay on, indicating the steamer is preheated.
- Prime the water pump by holding steam trigger until steam forms.

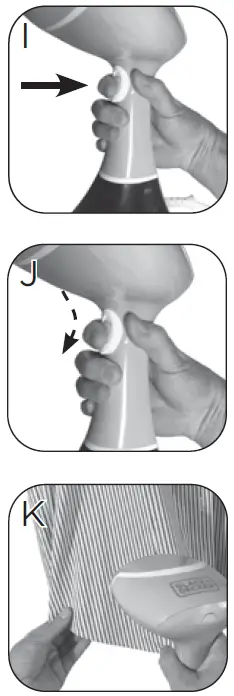
- To generate steam, press down on the steam trigger with your index finger. (I) As long as the trigger is held down, steam will emit from the steamer. When the trigger is released, the steam will stop.
- To generate a constant flow of steam without holding the trigger, press the steam trigger and then slide the continuous steam switch down. (J) This will activate the continuous steam feature. To turn the steam off, press the trigger, push the continuous steam switch up and then release trigger.
- With your free hand keep the fabric taut. Steam the garment with slow, downward strokes, keeping the head of the steamer in contact with the fabric. (K)Note: It is normal to feel or hear the water pump in the handle.Note: If the steamer is left inactive, the auto shut-off feature will activate, indicated by the rapidly blinking Power Button. To resume steaming after the auto shut-off is activated, either press the steam trigger or press the power button. Allow the steamer to preheat if needed.
- When finished steaming, press and hold the power button until its blue light turns off (about 3 seconds) and unplug from outlet. (L)
- Stand steamer on its base and allow it to completely cool off before storing. (M) To avoid mineral buildup, empty the tank after each use.


Auto Shut-OffThe steamer will automatically switch to auto shut-off mode after being left inactive for 15 minutes. The boiler and water pump will turn off until reactivated. Rapid blinking of the power button light indicates that the steamer is going into auto shut-off mode. To resume steaming, press the steam trigger or power button and wait for steamer to fully reheat.
Using Steam Around the HomeUsing steam on items that can tolerate hot, damp steam without damage is non-toxic, and inexpensive. Steam upholstery, draperies, linens and home textiles to refresh.
CLEANING AND CARE
This product contains no user serviceable parts. Refer to qualified service personnel.
CLEANING STEAMER EXTERIOR
- Make sure steamer is off, unplugged and completely cool.
- Wipe the ironing plate and outer surface with soft, damp cloth. Water and small amounts of gentle household soaps, such as dishwashing liquid, can be used on the exterior. Never use heavy-duty cleaner, or abrasive scouring pads that may scratch or discolor the steamer.
- After the steamer has been thoroughly dried, turn it back on and lightly steam over an old cloth. This will help remove any reside left in the steam holes.
- When finished cleaning, turn the steamer off by pressing the power button until the blue power light turns off (about 3 seconds). Unplug, empty tank, and allow time to cool before storing.
CLEANING FRAMES AND ACCESSORIESFor all accessories, allow to fully dry before using again or storing. Accessories are not suitable for cleaning in a washing machine.
- Lint frame: Wipe with damp cloth to clean.
- Delicate frame: Wash with cold water and small amounts of gentle cleanser if needed. The fabric in the frame cannot be removed. The foam pad inside the scent attachment can be removed and hand washed with warm water and a few drops of laundry detergent or dish soap.
- Upholstery frame: The fabric on this frame can be removed and hand washed with cold water and gentle cleanser.
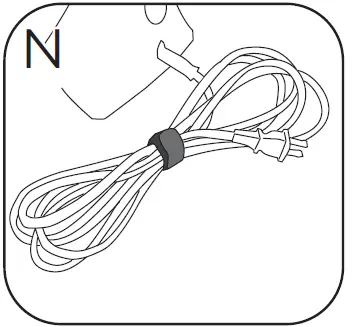
STORING THE STEAMER
- Check that the steamer is unplugged and completely cool.
- Gather the cord into even ovals and then gently cinch with the strip of hook and loop. (N)
- Always store steamer upright on its base to prevent water leakage.
Tip: Emptying the tank after each use is recommended because standing water can leave a residue over time.
STEAMING TIPS AND TRICKS
- This steamer is designed to use distilled, purified, or filtered water. Tap water contains minerals that build up. Using water with perfumes or scented additives is also not recommended.
- Always test garments by steaming a small hidden area to make sure the garment takes well to steam.
- Always read garment care label instructions. Low heat settings require the delicate fabric frame.
- Small amounts of dripping might occur during use. If excessive, the steamer needs time to get back up to full temperature. Just allow the steamer a minute to reheat.
- Wearing clothes immediately after ironing or steaming can actually create wrinkles. Always allow clothing to cool for about 5 minutes after ironing or steaming to set the press.
TROUBLESHOOTING
| Problem | Possible Cause | Solution |
| The steamer is plugged in but not heating. | There’s a power supply issue. | Check that the plug is properly inserted into the outlet or try plugging the steamer into a different outlet. |
| The auto shut-off has activated. | Press the steam trigger or press the power button to activate the steamer. | |
| Not enough steam or no steam is coming out of the steamer. | The steamer is not heated to full temperature. | Always allow steamer to preheat at least 45 seconds, or until the power button light is a steady blue. |
| There is not enough water in the water tank. | Follow the instructions under the “filling the water tank” section and fill to Max level marker. | |
| The water pump hasn’t been primed. | After preheating, always prime the water pump by holding the steam trigger until steam forms to ensure enough water is in the boiler. | |
| Discolored water is coming through the holes and staining the fabric. | Residue has built up in the water tank. | Empty the water tank after each use. Only use distilled, filtered, or purified water. |
| Perfumed or scented additives were used. | Regularly clean steamer and refrain from using perfumed or scented additives. | |
| Steamer is leaking or spitting. | Steamer is not hot enough. | Allow the steamer to heat for about 45 seconds. |
| Water tank is running low. | Follow the instructions under the “Filling the Water Tank” section and fill to Max level marker. |
If additional assistance is needed, please contact our consumer service team at 1-800-465-6070.
NEED HELP?
Two-Year Limited Warranty(Applies only in the United States and Canada)For service, repair or any questions regarding your appliance, call the appropriate 800 number listed within this section. Please DO NOT return the product to the place of purchase. Also, please DO NOT mail product back to manufacturer, nor bring it to a service center. You may also want to consult the website listed on the cover of this manual.
What does it cover?Any defect in material or workmanship provided; however, Spectrum Brands Inc’s liability will not exceed the purchase price of product.
For how long?Two years from the date of original purchase with proof of purchase.
What will we do to help you?Provide you with a reasonably similar replacement product that is either new or factory refurbished.
How do you get service?
- Save your receipt as proof of date of sale.
- Visit the online service website at www.prodprotect.com/blackanddecker or call toll-free 1-800-465-6070, for general warranty service.
- If you need parts or accessories, please call 1-800-738-0245.
How does state law relate to this warranty?This warranty gives you specific legal rights. You may also have other rights that vary from state to state or province to province.
What does your warranty not cover?
- Damage from commercial use
- Damage from misuse, abuse or neglect
- Products that have been modified in any way
- Products used or serviced outside the country of purchase
- Glass parts and other accessory items that are packed with the unit
- Shipping and handling costs associated with the replacement of the unit
- Consequential or incidental damages (Please note, however, that some states do not allow the exclusion or limitation of consequential or incidental damages, so this limitation may not apply to you.)
Are there additional warranty exclusions?This warranty shall not be valid where it is contrary to U.S. and other applicable laws, or where the warranty would be prohibited under any economic sanctions, export control laws, embargos, or other restrictive trade measures enforced by the United States or other applicable jurisdictions. This includes, without limitation, any warranty claims implicating parties from, or otherwise located in, Cuba, Iran, North Korea, Syria and the disputed Crimea region.
BLACK+DECKER and the BLACK+DECKER logos are trademarks of The Black & Decker Corporation, used under license by Spectrum Brands, Inc. for its manufacturing and sale of this product. All rights reserved.
 report this ad
![]()
References
[xyz-ips snippet=”download-snippet”]