

BEMW461ESBEMW471ESBEMW481ES


(Original instructions)
Intended use
Your BLACK+DECKER BEMW461ES, BEMW471ES, BEMW481ES lawn mowers have been designed for mowing grass. These appliances are intended for consumer use only.
Safety instructions
Warning! When using mains-powered appliances, basic safety precautions, including the following, should always be followed to reduce the risk of fire, electric shock, and personal injury.
- Read all of this manual carefully before using the appliance.
- The intended use is described in this manual. The use of any accessory or attachment or the performance of any operation with this appliance other than those recommended in this instruction manual may present a risk of personal injury.
- Retain this manual for future reference.
Training
- Read the instructions carefully. Be familiar with the controls and the proper use of the appliance.
- Never allow children or people unfamiliar with these instructions to use the machine. Local regulations can restrict the age of the operator.
- Never operate the machine while people, especially children, or pets are nearby.
- Keep in mind that the operator or user is responsible for accidents or hazards occurring to other people or their property.
Preparation
- While operating the machine always wear substantial footwear and long trousers.Do not operate the machine when barefoot or wearing open sandals.Avoid wearing clothing that is loose-fitting or that has hanging cords or ties.
- Thoroughly inspect the area where the machine is to be used and remove all objects which can be thrown by the machine.
- Before using, always visually inspect to see that the blade, blade bolt, and the blade assembly are not worn or damaged. Replace worn or damaged components in sets to preserve balance. Replace damaged or unreadable labels.
- Before use check the supply and extension cord for signs of damage or aging. If the cord becomes damaged during use, disconnect the cord from the supply immediately. DO NOT TOUCH THE CORD BEFORE DISCONNECTING THE SUPPLY. Do not use the machine if the cord is damaged or worn.
- Wear safety glasses or goggles when operating this tool.Use a face or dust mask whenever the operations take place in dusty surroundings. Hearing protection should be worn whenever the sound level seems uncomfortable.
- Guard against electric shock.Prevent body contact with earthed or grounded surfaces (e.g. metal railings, lampposts, etc.).
Operation
- Never operate the appliance with defective guards or shields, or without safety devices, for example, deflectors and/or grass catchers, in place.
- Only use the appliance in daylight or good artificial light.
- Do not expose the appliance to rain.Do not use the appliance in damp or wet conditions. Preferably do not use the appliance in wet grass.
- Be sure of your footing, particularly on slopes. Be aware that freshly cut grass is damp and slippery. Do not work on steep slopes.
- Work across the face of slopes, never up and down. Take extreme caution when changing direction on slopes.
- Do not mow excessively steep slopes.
- Walk, never run when using the appliance. Do not pull the appliance towards you or walk backward when using the appliance.
- Switch on the appliance according to instructions and with your feet well away from the blade.
- Do not start the machine when standing in front of the discharge opening.
- Do not tilt the appliance when switching it on, except if the appliance has to be tilted for starting.In that case, do not tilt the appliance more than absolutely necessary and lift only the part that is away from the operator. Always ensure that both hands are in the operating position before returning the appliance to the ground.
- Switch off the appliance and wait for the blade assembly to stop running if the appliance has to be tilted for transportation when crossing surfaces other than grass, and when transporting the appliance to and from the area to be mowed.
- Do not lift or carry the appliance until the blade has come to a complete standstill.
- Keep your hands and feet well away from the blade.
- Do not put your hands or feet near or under rotating parts.
- Keep away from discharge openings at all times.
- Switch off, remove the plug from the socket and ensure that moving parts have stopped rotating before leaving the appliance unattended and before changing, cleaning orinspecting any parts of the appliance or clearing a blockage. After striking a foreign object. Inspect the machine for damage and make repairs before restarting and operating the machine;
- If the appliance starts to vibrate abnormally or if you hit a foreign object, switch the appliance off and remove the plug from the socket.Check for any damage to the appliance, replace or repair any damaged parts, check for and tighten any loose parts.
- Take care to keep the mains cable away from the blade. Always be aware of the position of the cable.
- The motor will continue to run for a few seconds after switching the appliance off. Never attempt to force the blade to come to a standstill.
Maintenance and storage
- Before use, check the appliance for damaged or defective parts.Check for misalignment and seizure of moving parts, breakage of parts, damage to guards and switches, and any other conditions that may affect its operation. Ensure that the appliance will operate properly and perform its intended function. Never use the appliance when any guard or enclosure is damaged or not in place. Do not use the appliance if any part is damaged or defective. Do not use the appliance if the switch does not turn it on and off.Have any damaged or defective parts been repaired or replaced by an authorized repair agent?
- Check the cable frequently for damage. If the cable is damaged, it must be replaced by an authorized repair agent in order to prevent a hazard. Inspect extension cables periodically. Replace a damaged extension cable immediately. u Keep all nuts, bolts, and screws on the appliance tight to ensure a safe working condition.
- Check the grass collector for wear or damage and replace it if necessary.Never use the appliance without the grass collector.
- Be careful during the adjustment of the machine to prevent entrapment of the fingers between moving blades and fixed parts of the machine.
- When servicing the blades be aware that, even though the power source is switched off, the blades can still be moved.
- When not in use, the appliance should be stored in a dry place. Children should not have access to stored appliances.
- Always allow the machine to cool down before storing.
- Ensure that only replacement cutting means of the right type are used.
- Use only BLACK+DECKER recommended spare parts and accessories.
Additional safety instructions for Lawnmowers
- Always use an approved extension cable suitable for the power input of this tool (see technical data). The extension cable must be suitable for outdoor use and marked accordingly. Up to 30 m of 1.5 mm2 HO5VV-F extension cable can be used without loss of product performance.Before use, inspect the extension cable for signs of damage, wear, and aging. Replace the extension cable if damaged or defective. When using a cable reel, always unwind the cable completely.
- Do not transport the machine while the power source is running Firmly grip handle with both hands when operating the lawnmower.If at any time it is felt necessary to tilt the lawnmower, make sure that both hands remain in the operating position while the lawnmower is tilted. Keep both hands in the operating position until the lawnmower is returned to rest correctly on the ground.
- Never wear radio or music headphones while operating the lawnmower.
- Never attempt to make a wheel height adjustment while the motor is running or while the safety key is in the switch housing.
- If the lawnmower stalls, turn the mower off, wait for the blade to stop, before attempting to unclog the chute or remove anything from under the deck.
- Keep hands and feet away from the cutting area.
- Keep blades sharp.
- Always use protective gloves when handling the lawnmower blade.
- If you are using the grass collector, check it frequently for wear and deterioration. If excessively worn, replace it with a new grass collector for your safety.
- Use extreme caution when reversing or pulling the lawnmower towards you.
- Do not put hands or feet near or under the lawnmower.Keep clear of the discharger opening at all times.
- Clear the area where the lawnmower is to be used of objects such as rocks, sticks, wire, toys, bones, etc., which could be thrown by the blade.Objects struck by the blade can cause severe injury to persons. Stay behind the handle when the motor is running.
- Do not operate the lawnmower barefooted or while wearing sandals.Always wear substantial footwear.
- Do not pull lawn mower backward unless absolutely necessary. Always look down and behind before and while moving backward.
- Never direct discharged material toward anyone. Avoid discharging material against a wall or obstruction.Material may ricochet back toward the operator. Release the start handle to turn the lawnmower off and stop the blade when crossing gravel surfaces.
- Do not operate the lawnmower without the entire grass collector, discharge guard, rear guard, or other safety protective devices in place and working. Periodically check all guards and safety protective devices to ensure they are in good working order and will operate properly and perform their intended function.Replace a damaged guard or another safety device before further use.
- Never leave a running lawnmower unattended.
- Always release the bail bar to stop the motor and wait until the blade comes to a complete stop before cleaning the lawn mower, removing the grass bag, unclogging the discharge guard, when leaving the lawnmower, or before making any adjustments, repairs, or inspections.
- Operate lawn mower only in daylight or good artificial light when objects in the path of the blade are clearly visible from the operating area of the lawnmower.
- Do not operate the lawnmower while under the influence of alcohol or drug or when you are tired or ill. Always stay alert, watch what you are doing, and use common sense.
- Avoid dangerous environments.Never operate the lawnmower in damp or wet grass, never use lawn the mower in the rain. Always be sure of your footing, walk, never run.
- If the lawnmower should start to vibrate abnormally, release the on/off switch, wait for the blade to stop, and then check for the cause immediate vibration is generally a warning of trouble, see the troubleshooting guide for advice in the case of abnormal vibration.
- Always wear proper eye and respiratory protection when operating the lawnmower.
- The use of any accessory or attachment not recommended for use with this lawnmower could be hazardous. Only use accessories approved by BLACK+DECKER.
- Never overreach while operating the lawnmower. Always be sure to keep proper footing and balance at all times while operating the lawnmower.
- Mow across the face of slopes, never up and down. Exercise extreme caution when changing direction on slopes.
- Watch for holes, ruts, bumps, rocks, or other hidden objects. Uneven terrain could cause a slip and fall accident. Tallgrass can hide obstacles.
- Do not mow on wet grass or excessively steep slopes. Poor footing could cause a slip and fall accident.
- Do not mow near drop-offs, ditches, or embankments. You could lose your footing or balance.
- Always allow the mower to cool down before storing. Pull the plug from the socket and pull the battery pack from the machine. Make sure that all moving parts have come to a complete stop:
- Whenever you leave the machine;
- Before clearing a blockage;
- Before checking, cleaning, or working on the appliance.
Vibration
The declared vibration emission values stated in the technical data and the declaration of conformity have been measured in accordance with a standard test method provided y N50636 and may be used for comparing one tool with another. The declared vibration emission value may also be used in a preliminary assessment of exposure.Warning! the ibration emission value during actual use of the power tool can differ from the declared value depending on the ways in which the tool is used. The vibration level may increase above the level stated.When assessing vibration exposure to determine safety measures required by 2002/44/EC to protect persons regularly using power tools in employment, an estimation of vibration exposure should consider, the actual conditions of use and the way the tool is used, including taking account of all parts of the operating cycle such as the times when the tool is switched off and when it is running idle in addition to the trigger time.Do not operate the tool if the vibration registers as abnormal.
Safety of others
- This appliance is not intended for use by persons (including children) with reduced physical, sensory or mental capabilities, or lack of experience and knowledge.Unless they have been given supervision or instruction concerning the use of the appliance by a person responsible for their safety.
- Children must be supervised to ensure that they do not play with the appliance.
- After striking a foreign object. Inspect the appliance for damage and make repairs as necessary.
Residual risks
Additional residual risks may arise when using the tool which may not be included in the enclosed safety warnings. These risks can arise from misuse, prolonged use etc. Even with the application of the relevant safety regulations and the implementation of safety devices, certain residual risks can not be avoided. These include:
- Injuries caused by touching any moving parts.
- Injuries caused by touching any hot parts.
- Injuries are caused when changing any parts or accessories.
- Injuries caused by prolonged use of the appliance. When using any appliance for prolonged periods ensure you take regular breaks.
- Impairment of hearing.
- Health hazards caused by breathing dust developed when using your tool (example:- working with wood, especially oak, beech, and MDF.)
- If operating the mower in a damp location is unavoidable, use a residual current device (RCD) with a tripping current of not more than 30 mA.The use of an RCD reduces the risk of electric shock.
- Never pick up or carry an appliance while the motor is running.
Warning symbolsThe following warning symbols are found on the appliance along with the date code:
 Warning! Read the manual prior to operation.
 Do not expose the appliance to rain or high humidity.
 Always remove the plug from the socket before inspecting a damaged cable. Be careful not to use your appliance if the cable is damaged.
 Beware of sharp blades.
 Beware of flying objects. Keep bystanders away from the cutting area.
 Keep the cable away from the cutting blades.
 The blades will continue to rotate after the machine is switched off.
 Directive 2000/14/EC guaranteed sound power
Electrical safety Warning! This tool is double insulated; therefore no earth wire is required. Always check that the power supply corresponds to the voltage on the rating plate.
- If the supply cord is damaged, it must be replaced by the manufacturer or an authorized BLACK+DECKER Service Centre in order to avoid a hazard.
- Electric safety can be further improved by using a high sensitivity 30 mA Residual Current Device (RCD).
Features
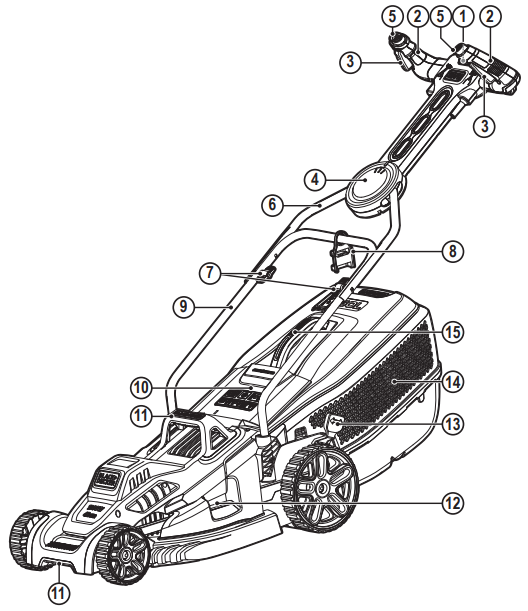
This appliance includes some or all of the following features.
- Power button
- Comfort grip handles
- On/off switches
- EasySteer pivot control
- EasySteer pivot control buttons
- Upper handle
- Handle knobs
- Cable management system (BEMW471ES, BEMW481ES units only)
- Lower handle
- Back flap
- Carrying handles
- Height adjustment gauge
- Height adjustment lever
- Grass box
- Grass box handle
Assembly
Warning! Before assembly, make sure that the appliance is switched off and unplugged.
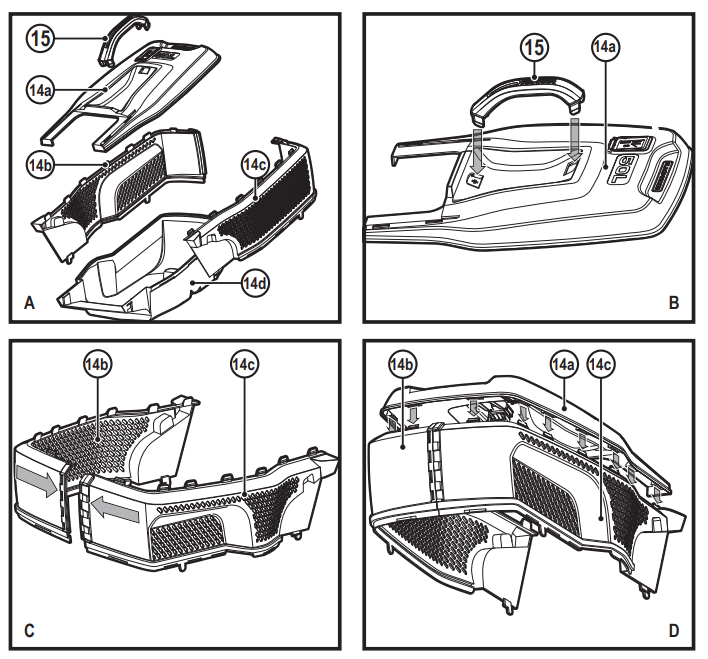
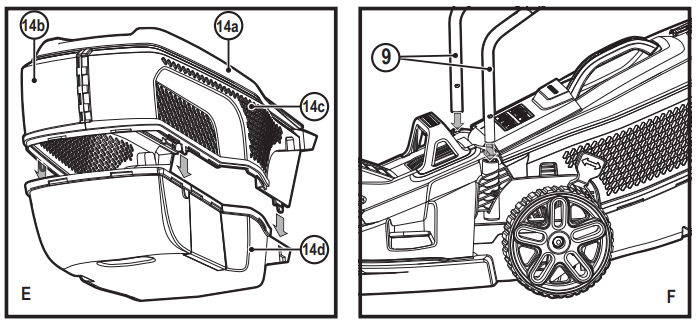
Assembling the grass collection box (fig. A, B, C, D, and E)The grass box requires assembly before use and comes in 5 pieces.
- Clip the handle (15) into the lid (14a) of the grass box (fig. B). The handle will only fit one way round.
- Clip the 2 sides (14b) and (14c) of the grass collection box together. Make sure that all clips and guides are aligned (fig. C).
- Align the lid (14a) onto the assembled grass collection box. Ensure that the 10 guides are aligned (fig. D)
- Align the assembled sides onto the bottom (14d) of the grass collection box. Ensure that the 4 guides are aligned (fig. E)
- Push the 2 parts together. Apply even force around all edges of the grass collection box securing the clips into position uniformly. Check that each clip is fastened together securely.
Fitting the lower handle (fig. F)
- Insert the ends of the lower handles (9) into the corresponding holes in the mower.
- Press the handle down as far as it will go.
- Secure the handle using the screws.
Assembling the upper handle (fig. G)
- Fit the upper handle part to the lower handle using the handle knobs (7) , washers and screws as shown.
Securing the motor cable (fig. H)
- The motor cable has to be fixed using the cable restraint.
- Snap a restraint clip (16) around the cable and lower the handle about 150mm below the handle knob (7).
Fitting the grass collection box (fig. I)
- Lift the flap (10) and place the grass collection box (14) ensuring the recesses (14f) fit over the lugs (14g).
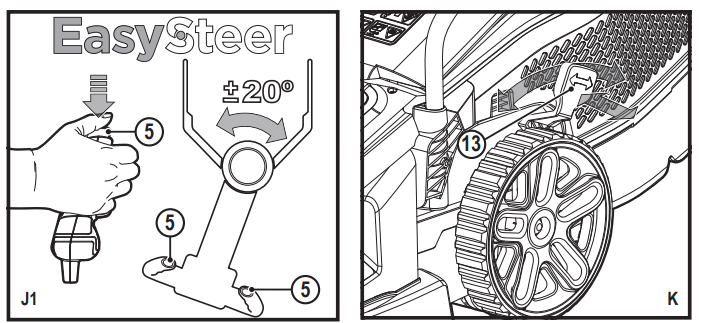
Proper Hand Position (Fig. J)Warning! To reduce the risk of serious personal injury, ALWAYS use proper hand position as shown.Warning!: To reduce the risk of serious personal injury, ALWAYS hold securely in anticipation of a sudden reaction.Proper hand position requires one hand on each of the comfort grip handles (2).
![]() (Fig. J1)EasySteer Innovation – The innovative handle design easily moves from left to right at the push of a button, giving you precision control and maneuverability around your garden.
(Fig. J1)EasySteer Innovation – The innovative handle design easily moves from left to right at the push of a button, giving you precision control and maneuverability around your garden.
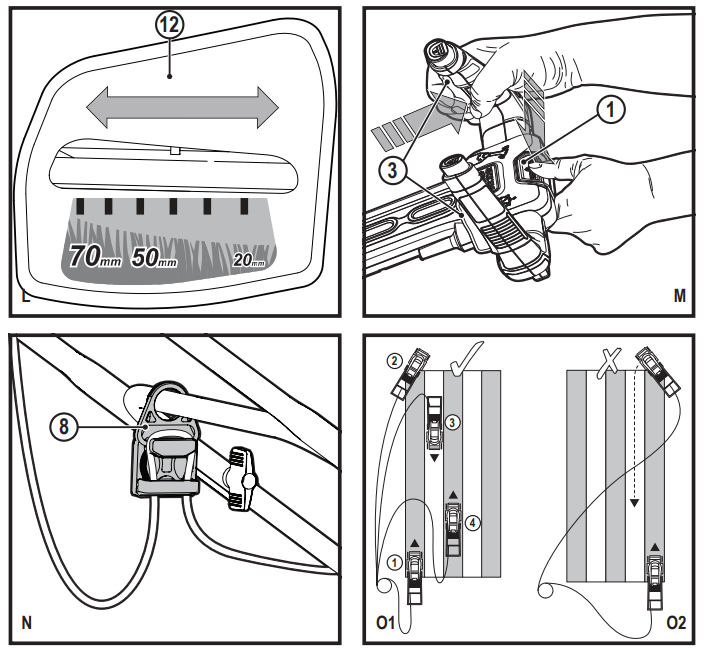
Adjusting the height of cut (fig. K)The height of the cut is adjusted by the central height adjust mechanism, there are 6 positions to choose from.
- Pull the height adjustment lever (13) away from the body of the unit.
- Move the lever towards the rear of the appliance to lower the height of the cut.
- Move the lever towards the front of the appliance to raise the height of the cut.
- Push the height adjustment lever into one of the 6 height locations.NOTE: The height of the cut can be viewed on the height of the cut gauge (12) on the side of the unit.
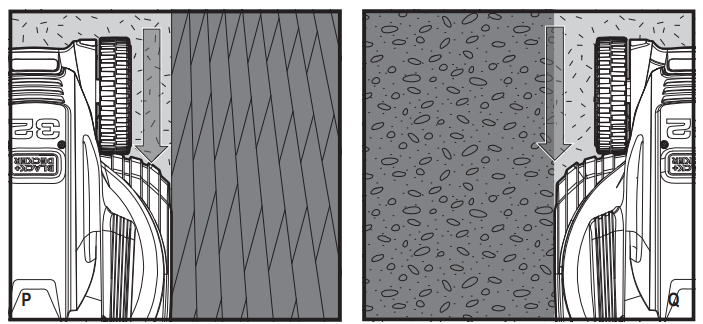
Switching on and off (fig. M)
Switching on
- Push the power button (1).
- Pull the left or right ON/OFF switch (3) towards the handle.
Switching off
- Release ON/OFF switches (3).Warning! Never attempt to lock a switch in the on position.
Mowing (fig. N, O1 & O2)We recommend using your mower as outlined in this section in order to achieve optimum results and to reduce the risk of cutting the mains cable.
- Loop the extension cord through the cable management system (5) (BEMW471ES, BEMW481ES units only) as shown (Fig. N). Ensure you leave approximately 100 of cords between the power switch (1) and the cable management system.
- Ensure that the cable management system (BEMW471ES, BEMW481ES GB units only) can slide freely from one side to the other.
- Place the bulk of the mains cable on the lawn, close to the starting point (position 1 in fig. O1).
- Switch the appliance on as described above.
- Proceed as shown in fig. O1
- Move from position 1 to position 2.
- Turn right and proceed towards position 3. The cable management system will slide from one side to the other, ensuring the extension cord is kept away from the cuttingblade.
- Turn left and move towards position 4.
- Repeat the above procedure as required.Warning! Do not work towards the cable as shown in fig. O2.
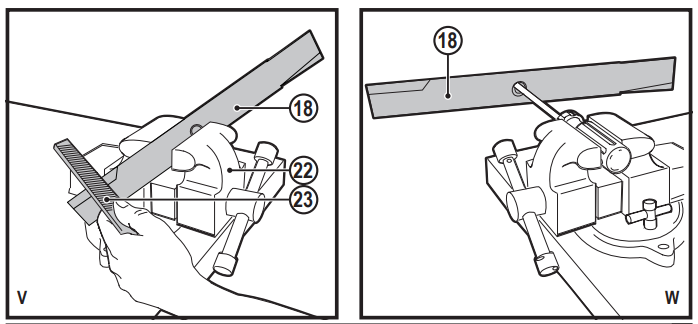
Up to edge cutting (fig. P, Q)Up to edge cutting allows you to cut grass right up to the edge of a wall or fence (fig P).Up to edge cutting allows you to accurately cut grass right up to the edge of your lawn (fig Q).
- With the lawnmower parallel with the edge of your lawn, push the lawnmower along the edge of the lawn. Ensure that the edge of the mower is slightly over the edge ofyour lawn (fig.Q).
Cable tidy (fig. R)
- Cable tidy, stores cable when not in use. Only available on BEMW471ES & BEMW481ES GB units.
Removing Blade (Fig. S, T)Note: BEMW461ES / BEMW471ES & BEMW481ES all use new winged blades which improves collection vs the previous range of mowers. Blade accessories Cat # 34cm A6320 38cm A6321 42cm A6322.Warning! Ensure the blade has completely stopped and disconnected the mower from the power source.
- Cut a piece of 2×4 wood (17) 305mm to keep blade from turning while removing the flange nut.
- Turn the appliance onto its side. Wear gloves and proper eye protection. Be careful of the sharp edges of the blade.
- Position piece of wood (17) to keep the blade from turning as shown in Fig. S.
- Use a 14mm wrench (19) to loosen and remove the blade bolt by turning counterclockwise.
- Pull off blade (18), blade insulator (20), as shown in Fig. T. Examine all pieces for damage and replace if necessary.
Installing Blade (Fig. U)
- Place blade insulator (20) then the blade (18) onto bolt shaft with the lettering on the blade facing out, and place the blade bolt (21) onto the bolt shaft.
- Tighten the blade bolt as firmly as possible by hand.
- Position piece of wood (17) to keep the blade from turning as shown in Fig. U.
- Use a 14mm wrench to securely tighten the blade bolt by turning the wrench clockwise.
Blade sharpeningKeep the blade sharp for the best mower performance. A dull blade does not cut grass cleanly. Use proper eye protection while removing, sharpening, and installing the blade. Sharpening the blade twice during a mowing season is usually sufficient under normal circumstances.Sand causes the blade to dull quickly. If your lawn has sandy soil, more frequent sharpening may be required.Note: Replace bent or damaged blade immediately. When sharpening the blade:
- Make sure the blade remains balanced.
- Sharpen the blade at the original cutting angle.
- Sharpen cutting edges on both ends of the blade, removing equal amounts of material from both ends.
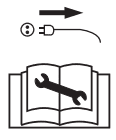
To sharpen the blade in a vice (fig. V)
- Be sure the blade has stopped and the mower is unplugged before removing the blade.
- Remove blade from mower. See instructions for removing and installing the blade.
- Secure blade (18) in a vice (22).
- Wear proper eye protection and gloves and be careful not to cut yourself.Carefully file the cutting edges of the blade with a fine-tooth file (23) or sharpening stone, maintaining the angle of the original cutting edge. Check the balance of the blade. See instructions for blade balancing.
- Replace blade on mower and tighten securely.
Blade balancing (fig. W)Check the balance of the blade (18) by placing a center hole in the blade over a nail or round shank screwdriver, clamped horizontally in a vice. If either end of the blade rotatesdownward, file along the sharp edge of that dropping end. The blade is properly balanced when neither end drops.
LubricationNo lubrication is necessary. Do not oil the wheels. They have plastic bearing surfaces which require no lubrication.
Cleaning Turn the mower off and let the blade come to a stop. Use only mild soap and a damp cloth to clean the mower. Clean out any clippings which may have accumulated on the underside of the deck. After several uses, check all exposed fasteners for tightness.
Preventing corrosionFertilizers and other garden chemicals contain agents which greatly accelerate the corrosion of metals.If you mow in areas where fertilizers or chemicals have been used, the mower should be cleaned immediately afterward as follows:Turn the mower off and unplug the mower. Wipe all exposed parts with a damp cloth.
MaintenanceYour BLACK+DECKER corded/cordless appliance/tool has been designed to operate over a long period of time with a minimum of maintenance. Continuous satisfactory operation depends upon proper tool/appliance care and regular cleaning.Warning! Before performing any maintenance on corded/ cordless power tools:
- Switch off and unplug the appliance/tool.
- Or run the battery down completely if it is integral and then switch off.
- Unplug the charger before cleaning it.Your charger does not require any maintenance apart from regular cleaning.
- Regularly clean the ventilation slots in your tool/appliance and charger using a soft brush or dry cloth.
- Regularly clean the motor housing using a damp cloth. Do not use any abrasive or solvent-based cleaner.
- Regularly use a blunt scraper to remove grass and dirt from underneath the guard.
TroubleshootingIf your appliance seems not to operate properly, follow the instructions below. If this does not solve the problem, please contact your local BLACK+DECKER repair agent.Warning! Before proceeding, release the bail bar to turn the mower off and wait for the blade to stop.
| Problem | Possible cause | Possible solution |
| The mower will not start. | The cord is not plugged in. | Plug mower into a working outlet. |
| The circuit fuse is blown. | Replace circuit fuse. (If the product repeatedly causes the circuit fuse to blow, discontinue use immediately and have it serviced by an authorized BLACK+DECKER service center. | |
| Cord or switch is damaged. | Has the cord or switch been replaced at an authorized BLACK+DECKER service center? | |
| Grass too long. | Increase the height of the cut and move the machine to shorter grass to start. | |
| Machine functions intermittently. | Thermal cut-out activated. | Allow the motor to cool and increase the height of the cut. |
| The machine leaves a ragged finish or motor labor.
|
Height of cut too low. | Increase the height of the cut. |
| Cutting blade blunt. | Replace the blade. | |
| The underside of the machine is clogged. | Check underneath the machine and clear out as necessary (always wear heavy-duty gloves) | |
| Blade fitted upside down. | Refit blade correctly. |
Protecting the environment Separate collection. Products and batteries marked with this symbol must not be disposed of with normal household waste.
Products and batteries contain materials that can be recovered or recycled, reducing demand for raw materials.Please recycle electrical products and batteries according to local provisions. Further information is available at www.2helpU.com
Technical data
| BEMW461ES | BEMW471ES | BEMW481ES | ||
| Voltage | VAC | 230 | 230 | 230 |
| Power input | W | 1400 | 1600 | 1800 |
| No-Load speed | min-¹ | 3500 | 3500 | 3500 |
| Height adjustment | mm | 20 – 70 | 20 – 70 | 20 – 70 |
| Blade length | cm | 34 | 38 | 42 |
| Weight | Kg | 14.37 | 15.14 | 16.31 |
Hand/arm weighted vibration value:= 2.5m/s² , uncertainty (K) = 1.5m/s² .Sound pressure level at the operator’s ear:LPA : 82dB(A); K= 2.1dB(A)Sound power level LWA : 95dB(A); K= 1.3dB(A)EC declaration of conformity MACHINERY DIRECTIVE OUTDOOR NOISE DIRECTIVE
![]()
BEMW461ES, BEMW471ES, BEMW481ES lawn mower Black & Decker declares that these products described under “technical data” are in compliance with:2006/42/EC, EN 60335-1:2012 + A11:2014,60335-2-77:20102000/14/EC, Lawn Mower, L < 50cm, Annex VI,DEKRA Certification B.V. Meander 1051 / P.O. Box 51856825 MJ ARNHEM / 6802 ED ARNHEM Netherlands.Level of acoustic power according to 2000/14/EC (Article 12,Annex III, L< 50cm): measured sound power level LWA: 95dB(A); K= 1.3dB(A).guaranteed sound power level LWA: 96dB(A).These products also comply with directives 2014/30/EU, 2011/65/EU. For more information, please contact Black & Decker at the following address or refer to the back of the manual.
The undersigned is responsible for the compilation of the technical file and makes this declaration on behalf of Black & Decker.
 R. LaverickDirector of EngineeringBlack & Decker Europe, 210 Bath Road, Slough,Berkshire, SL1 3YDUnited Kingdom31/10/2017
- GuaranteeBlack & Decker is confident of the quality of its products and offers consumers a 24-month guarantee from the date of purchase. This guarantee is in addition to and in no way prejudices your statutory rights. The guarantee is valid within the territories of the Member States of the European Union and the European Free Trade Area.
- To claim on the guarantee, the claim must be in accordance with Black & Decker Terms and Conditions and you will need to submit proof of purchase to the seller or an authorized repair agent. Terms and conditions of the Black & Decker 2 year guarantee and the location of your nearest authorized repair agent can be obtained on the Internet at www.2helpU.com, or by contacting your local Black & Decker office at the address indicated in this manual.Please visit our website www.blackanddecker.co.uk to register your new Black & Decker product and receive updates on new products and special offers.
References
Elektrowerkzeuge | Gartengeräte | Haushaltsprodukte | BLACK+DECKER
BLACK+DECKER Onlineshop | Elektrowerkzeuge, Gartengeräte & mehr
Elektrikli El Aletleri, Bahçe, Aksesuarlar | BLACK+DECKER
Ηλεκτρικά Εργαλεία | Εργαλεία Κήπου | Οικιακές συσκευές | BLACK+DECKER
2helpU
Power Tools | Garden Tools | Household Products | BLACK+DECKER
Elverktyg | Trädgård | Hushåll | BLACK+DECKER
Sähkötyökalut | Puutarhatyökalut | Kotitaloustuotteet | BLACK+DECKER
Elværktøj | Haveredskaber | Husholdningsprodukter | BLACK+DECKER
Ferramentas Eléctricas | Ferramentas de Jardim | Pequenos Eletrodomésticos | BLACK+DECKER
Elektrisch Gereedschap | Tuingereedschap | Huishoudproducten | BLACK+DECKER
Herramientas Eléctricas | Herramientas de Jardin | Pequeños Electrodomésticos | BLACK+DECKER
Elektrowerkzeuge | Gartengeräte | Haushaltsprodukte | BLACK+DECKER
Elektrisch gereedschap | Tuingereedschap | Huishoudproducten | BLACK+DECKER
Elektroverktøy | Hageprodukter | husholdning produkterBLACK+DECKER
Power Tools | Garden Tools | Household Products | BLACK+DECKER
Ηλεκτρικά Εργαλεία | Εργαλεία Κήπου | Οικιακές συσκευές | BLACK+DECKER
Bricolage | Outils de Jardin | Petit Electroménager | BLACK+DECKER
Elettroutensili | Utensili da giardino| Pulizia della casa | BLACK+DECKER
[xyz-ips snippet=”download-snippet”]