BLACK LION AUDIO B12A Quad 4-Channel Preamp with Mic and DI Input Owner’s Manual
NoticeThis manual provides general information, preparation for use, installation and operating instructions for the Black Lion Audio B12A Quad.
The information contained in this manual is subject to change without notice. Black Lion Audio makes no warranties of any kind with regard to this manual, including, but not limited to, the implied warranties of merchantability and fitness for a particular purpose. Black Lion Audio shall not be liable for errors contained herein or direct, indirect, special, incidental, or consequential damages in connection with the furnishing, performance, or use of this material.
©2021 Black Lion Audio. The Black Lion Audio ‘Lion Face’ logo, BLA, are trademarks or registered trademarks of Black Lion Audio.
This manual and any associated intellectual property are subject to copyright protection. No part of this document may be reproduced in any form without explicit written consent from Black Lion Audio.
IMPORTANT SAFETY INSTRUCTIONS
- Read these instructions.
- Keep these instructions
- Heed all warnings.
- Follow all instructions.
- Do not use this apparatus near water.
- Clean only with dry cloth.
- Install in accordance with the manufacturer’s instructions.
- Do not install near any heat sources such as radiators, heat registers, stoves, or other apparatus that produce heat.
- Do not defeat the safety purpose of the polarized or grounding-type plug. A polarized plug has two blades with one wider than the other. A grounding-type plug has two blades and a third grounding prong. The wide blade or third prong is provided for your safety. If the provided plug does not fit into your outlet, consult an electrician for replacement of the obsolete outlet.
- Protect the power cord from being walked on or pinched particularly at plugs, convenience receptacles, and the point where they exit from the apparatus. If the power cord becomes frayed, stop using immediately.
- Use only attachments/accessories specified by the manufacturer
- Use only with a cart, stand, tripod, bracket or table specified by the manufacturer, or sold with the apparatus. When a cart is used, use caution when moving the cart/apparatus combination to avoid injury from tip-over.
- Unplug this apparatus during lightning storms or when unused for long periods of time.
- Refer all servicing to qualified service personnel. Servicing is required when the apparatus has been damaged in any way, such as power supply cord or plug is damaged, liquid has been spilled or objects have fallen into the apparatus, the apparatus has been exposed to rain or moisture, does not operate normally, or has been dropped.
- This apparatus shall not be exposed to dripping or splashing, and no object filled with liquids, such as vases, shall be placed on the apparatus.
- Note that this apparatus is not completely disconnected from the AC mains service when the power switch is in the OFF position.
- The mains plug or power inlet on the product is used as the disconnect device, so the disconnected device shall remain readily operable when reconnected.
- Any changes or modifications not expressly approved in this manual could void your authority to operate this apparatus.
IMPORTANT !Be sure to use a three prong AC cable that properly fits the power source. Please use the correct fuse designated on the rear panel before plugging in the power cord. Improper selection can result in damage to the unit that will not be covered under the warranty.
The lightning flash with an arrowhead symbol within an equilateral triangle is intended to alert the user to the presence of uninsulated “dangerous voltage” within the product’s enclosure that may be of sufficient magnitude to constitute a risk of electric shock
The exclamation point within an equilateral triangle is intended to alert the user to the presence of important operating and maintenance (servicing) instructions in the literature accompanying the product.
The Black Lion Audio B12A Quad complies with all applicable / RoHS/ WEEE European Union directives.
Do not attempt to service this unit yourself, as it will void your warranty. Please check your unit carefully upon receipt and return to place of purchase immediately if there are any problems with the product. After that, the standard Black Lion Audio 3 YEAR warranty will apply to defects in materials and workmanship.
INTERNATIONAL
For service or warranty assistance, please contact the Black Lion Audio distributor in your country through the dealer from whom you purchased this product.
LIMITED 3 YEAR WARRANTY
Black Lion Audio’s B12A Quad is warranted by Black Lion Audio to be free from defects in materials and workmanship for the period of THREE (3) YEARS to the original purchaser. In the event of such defects, the product will be repaired without charge or, at our option, replaced with a new one if delivered to Black Lion Audio prepaid, together with a copy of the sales slip or other proof of purchase date. The warranty excludes problems due to normal wear, abuse, shipping damage or failure to use the product in accordance with the specifications.
All parts and labor are covered under this Limited Warranty. However, if it is determined by Black Lion Audio that the device was damaged or made defective through abuse, we reserve the right to charge the customer for the cost of the repair.
Black Lion Audio shall not be liable for damages based upon inconvenience, loss of use of the product, loss of time, interrupted operation or commercial loss or any other damages, whether incidental, consequential or otherwise. This warranty gives you specific legal rights, and you may have other rights, which will vary from state to state.
This warranty is not transferable.
QUICK START GUIDE
More than just another 312A clone, the B12A Quad combines vintage-inspired sonics and modern features in a rugged 1RU chassis with a smart feature set that will satisfy the most demanding audio engineers. A revised gain stage and lower noise floor deliver cleaner sound with lower distortion, while CineMag input and output transformers keep things warm, creamy, and beefy. Two front-panel DIs impart harmonic richness to guitars, basses, and synths, while stepped input gain and variable output attenuation give you exacting control over transformer saturation. Per-channel metering displays how hot your output signal is hitting the parallel TRS/XLR outputs, while an external power supply keeps noise out of your tracks.
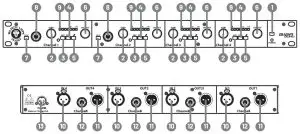
- Power Button: This turns the unit on and off.
- Gain: This control operates the amount of gain provided by each preamp.
- 48V Button: Engage to turn on 48V phantom power.
- Pad Button: Engage to reduce input signal amplitude by 18dB
- Phase Invert Button: Engage to adjust input signal polarity by 180°.
- Output: This control attenuates the volume after the preamp, allowing for the preamp to be driven while maintaining usable level.
- Hi-Z Button: Engage this to use the Hi-Z Input as the input source.
- Hi-Z Input: Input jack for use with high-impedance, unbalanced sources (GAIN knob adjusts signal amplitude).
- LED Meters: 7-segment LED meters for gain adjustment.
- XLR Input: Balanced mic-level input.
- XLR Output: Balanced line-level output.
- TRS Output: Balanced line-level output.
- Power Input: Power input jack (Note: only use a BLA-specified power supply).
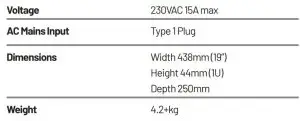
SPECIFICATIONS
report this ad[xyz-ips snippet=”download-snippet”]