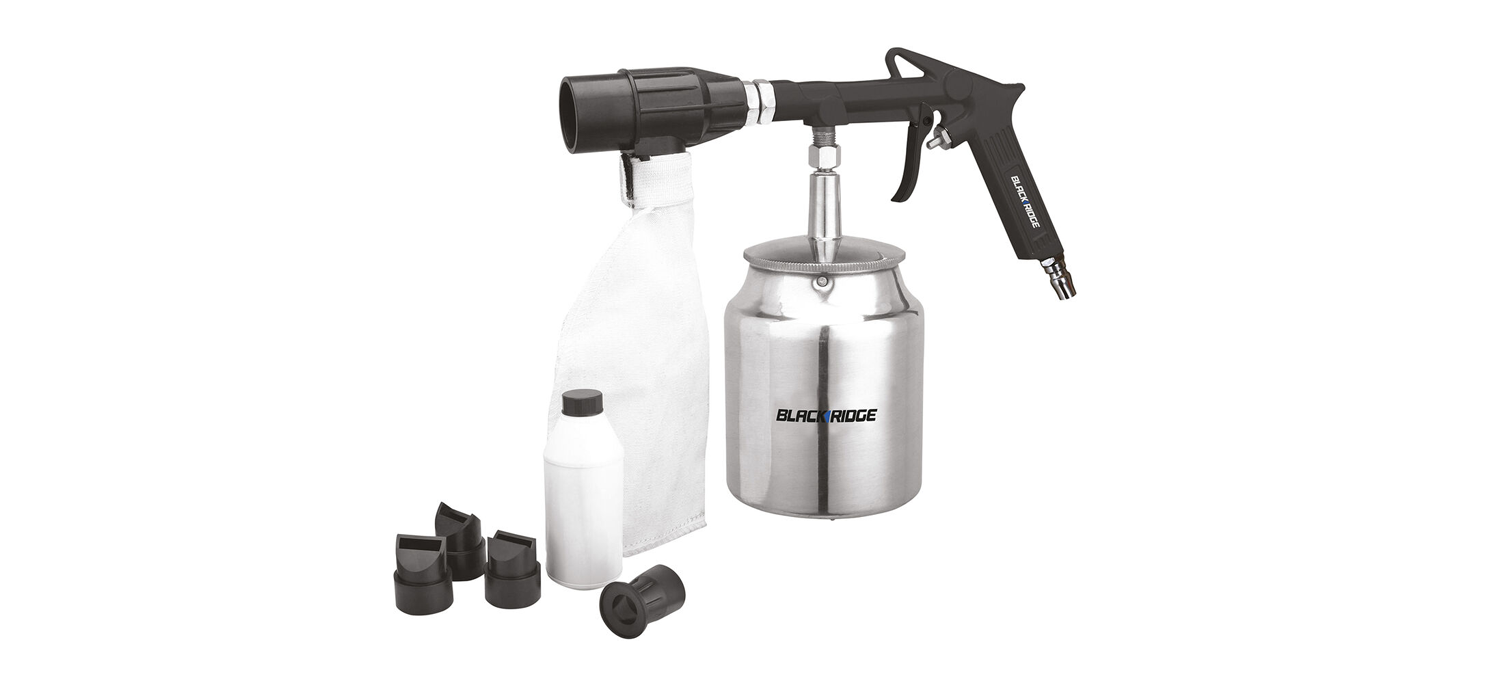
BLACK RIDGEAir Spot Sand Blasting GunInstruction Manual
PLU 572896

Manufactured and packaged for SRGS PTY LTD ABN 23 113 230 050 751 Gympie Road, Lawnton, Queensland 4501, Australia.
WARRANTY
This product is guaranteed against defects for a period 0102 months) from date of purchase. This warranty is provided by SRGS FM/ LTD ABN 23 113 230 050 of 751 Gympie Rd Lawnton QLD 4501 Ph (07) 3482 7500. Supercheap Auto will offer a repair, replacement product or store credit if the product is assessed as being defective during the warranty period.
To claim under this warranty, take this product to the Front Service Desk of your nearest Supercheap Auto store. For store locations, visit www.supercheapauto.com.au (AUS) or www.supercheapauto.co.nz (NZ). You will need your receipt or proof of purchase.
Additional information may be requested of you to process your claim. Should you not be able to provide proof of purchase with a receipt or a bank statement, identification showing your name, address and signature may be rceuired to process your claim. This product may need to be sent to the manufacturer to assess the defect before determining any claim. Faults or defects caused by product modification, misuse and abuse, normal wear and tear or failure to follow user instructions are not covered under this warranty.
Our goods come with guarantees that cannot be excluded under the Australian Consumer Law.You are entitled to a replacement or refund for a major failure and for compensation for any other reasonably foreseeable loss or damage. You are also entitled to have the goods repaired or replaced if the goads fail to be of acceptable quality and the failure does not amount to a major failure.
Any expenses incurred relating to the return of this product to store will normally have to be paid by you. For more information contact your nearest Superchcep Auto store.
The benefits to the consumer given by this warranty are in addition to other rights and remedies of the Australian Consumer Law in relation to the goods and services to which this warranty relates.
SAFETY GUIDELINE – DEFINITIONS
This spot blast kit is used for the removal of rust spots on car body panels, door, boot and bonnet edges and provides a very focussed rust removal area using the special rubber nozzle sleeves.
WARNING
Please read and understand all safety precautions in this manual before operating. Failure to comply with lnS11’1.ictlons In 1hls manual could result In personal Injury, property damage and/or invalidate your warranty. The manufacturer Will. NOT be liable for any damage due to failure to follow these instructions,
This manual contains information that is important for you to know and understand. This information relates to protecting YOUR SAFETY and PREVENTING EQUIPMENT PROBLEMS. To help you recognize this information, we use the following symbols. Please read the manual and pay attention to these sections.
This is the safety alert symbol. It is used to alert you to potential personal injury hazards. Observe all safety points that follow this symbol to avoid possible injury or death.
DANGER: Indicates an imminently hazardous situation which, if not avoided, will result in death or serious injury.
WARNING: Indicates a potentially hazardous situation which, if not avoided, could result in death or serious injury.
CAUTION: Indicates a potentially hazardous situation which, if not avoided, may result in minor or moderate injury and/or property damage.
IMPORTANT SAFETY INSTRUCTIONS
SAVE THESE INSTRUCTIONSWARNING: To reduce the risk of electric shock, fire, and injury to persons, read all the instructions before using the tool. You must also read the compressor manual and follow all compressor safety instructions.
GENERAL SAFETYWARNING: RISK OF clean and ELECTRIC well lit. SHOCK, Cluttered FIRE, benches AND/OR and dark areas Keep increase the work the risks of electric shock, fire, and injury to persons. Place cleaning rags and other flammable waste materials in a secured metal container: The container should be disposed of properly In accordance with local authority regulations.
WORK AREA SAFETYWARNING: RISK explosive OF atmospheres, EXPLOSION such AND/OR as in 1he FIRE, Do presence not of operate flammable the tool liquids in gases. or dust. The tool is able to create sparks resulting in the ignition of the dust or fumes.
RISK OF INJURY. Keep bystanders, children, and pets away while operating the tool. Distractions are able to result in the loss of control of the tool.
PERSONAL SAFETYWARNING: RISK OF INJURY. Stay alert. Watch What you are doing and use common sense when operating the tool. Do not use the tool while tired or under 1he influence of drugs, alcohol, or medication. A moment of attention lapse while operating the tool increases the risk of injury to persons.
RISK OF INJURY. Dress properly. Do not wear loose clothing or jewelry. Contain long hair. Keep hair, clothing, and gloves away from moving parts. Loose clothes, jewelry, or long hair increase the risk of injury to persons as a result of being caught in moving parts.
RISK OF INJURY. Avoid unintentional starting. Be sure the trigger is off before connecting to the air supply. Do not carry the tool with your finger on the trigger or connect the tool to the air supply with the trigger on. Do not carry the tool by the hose.
IMPORTANT SAFETY INSTRUCTIONS
RISK TO BREATHING/INHALATION HAZARD. Always wear approved, properly filling face mask or respirator and work in a well ventilated area when using tools that generate dust. Some dust created contains chemicals hazardous to health.
RISK OF INJURY. Do not overreach. Keep proper fooling and balance at all times. Proper footing and balance enables better control of the tool in unexpected situations .
RISK OF EYE NJURY. Always wear approved safety goggles when using an air tool. Air powered equipment and power tools are capable of propelling materials such as metal particles and other debris at high speed which could r8Sult in serious aye injury.
RISK OF ELECTRIC SHOCK. Explore the workplace to avoid contact with hidden wiring. Thoroughly Investigate 1he workplace for possible hidden wiring before performing work Contact with a “live” wire will also make exposed metal parts o11he tool “live” and shack the operator.
TOOL USE AND CARE SAFETY
RISK OF INJURY. Use clamps or another practical way to secure and support the workplace to a stable platform. Holding 1he workpiece by hand or against the body is unstable and is able to lead to loss of control.
RISK OF INJURY. Do not use the tool if 1he trigger does not turn the tool on or off. Any tool that cannot be controlled with the trigger is dangerous and must be required.
RISK OF INJURY. Disconnect the tool from the air source before making any adjustments, changing accessories. or storing the tool. Such preventative safety measures reduce the risk of starting the tool unintentionally.
RISK OF INJURY. Store the tool when it is idle, out of reach of children and other untrained persons. A tool is dangerous in the hands of untrained users.
IMPORTANT SAFETY INSTRUCTIONS
RISK OF BURSTING AND/OR INJURY. Check for misalignment or binding of moving parts, breakage of parts and any other condition that affects the tool’s operation. If damaged, have the tool serviced before using. Do not operate the tool with the protective guarding removed or damaged. Replace the tool or have it repaired by an authorized service center. Many accidents are caused by poorly maintained tools or air hose. There is a risl< of bursting if the tool is damaged.
RISK OF BURSTING AND/OR INJURY. Check for damaged air hose. Keep 1h<l air hos.i away from heat, 011, and sharp edges. Inspect the air hose periodically and replace it if it becomes worn or damaged.
RISK OF BURSTING AND/OR INJURY. Use compressed air regulated to a maximum pressure at or below the rated pressure of any attachments. Never operate the tool over 90 PSI (6.2 BAR). Exceeding the maximum pressure rating of tools or accessories could cause an explosion resulting in serious injury.
RISK OF INJURY. Use only accessories that are designed for the specific tool. Use of an accessory not intended for use with the specific tool, increases the risk of injury to persons.
TOOL USE AND CARE SAFETY
RISK OF INJURY. Tool service must be performed only by qualified repair personnel.RISK OF INJURY. When servicing a tool, use only identical replacement parts. Use only authorized parts.
AIR SOURCE SAFETY
RISK OF BURSTING AND/OR INJURY. Never connect to an air source that is greater than 90 PSI (6.2 BAR). Over pressurizing the tool may result in bursting, abnormal operation, breakage of the tool, or serious injury to persons. Use only clean, dry, regulated compressed air at the rated pressure or within the rated pressure range as marked on the tool. Always verify prior to using the tool that the air source has been adjusted to the rated air pressure or within the rated air pressure range.
RISK OF EXPLOSION AND INJURY. Never use oxygen, carbon dioxide, combustible gases or any bottled gas as an air source for the tool. Such gases are capable of explosion and serious injury to persons.
OPERATING INSTRUCTIONS
To begin using the tool:
- As a standard practice, drain water from the air compressor receiver and air lines prior to use each day (reference your compressor operator manual tor detailed instructions). IMPORTANT: installation of an air filter to remove water/ oil is recommended. Failure to do so will cake the abrasive material and clog the sandblasting gun, causing the gun to not operate.
- Turn on 1he air compressor and allow it build up pressure.
- Adjust the air compressor’s regulator or the supplier line regulator to 90 PSI (6.2 BAR).
Assembly:

Spot Blast Gun is now reedy for connecting to the air line and use
Usage guidelines:
1a. When de-rusting steel components, use aluminum oxide recyclable abrasive
lb. When de-oxidising aluminum component, use glass bead abrasive material
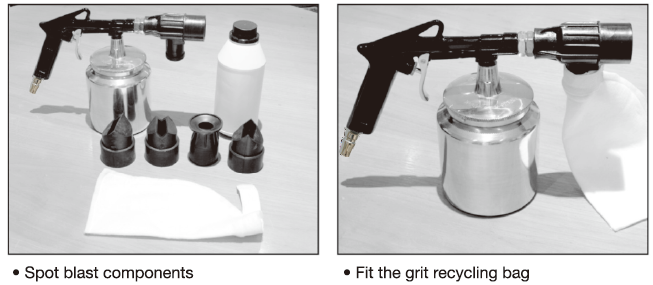
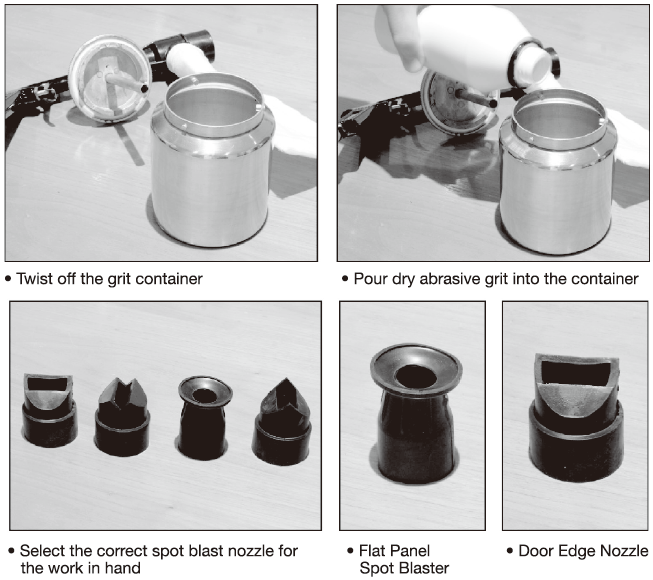
2. Pour the appropriate abrasive into the spot blast gun container (the spot blast kit is supplied with aluminum oxide abrasive)
3. Fit the recycle collecting bag under the nozzle guide
4. Select and IS the appropriate rubber nozzle for the job in hand
5. Connect the air hose
6. Set the air pressure by adjusting the air outlet pressure regulator to a maximum of 90 P51(6.2 BAR)
7. Ensure that you are wearing the correct protective clothing, safety goggles and mask.
8. Hold the rubber nozzle firmly against the workpiece and squeeze the trigger. Release the trigger before removing the rubber nozzle from the workpiece. Squeezing the trigger will operate the spot blast gun, releasing the trigger will stop it
9. Having released the trigger, remove the gun from the workpiece to inspect the job. Repeat procedure from step 8 until the job is complete.
10. Spent abrasive is collected in the recycle collecting bag and may be poured back into the guns container for m-use.
11. Do not leave abrasive in the gun after use. Always thoroughly clean the spot blast gun before storing. The abrasive material must be kept dry at all times.
WARNING: Always disconnect the sandblaster from the air supply before changing accessories, relocating or performing any maintenance.
WARNING: Risk of Injection. The high pressure and abrasive materials that are used during sandblasting can penetrate skin and cause serious injury. Wear approved safety glasses or face shield, gloves and a approved respirator during operation.
WARNING: Always direct spray away from self and others or serious injury could occur. Ensure that youam wearing the correct protective clothing, safety goggles and mask.
MAINTENANCE INSTRUCTIONS
After each use:Clean the surface with an air blaster or medium bristle brush to remove any remaining abrasive material.
WANING: Always disconnect the tool from the air supply before performing any maintenance.
Changing Nozzles: Periodically (depending on the amount of use), the nozzle will become worn. causing the spray to become irregular or to stop.
- Disconnect the sandblaster from the air supply.
- Remove the nozzle lock nut and carefully pull out the nozzle.
- Gently insect a new nozzle, replace the nozzle nut.
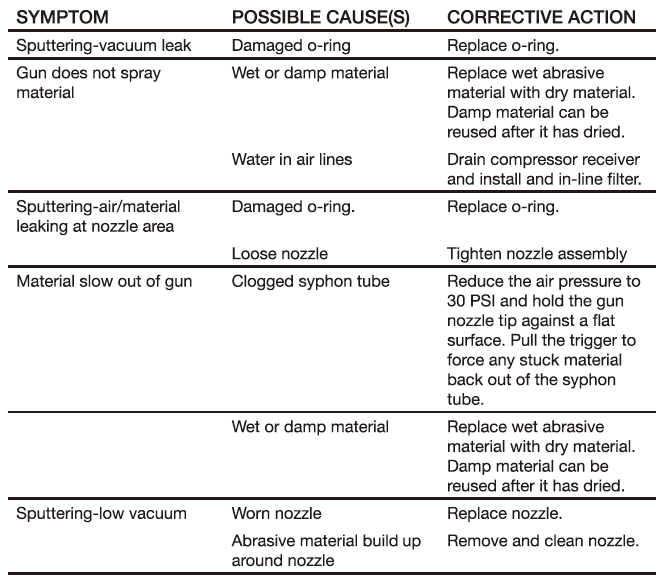
TROUBLESHOOTING
[xyz-ips snippet=”download-snippet”]