
![]()
![]() 4K DisplayPort® 2.02×1 USB 3.0 KVM SwitchPN 42645USER’S MANUAL
4K DisplayPort® 2.02×1 USB 3.0 KVM SwitchPN 42645USER’S MANUAL
SAFETY WARNINGS AND GUIDELINESPlease read this entire manual before using this device, paying extra attention to these safety warnings and guidelines. Please keep this manual in a safe place for future reference.
- This device is intended for indoor use only.
- Do not expose this device to water or moisture of any kind. Do not place drinks or other containers with moisture on or near the device. If moisture does get in or on the device, immediately remove it from its power source and allow it to fully dry before reapplying power.
- Do not touch the device, the power cord, or any other connected cables with wet hands.
- Do not expose this device to excessive vibration, extreme force, shock, or fluctuations in temperature or humidity.
- Do not expose this device to excessively high temperatures. Do not place it in, on, or near a heat source, such as a fireplace, stove, radiator, etc. Do not leave it in direct sunlight.
- Do not place or install this device in an area where it can be exposed to excessive amounts of dust, humidity, oil, smoke, or combustible vapors.
- Use only in a well-ventilated area. Do not use in close, confined spaces.
- Prior to operation, check the unit and power cord for physical damage. Do not use if physical damage has occurred.
- Before plugging the unit into a power outlet, ensure that the outlet provides the same type and level of power required by the device.
- Unplug this device from the power source when not in use.
- Take care to prevent damage to the power cord. Do not allow it to become crimped, pinched, walked on, or become tangled with other cords. Ensure that the power cord does not present a tripping hazard.
- Never unplug the unit by pulling on the power cord. Always grasp the connector head or adapter body.
- Remove the batteries from the controller if it will go unused for a lengthy period of time.
- Clean using a soft, dry cloth only. Do not use chemical cleaners, solvents, or detergents. For stubborn deposits, moisten the cloth with warm water.
- This device has no user-serviceable parts. Do not attempt to open, service, or modify this device.
INTRODUCTION
This Blackbird™ 4K DisplayPort® 2.0 2×1 KVM Switch allows you to control up to two computers using a single keyboard, mouse, and video display. It is compliant with theDisplayPort 1.4 and HDMI® 2.0 specifications, provides up to 32.4Gbps (DP)/18Gbps (HDMI) bandwidth and supports resolutions up to with the YCbCr 4:4:4 color space. It is compatible with computers running Windows® 2000 and later, Mac® OS X®, and Linux® operating systems.
FEATURES
- Allows control of up to two computers using a single keyboard, video display, and mouse
- Supports resolutions up to , including 3840×2160, 4096×2160, and all 3D video modes
- Compliant with the DisplayPort® 1.4, HDMI® 2.0, and HDCP™ 2.2/1.4 standards
- Delivers up to 32.4Gbps (DisplayPort) and 18Gbps (HDMI) bandwidth
- Supports the RGB 4:4:4, YCbCr 4:4:4, YCbCr 4:2:2, and YCbCr 4:2:0 color spaces
- Includes an IR remote control
- Supports HDR and Deep Color with 16-bits/channel (48-bit total) for DisplayPort and 12-bits/channel (36-bit total) for HDMI
- Compatible with Windows® 2000 / XP / Vista® / 7 / 8 / 10, Mac® OS X®, and Linux® operating systems
- Supports multiple switching methods
CUSTOMER SERVICE
The Monoprice Customer Service department is dedicated to ensuring that your ordering, purchasing, and delivery experience is second to none. If you have any problem with your order, please give us an opportunity to make it right. You can contact a Monoprice Customer Service representative through the Live Chat link on our website www.monoprice.com or via email at [email protected]. Check the website for support times and links.
PACKAGE CONTENTS
Please take an inventory of the package contents to ensure you have all the items listed below. If anything is missing or damaged, please contact Monoprice Customer Servicefor a replacement.
|
|
PRODUCT OVERVIEW
Front Panel
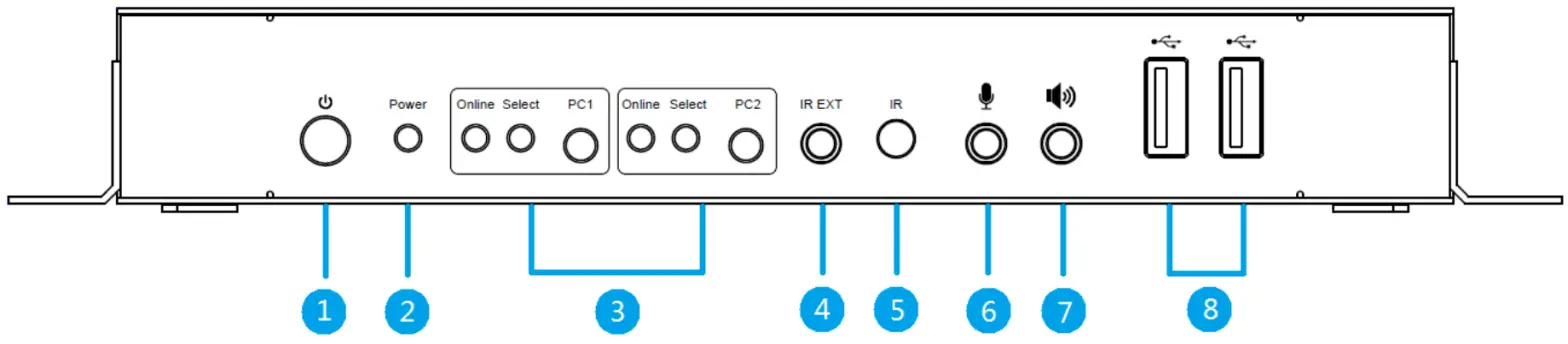
- Power Button: Press the power button to power the unit on or oft
- Power LED: The LED illuminates when power is applied.
- INPUT SELECT: Each of the two sections includes a Connect LED, a Select LED, and a PC# button for direct selection of that input. When a PC is powered on and connected to one of the USB ports on the rear panel, the corresponding Connect LED will illuminate. When one of the inputs is selected, the corresponding Select LED will illuminate. When Automatic Switching Mode is enabled, the Select LED corresponding to the currently displayed input flashes.
- IR EXT: 5mm jack for connecting the included IR receiver.
- It IR “eye” for receiving signals from the included IR remote control.
- MICROPHONE: 5mm jack for connecting a microphone. Note that this jack is identical to the MICROPHONE jack above the DisplayPort Out port on the rear panel. Connect a single microphone to either jack, but not both.
- SPEAKERS: 5mm jack for connecting headphones, powered speakers, or an external amplifier. Note that this jack is identical to the SPEAKERS jack above the DisplayPort Out port on the rear panel. Connect a single pair of headphones, powered speakers, or external amplifier to either jack, but not both.
- USB: Two USB 3.0 ports for connecting external USB devices, such as printers, scanners, flash drives, external hard drives, etc.Rear Panel

- LOCAL: The LOCAL section includes connections for the local keyboard, both HDMI® and DisplayPort® video displays, and mouse, as well as MICROPHONE and SPEAKERS Note that the MICROPHONE and SPEAKERS jacks are identical to the same jacks on the front panel. If both video outputs are connected, the DisplayPort output will be used.
- PC1: This section contains DisplayPort and USB input ports from the first PC, as well as MICROPHONE and SPEAKERS jacks for connecting the microphone input and the audio output on the first PC.
- PC2: This section contains DisplayPort and USB input ports from the second PC, as well as MICROPHONE and SPEAKERS jacks for connecting the microphone input and the audio output on the second PC.
- DC 5V: DC barrel connector for connecting the included AC power adapter.Remote Control
- 1, 2: Press one of the buttons to directly select the corresponding PC.
- : Use the button to cycle backward through the connected PCs. Use the button to cycle forward through the connected PCs. The forward cycle order is PC1 > PC2 > PC1 > etc.
SAMPLE CONNECTION DIAGRAM

INSTALLATION
report this adPerform the following steps to install this KVM into your computer system.
- Ensure that all equipment to be connected is powered off and disconnected from its power source.
- Using a DisplayPort°4 cable (available separately) up to 2m in length, plug one end into the DisplayPort input on your local display, then plug the other end into the DisplayPort Out port in the LOCAL section on the rear panel. Alternatively, using a Premium High-Speed HDMI® Cable (available separately), plug one end into the HDMI input port on your local display, then plug the other end into the HDMI Out port in the LOCAL section on the rear panel. If both outputs are connected, the DisplayPort® output will be used.
- Plug a USB keyboard into the KEYBOARD port in the LOCAL section on the rear
- Plug a USB mouse into the MOUSE port in the LOCAL section on the rear panel.
- Plug a microphone into either the MICROPHONE jack in the LOCAL section on the rear panel or the MICROPHONE jack on the front panel.
- Plug a pair of headphones, powered speakers, or an external amplifier into the SPEAKERS jack in the LOCAL section on the rear panel or the SPEAKERS jack on the front panel.
- Using a DisplayPort®4 cable (available separately), plug one end into the DisplayPort In port in the PC1 section on the rear panel, then plug the other end into the DisplayPort output on the first PC.
- Using one of the included USB 3.0 cables, plug one end into the USB port in the PCI section on the rear panel, then plug the other end into an available USB port on the first PC.
- Using a 3.5mm audio cable (available separately), plug one end into the MICROPHONE jack in the pa section on the rear panel, then plug the other end into the microphone input on the first PC.
- Using a 3.5mm audio cable (available separately), plug one end into the SPEAKERS jack in the PC1 section on the rear panel, then plug the other end into the audio output on the first PC.
- Repeat steps 7-10 for the PO section on the rear panel and the second PC.
- Plug one end of the included AC power adapter in the DC 5V jack on the rear panel, then plug the other end into a nearby AC power outlet.
- Plugin and power on all PCs and any connected power speakers or external
- Press the Power Button on the front panel to power the KVM on. The Power LED will illuminate to indicate that power is applied.
- For each connected PC, the Connect LED should illuminate, indicating a valid connection. Additionally, the Select LED for one of the connected PCs should be illuminated, indicating that it is the currently selected PC.
- Verify that you can control the selected PC using the keyboard and mouse and that you can see video on the display.
- Press each of the PC# buttons on the front panel to select each PC in turn. Verify that you can control each PC using the keyboard and mouse and that you can see video on the display.
Congratulations, your KVM is installed and ready for use!
OPERATION
This KVM supports several different methods for switching focus from one PC to another.Manual Front PanelThe most basic method is to press one of the PC# buttons on the front panel to directly select the corresponding PC.IR Remote ControlThe remote control offers two ways to select a PC.
- Press one of the numbered buttons to directly select the corresponding PC.
- Press the button to cycle backward through the connected PCs. Press the button to cycle forward through the connected PCs. The forward cycle order isPC1 > PC2 > PC1 > etc.
Mouse TraversePut the mouse cursor on the right side of the screen, then move it to the right for about 2 seconds. The KVM will automatically cycle forward to the next connected PC. Theforward cycle order is PC1 > PC2 > PC1 > etc.USB Port DetectionThe KVM monitors the USB ports to each PC to detect the presence of a signal and will switch the selected PC in one of the following ways.
- If the currently selected PC is powered off or the USB connection is broken, the KVM will cycle forward to the next available PC. While searching for an available connection, the Select LEDs on the front panel will flash sequentially in a loop.Once a PC connection is found and the PC connection established, the corresponding Select LED on the front panel will illuminate. The forward cycle order is PC1 > PC2 > PC1 > etc.
- If a PC is powered on or a USB connection is established, the KVM will automatically switch focus to that PC.
Hotkey SelectionUse one of the hotkey sequences on the keyboard connected to one of the USB ports on the rear panel to activate various functions. A keyboard plugged into one of the front panel USB ports cannot be used to issue hotkey sequences.Each hotkey command begins with pressing the Scroll Lock (SL) key twice, followed by one or more other keys, all of which must occur within 5 seconds, from beginning to end. This will be represented in the following table with SL+SL+X, where X is the one or more keys that constitute the actual command. If more than 5 seconds elapse withoutissuing a valid command, the existing command elements will be discarded.Refer to the following table for the various hotkey commands and an explanation of what they do. Note that the commands are not case sensitive and that the case used in the commands are mixed for clarity.
| Hotkey | Function |
| SL+SL+↑ or SL+St.+-→ | Cycle forward to the next PC. |
| SL+SL+← or SL+SL+ | Cycle back to the previous PC |
| SL+SL+# | Direct selection of a PC, where # is tor 2. |
| SL+SL+s | Enable Automatic Switching Mode. The KVM will automatically switch the DisplayPort®/HDMI®, MICROPHONE, and SPEAKERS inputs from one to another without changing the USB connection, staying on each input for the interval amount of time (default 15 seconds). Press the SPACE BAR when input is displayed to select that input Press any other key to return to the input that was selected before Automatic Switching Mode was enabled. When Automatic Switching Mode is enabled, the Select LED corresponding to the currently displayed input will flash. |
| SL+SL+I+#+ENTER | Set the Automatic Switching Mode Interval, where # is 5-999 seconds (default 15 seconds). |
| SL+SL+b+# | Enables or disables the buzzer that sounds when switching to PC1 or PC2, where # is 1 (on) or 0 (off) (default on). |
| SL+SLH+L+a+s+h+ENTER | Resumes normal operation and restores the default settings. |
TECHNICAL SUPPORT
Monoprice is pleased to provide free, live, online technical support to assist you with any questions you may have about installation, setup, troubleshooting, or product recommendations. If you ever need assistance with your new product, please come online to talk to one of our friendly and knowledgeable Tech Support Associates.Technical support is available through the online chat button on our website www.monoprice.com or through email by sending a message to [email protected].Check the website for support times and links.To download the latest drivers, firmware, manuals, etc., go to www.monoprice.com and type the P/N into the search bar. If available, support files are linked at the bottom ofthe product page.
SPECIFICATIONS
| P/N | 42645 |
| Video Connections | DisplayPort® input, DisplayPort and HDMI® outputs |
| Number of Connected PCs | 2 |
| Supported Operating Systems | Windows® 2000 / XP / Vista® /7 / 8 /10, Mac® OS X®, Linux® |
| Maximum Video Resolution | (3840/4096 x 2160p @60Hz) |
| Video Bandwidth | 32.4Gbps (DisplayPort) and 18Gbps (HDMI) |
| USB Version | 3.0 |
| USB Connections | lx keyboard, lx mouse, 2x USB hub ports |
| Input Power | 5 VDC, 3A |
| AC Adapter Input Power | 100 — 240 VAC, 50/60 Hz |
| Maximum Power Consumption | 12 watts |
| Operating Temperature | +32∼+113°F (0 ∼+45°C) |
| Operating Humidity | 10 ∼ 85% RH, noncondensing |
| Storage Temperature | +14 ∼+176°F (-10 ∼ +80°C) |
| Storage Humidity | 5 ∼90% RH, noncondensing |
| Dimensions | 7.0′ x 3.0′ x 1.0″ (178 x 75 x 26 mm) |
| Weight | 13.2 oz. (373g) |
| Certifications | FCC, CE |
REGULATORY COMPLIANCE
Notice for FCC This device complies with Part 15 of the FCC rules. Operation is subject to the following two conditions: (1) this device may not cause harmful interference, and (2) this devicemust accept any interference received, including interference that may cause undesired operation.Modifying the equipment without Monoprice’s authorization may result in the equipment no longer complying with FCC requirements for Class B digital devices. In that event, your right to use the equipment may be limited by FCC regulations, and you may be required to correct any interference to radio or television communications at your own expense.This equipment has been tested and found to comply with the limits for a Class B digital device, pursuant to Part 15 of the FCC Rules. These limits are designed to providereasonable protection against harmful interference in a residential installation. This equipment generates, uses, and can radiate radio frequency energy and, if not installedand used in accordance with the instructions, may cause harmful interference to radio communications. However, there is no guarantee that interference will not occur in aparticular installation. If this equipment does cause harmful interference to radio or television reception, which can be determined by turning the equipment off and on,the user is encouraged to try to correct the interference by one or more of the following measures:
- Reorient or relocate the receiving antenna.
- Increase the separation between the equipment and receiver.
- Connect the equipment into an outlet on a circuit different from that to which the receiver is connected.
- Consult the dealer or an experienced radio/TV technician for help.
Notice for Industry CanadaThis Class B digital apparatus complies with Canadian ICES-003.Monoprice™, Blackbird™, the Blackbird logo, and all Monoprice logos are trademarks of Monoprice Inc.HDMI®, the HDMI Logo, and High-Definition Multimedia Interface are trademarks or registered trademarks of HDMI Licensing LLC in the United States and other countries.HDCP™ is a trademark of Digital Content Protection LLC.Microsoft®, Windows®, and Vista® are either registered trademarks or trademarks of Microsoft Corporation in the United States and/or other countries.Mac® and OS X® are trademarks of Apple Inc., registered in the U.S. and other countries.Linux® is the registered trademark of Linus Torvalds in the U.S. and other countries.
TECHNOLOGY AT PRICES THAT MAKE SENSENeed Help? We’re here for you!Contact us www.monoprice.com/contactusProduct pictures are for reference only.Specifications described herein are subject to change without prior notification.All trademarks are the sole property of their respective companies.Blackbird™ is a Sub-brand of Monoprice Inc.Copyright © 2021 Monoprice, Inc. All rights reserved.www.monoprice.com
References
[xyz-ips snippet=”download-snippet”]