![]()
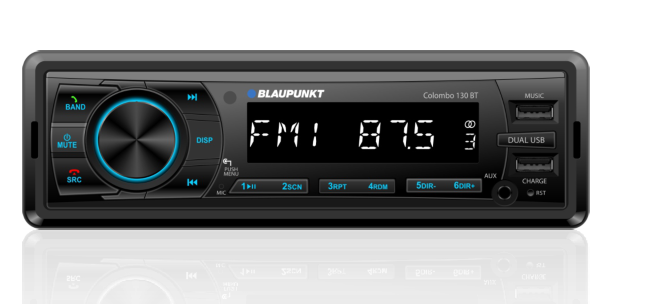
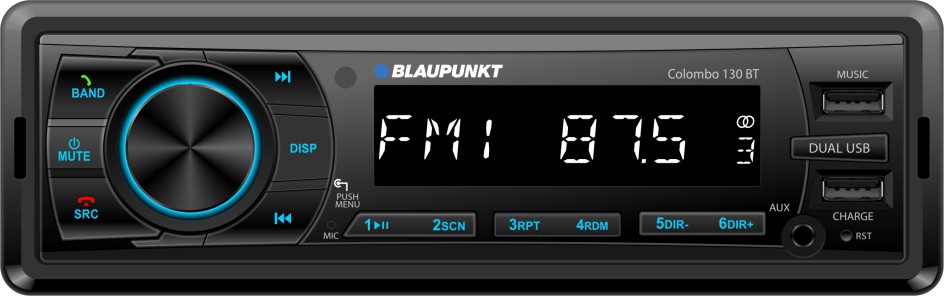
CAR RADIOCOLOMBO 130 BTUSB AUX-IN BT TUNER
Operating instruction
Controls-Device
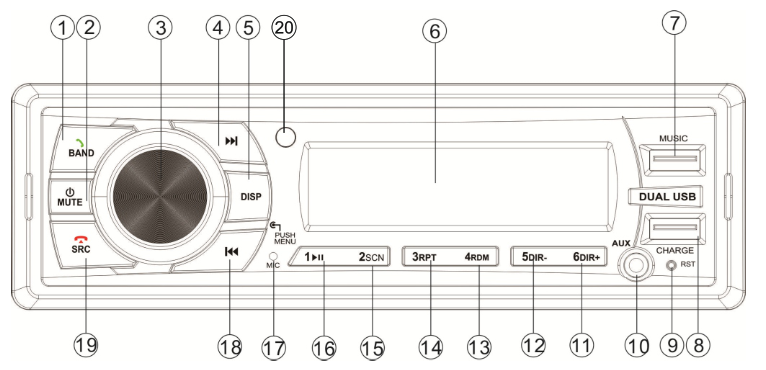
- BAND/Answer call C

- power/Mute
- Push/MenuNolume
- Fast Forward/Next
- Display
- LCD
- USB (Music)
- USB (Charge)
- Reset function
- AUX-IN
- 6/DIR+
- 5/DIR-
- 4/RDM
- 3/RPT
- 2/SCN
- 1/
- Microphone
- /Rewind/Previous
- SRC/Call Hand Up
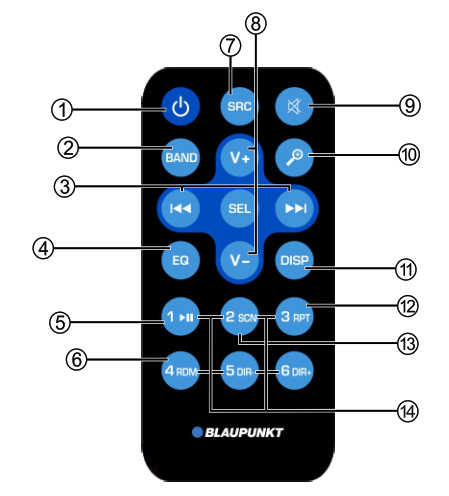
- Power on / Power off (long press)
- Band switch: Select FM1 /FM2/FM3/MW1 /MW2 band in RADIO mode & C key in BT mode.
- Radio tune Track seek
- EQ
- Play / Pause
- Random play
- Toggle the audio source
- Volume up /down
- Mute volume
- Search function
- Display switch Press to enter menu mode. (long press)
- Repeat play
- Scan play / Preset scan Auto memory store (long press)
- Buttons[1] Button: Preset station 1.[2] Button: Preset station 2.[3] Button: Preset station 3.[4] Button: Preset station 4.[5] Button: Preset station 5.[6] Button: Preset station 6.
Installation
Notes:• Choose a mounting location where the unit will not interfere with the normal driving functions.• Before finally installing the unit, connect the wiring temporarily and make sure it is all connected properly and the unit and the system work properly.• Use only the parts included with the unit to ensure proper installation. The use of unauthorized parts can cause malfunction.• Consult with your nearest dealer if installation requires the drilling of holes or other modifications in the vehicle.• Install the unit where it does not get in the driver’s way and cannot injure the passenger if there is a sudden stop, like an emergency stop.• If the installation angle exceeds 30°from horizontal, the unit might not function optimally.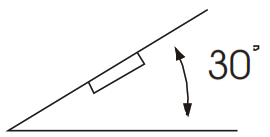 • Avoid installing the unit where it would be subject to high temperature, such as from direct sunlight, or hot air, from the heater, or where it would be subject to dust, dirt or excessive vibration.DIN Front/Rear-MountThis unit can be properly installed either from “Front” (conventional DIN Front-mount) or “Rear” (DIN Rear-mount installation, utilizing threaded screw holes at the sides of the unit chassis). For details, refer to the following illustrated installation methods.DIN Front-Mount (Method A) Installation OpeningThis unit can be installed in any dashboard having an opening as shown below:

Installing the unitBe sure you test all connections first, and then follow these steps to install the unit.1. Make sure the ignition is turned off, and then disconnect the cable from the -ye terminal of the vehicle’s battery.2. Disconnect the wire harness and the antenna.3. Lift the top of the outer trim ring then pull it out to remove it.

4. Mount the sleeve by inserting the sleeve into the opening of the dashboard and bend open the tabs located around the sleeve with a screwdriver. Not all tabs will be able to make contact, so examine which ones will be most effective. Bend open the appropriate tabs behind the dashboard to secure the sleeve in place.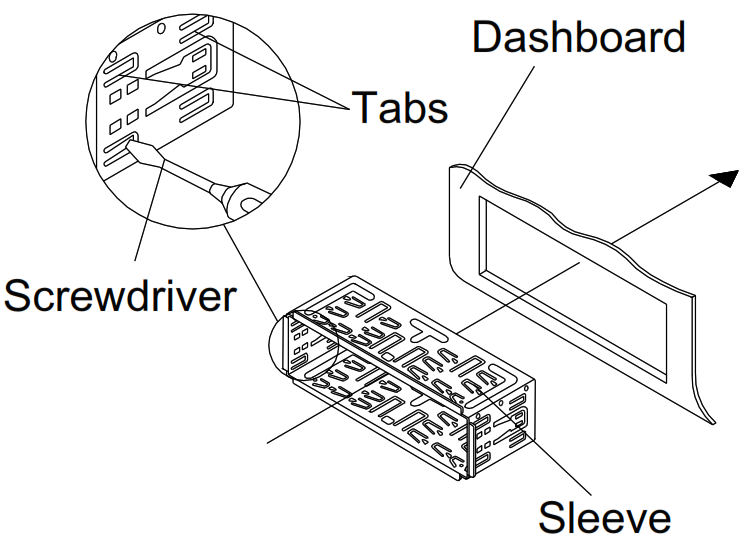 5. Reconnect the wire harness and the antenna and be careful not to pinch any wires or cables.6. Slide the unit into the sleeve until it locks into place.7. To further secure the unit, use the supplied metal strap to secure the back of the unit in place. Use the supplied hardware (Hex Nut (MSmm) and Spring Washer) to attach one end of the strap to the mounting bolt on the back of the unit. If necessary, bend the metal strap to fit your vehicles mounting area. Then use the supplied hardware (Tapping Screw (5x25mm) and Plain Washer) to attach the other end of metal strap to a solid metal part of the vehicle under the dashboard. This strap also helps ensure proper electrical grounding of the unit. (Not applicable)Note: To install the short thread terminal of the mounting bolt to the back of the unit and the other long thread terminal to the dashboard. (Not applicable)
 8. Reconnect the cable to the vehicle battery’s negative (-) terminal. Install the outer trim ring and the unit’s front panel (see the steps for”installing the front panel”).Removing the unit1. Make sure the ignition is turned off, then disconnect the cable from the vehicle battery’s negative (-) terminal.2. Remove the metal strap attached the back of the unit (if attached).3. Press the release button to remove thefront panel.4. Lift the top of the outer trim ring then pull it out to remove it.5. Insert both of the supplied keys into the slots at the middle left and right sides of the unit, then pull the unit out of the dashboard (Not applicable for all models).
 DIN Rear-mount (Method B)If your vehicle is a Nissan, Toyota, follow these mounting instructions. Use the screw holes marked T (Toyota), N (Nissan) located on both sides of the unit to fasten the unit to the factory radio mounting brackets supplied with your vehicle.
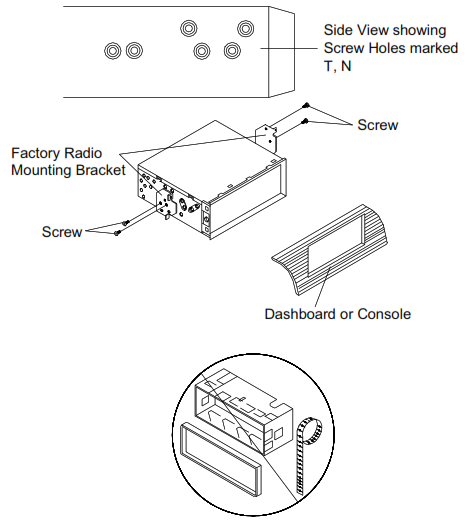 Align the screw holes on the bracket with the screw holes on the unit, and then tighten the screws (5x5mm) on each side. Note:The outer trim ring, sleeve and metal strap are not used for Method B installation (Not applicable for all models).
Operation
Turn On/Off the Unit
Turn on the unit by pressing![]() button (2). Press and hold
button (2). Press and hold![]() button(2)for 2 seconds to turn off the unit.MUTEShort press MUTE button (2) to mute audio output Press it again to resume output.SOUND ADJUSTMENTShort press round button (3) to select the desired adjustment mode. The adjustment mode will change in the following order: BASS-TRE-BAL-FAD-EQ-LOUD TRE: TrebleBAL: BalanceFAD: FaderED: Equalizer: Short press (3) to select from the preset EQoptionsas below: FLAT-CLASSICAL-POP-ROCK-EQ OFFRotate the volume knob (3) to adjust the desired sound quality or setting. Press and hold MENU button (3) for 2 seconds to access the RDS menu as below: AF-TA-REG-LOUD-BEEP-LOC/DX-STEREO/MONO-CLOCK-PRESETTURN ON VOL-CTAF: Alternate FrequencyTA: Traffic AnnouncementREG on/offWhen OF Function is on under SEL menu you can switch on/off region mode. Some broadcasting stations change their program from normal broadcasting to regional broadcasting for a certain period of time. When REG is on, the current listening program remains unchanged.Loud: Press and hold the Menu EQ button (3) for 2 seconds to access LOUD function. Rotate the vol. dial to turn ON/OFF LOUD function. Press and hold it again to cancel this function.Beep on/off:This device is equipped with 2 beep tones. Rotate the volume knob to choose either.• Beep on: Confirmation beep sound is heard when a button is pressed• Beep off: Confirmation beep is switched off whenever a key is pressed.LOC/DX: Rotate the volume knob (3) to turn on/off local function. In LOC mode the unit will reduce the sensitivity of the tuner while searching for a station.This means that stations with strong signals only are stored in memory. Switching to DX mode will increase the sensitivity of the tuner.Stereo/MonoRotate the volume knob (3) to choose between STEREO or MONO options. While in STEREO mode the radio receives FM signal in stereo. On some occasions switching to mono mode eliminates static and other interference that appear while tuned and locked on to a weak signal.ClockUnder the CLOCK settings option of the menu button (3) user can select between 12-24HOUR formats.Pre-set Turn On VolumeThis option allows user to pre-set a volume level upon turn on.CT(Independent /Synchronized)CT Independent: The clock works independently. It doesn’t be synchronized to the station’s time. CT Synchronized: When received a RDS station. The clock will be synchronized to the station’s time.Note: When manually setting the time.The CT item will be back to independent mode automatically.Display InformationPress DISP button (5) to show the clock for 5 seconds.Setting the Time1. Manual setting:Press and hold DISP button for 2 seconds. The hour section of the clock will flash. Press
button(2)for 2 seconds to turn off the unit.MUTEShort press MUTE button (2) to mute audio output Press it again to resume output.SOUND ADJUSTMENTShort press round button (3) to select the desired adjustment mode. The adjustment mode will change in the following order: BASS-TRE-BAL-FAD-EQ-LOUD TRE: TrebleBAL: BalanceFAD: FaderED: Equalizer: Short press (3) to select from the preset EQoptionsas below: FLAT-CLASSICAL-POP-ROCK-EQ OFFRotate the volume knob (3) to adjust the desired sound quality or setting. Press and hold MENU button (3) for 2 seconds to access the RDS menu as below: AF-TA-REG-LOUD-BEEP-LOC/DX-STEREO/MONO-CLOCK-PRESETTURN ON VOL-CTAF: Alternate FrequencyTA: Traffic AnnouncementREG on/offWhen OF Function is on under SEL menu you can switch on/off region mode. Some broadcasting stations change their program from normal broadcasting to regional broadcasting for a certain period of time. When REG is on, the current listening program remains unchanged.Loud: Press and hold the Menu EQ button (3) for 2 seconds to access LOUD function. Rotate the vol. dial to turn ON/OFF LOUD function. Press and hold it again to cancel this function.Beep on/off:This device is equipped with 2 beep tones. Rotate the volume knob to choose either.• Beep on: Confirmation beep sound is heard when a button is pressed• Beep off: Confirmation beep is switched off whenever a key is pressed.LOC/DX: Rotate the volume knob (3) to turn on/off local function. In LOC mode the unit will reduce the sensitivity of the tuner while searching for a station.This means that stations with strong signals only are stored in memory. Switching to DX mode will increase the sensitivity of the tuner.Stereo/MonoRotate the volume knob (3) to choose between STEREO or MONO options. While in STEREO mode the radio receives FM signal in stereo. On some occasions switching to mono mode eliminates static and other interference that appear while tuned and locked on to a weak signal.ClockUnder the CLOCK settings option of the menu button (3) user can select between 12-24HOUR formats.Pre-set Turn On VolumeThis option allows user to pre-set a volume level upon turn on.CT(Independent /Synchronized)CT Independent: The clock works independently. It doesn’t be synchronized to the station’s time. CT Synchronized: When received a RDS station. The clock will be synchronized to the station’s time.Note: When manually setting the time.The CT item will be back to independent mode automatically.Display InformationPress DISP button (5) to show the clock for 5 seconds.Setting the Time1. Manual setting:Press and hold DISP button for 2 seconds. The hour section of the clock will flash. Press ![]() button (or rotate the volume knob) to set the hour. Short press DISP button to change to set minutes. Also use
button (or rotate the volume knob) to set the hour. Short press DISP button to change to set minutes. Also use ![]() button or rotate the volume knob) to set the correct minute. Press the button to confirm.2. Synchronize time from the RDS station:When RDS is turned on and the turner receives a good strong signal, (AF symbol on the display remains steady)the Radio will synchronize its in built clock with the information received from the Radio station. (In India most radio stations do not set the correct time in their broadcast equipment, hence it’s recommended to keep this option in OFF mode).Auxiliary InputThe unit can be connected to a portable audio player through the AUXIN port (10). Press SRC button (19) to switch to AUXIN mode.Reset FunctionThe RESET button (9) must be activated with either aballpoint pen or thin metal object when necessary. The RESET button is to be activated only for the following reasons:• Initial installation of the unit when all wiring is completed.• Any function buttons do not operate• Error symbol on the display.Note: If the Radio does not work despite pressing the RESET button(9), please use a cotton swab soaked in isopropyl alcohol to clean the socket on thefront panel. Once the RESET button Is pressed, all stored memory will be erased & the Radio returns to Factory default settings mode.
button or rotate the volume knob) to set the correct minute. Press the button to confirm.2. Synchronize time from the RDS station:When RDS is turned on and the turner receives a good strong signal, (AF symbol on the display remains steady)the Radio will synchronize its in built clock with the information received from the Radio station. (In India most radio stations do not set the correct time in their broadcast equipment, hence it’s recommended to keep this option in OFF mode).Auxiliary InputThe unit can be connected to a portable audio player through the AUXIN port (10). Press SRC button (19) to switch to AUXIN mode.Reset FunctionThe RESET button (9) must be activated with either aballpoint pen or thin metal object when necessary. The RESET button is to be activated only for the following reasons:• Initial installation of the unit when all wiring is completed.• Any function buttons do not operate• Error symbol on the display.Note: If the Radio does not work despite pressing the RESET button(9), please use a cotton swab soaked in isopropyl alcohol to clean the socket on thefront panel. Once the RESET button Is pressed, all stored memory will be erased & the Radio returns to Factory default settings mode.
Radio Operation
• SwitchingTo Radio ModePress SRC button (2) to select radio mode, the radio mode appears in the display together with the memory band &frequency.• Selecting a Radio BandWhile in Radio mode, press the BAND button (1) to select the desired band from the following options: FM1-FM2-FM3-MW1(AM1)-MW2 (AM2).• Selecting StationShort Press![]() button (4) or
button (4) or![]() button (18) to activate the Auto seek function. Long press the
button (18) to activate the Auto seek function. Long press the![]() button (4) or
button (4) or![]() button (18) for 2 or more seconds until the word “MANUAL” appears on the display. Under manual tuning mode user can manually scan up/down. If both buttons have not been pressed for 5 seconds, it will return to seek tuning mode and “AUTO” appears on the display.• Station StoringOnce the tuner locks on to a station, press one of the preset button (1-6) for 2 seconds to store that particular station at that location. Shortly press the preset button (1-6) to recall the station stored at that location.
button (18) for 2 or more seconds until the word “MANUAL” appears on the display. Under manual tuning mode user can manually scan up/down. If both buttons have not been pressed for 5 seconds, it will return to seek tuning mode and “AUTO” appears on the display.• Station StoringOnce the tuner locks on to a station, press one of the preset button (1-6) for 2 seconds to store that particular station at that location. Shortly press the preset button (1-6) to recall the station stored at that location.
RDS (Radio Data System) Operation
Setting RDS mode In the RDS menu, rotate the volume dial to switch the AF option ON/OFF (AF-Alternative Frequency). When this option is turned on, the AF symbol is displayed on the front display. Also, the name of the broadcasting station is displayed while locked on to a RDS station.Should there be an Emergency Broadcast the word “ALARM” is displayed on the front display and the volume level will be adjusted to the preset output level automatically.
Traffic Announcement
While scrolling through the RDS menu options of the radio, the TA function can be switched ON/OFF by rotating the volume dial. If turned ON, the radio is equipped to receive traffic announcement. While the unit is In USB or AUX-IN mode, it will temporarily switch to the tuner mode. when there’s a Traffic Announcement.PS: Program Service Name Broadcast station name data expressed in alphanumeric characters. AF: Alternate Frequencies Frequency list of broadcasting stations transmitting the same program.TA: Traffic Announcement Identification Identification data showing traffic Information is being transmitted or not.USBThis device is equipped with 2 USB (type A) ports on the front panel (7&8). USB ports (7) is for media playback. USB port (8) is for charging devices only (No media playback is possible from this port) Once a USB device is connected to this port (7), the unit searches for Mp3/WMA files and begins playback. To familiarise yourself with the functions of the USB port please refer to the following instructions.• Selecting FilePress![]() of button (4) to select the next file or
of button (4) to select the next file or![]() button (18) to select a previous file. File numbers are displayed on the front panel.• Pause Play BackPress button(16) to pause playback. Press again to resume playback.• Scan Play All FilesPress SCN button (15) to preview the track lined up for playback. Press it again to stop preview function and listen to a file.• Repeating the same Track/fileThere are 3 options to repeat playback of a file: Repeat Folder- Repeat One- Repeat All. Repeat All is the default mode set in the radio when shipped from the factory.• Playing All Files In RandomPress RDM button (13) to playback in a random (shuffle) order. Press it again to cancel this function.• Select Directory Up/downPress DIR- button (12) or DIR+ button (11) to select previous or next directory. If the storage device /CD does not contain any directory, pressing DIR- button (12) or DIR+ button (11) has no effect.Note:• All USB/Mp3 players are not same. Different manufactures use different standard and operating systems.This unit is compatible with most but there could be the possibility that some devices are not compatible with the unit.• USB Mp3 player is not a standard which means different brand name or different models have their own standard. So our product cannot support every MP3 player.• Should the user decide to connect a Mp3 player with a built in battery to the USB port of this unit, it is recommended to remove this non rechargeable battery pack before connecting.Supported Mp3/WMA files formatsThe unit supports the following Mp3/WMA file formats
button (18) to select a previous file. File numbers are displayed on the front panel.• Pause Play BackPress button(16) to pause playback. Press again to resume playback.• Scan Play All FilesPress SCN button (15) to preview the track lined up for playback. Press it again to stop preview function and listen to a file.• Repeating the same Track/fileThere are 3 options to repeat playback of a file: Repeat Folder- Repeat One- Repeat All. Repeat All is the default mode set in the radio when shipped from the factory.• Playing All Files In RandomPress RDM button (13) to playback in a random (shuffle) order. Press it again to cancel this function.• Select Directory Up/downPress DIR- button (12) or DIR+ button (11) to select previous or next directory. If the storage device /CD does not contain any directory, pressing DIR- button (12) or DIR+ button (11) has no effect.Note:• All USB/Mp3 players are not same. Different manufactures use different standard and operating systems.This unit is compatible with most but there could be the possibility that some devices are not compatible with the unit.• USB Mp3 player is not a standard which means different brand name or different models have their own standard. So our product cannot support every MP3 player.• Should the user decide to connect a Mp3 player with a built in battery to the USB port of this unit, it is recommended to remove this non rechargeable battery pack before connecting.Supported Mp3/WMA files formatsThe unit supports the following Mp3/WMA file formats
| Standard | Bit Rate (kbps) | Supports Mode |
| MPEG1 Audio Layer 3(44.1 kHz) | 32, 48, 64, 96, 128, 192, 256, 320 | Stereo |
| Windows MediaAudio (44.1 kHz) |
64, 96, 128, 192 |
|
| Stereo |
The USB port can support:1.500 Folder (max)2.999 files (max)3.8 layers4.32GB (max)CAUTION Please ensure that the storage device (USD) do not contain important data files. Should any of these files get corrupted during playback, we do not assume any responsibility for the loss of this important data.
BLUETOOTH (BT) OPERATION
• Pre-pair(I) Please ensure that the device you intend to pair with this unit supports BTfunction (II) Not all phones have the same signal strength while in BT mode. It is recommended to keep the BT device, within 3M of this radio for best result. Please remove any metal object between the unit and the BT device• PairingPlease access the BT pausing mode in the device you intend to pair with this unit “BP 130″should appear in the list of devices that are visible and ready to pair with your BT device/phone. Please select “BP 130” and proceed to input the password 0000, when prompted. Upon completion this pairing exercise, the BT symbol should be displayed on the front display panel.• Answering /rejecting an incoming callWhen there is an incoming call, Press![]() key to answer the call and
key to answer the call and![]() to reject the call• Hang up a callWhen finished, press
to reject the call• Hang up a callWhen finished, press![]() to hang up.• Outgoing callPress SRC button (19) to switch to the “BT” mode. This should blank out the front panel & allow user to enter a phone number using the 1-6 numeric keys, DISP button (5), EQ button(3),
to hang up.• Outgoing callPress SRC button (19) to switch to the “BT” mode. This should blank out the front panel & allow user to enter a phone number using the 1-6 numeric keys, DISP button (5), EQ button(3), ![]() button(18),
button(18),![]() button(9), press and hold (1) key for 2 seconds: * & press and hold (20) key for 2 seconds: #. Once the number is entered press
button(9), press and hold (1) key for 2 seconds: * & press and hold (20) key for 2 seconds: #. Once the number is entered press![]() the button to confirm.• Redialing the last outgoing callWhile in BT mode, press and hold
the button to confirm.• Redialing the last outgoing callWhile in BT mode, press and hold![]() the button for 2 seconds to redial last called number.• Transfer a call between mobile phone & unitDuring a call, press
the button for 2 seconds to redial last called number.• Transfer a call between mobile phone & unitDuring a call, press![]() button to transfer the call between the phone and the unit.• Audio Streaming (A2DP)While in BT mode, user can playback music on a paired device via this units internal amplifier. All other functions like pause/play
button to transfer the call between the phone and the unit.• Audio Streaming (A2DP)While in BT mode, user can playback music on a paired device via this units internal amplifier. All other functions like pause/play![]() button (4) or
button (4) or![]() button (18) are same as USB playback.
button (18) are same as USB playback.
GENERAL
Power Supply Requirements: DC 12 Volts, Negative GroundChassis Dimensions: 178(W) x 97(D) x 50(H)Maximum Output Power: 4×40 wattsCurrent Drain: 10 Amperes (max.)
RADIO
Frequency Coverage: 87.5 to 108 MHz.IF: 10.7 MHzSensitivity (S/N=30dB): 41.1VStereo Separation: >25DbFrequency Coverage: MW 522 to 1620 kHzIF: 450 kHzSensitivity (S/N=20dB): 36 dBuV
Key Function
| KEYS | ACTION | RADIO | USB | MIX IN | BT MUSIC |
| PWR/MUT | Short | Power on/Mute on/off | Mute on/off | Mute on/off | Mute on/off / Dial:7 |
| Long | Power off | Power off | Power off | Power off | |
| SRC |
Short | Source change / Hangup | Source change /Search:7 / Hang up | Source change / Hangup | Source change /Dial:Del/Hang up |
| Long | BT off/link | BT off/link | BT off/link | BT off/link | |
| BAND |
Short | Band change | File search/Search:Del | / | Answer/Dial |
| Long | Auto Store | Back to 11st song of allsongs | / | Re-dial/Trans | |
| ‘‘ | |||||
| DISP | Short | Info/Clock | Info/Clock / Search:0 | Info/Clock | Info/Clock / Dial:O |
| Long | Clock setting | Clock setting | Clock setting | Clock setting | |
| l<< | Short | Seek down | Previous file /Search:8 | / | Previous file / Dial:8 |
| Long | Manual Tune down | FR | / | / | |
| »1 | Short | Seek up | Next file / Search:9 | / | Next file / Dial:9 |
| Long | Manual Tune up | FF | / | / | |
| VOL | Rotary | Volume up/down | Volume up/down | Volume up/down | Volume up/down |
| MENU(pushVOL) | Short | BAS/TRE/BAUFAD/EQ/LOUD | BAS/TRE/BAUFAD/EQ/LOUD | BAS/TRE/BAUFAD/EQ/LOUD | BAS/TRE/BAUFAD/EQ/LOUD |
| Long | AF/TA/PTY/REG/CT(IN DEP/SYNC)/BEEP/CLOCK(12/24)/P_VOUDX/ST | AF/TA/CT(INDEP/SY NC)/BEEP/ CLOCK (12/24)/P_VOL | AF/TA/CT(INDEP/SY NC)/BEEP/ CLOCK (12/24)/P_VOL | AF/TA/CT(INDEP/SY NC)/BEEP/ CLOCK (12/24)/P_VOL | |
| 1 / >11 | Short | Recall M1 station | Pause/Play / Search:1 | / | Pause/Play / Dial:1 |
| Long | Save station to M1 | Back to 11st song of allsongs | software version | / | |
| 2/INT | Short | Recall M2 station | INT on/off/Search:2 | / | BT menu / Dial:2 |
| Long | Save station to M2 | / | / | / | |
| 3/RPT | Short | Recall M3 station | RPT on/off/Search:3 | / | Dial:3 |
| Long | Save station to M3 | / | / | / | |
| 4/RMD | Short | Recall M4 station | RDM on/off/Search:4 | / | Dial:4 |
| Long | Save station to M4 | / | / | Dial:+ | |
| 5/DIR | Short | Recall M5 station | DIR-/Search:5 | / | Dia1:5 |
| Long | Save station to M5 | -10 | / | Dial:* | |
| 6/DIR+ | Short | Recall M6 station | DIR+/Search:6 | / | Dial:6 |
| Long | Save station to M6 | +10 | / | Dial:# |
Trouble Shooting
Before going through the checklist, check the wiring connection. If any of the problems persist after checklist has been made, consult your nearest service dealer.
| Symptom | Cause | Solution |
| No power. | The car ignition is not on. | If the power supply is connected to the car accessory circuits, but the engine is switched off turn the ignition key to “ACC |
| The fuse is blown. | Replace the fuse. | |
| No sound. | Volume is at minimum. | Adjust volume to a desired level. |
| Speaker wiring is not properly connected. | Check wiring connection. | |
| The operation keys do not work. | The built-in microcomputer is not operating properly due to voltage variation. | Press the RESET button. Ensure front panel is locked firmly into its location. |
| The radio does not work. Automatic tuning selection does not work. | Antenna cable is not connected. | Insert the antenna cable firmly. |
| Broadcast signals are too weak. | Select a station manually. |
Blaupunkt India Private Limited 47, Atlanta Society, Nariman Point Mumbai- 400 021. Maharashtra. India.Toll Free: 1800 209 6820[email protected]www.blaupunkt.com

[xyz-ips snippet=”download-snippet”]