
PORSCHE 911 964 STUTTGART Car Stereo Radio
OWNER’S MANUAL
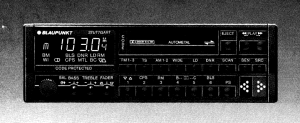
BLUEPUNKT STUTTGARTBosch Telecom
Please Note: This Page Has Been Intentionally Left Bank
Features
Congratulations! on your purchase of the Blaupunkt Stuttgart FM/AM Cassette Player. This unit is truly at the leading edge of car audio technology. its High Definition Tuner and Ultra Precise Superlaminated Tape Head provide the ultimate in sound reproduction. Its Travel Store feature allows you to automatically load the six strongest receivable FM stations into the tuner’s presets as you travel through various reception areas. The unit has been designed to interface with any of Blaupunkt’s excellent amplifiers, equalizers, crossover networks and speakers. The unit incorporates a user programmable electronic Anti-Theft System which makes the radio useless should it be forcefully removed from the vehicle.
- UHDT – Ultra High Definition Tuner”
- 18 FM/12 AM Station Presets
- 6 FM Travel Store Presets
- 4x 10 watts output in 4 channel mode
- FM frequency response 35 16,000 Hz
- Auto and Manual Seek up/down
- FM and AM Scan
- Preset Scan
- Multi-Path Suppression
- Automatic Local Distance Seek Tuning
- ASU Impulse Noise Quieting
- Direct Software Control (DSC)
- Full Logic Cassette Operation
- Motorized Loading and Eject
- Pinch Roller Release
- Dolby Band C
- DNR™— Dynamic Noise Reduction for FM and Cassette
- Super Cassette Program Search
- Blank Skip (BLS)
- Radio Monitor (RM)
- Cassette Frequency Response 35 – 18.000 Hz -3d8
- Automatic Metal Tape Equalization (70-120 usec.)
- Ultra Precise Superiaminated Tape Head
- Cassette Scan
- Separate Bass and Treble Controls
- Separate Balance and Fader Controls.
- Programmable Loudness
- Preamp Output
- Flex Fader
- Anti Theft Code / Personal Identification Number
- Dimensions (mm): 180W, 52H, 160D
Dolby B/C – Noise reduction is manufactured under license from Dolby Licensing Corporation. “Dolby” and the double D symbol are trademarks of Dolby Laboratories Licensing Corporation,DNR™ – Is a registered trademark of National Semiconductor.ASU – Is a registered trademark of Blaupunkt Werke GmbH
FM reception in your car
Unlike your home audio system, where the antenna is fixed, your car radio must rely on reception from an aerial which is constantly moving. The Ultra High Definition Tuner UHDT, included with this unit, was developed by Blaupunkt to minimize the effects from varying signal strength, multi-path distortion and shadowing created by large buildings and obstacles in the environment. There may be times when the signal strength is insufficient for the UHDT tuner to adequately improve reception. During these occasions, we suggest the selection of another, stronger station In order to optimize the performance of this advanced tuner, care should be taken to insure that a properly installed and extended aerial is used at all times.
Basic guide to operation
‘This chapter is divided in the following foursections:
Sound controlRadio operationCassette operationCD-Changer operation
In the case of double functions separate instructions are given. Functions, which need further explanations are described in chapter, “Notes on Operation”.
➀ On/ott
Sound contro!
➀ Volume control➀ Balance controFor adjusting the left/right volume. Pull knob (locks) Push button back in after adjustment⑦ Button ‘Wide’To switch over the AM bandwidth from 4.5kHz to 9kHz in case of spurious irequencies.ia bandwidth of 9 kHz is selected, “WI” is shown in the display.⑧ LO buttonLoudness – boosts bass at low volume levels to compensate for the inefficiencies ofthe human ear, Loudness is switched on/off by pressingthe button LD⑧. “LD” ②g lights Up in the display when loudness is switched on.⑨DNA™ buttonDNA stands for Dynamic Noise Reduction This function allows you to reduce the nolse which may be present during cassette and radio operation DNR is switehed on when the display ②i indicates “DNF Press the button to activate and deactivate this function,㉔ FaderFor adjusting the front/rear volume, Push control knob so that it unlocks and tum it If only two speakers are connected, the fader must be set to middle position, Depress control when adjustment is completed㉕ Treble controlUnlock rotary control by pressing it⤼ treble is boosted⤻ treble is cutJepress rotary control,㉖ Bass controlPush control to release. tu bass is boosted Bepbass 8 out Jepress rotary control.
Radio operation
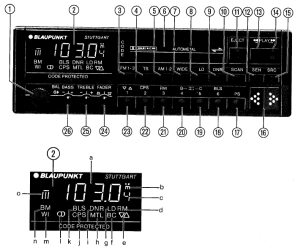
➁ Display – fora) Frequency, code, ast winding.title election, With Super-CPS the number of titles to be skipped is displayedb) Search tuning sensitivity level● Normal sensitivity●● High sensitivitym manvai tuningc) 1-6 (station buttons)4) RM (radio reproduction during fast winding)e) Track indicator▼ track A or will be played▲ (Reverse mode) Track B or 2 will be Blayedg) LD (loudness)h) MTL (tape type)i) BNR {noise suppression)j). CPS (cassette program search)k) BLS (automatic fast forward at tape blanks)l) CD (stereo)m) if a bandwidth of 9kHz Is selected, “WI” is shown in the displayn) AM/FMo) Ill’ (FM memory banks)
➂ Button FM 1-3FM waveband button (875 – 1079 MHz) and for the FM memory banks Il On each memory bank six FM stations can be stored by means of the buttons ⑱-㉓.By pressing button ➂ several times you switch over between the memory bank I,and Il, The display ➁o shows the activated memory bank,
➃ Button TSWith this button the six strongest stations of the relevant area can be automatically stored and called up.
➄ Button AM1:2Waveband button for AM 520 – 1710 kHz and AM memory bank selector.With the aid of the buttons @ six AM giatons can be stored on each memoryThe memory banks are switched over by pressing the bution.The display ®o shows the activated memory bank
➆ Button ‘Wide’To switch over the AM bandwidth from 45kHz to 9kHz in case of spurious frequencies. it a bandwidth of 9 kHz is selected, “WI” shown in the display.
⑩ SCAN buttonThis button serves to automatically search and play the receivable stations of the selected waveband.
⑫ Button SENFor setting the search tuning sensitvity manual search tuning ● – normal sensitivity Search tuning only stops at stations that provide good reception. ●● – high sensitivity Search tuning also stops at stations that provide minor reception. m ~ manual tuning, The search tuning sensitivity can be stored for each station separately since reception conditions vary from region to region (see“Setting the Search Tuning Sensitivity”)⑮ Button SRC (SOURCE)This button serves to switch over between the audio sources at cassette operation(cassette = radio).⑯Search tuning rocker switch – station selection⑰ Button PS (Preset Station Scan)This button serves to scan a stored program on the chosen waveband, in FM mode on all memory banks. Button depressed – the stations are scanned in intervals of 8 seconds. Quit this function by pressing this button once again,
⑱-㉓ Buttons 1-6 (station buttons)Storing a station – hold button depressed until the program is audible again. Call up ~ press button.
Cassette operation
➁ Display – fora) Cassette functionsFR – fast rewindF – fast forwardtitle selection. With Super-CPS the number of titles to be skipped is displayed,d) RM (radio reproduction during fast winjing)e) Track indicator▼ Track A or 1 will be played▲ (Reverse mode) Track B or 2 will be playedf) Dolby B/Cg) LD (loudness)h) MTL (tape type)i) DNR (noise suppression)j) CPS (cassette program search)k) BLS (automatic fast forward at tape blanks)
➅ Cassette door➉ Butlon SCAN (scanning mode)Titles are played for a short time one after, the other.
⑪ Button Eject – Cassette eject
⑬⑭ Rocker switch (fast winding)4.4.0 depressed ~ fast rewinging (Rin Display). > depresced tat forward FF in play)Stop fast winding by pressing the other side of the rocker switch At the beginning and the end of the tape, fast winding is stopped automatically.The set switches over to cassette reproduction (at the end of the tape ater automatic track switching).
⑮ Button SRC (SOURCE)Allows to change over between the audio sources cassette = radio = cassetteThe display shows the activated audio source. The red lettering on the buttons ⑱-㉓applies for cassette operation. The cassette functions can only be activated during cassette operation.
⑱ Button BLS (Blank Skip – skipping of tape blanks) This function allows to skip pauses on the tape eg. at tape end. The display @k indicates BLS when this, function is activated. Incase of a pause lasting more than 15 06. the casselte is fast forwarded automatically to the end of the tape or to the folowing track
⑲⑳ Buttons 3 (Dolby NR*)Gassettes with Dolby NR-B or Dolby NR-C encoded tapes can be played. These modes are switched on/off with button @ for ‘Dolby NA-B” and button @ for “Dolby NR-C*The display @t shows the activated mode.
㉑ Button RMRadio Monitor – allows radio operation during fast winding.
㉒ Button CPS (Super-CPS)This button serves to select particular tunes. The display indicates the number of titles to be skipped.
㉓ Track selectorPress this button to switch over to the other track. The display @e shows which track isplayed, Track A or 1 A (Reverse mode) Track 8 or 2
Notes on operation On/ Turn knob Sound control Volume @(TREBLE) ® Depress knob to unlock itit you want to ad- just treble.Bass ® Depress knob to unlock it if you want to adjust bass.Balance © Pull out knob and adjust the left/right sound volume, Press knob.
FaderTo adjust the front/rear sound volume. Press this rotary knob so that it unlocks in order to make the adjustment.
When four speakers are connected, maximum volume is obtained in middle position. When two speakers are connected, turn the fader into middle position.
The loudness
At reduced volume the human ear is less sensitive to bass than to middle and higher frequencies. This effect is reduced with increasing volume. Since the perception of sound depends on the type of equipment (ampiiien, the arrangement and the type of the speakers as well as. on the vehicle, the loudness can be adjusted in different levels.
The loudness is switched on or off by
- pressing button “LD” @. When the loudhess is switched on “LD” appears on thedisplay Og The desired level is adjusted as follows:
- Hold button “LD* @ depressed for approx. 8sec until “LD” flashes and a number between 1 -6 is displayed. Set the desired level with the rocker switch ⑯ (© downwards, ~ upwards). In order to store the setting
- press momentarily the button
Radio operation
The following wavebands can be received:FM 875 – 1079MHz andAM 520 – 1710 kHz
Selecting a wavebandSelect the desired waveband by
- pressing the keys ➂ or ➃ ➄
Selecting a station using the search tuning rocker switch
In order to start the search tuning
- press rocker switch ⑯. Start the search tuning untit you have tuned to the desiredstation. Hold the rocker switch depressed for more rapid tuning.— using station buttons and memory banks For this, a prior storage allocation as descri- bed in chapter “Storing a station” is required
- In order to call up FM stations, press the bution FM 1-3) several times until the desired memory bank |, ILor Ilo is displayed
- Now press the corresponding preset button The stations stored in the travelstore range can be called up after having pressed the button TSO,
—using the SCAN button ⑰
This button serves to automatically searchand scan programs of the selected waveband,@ Press button SCAN —all stations are played for 8 sec.When the desired program has been found,@ press button “SCAN” once again. Thescanning function is switched off.The scanning function can be activated on allwavebands.
— using Preset-Scan (PS) ®
This button serves to automatically search and scan the stored program of the selected waveband (in case of FM on each memory bank |, I, ll and 7), For this, a prior storage allocation as described in chapter “Storing a station” is required.
- Press momentarily button PS, the set scans the next stored station. The program of the corresponding station is played for a short time. Then the next stored Station is played, etc. It no station is stored on a certain preset button, the unit skips to the next preset station, Preset-Scan is functional on all wavebands. Having found an appropriate program,
- press button PS once again. Preset-Scan fs switched off.
Storing a station
… using automatic search tuning
In FM mode, you can store 3×6 stations on 3 memory banks. The FM memory banks can be selected by pressing the button FM 1-3. You can store 2×6 stations of the AM wave-band. Additionally, the 6 strongest FM stations on the travelstore range can be stored automati cally. Stored programs and stations can be called up again by pressing the corresponding pre-set button For storing a station proceed as follows:
- Should you wish to store an FM station, select a memory bank by pressing the button or several times, if required. The display ®o indicates the number of thecorresponding memory bank II, II or .T*. In order to store the desired station,
- hold the appropriate preset button ⑱-㉓ depressed until the audio returns (approx. 2’Se0). This station is now stored. The preset indicator @c shows which preset button has been used Repeat this procedure for the other presets, as required, on all wavebands and FM memory banks.
 This helps to avoid irregular tape transport Constant wear of the tape soils the cassette mechanism. Therefore, the head, the rubber pressure rolls, and the capstan shaft are to be cleaned so that a trouble-free reproduction and function of the cassette unit is ensured. These parts should be cleaned with a cotton pad dipped in alcohol. Never use hard tools for cleaning. After approx. 50 hours of operation, the unit should be examined and tho-roughly cleaned by an expert.
This maintenance work is not part of the service covered by our guarantee conditions.
Anti-theft coding
A 4-digit fix code may render your car radio unusuable to thieves. In addition, you can enter max. 3×4 numbers for your Personal Identification Number (PIN) When switching on the unit after the power supply to the unit has been interrupted (e.g. in the case of theft or repair), the entered number will be displayed in sequences. Since your individual data are displayed it is easy to Prove your ownership. The unit now prompts the correct entry of the secret code number. I fan incorrect code number is entered, the display indicates for approx. 10 sec. * After the sixth unsuccessful attempt of enteting the correct code number, this period is extended to 1 hour. After 20 incorrect attempts the set can only be decoded by special It the coding system has not been activated, the set can be operated without entering the code after a power supply cut off. The four-digit fix code predefined ex factory is, given in the enclosed car radio ID card,Attention! Keep your car radio ID card in a sate place to avoid that any unauthorized person can find out the four-digit code.
It you forget your code (or if you lose your ID card), you will not be able to operate the unit ater the power supply was interrupted provided the coding system has been activated. In this case, your radio will have to be decoded in our central service workshop or in one of our foreign agencies on presentation of the purchase receipt.
Activating the code system/entering the Personal Identification Number (PIN)
- Switch the set off
- Depress and hold preset buttons 1 and 4.
- Switch the set back on.
The display shortly indicates “Code, then id starts to flash You can store all 12 digits your Personal Identification Number” (PIN) on three different levels.a) If you prefer not to enter “PIN”,
- press right hand part of rocker switch. The last selected frequency in the last selected waveband is displayed The code system is active
b) if you want to enter or modity “PIN
- press any of the station preset buttons, for instance button 1㉓.
The display shows four zeros and a small “1”1″ indicates the storage level. Using the left hand part of the rocker switch, you can select the storage level (1, 2,3. 1, etc). With the station preset buttons 1 @ through 4⑳4 digits each of your “PIN” code can be stored on either level.
You should preferrably start out entering the first four digits on storage level 1
- Depress bution 1 until the first digit is set.
- Press buttons 2, 3 and 4 accordingly, to have all preset digits displayed
Enter the corresponding digits of your personal code on the storage levels 2 and 3 as well Incorrect entries can still be corrected on all levels. To save your “PIN” code:
- depress the right hand part of the rocker switch, The last selected frequency in the last selected waveband is displayed. The code system is active, Whenever the set is switched on, “Code” appears shortly on the display.
ATTENTIONIf your unit is not connected to constant power, the word “PLUS” appears on the display for about 2sec. The unit then tunes in to the station receivedlast. In this case, the unit cannot be coded. For coding, connect the set to permanent plus (as described on the label of your set)
Power supply interruption
After an interruption of the power supply (in the case of theft or during repairs in the shop), the personal identification number is displayed for 8 sec per storage level every time the radio is switched on. The personal code being obvious and readable to everybody, itis simple to prove who is. the legitimate owner of the set. The radio the wants the correct code number to be entered
- Pross button 1 ㉓ until the first digit is set
- Press buttons 2,3, 4 accordingly until the selected code is displayed
- Depress the right hand part of the rocker switch
The radio is ready for operation when the correct code has been entered. not, the display shows for 10sec.
Please verify the correct code in the radio passport before you try to make it play again
Deactivating the code system/erasing the PIN code
- Depress and hold the station preset buttons 1 and 4.
- Switch the set on. The personal identification number shows on the display for 8 sec per storage level and alter that “CODE” appears. To select a storage level
- depress the left hand part of the rocker switch.
- Enter the personal code with the station preset buttons 1 through 4.
- Now press first the left hand part of the rocker switch and then the right hand part ⑯®.
This, then, deactivates your personal code and the “PIN” function. The set changes back to the last intuned station.
Specifications
Cassette DeckPlayer System – Autoreverse cassette player with FF/FRTape – 4-track 2-channel stereo cassetteTape speed – 4.76 cm/s (1-7/8 IPS)Wow and flutter – Less than 0.06 %Noise reduction – Switchable DNR and Dolby B/C
RadioTuner system – Quartz lock Ultra High Definition PLL synthesizedFM band – 875 – 1079 MHz (200 kHz spacing)AM band – 520 – 1710 kHz (10 kHz spacing)Mono sensitivity – 15 dB1 (1,2 uV/75 0)(with 0 d8 quieting) – 17 dB1(1.5 uV/75 0)Digital display – TLCO station frequencyNoise reduction – ASU and switchable DNR
GeneralPower source – 12 V (11 – 16 V) DC negative groundOutput power – 4x10watts @ 40.Preamp Output Level – 2 avSwitchable Loudness – £7 dB @ 100 HzWeight (net) – 3.4 Ibs. (1.55 kg)Dimensions(in) – 7Wx2Hx5 7/40(mm) – 180 x 2 x 160 D
Due to continuing product improvements, specifications subject to change without notice.
 report this ad
This file has been downloaded from: www.UsersManualGuide.comUser Manual and User Guide for many equipments like mobile phones, photo cameras, monther board, monitors, software, tv, dvd, and othes.. Manual users, user manuals, user guide manual, owners manual, instruction manual, manual owner, manual owner’s, manual guide, manual operation, operating manual, user’s manual, operating instructions, manual operators, manual operator, manual product, documentation manual, user maintenance, brochure, user reference, pdf manual
References
[xyz-ips snippet=”download-snippet”]