BLAUPUNKT Smart Monitoring HOS User Manual
Quick Start Guide HOS-1800
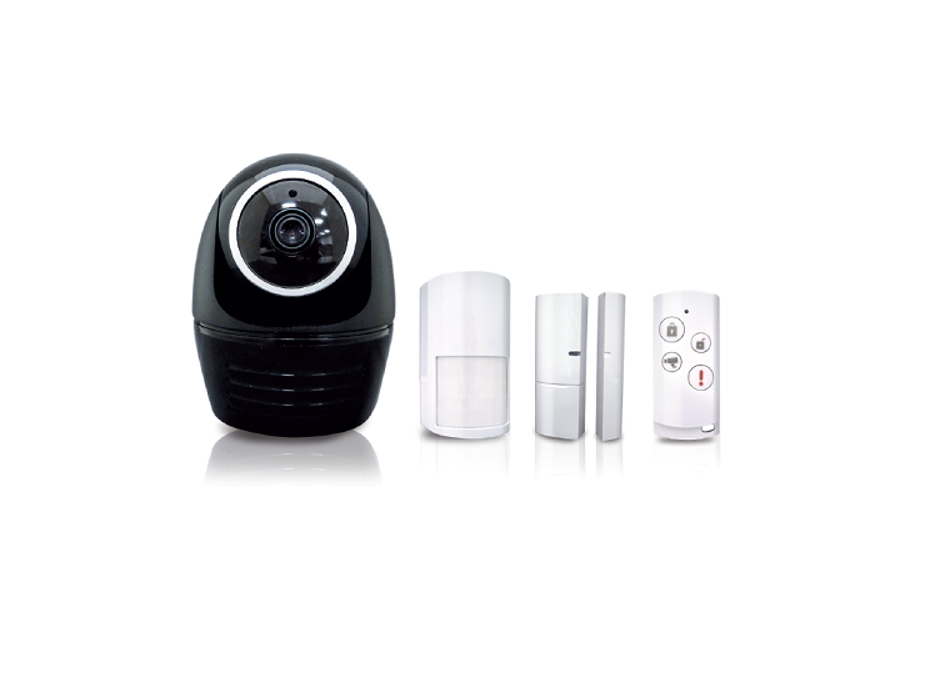
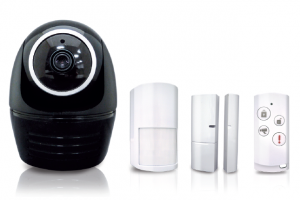
Kit content:

– Motion PIR HOS-IR1 – Window/door contact HOS-DC1 – Installed 8GB MicroSD card– Panic Remote
Important:
– For video recording, BE SURE TO use CLASS 10 memory card or above (not included). Other kinds of memory card may cause unexpected results and should be avoided.– Anytime when you find the camera pan/tile function does not perform properly, calibrate the camera to get correct principle position (refer to step 8 of setup the camera section)
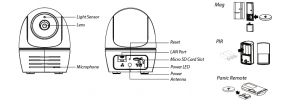
Hardware overview:
Setup the camera
- Download and install the “OM Guard HD” APP to your device.
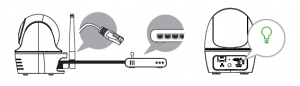
- Power on the camera and wait until the GREEN LED indicator becomes steady on. (This process would be finished within 45 seconds and make sure the LED is flashing in green)3a.Wireless Connection


- In the Wi-Fi setting of your smart device. Choose the Wi-Fi router with prefix of HD-xxxxxx (xxxxxx=Camera ID numbers). Enter the defaultpassword 12345678 and save the settings.
- Launch the APP, tap to add the camera.
- Tap (QR code icon) and scan the QR code label on the back of the camera to bring up the DID information. Or tap “Search” to locate the camera.
- Enter the default password 123456 and save the settings.
- Later, APP will request user to modify default password to private password .
3b.Wired Connection
- Make sure your smartphone is connected your Wi-Fi router.
- Connect the camera to the Wi-Fi router with an Ethernet cable.
- Launch the APP, tap the “Search” to locate the camera.
- Enter the default password 123456 and save the settings.
- Later, APP will request user to modify default password to private password .
Note: In soft AP mode, the GREEN LED long flashes once followed by 2 short flashes. In normal mode, the LEDis flashing in green. For more details, please refer to the user manual at http://security.blaupunkt-service.com
4. Wi-Fi Setting

4b. The Camera will offline for around 40 seconds to reboot for Wifi connection. When camera connects to Wi-Fi router correctly, the Green LED will stay ON.4c. In the Wi-Fi setting on your smart device again, make sure the Wi-Fi router you are connecting to is the same as the camera. If not, manually assign to it.
Note: If you fail to add the camera for several times, please press and hold the “Reset” button for 5 seconds to reset it.Then follow steps 3a or 3b again.
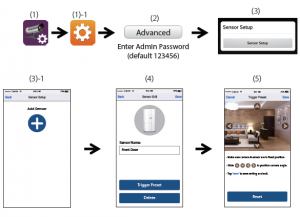
Setup sensor PIR/MAG
Add Sensor Device
- Tap then choose
- In the advanced section, enter admin password default 123456.
- Select sensor setup, tap “+” to add sensor device.
- Name your device and tap”Save”.
- Tap “Camera Pan control” to calibrate the camera position, and save the settings
Position your camera & sensor
Event Trigger Auto-Position– When an intruder is detected, the camera can immediately and automatically position itself to capture video image of the intruder as evidence. With every event, the camera will immediately send out push notifications to your mobile device.– If you move or relocate the camera, please recalibrate the camera position again.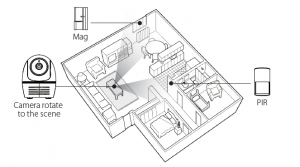
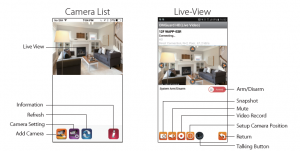
APP introduction
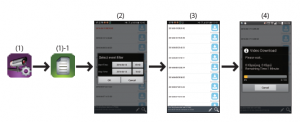
Follow the steps below for Event Playback
- Tap and then the
- Select the time interval for the event list.
- Tap to select the file for playback.
- If you want to store the files in mobile device, tap to download the file (Best while underWi-Fi enviornment due to larger high defination data size).
Motion detection / camera setting tips
For optimum detection, we suggest the camera is to be mounted 7 to 8 feet (2.1m to 2.4m) from the floor, and:
- On a rigid vibration-free surface.
- So the expected movement of an intruder is across the fields of the detection pattern.
To avoid false alerts, please note this device is equipped with a PIR Motion Sensor that operates bydetecting temperature changes in the area in front of the device; Please avoid placing the device underthe following environments:
- Aiming the PIR at windows or glass doors.
- Where small animals may enter the detection area.
- Where a heat source (sunlight, incandescent light, car headlights, etc) may affect the motion sensor.
- Where sudden temperature changes inside or around the detection area caused by hot or cold wind (fans, air conditioners, etc.).
Note: For more details, please refer to the user manual at http://security.blaupunkt-service.com
 Products with CE Marking comply with EMC Directive (2014/30/EU); Low Voltage Directive (2014/35/EU); RED (2014/53/EU);ROHS Directive (2011/65/EU) issued by the Commission of the European Community. Compliance with these directives implies conformity to the following European Norms:EMC: EN 301 489 LVD: EN 60950 Radio: EN 300 328
 If the camera system no longer functions or can no longer be repaired, it must be disposed of according to the valid statutory regulations. Disposal of spent batteries/accumulators: You are required by law (Battery Ordinance) to return all spent batteries and accumulators. Disposing of spent batteries/accumulators withcommon household waste is prohibited! Batteries/accumulators that contain hazardous substances are marked with the symbols on the side. These symbols indicate that it is prohibited to dispose of these batteries/accumulators in the household waste. The abbreviations for the respective heavy metals are: Cd=cadmium, Hg=mercury, Pb=lead. You can return spent batteries and accumulators that can no longer be charged to the designated collection points in your community, outlets or wherever batteries or accumulators are sold. Following these instructions will allow you to fulll the legal requirements and contribute to the protection of our environment!
Read More About This Manual & Download PDF:
[xyz-ips snippet=”download-snippet”]