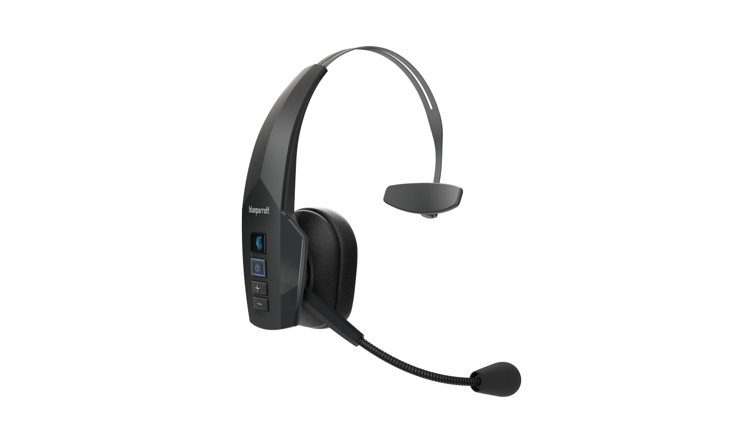
 BlueParrott B450-XTUser Manual
BPB-45020
![]()
SAFETY INFORMATION
IMPORTANT SAFETY NOTE: Prolonged exposure to high volume levels can damage your hearing. To avoid injury, set the volume to the lowest comfortable level. If you experience ringing in your ears, or voices sound muffled, stop using the headset. Avoid turning up the volume to block noisy surroundings. It’s possible for your ears to adapt to the volume that is too high, and this could result in permanent hearing damage without any noticeable discomfort.
- Check with local and state laws regarding cell phone/headset usage while operating a motor vehicle.
- The headset is IP54 rated. Do not immerse any part of this product in water .
- Plastic bags and small parts may cause choking if ingested. Keep them away from small children and pets .
- Use only the power cords included with this product .
- Avoid temperatures exceeding 60° C (140° F) (may cause equipment failure).
PACKAGE CONTENTS
A. B450-XT Headset with Leatherette Ear Cushion AB. Spare Foam Ear CushionC. Spare Microphone WindscreenD. USB-C Charging CableE. Auto (DC) AdapterF. Quick-Start Guide*G. Warranty and Compliance Document**Not pictured.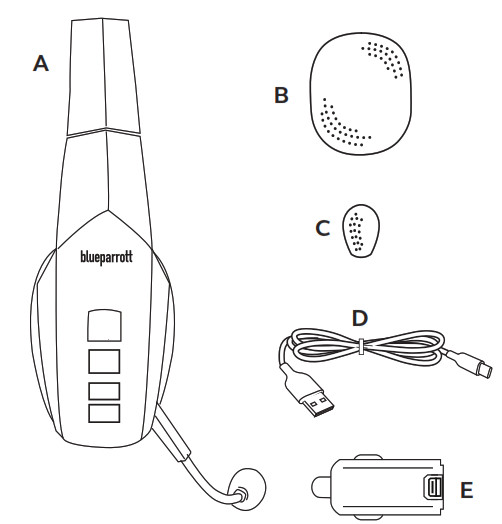
Images are not shown to scale.
GLOSSARY OF TERMS
On: Headset is on, but there is no connection to the phone (red light will flash).MFB: Abbreviation for “Multifunction Button “.Multipoint Mode: Multipoint Mode allows you to connect and switch between two Bluetooth devices.Paired: Two Bluetooth devices agree to communicate with one another.Standby Mode: Headset is on, Bluetooth link is active, and the user is not on a call (blue light will flash).Talk Mode: Headset is in use with the cell phone while the cell phone is on an active call (blue light will flash).A2DP: Advanced Audio Distribution Profile is a Bluetooth protocol for streaming audio other than call audio, e .g . music or GPS directions.
HEADSET OVERVIEW
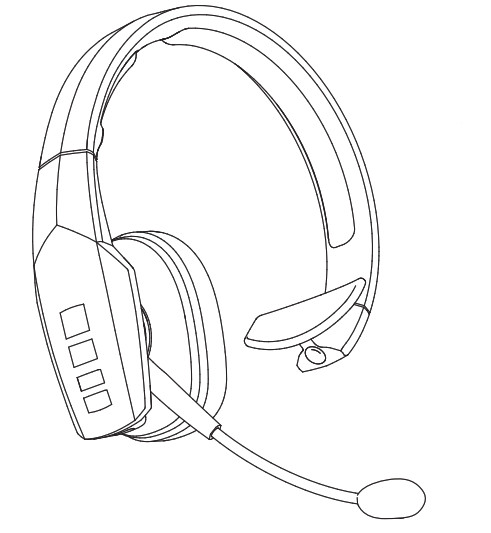
A. Flexible Microphone BoomB. Volume DownC. Volume Up/MuteD. Indicator LightsE. Multifunction Button (MFB)F. Parrott Button
CHARGING THE HEADSET
Connect the USB-C charging cable into the headset’s USB-C charging port. If the headset is not fully charged, the indicator will turn red. When the indicator turns blue and stays blue, the unit is fully charged. A fully discharged battery will need approximately 3 hours to achieve a complete charge.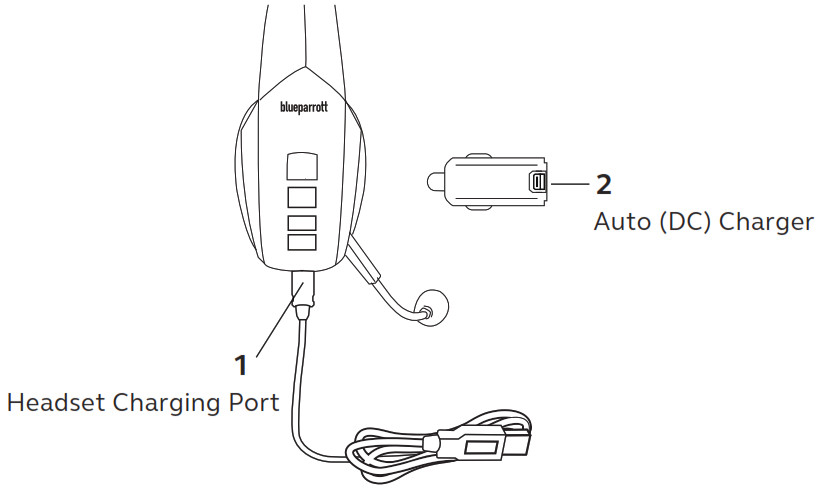
Battery Power IndicatorsWhile charging, the MFB’s indicator light shows the level of battery power on your B450-XT as follows:Blue light: Fully charged. Over 24 hours’ talk time.Red light: Less than a full charge.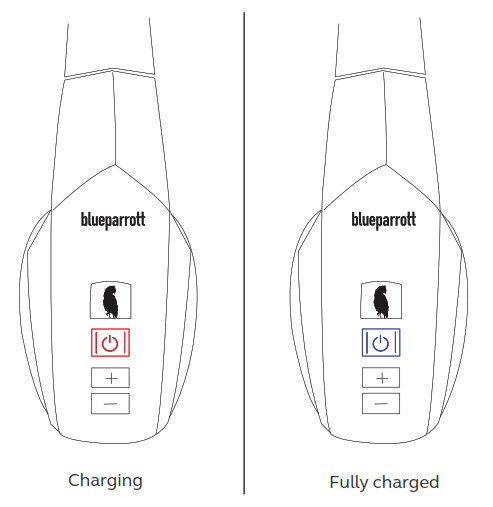 Operation While Using the Charger/AdapterThe B450-XT headset will operate from battery power or from power supplied via the USB-C cable.NOTE: Do not attach the USB-C cable to a powered USB-C port mid-call. This will cause the headset to reset, and the call will be sent back to the phone.When the headset is operating from the battery, all indicator lights and sounds will function as described in this guide.When the headset is operating from power supplied via the USB-C cable, the headset– including the audio indicators–will function as described in this user guide. However, the MFB lights will indicate the battery charge status.While the headset is on the charger, press the MFB long enough to power the unit on. The headset should reconnect automatically unless your phone is set to “always ask” for connection requests.After the battery is fully charged, the MFB charge light will turn blue and stay blue as long as a powered USB-C cable is connected to the headset. While the headset is fully charged and the charge light is blue, the blue indicator light will also be on if the headset is powered on.
GETTING STARTED
On/Off/StandbyTurn Headset On: Hold down the MFB for approximately 2-3 seconds until you hear a voice prompt, “power on “. The red light will flash once every second.
Turn Headset Off (conserves battery power): Hold down the MFB for approximately 45 seconds until you hear a voice prompt “power off “. A red light will flash 4 times and the headset will turn off.
Standby Mode: Once the headset is turned on (after the initial pairing), it will attempt to connect to the last device that it was paired with, putting itself into Standby Mode.
Pairing with a PhoneWhen you turn your B450-XT on for the first time, or if its Paired Device List has been cleared, it will go into pairing mode automatically. You can pair the headset using NFC or manually.
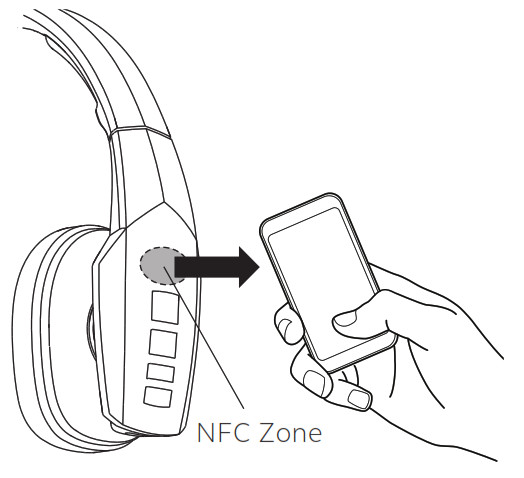
NFC (One-Touch) Pairing
- Make sure that NFC is enabled on your cell phone.
- Place the NFC zone of your cell phone against the NFC zone of the headset and hold them together until your cell phone registers the headset.
- Follow the prompts on your cell phone to complete pairing.

Note: NFC and One-Touch Pairing are dependent on your cell phone. The size and sensitivity of your phone’s NFC zone and the specific way to connect the headset may vary between devices.
Manual PairingIf the B450-XT has already been paired with another device and you are not going to use NFC Pairing, you will need to put it into Pairing Mode manually:
Placing Headset into Pairing ModeBy Voice: Activate headset voice recognition by pressing the Parrott Button or by pressing and holding the Volume Up button. Then, after the prompt, say “pair mode “. The headset will enter pairing mode and be visible for pairing to devices for 120 seconds.
Using Buttons:With the headset powered off, press and hold the MFB until you hear “Power on”. Keep holding the MFB for approximately 6 seconds until the LED flashes alternating blue and red, or you hear “Pair mode”. The headset will be visible for pairing to devices for 120 seconds.
Pairing to a Cell Phone
- Make sure that other Bluetooth devices are turned off or out of range.
- Place the headset into pairing mode.
- Put your cell phone in Bluetooth Search/Scan Mode per the manufacturer’s instructions.
- Select “BlueParrott B450-XT” to pair. (Passcode is “0000” if needed .)
- Accept the phone book access request to enable caller ID in the headset.
- When connected, the headset will give you the voice prompt, “Your headset is connected “.
HOW TO WEAR AND ADJUST THE B450-XT
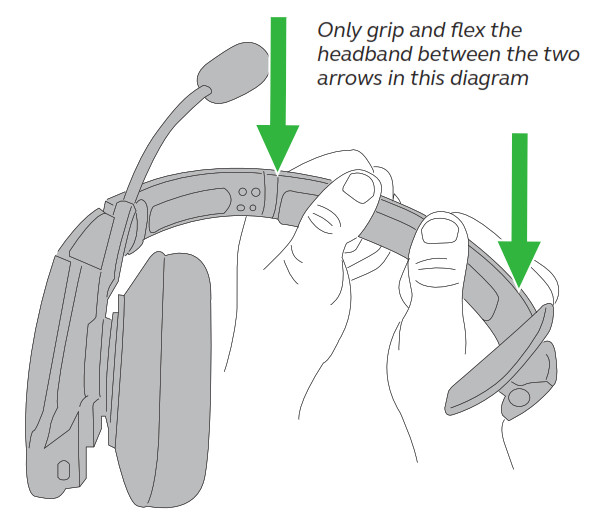
Adjusting the headband lengthFor a more comfortable and secure fit, the headband length can be adjusted as illustrated below: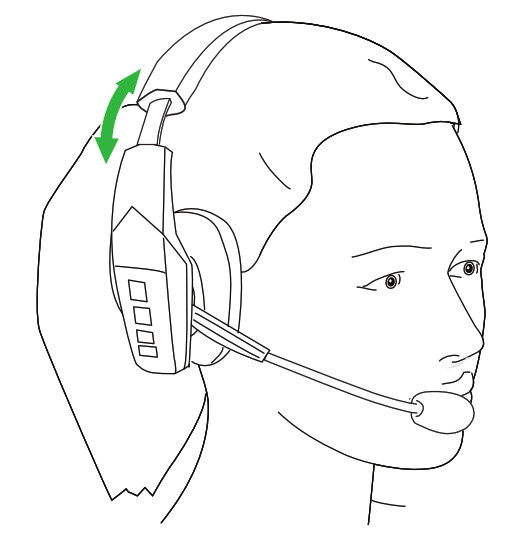 Adjusting the headband tensionIf the headband feels too tight or too loose, it is possible to adjust the tension of the headband for a more comfortable fit. To adjust the tension of the headband, grip and flex it ONLY as shown in the diagrams below. Flex inward to increase tension. Flex outward to reduce the tension. Use mild to moderate force when flexing the headband. Repeat the process until desired tension comfort level is attained.
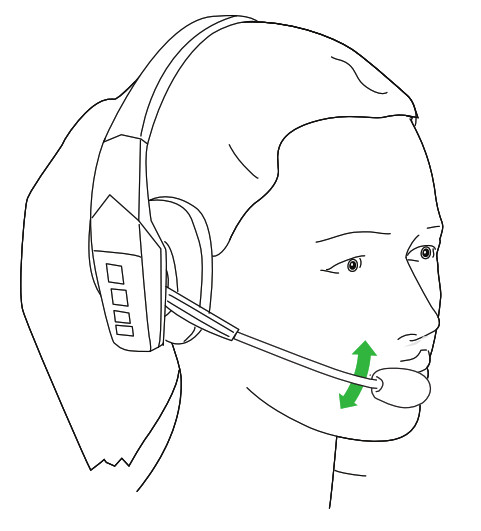
 Positioning the microphoneTo get the best performance from our noise-canceling technology, position the microphone near the corner of your mouth. Positioning is important; small adjustments in microphone placement can improve performance.
- Place the headset on your head.
- Position the speaker directly on your ear. You can slide the headband in or out of the side support to find the best fit for stability and comfort.
- Position the microphone about one finger’s width away from your face at the corner of your mouth. The boom will rotate so you can position the microphone correctly with the speaker on either ear.

Switching microphone boom between left and right earThe microphone boom can be adjusted for use on the right or left ear by sweeping it from one side to the other on the top side just underneath the headband. Do not try and push the microphone boom arm from one side to the other at the bottom of the headset.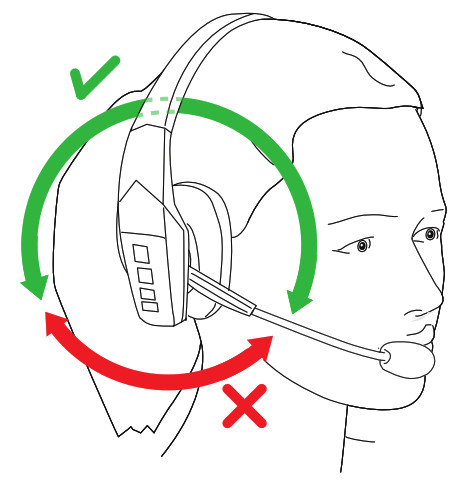
GETTING STARTED
Making/Taking CallsThe headset must be on and connected with your phone.
Making a Call
- Dial the desired number on your phone. You will hear the call in the headset.
- To end the call, press the MFB once. The call will end and the headset will enter standby mode.
Answering a CallBy Voice:
- When you receive a call, you will hear ringtones in the headset, or the caller ID. Say “answer” to answer the call.
- To end the call, press the MFB once. The call will end and the headset will enter standby mode.
Using Buttons:
- When you receive a call, you will either hear ringtones in the headset, or the caller ID. Press the MFB once to answer the call.
- To end the call, press the MFB once. The call will end and the headset will enter standby mode.
Rejecting a CallBy Voice:
- To reject an incoming call, say “ignore “. You will hear two descending tones and the call will be transferred to your voicemail (if available).Using Buttons: 1 . To reject an incoming call, press and hold the MFB for two seconds. You will hear two descending tones and the call will be transferred to your voicemail (if available).
VOICE COMMANDS
The B450-XT will recognize English voice commands, enabling you to handle incoming calls without touching the headset. You can say “answer” to answer an incoming call, or “ignore” to reject it.When not on a call, press the Parrott Button (if not reconfigured to do something else), or press and hold the Volume Up button to activate voice commands. For a list of available commands, say “What can I say?”
Voice Commands Available:Answer -Answers an incoming callIgnore- Rejects the incoming call and sends it to voicemail (if available)What can I say? - Provides a list of available commandsPair mode- Puts the headset into pairing modeAm I connected?- Verifies that the headset is connected to a deviceCheck battery - Checks battery levels in the headset and paired device (if applicable)Redial- Redials the last outgoing callCallback - Calls the last incoming call (if number available)Cancel- Cancels voice command
As provided from the factory, the Parrott Button provides an easy way to mute the headset on a call and activates voice commands when not. However, you can also configure the button for other functions, such as a speed dial button for a dedicated phone number, or to launch a particular application on your phone.If the Parrott Button is reconfigured to provide a different function, voice commands can still be activated by pressing and holding the Volume Up button.To change the Parrott Button functions, you will need to download an app for your phone (Android or iOS) or PC. Go to www.blueparrott.com/parrott for updates and more information.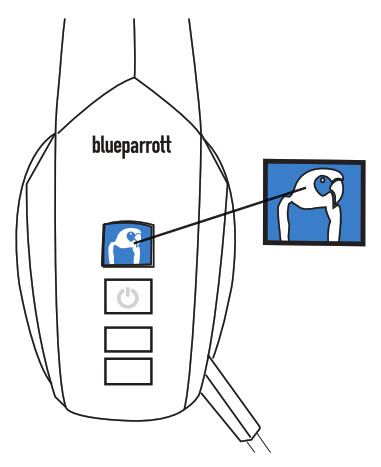
ADVANCED FEATURES AND FUNCTIONS
Multiple Device Pairing and Multipoint ModeThe B450-XT has pairing memory for up to eight (8) devices. The headset is enabled with Multipoint Mode, which means that it can be connected to and toggle between two Bluetooth devices. You do not have to do anything to enable Multipoint Mode. Multipoint Mode is a fixed feature and cannot be disabled.
Using the B450-XT in Multipoint Mode
- To use the headset in Multipoint Mode, first make sure the headset is paired with both your devices.
- With both devices in range and with their Bluetooth enabled, turn the headset on.
- As each Bluetooth device connects to the headset, you will hear the voice prompt, “Your headset is connected “.The B450-XT will monitor both phones and enable you to answer a call on either one using the headset.If you are on a call and the other device receives a call, you will hear a notification in the headset.
Proximity PairingProximity Pairing is an alternative method of pairing where the headset initiates the pairing process instead of your phone.
- Make sure the headset is powered on and not connected to another device.
- Set your phone so it is “discoverable,” or visible to other devices.
- Quickly press the MFB and the Volume Down button, if headset is not already in pair mode.
- You should hear the voice prompt “pair mode” in the headset.
- The headset lights should now be alternating red and blue.
- The headset initiates pairing activity, and the incoming pairing request must be accepted on the phone.NOTE: This may include entering the pin number “0000” (four zeros).
Additional Features and FunctionsLast Number RedialBy Voice:You can use voice commands to dial both the last outgoing and last incoming call.
- To redial the last outgoing call, activate voice command and say “redial “.
- To call back the last incoming call, activate voice command and say “callback “.
Using Buttons: To redial the last outgoing call that was dialed from the cell phone, press and hold the Volume Down button for approximately 1 second. A beep will be heard and the phone will redial the last number.
Call Waiting/Rejecting a CallIf you are on an active call and a second call comes in, you will hear a low tone notification in the headset. Where supported by your phone, you can either accept the incoming call and end the active call, accept the incoming call and place the active call on hold, or reject the incoming call and continue the active call.
- To accept the incoming call and end the active call, press the MFB once.
- To accept the incoming call and place the active call on hold, quickly press the MFB twice.
- To reject the incoming call, press and hold the MFB for 1-2 seconds.
Rejecting a CallBy Voice:To reject an incoming call by voice when not on another call, say “ignore “.
Using Buttons:To reject an incoming call manually, press and hold the MFB for 1-2 seconds.
Phone Voice Control (e.g. Siri, Google Now)Press the MFB once while the headset is in standby mode to initiate voice command functions on your phone. Support for this is phone dependent. See your phone’s user guide for more information.
MutingBy default, the Parrott Button will act as a mute on calls (unless it has been configured for another function). The Volume Up button will also function to control mute.
- Unless otherwise configured, quickly pressing the Parrott Button while on a call will mute the headset. Press again to unmute.
- To use Volume Up to mute the headset microphone while on a call, press and hold the Volume Up button for 1-2 seconds. To unmute, press and hold the button again for 1-2 seconds.
- While muted, a reminder tone will sound every 10 seconds.
Transferring AudioTo transfer audio from the headset to the cell phone while on a call, press and hold the Volume Down button for 1-2 seconds. The audio will transfer to the phone. Repeat to transfer audio back to the headset. When audio is transferred to the phone, the light on the headset will pulse blue quickly until the call ends, or audio is transferred back to headset.
Turning Headset Indicator Lights On/OffA quick press of the Volume Up and Volume Down buttons together will turn the headset indicator lights off. Repeat to turn the indicator lights on. When powering on the headset, the indicator lights will revert to being on.
Reset Headset Paired Devices ListThis will reset, or clear the headset’s internal paired devices list. The headset must be on to perform this function.
- Power on the headset. It does not matter if it connects to any devices.
- Hold the headset near your ear and press and hold the Volume Up and the Volume Down buttons together for approximately 6-10 seconds until two low tones and/or the “Pair Mode” voice indicator is heard.
- The pairing memory is now clear and will need to be paired to any desired devices before it can be used with them.
Reset Parrott Button DefaultsThis will reset or clear the headset’s internal paired devices list and will also restore the Parrott Button’s factory defaults (voice command and mute). The headset must be on to perform this function.
- Power on the headset. It does not matter if it connects to any devices.
- Hold the headset near your ear and press and hold the Parrott Button and the Volume Down buttons together for approximately 6-10 seconds until you see two quick purple flashes on the MFB.
- The headset Parrott Button is reset and the pairing memory is now clear. The headset will re-enter pairing mode. If you are not ready to re-pair to your device, power off the headset.
Over-the-air UpdatesThe headset firmware can be updated over-the-air via the BlueParrott app. Over-the-air updates are only available for Android devices.
- The BlueParrott app will notify you when a firmware update is available.
- Ensure the headset and the Android phone have a minimum 50% charge and are connected to one another before beginning the update.
- In the BlueParrott app main screen, select Update headset and follow the instructions.The Over-the-air update takes approx. 30 minutes to complete, depending on the strength and stability of your Wi-Fi network.
FUNCTIONS & INDICATORS TABLES
Standby Mode Function
|
Function |
Button/Duration of Press | LED Indicator | Audio Indicator |
Voice Indicator |
| Power On | MFB (1-2 seconds) | 3 fast blue flashes | 2 rising low tones | “Power on” |
| Power Off | MFB (2–3seconds) | 4 fast red flashes | 2 falling low tones | “Power off” |
| Enable Pairing Mode | MFB (5-15 seconds) | Alternating red and blue flash | NONE | “Pair Mode” |
| Volume Up | Volume Up (quick press) | NONE | 1 short tone | NONE |
| Volume Down | Volume Down (quick press) | NONE | 1 short tone | NONE |
| Initiate Headset
Voice Commands |
Parrott Button (quick press) or Volume Up (1-2 seconds) | NONE | NONE | “Say a command” |
| Phone Voice Control (Start/End) | MFB (quick press) | NONE | 1 tone | NONE |
| Last Number Redial | Volume Down (1-2 seconds) | NONE | 1 short tone | NONE |
| Disable LEDs | Volume Up/Volume Down (quick press) | NONE | 1 short tone | NONE |
| Enable LEDs | Volume Up/Volume Down (quick press) | LEDs active | 1 short tone | NONE |
| Reset Paired Devices | Volume Up/Volume Down (5-6 seconds) | NONE | 2 low tones | “Pair Mode” |
| Reset Parrott Button | Parrott Button/Volume Down (6-9 seconds) | 2 fast purple flashes | NONE | NONE |
| Establish Service Level Connection | MFB (quick press) | Fast blue flash | 1 long tone | “ Your headset is connected” |
| Start Proximity Pairing | MFB & Volume Down (quick press) | Alternating red and blue flash | Long low tone every 5 seconds for 60 seconds | “Pair Mode” |
| Proximity Pairing Timeout | NONE | NONE | 2 short tones(after 60 seconds) | NONE |
In-Call Functions
| Function | Button/Duration of Press | LED Indicator | Audio Indicator | Voice Indicator |
| Volume Up | Volume Up (quick press) | NONE | 1 short tone | NONE |
| Volume Down | Volume Down (quick press) | NONE | 1 short tone | NONE |
| Mute (On/Off) | Parrott Button (quickpress) unless configured otherwise | NONE | 1 tone | NONE |
| Mute (On/Off) | Volume Up (1-2 seconds) | NONE | 1 tone | NONE |
| Mute Reminder | NONE | NONE | 1 tone (every 10 seconds) | NONE |
| Answer a Call | MFB (quick press) or say “answer” | Blue light flashes slightly slower | 2 rising tones | NONE |
| End a Call | MFB (quickpress) | Blue light flashes slightly faster | 2 falling tones | “Call terminated” |
| Reject a Call* | MFB (1-2 seconds) or say “ignore” | NONE | 2 falling tones | NONE |
| Transfer Audio | Volume Down (1-2 seconds) | Quick pulsing Blue light until call ends, or audio is transferred back to headset | 1 long tone | NONE |
| Hold Active Call to Answer a Second Incoming Call | MFB (2 quick presses) | NONE | 1 short tone | NONE |
| End Current Call and Accept a Second Incoming Call | MFB (quick press) | NONE | 1 short tone | NONE |
| Reject Held Incoming Call (not all devices allow this function) | MFB (1-2 seconds) | NONE | 2 falling tones | NONE |
| Toggle Between Activeand Held Calls | MFB (2 quick presses) | NONE | 1 short tone | NONE |
*Sends call to voicemail (if available)
Notifications
| Notification | Button/Duration
of Press |
LED Indicator | Audio Indicator | Voice Indicator |
| Mute Reminder | NONE | NONE | 1 tone (every 10 seconds) | NONE |
| Headset Connects to Device | NONE | Blue light, fast flash | 1 short tone | “ Your headset is connected” |
| Disconnect from Device | NONE | Red light, slow flash | NONE | “ Your headset is disconnected” |
| Out of Range(Link Loss) | NONE | Red light, slow flash | 1 short tone (every 10 seconds) | NONE |
| Low Battery | NONE | Red light, 2 fast flashes | Double tone | “ Battery low” every 60 seconds |
| Connect A2DP | NONE | Blue MFB (quick, double-flash) | NONE | NONE |
| Proximity PairingTimeout | NONE | NONE | 2 short tones (after 60 seconds) | NONE |
 blueparrott.com/support© 2020 GN Audio A/S . All rights reserved . APN204274A04/19
References
[xyz-ips snippet=”download-snippet”]

