
BLUESOUND N330 Power node Wireless
 Streaming Amplifier Owner's Manual

WELCOME TO #LIVINGHIFIThank you for purchasing your POWERNODE. It is a network music streaming amplifier that conveniently bring the enjoyment of hi-resolution audio to everyday life. Simply add a pair of loudspeakers to create the ultimate two-channel system, which can also be grouped with other Bluesound players to create multi-room listening experiences.
JUST ADD SPEAKERS. The POWERNODE is the amp reinvented, the streaming amplifier that merges several traditional components into one and unlocks a world of high-fidelity streaming. Source, control, and amplification come packed into the compact and minimalist POWERNODE, allowing you to stream your music from dozens of sources to your favorite speakers effortlessly.
HI-RES MUSIC. EVERYWHERE. One or many rooms, the POWERNODE is a versatile workhorse for any listening set-up. Just add speakers for a traditional two-channel audiophile-grade listening system. Add the wireless PULSE SUB+ to create an enhanced 2.1 experience, plus a pair of PULSE FLEX 2i speakers as rear channel additions to create a Dolby surround sound wireless home theater. Or sprinkle other Bluesound players around your home for a whole-home, multi-room audio solution.
PLAYS WELL WITH OTHERS. The POWERNODE is equipped with an array of digital and analog inputs, including HDMI eARC, dual-band Wi-Fi, Gigabit Ethernet, Apple Airplay 2, aptX HD Bluetooth, digital optical, 3.5mm auxiliary, and USB. Stream music through your POWERNODE from dozens of internet radio stations and premium music services, or connect your Bluetooth devices, CD Players, Apple devices, network or local hard drives, or your TV for a serious upgrade to your TV audio.
This Owner’s Manual will provide you with a more detailed overview of your POWERNODE and its features. It also includes some troubleshooting tips and tricks and networking best practices. The Quick Setup Guide included with your POWERNODE will help you get it on the network and ready to listen to your music.
If you need more help or information please visit support.bluesound.com or send us an email at [email protected]
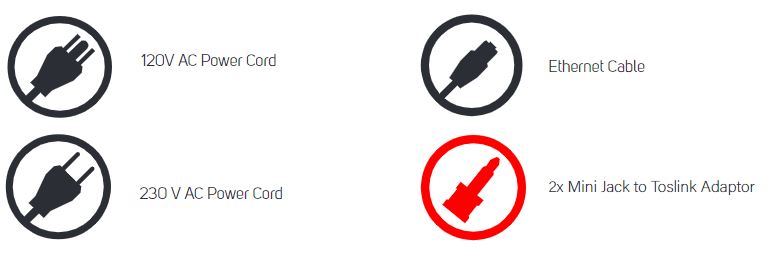
Included Accessories

(1) PRESETS The POWERNODE has 5 programmable preset buttons. These presets are configured using the presets menu in the BluOS App.
(2) VOLUME SLIDER/TAP Use the LED slider to vary volume level. Tap the · buttons at either end of the slider to vary the volume level in 1db intervals, or tap the slider in the direction you wish to adjust to vary the level by 3db intervals. These volume tap methods allow you to fine-tune your volume setting.
(3) PREVIOUS TRACK/NEXT TRACK These buttons can be used to go back to the previous track or skip to the next track in your current play queue.
(4) STATUS INDICATOR Below is a table of the LED blink codes and their corresponding descriptions
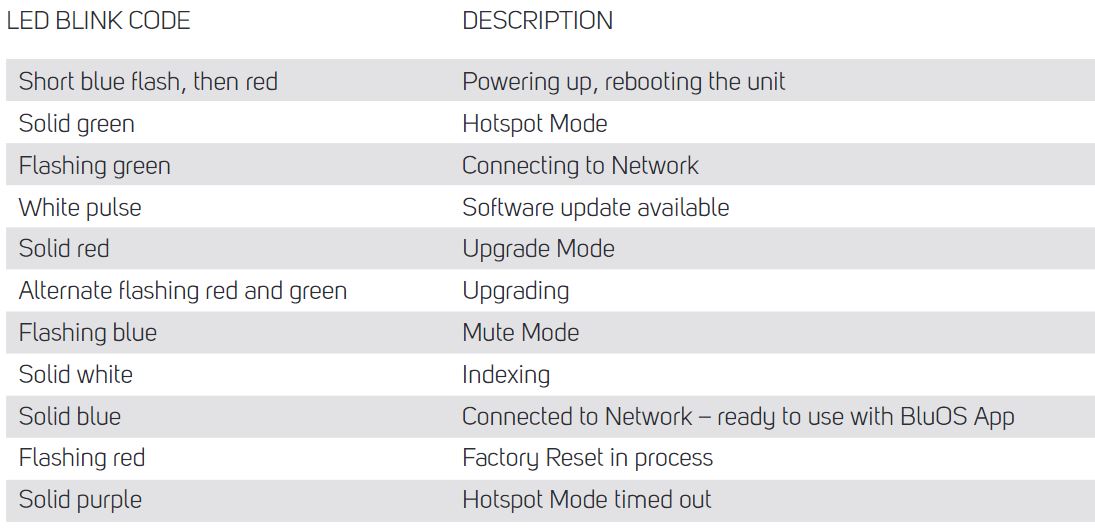
(5) PLAY/PAUSE BUTTON This button has multiple functions a visual indicator of network connectivity and a PLAY/PAUSE button. For a full listing of LED Blink Codes, please see #4 Blink Codes. For an ungrouped Player, press the button to Play and Pause the stream. If listening to an internet radio stream, the Pause- function will work for 30 seconds. At this point, the buffer is full and the stream will Stop. When a Player is grouped, pressing the PLAY/PAUSE button will Mute that Player while other Players continue the stream. The Player’s LED will flash blue when muted. This button is also used for Factory Reset functions. See steps for Factory Reset later in this manual.
(6) HEADPHONE JACK A 3.5mm headphone jack is located on the front of the POWERNODE.
(7) OPTICAL/ANALOG IN 1 Using a 3.5mm Stereo Audio Cable (not provided), connect one end to the Analog In of the POWERNODE and the other end to the corresponding analog output of other compatible devices. The source will show as an Analog Input 1 in the BluOS App. Using the 3.5mm Mini Jack to To slink adaptor (included with the POWERNODE), a digital optical source can also be added. This will appear as Optical Input 1 in the BluOS App.
(8) SUBW (SUBWOOFER) OUT A subwoofer can be connected directly to the POWERNODE. Connect SUBW OUT to a powered (“active”) subwoofer. By default, a crossover is applied at 80Hz meaning audio below 80Hz is transmitted through the SUBW OUT. Alternatively, you can connect the NODE to a Bluesound PULSE SUB+ over the network.
(9) USB INPUT (TYPE A) Connect a USB mass storage device to the USB input. Typical USB mass storage devices compatible with the NODE include portable flash memory devices and external hard drives (FAT32 formatted).
(10) LAN PORT The LAN PORT connection can be used with the Ethernet cable provided. This is an optional connection since the POWERNODE can be connected to the network through a Wi-Fi connection to your router. To setup the POWERNODE using the LAN Port a Wired Ethernet connection is required. Using the Ethernet cable provided, connect one end of the Ethernet cable to the LAN port of your wired Ethernet broadband router and the other end to the POWERNODE’s LAN port.
(11) IR IN An infrared extender can be connected to allow for programmable learning remotes to control volume and source selection when a POWERNODE is stored in a way that the front panel IR sensor is not visible.
(12) OPTICAL IN/ANALOG IN 2 TU sing a 3.5mm Stereo Audio Cable (not provided), connect one end to the Analog In of the POWERNODE and the other end to the corresponding analog output of other compatible devices. The source will show as an Analog Input 2 in the BluOS App. Using the 3.5mm Mini Jack to To slink adaptor (included with the POWERNODE), a digital optical source can also be added. This will appear as Optical Input 2 in the BluOS App.
(13) SPEAKERS Connect the right speaker to the terminals marked “R+” and “R-” ensuring that “R+” is connected to the “+” terminal on your loudspeaker and “R-” is connected to the loudspeaker’s “-” terminal. Repeat for the left speaker using “L+” and “L-“. Use extra care to ensure that no stray wires or strands cross between posts or terminals at either end.
(14) HDMI eARC Using a HDMI cable (not provided), connect one end to the eARC input of the POWERNODE and the other end to an ARC-enabled HDMI output on your television. You may be required to enable ARC in your TV settings. Consult you TV user manual for more information. The source will appear as HDMI ARC in the BluOS App
(15) AC MAINS INPUT The POWERNODE comes supplied with two separate AC power cords. Select the AC power cord appropriate for your region. Before connecting the plug to the wall outlet, connect firmly the other end of the AC power cord to POWERNODE’s AC Mains input socket. Never force the plug into a wall outlet. An adaptor may be necessary in certain regions. Always disconnect the plug from the wall outlet first, before disconnecting the cable from the POWERNODE’s AC Mains input socket.et.
WARNING!
THIS IS A FACTORY RESET OF YOUR PLAYER. ALL CUSTOMIZATION INCLUDING WI-FI NETWORK CONFIGURATION, FILE SHARES AND SAVED PLAYLISTS WILL BE LOST. YOU WILL HAVE TO RECREATE THESE ONCE COMPLETE. THIS PROCESS IS ONLY RECOMMENDED IF YOUR PLAYER IS NOT FUNCTIONING AND AN INTERNET FIRMWARE UPGRADE HAS FAILED. FOR ANY QUESTIONS OR CONCERNS CONTACT AN AUTHORISED BLUESOUND CUSTOMER REPRESENTATIVE BEFORE PROCEEDING!
Steps to Factory Reset:
- Disconnect the player from electrical power.
- Wait 30 seconds
- Reconnect the power
- Once the LED turns Red, press and hold the PLAY/PAUSE button. The LED will immediately turn Green and then back to Red – continue to hold the button for 30 seconds
- After 30 seconds, the LED will begin to blink red then release the button
- All customization to the Bluesound player will be removed and restored to factory settings
IMPORTANT: Removing your finger from the PLAY/PAUSE button at any time before the LED begins flashing red will cancel the factory reset and leave the player in Upgrade Mode. Just start the steps again to factory reset the player.
You will know the factory reset is successful if the player returns to Hotspot mode (wireless connection the LED will turn solid green). If the player is connected to your network through a wired Ethernet connection, it will simply connect as if it was a new player (LED will turn solid blue).
![]()
[xyz-ips snippet=”download-snippet”]