
BlueThumb Water Garden
Blue Thumb ECO-SYSTEM

![]() Biological Waterfall BoxFilters harmful waste and toxins from water, keeping your pond clean and clear. Provides excellent surface area for beneficial bacteria growth while making a simple and artistic way of creating a waterfall. Easy to camouflage-especially when using the Landscape Lid™.
Biological Waterfall BoxFilters harmful waste and toxins from water, keeping your pond clean and clear. Provides excellent surface area for beneficial bacteria growth while making a simple and artistic way of creating a waterfall. Easy to camouflage-especially when using the Landscape Lid™.
![]() Black PVC Flex HoseCarries water from skimmer box up to the biological waterfall box. Much easier to install than rigid PVC.
Black PVC Flex HoseCarries water from skimmer box up to the biological waterfall box. Much easier to install than rigid PVC.
![]() Aquatic PlantsAdd beauty to any pond! Plants can be placed throughout or along the pond’s edge. There are many varieties: floating, marginal, sinking, oxygenators and lilies. Watergarden kits are great when your desire is to keep many colorful and beautiful aquatic plants.
Aquatic PlantsAdd beauty to any pond! Plants can be placed throughout or along the pond’s edge. There are many varieties: floating, marginal, sinking, oxygenators and lilies. Watergarden kits are great when your desire is to keep many colorful and beautiful aquatic plants.
![]() Rocks & GravelProvides additional surface area for beneficial bacteria to colonize. Protects liner from harmful UV rays and damage from animals. Creates a very natural look
Rocks & GravelProvides additional surface area for beneficial bacteria to colonize. Protects liner from harmful UV rays and damage from animals. Creates a very natural look
![]() FishAdding colorful koi and goldfish creates an even more dramatic display. Watergardens are great for Goldfish and Koi.
FishAdding colorful koi and goldfish creates an even more dramatic display. Watergardens are great for Goldfish and Koi.
![]() High-Efficiency PumpPump sits in back pump chamber protected from clogging by nets and filter mats. Blue Thumb pumps are recommended as they will use far less electricity and are meant to operate continuously.
High-Efficiency PumpPump sits in back pump chamber protected from clogging by nets and filter mats. Blue Thumb pumps are recommended as they will use far less electricity and are meant to operate continuously.
![]() Mechanical Skimmer BoxSimplifies routine maintenance by removing floating debris before it sinks to the bottom of the pond. Protects the pump and hides unsightly plumbing.
Mechanical Skimmer BoxSimplifies routine maintenance by removing floating debris before it sinks to the bottom of the pond. Protects the pump and hides unsightly plumbing.
![]() Protective UnderlinerA non-woven, protective underliner fabric forms a soft padding for the liner.
Protective UnderlinerA non-woven, protective underliner fabric forms a soft padding for the liner.
![]() Fish-Friendly Rubber LinerSuper-strong 45-mil EPDM liner is the best choice when building a pond. Very flexible – conforms to pond’s curves and slopes.
Fish-Friendly Rubber LinerSuper-strong 45-mil EPDM liner is the best choice when building a pond. Very flexible – conforms to pond’s curves and slopes.
STEP 1Determine Shape using Hose & Spray Pond Outline:The first step to installing your new water garden is to lay out a garden hose on the ground to help create the size and shape of your new pond. Locate the pond near the house, patio, deck or other living areas for the best views and interaction with the fish and waterfalls. Once you’ve determined the shape of your pond outline it using a can of spray paint. Once you’ve sprayed the outline you can remove the garden hose but keep it handy- you’re going to need it later!
STEP 2
Place Filters & Flexible Hose:Place your waterfall & skimmer box in the desired locations keeping in mind that whenever possible the skimmer and waterfall should be placed at opposite ends of the pond. Next lay the flexible pipe into position. At this point we can cement the flexible hose to the waterfall box but we must first install the plumbing fittings into the spin welds located on each side of the box. First, Teflon tape the male adapter and thread it into the spin weld on the side of the box that you will be bringing the flexible hose into. You can add a bead of silicone to the threads for added insurance. Next, Teflon tape the threaded plug and install that into the spin weld on the other side of the box.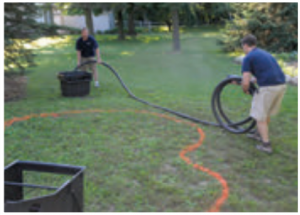
Set the waterfall box into position and using the PVC Cement supplied install the flexible hose into the male adapter. Hold it in position for 60 seconds to allow the cement to set. Note that the PVC Cement supplied with the kit is special cement that does not require the use of primer. It is recommended, however, that you first wipe off any dirt prior to using the cement.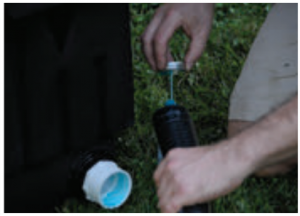
STEP 3Excavation of Pond Area: Spray out the area for the skimmer box in preparation for excavation. It’s now time to begin excavating the pond. Please remember to call your local utility company prior to digging to ensure there are no pipes & cables in the area. The excavated soil can be used to cover the flexible hose, build up your waterfall and stream, and to create a berm around and behind the waterfall box. Be sure to check the level of the waterfall box occasionally throughout. If the waterfall box is installed off level then the water will not flow evenly over the weir. Tamping the area beneath the waterfall box will help to minimize the area from settling and creating an uneven waterfall. Once the box is level use some the excavated pond soil to support the box in place.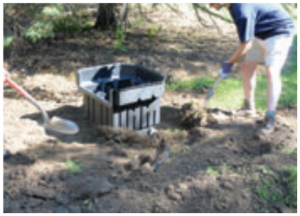
Excavate the pond down as deep as you’d like your first level to be.You should excavate your pond with at least two levels. Once the first level is dug out completely, spray out the area that will become the deeper portion of the pond. The size and shape of this area is completely up to you but keep in mind that we’ll be filling this area later with boulders that will take up some of the space. The use of a laser level is very helpful in determining whether the sides of your pond are level all around but a string level works too.Now that we’ve determined that the pond is level we can begin excavation of the skimmer box. Once the excavation is complete, set the skimmer into position and check the height using the level. Continue to excavate the area beneath the skimmer as necessary until the desired height is achieved all while checking to ensure that the skimmer box is level. Refer to the skimmer instruction manual for further information.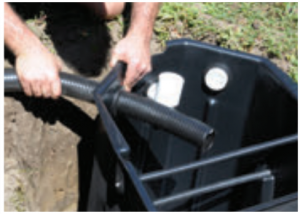
Once the skimmer has been installed, you can bring your flexible hose into the skimmer box by pushing it through the rubber fitting. Push it in as far as necessary, you can cut off any excess when we install the pump.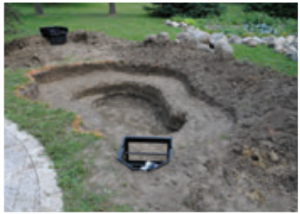
Now is a good time to install the overflow hose if you are installing an Elite Skimmer. Use any extra flexible hose from the kit to take the overflow water from the skimmer to a French style drain or to wherever drainage is available in your yard. Trench out an area for the hose to lay. Connect the hose to the male adapter on the skimmer using the PVC Cement. Finish off the skimmer by backfilling around the sides using the excavated soil, tamping lightly to prevent settling. It’s best to stand inside the skimmer to prevent it from shifting around while adding the soil.
Finish off the pond excavation by removing any roots and/or sharp edges so they won’t puncture the rubber liner. Rake out the flat areas in preparation for the underliner and liner.
STEP 4Install Pump in Skimmer:Using a clockwise motion thread the check valve assembly onto the pump. Next, you’ll want to set the pump inside the skimmer box and cut away any excess pipe. Connect the black flexible hose to the pump discharge using a screw or nut driver to tighten down the hose clamps. Note the notch at the top of the skimmer along the back- this is where you’ll bring the pump power cord through.
STEP 5Install Underliner & Fish-Friendly Liner:Unfold the protective underliner and lay it in the pond squarely.Work your way from the bottom out to ensure the underliner is installed properly. Use a couple of boulders to hold the underliner in place, just be sure to remove them once the liner is installed. Next, unfold the rubber liner and lay it in the pond on top of the underliner again working your way from the bottom out to ensure that the liner is installed properly. You want the liner to be able to lay along top the underliner without any tautness. Note: Be sure you are using a Fish-Friendly liner. We recommend a 45mil, rubber, EPDM liner.
STEP 6Attach Liner to Skimmer Box:It’s now time to attach the pond liner to the Skimmer Box. Refer to the instructions included with the skimmer box for exact instruction.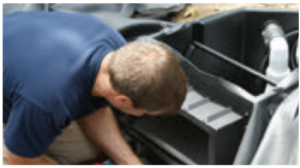 STEP 7Add Boulders & Rockwork:You typically want to begin rocking the pond from the deepest area out.Complete rocking in the entire pond but don’t complete the area where your stream or waterfall will enter the pond. Around the backside of your waterfall box, use some boulders to help create your berm.
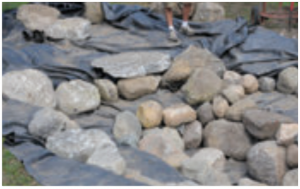
STEP 7.5Add extra Waterfall & Stream Liner (optional):One option for creating your waterfall is to have the waterfall box right at the edge so that the water falls directly into the pond. However, we find that most pond owners like to have their waterfall box set back a bit so that they can create a streambed. If you decide to do this you will need a second piece of liner to create your stream. Lay the stream liner so that there’s enough to overlap the pond liner by at least 6” and also so that there’s enough liner at the top of the waterfall to attach to the Waterfall Box. Trim any excess waterfall liner away but leave enough to tuck down over the pond liner. Lay the pond liner up the streambed as far as possible and then lay the waterfall liner over top the pond liner. This will ensure water won’t leak when flowing from the waterfall into the pond. Once the stream liner is installed on top of the pond liner and in position you can complete rocking in this area.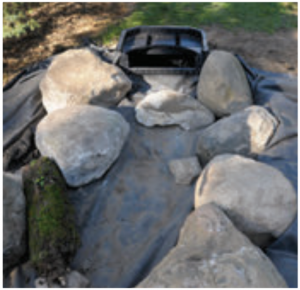
STEP 8Attach liner to Waterfall Box:It’s now time to attach the liner to the Waterfall Box. Refer to the instructions provided with the waterfall box for assistance. Once the liner has been installed on the waterfall box you can complete rocking in your waterfall and streambed.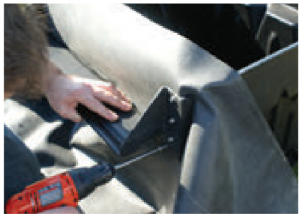
STEP 9Add Gravel:Use gravel to fill in the areas between the boulders. This will help keep the boulders in place as well as hide the black liner completely.
STEP 10Underwater Lights:Underwater lights can create stunning, romantic images in ponds and make the pond safer for visitors at night. They also extend the enjoyment of your new pond into the evening hours. The Elite Pond kits come with one submersible light and one transformer.Typically, if you want to add additional lights the transformer will accommodate them. Consult your local Blue Thumb Dealer for assistance. Be sure to install the lights with enough cord slack so that you can bring the fixture out of the water when changing out a burned out bulb. Run the cord around and between the rockwork so that it is hidden from view.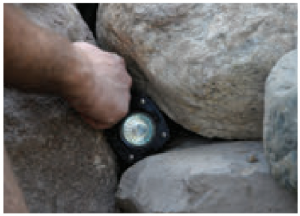

STEP 11Add Aquatic Plants & Fill ‘er up:If desired, adding aquatic plants will really help to bring your new water feature to life. Sometimes you can remove a boulder or rock and put a plant in its place. This will help give your display a softer and finished look. You can either direct root your plants into the pond or simply set the plant and pot into the pond.
At this point you can begin filling the pond with water while you complete the rest of the steps. Along the way it’s a good idea to wash off any dust from your rockwork. If desired, you can then pump out the dirty water a few times before a final filling.
STEP 12PondBuild ‘n Foam:Included in the Elite kits is a can of PondBuild ‘n Foam. This foam is used to seal in and around the rockwork of the waterfall. This forces the water over the top of the rocks instead of around and beneath them. It greatly enhances the waterfall effect and will help to seal everything together. It’s black in color and can be cut away once cured if it expands too much. Before curing completely you can sprinkle some rock dust on the foam to disguise it.
STEP 13Add Biological Media:Even the best waterfall boxes are not filters unless biological media is added to them. The first option is to lay the supplied green matala mats into the waterfall box and then fill the black media bag with the colored blocks. This is the most economical way but it’s not the best.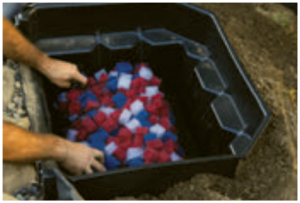
Another option is to fill the black media bag with Bacti-twist bio media. This will cost a little more but it will help to keep your new pond cleaner.
The best option is to purchase additional green matala mats and stand them up vertically inside the waterfall box. Blue Thumb has pre-boxed upgrade kits to make this easier for you. This will cost a little more but it’s by far the best option if your goal is to have clear water, keep algae minimized, and keep many fish. Keep in mind that you can always upgrade this filtration media as your pond matures.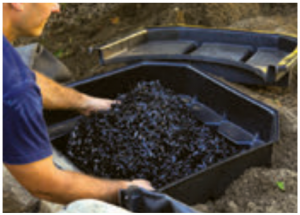
Elite Waterfall Boxes Only: Once you’ve added the biological media, disguise the Waterfall box from view by using some gravel and a selection of creeping aquatic plants. Because the Landscape Lid has holes in the bottom of it the root system of the plants will always have flowing water around them. Other options for using the landscape lid include mulch, gravel, slate, or driftwood. Use your imagination! The Blue Thumb Elite Waterfall Box is the only system on the market that comes complete with the Landscape Lid! Landscape Lids are not available on the Serenity or Crystal Falls products.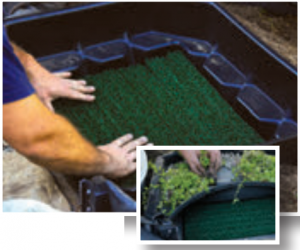
STEP 14Finishing Touches:After the pond is full and you can see that there are no low areas or leaks, you can trim the excess liner but we recommend leaving at least 12” along each edge and folding it back into the landscape. Hide the extra liner by folding it behind or under the rocks and mulch along the edge. Another option is to dig away the soil beneath the liner, creating an area for the liner to lay with topsoil added back over top. This will allow you to bring your landscaping that much closer to the pond edge. Leave as much excess liner as possible to allow for settling and future repair. Once you’ve taken care of the ponds edges, mulch can be added to give your feature a finished look. Add in some landscape plants around your new pond to really set it off!
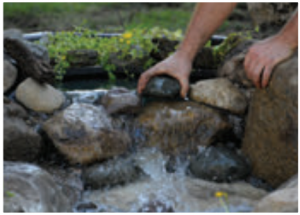
STEP 15Add Water Treatments & Review Owners Manual:If you are filling your pond with chlorinated water you will want to add a dechlorinate. Chlorine is not good for fish and aquatic plants.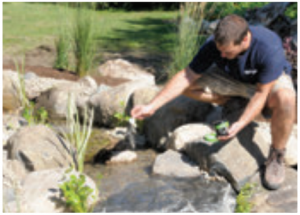
Next, add beneficial bacteria to the pond. This bacteria will take seed throughout the bio media located inside the waterfall box as well as spread throughout the rest of the pond. This bacteria will help consume excess nutrients in the pond as well as process any waste from the fish.
Now it’s time to clean up the scraps and remaining materials in anticipation of running the waterfall for the first time!
Plug in pump and enjoy!An overwhelming feeling of satisfaction and reward should come over you as you plug in your pump and watch the waterfalls for the first time. Move some rocks around to get the waterfall to look exactly the way you want it. And remember, it’s your waterfall, make it the way you like it.
One last thing! When you get your feature created and you want to show it off to others, snap a hi-res picture and submit it on our Facebook page. We look forward to seeing your work of art!

MAINTANING YOUR NEEW POND
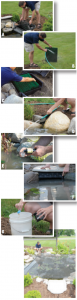
Skimmer Box MaintenanceWhen necessary remove and clean the net and mat located in the skimmer (pic A). If the water level where the pump is located is lower than the water level in the pond than the skimmer mat and net need to be cleaned (pic B). This typically needs to be done every 10-14 days but will vary depending on the amount of debris falling into the pond, fish load, and feeding regimen.
Waterfall Box MaintenanceUsually once per year you should remove the filter media located in your waterfall box and clean thoroughly to remove the debris that has collected over time (pic C). This should only be done when water temperatures are coldest or below 50 degrees. Whenever possible, clean and rinse the media using water collected from the pond. Chlorinated tap water can kill the beneficial bacteria living on the media.
EvaporationIf you are not using the Blue Thumb Automatic Fill Valve then you will need to occasionally replace any evaporated water. This can be done using a garden hose (pic D). If you are using tap water that contains chlorine and you have fish then be sure to add a dechlorinate to the pond as you add water (pic E). Add water until the water level reaches to within 3/4” – 1” below the opening of the skimmer box (pic F).
Beneficial BacteriaAdd beneficial bacteria to the pond regularly to keep the pond clean and healthy. We suggest adding the bacteria to a small bucket of pond water to premix before adding to the pond (pic G).
Fall PrepIf your pond is located near trees we recommend using a net to cover the pond during the fall (pic H). When trees are shedding their leaves the skimmer box can become overwhelmed with debris.
*Consult your local Blue Thumb Dealer for additional maintenance tips and recommendations.

References
[xyz-ips snippet=”download-snippet”]