
blushley V37535 Hollywood Vanity Mirror with Phone Mount Instruction Manual![]()
Components in the box:
- Lighted LED Makeup Mirror
- Removable lOX magnification Mirror
- USB Power Cord
- USB Wall adaptor
- Instruction manual
Features:
- Dimmable light system- Ultra bright LED’s
- 3 LED light settings – Warm, Cool and Daylight
- Detachable lOX Spot Mirror
- Touch sensor switch
- Phone storage mount
IMPORTANT Safety Instructions and Warnings:
- REFLECTED SUNLIGHT CAN CAUSE FIRE -Be sure the mirror is not in a position where it can reflect sunlight when unattended
- When using electrical products, basic safety precautions should always be followed.
- KEEP AWAY FROM WATER
- ALWAYS UNPLUG PRODUCT WHEN NOT IN USE
- Th is product is not intended for use by children or disabled persons. A person responsible for their safety should supervise and instruct in the use of the product. Children should be supervised at alltimes to ensure that they do not play with the product.
- Keep out of reach of children – This product is not a toy
- Keep the cord away from heated surfaces
- Never drop or insert any object into any opening
- Do not use outdoors
- To disconnect, turn all controls to the Off position then remove plug from outlet
- Do not place product in a place where it can fall into the tub or sink
- If it does fall into water, unplug immediately. DO NOT REACH INTO THE WATER
- Never operate the mirror if it is not working properly or damaged
- Do not immerse the product in water or any other liquid.
- Do not operate the product with wet hands.
- Do not operate the product if it has been exposed to water, moisture or any other liquid, to prevent against electric shock, explosion or injury to yourself and damage to the product.
- Do not use the product for anything other than its intended use.
Power Source Options
This mirror can be powered one of 2 ways –
- Battery Power – 4 x AA Batteries (not included) – Battery compartment is located on the back of the mirror. Battery replacement instructions below.
- USB Power Cord (included) – Mini USB out let is on the back of the mirror. Simply plug the smaller mini USB side into the mirror. Then plug the USB side into the provided wall adaptor and plug into the wall outlet.NOTE: This mirror doesn’t have a rechargeable battery inside so the power must come from one of the 2 options listed above.
Battery Replacement
- The battery compartment is located on the back of the mirror
- Before replacing batteries, turn the mirrors power off.
- To replace or install the batteries, remove the battery cover from the back of the mirror.
- Carefully remove the dead batteries (if necessary) and dispose of safely.
- Insert the new batteries (4 x AA not included) according to the polarity indicated in the battery compartment.
- All 4 batteries are required and must be placed properly to work
- Replace the battery cover on the back of mirror.
Instructions for Use
Carefully unpack the mirror from its box and packing material. Remove the thin plastic sheet on the surface of the mirror.
- Choose one of 2 power options listed above. Insert batteries or plug in using the USB cord.
- Turn on the power with the black switch on the back of the mirror. Power on(–). Power off (O)
- Locate your !OX spot mirror- You can use this anywhere on the mirror surface or take it with you for the ideal close-up.
- Locate the SMARTTOUCH control panel on the bottom front of the mirror where there are 2 white circles. This is your SMART TOUCH control panel.
NOTE: These are soft touch sensor buttons. They only work when you lightly touch them with your finger. They do not respond if you press or push them hard.
– This cont rols the power and the light settings. Lightly tap on the button to turn on t he light s. Tap it again to scroll t hrough the 3 light settings. First – Neutral Cool (similar to bright lights and the offi ce) Second – Soft Warm {similar to home light) Third – Natural Daylight {Outside) 4th Tap will turn otf the tights
This button allows you to slowly dim the LED lights in any of the 3 settings.To use, place your finger on the button for a few seconds.Note: Touch buttons are ver.; sensit ive. If it doesn’t work the fi rst time try removing your finger and then touch again for a few seconds. You will get the hang of it after a few tryslNote: that you will need to dim all the way down before you can increase the bright ness.
Phone Mount –
This mirror has a convenient phone mount clip to hold your phone at the perfect spot and angle. Simply place your phone horizontally in the clip as shown below. Make sure that itsecurely placed in the grooves.
Clip with and without phone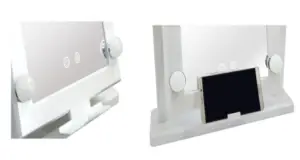
Care and Maintenance
- To Clean – Wipe the mirror with a soft, damp, lint-free cloth and allow to dry thoroughly. Do not immerse the mirror in water or any other liquid. Can use a non-abrasive cleaner
- Do not expose the mirror to liquid, moisture or humidity to avoid the product’s internal circuit being affected.
- Do not use any abrasive cleaning solvents to clean the mirror, as this can cause damage.
- Do not expose the mirror to sharp object s, which may cause damage.
- Do not expose the mirror to extremely high or low temperature as this will shorten the life of electronic devices, destroy the battery or distort ce rtain plastic parts.
- Do not drop the mirror, as the internal circuit may become damaged.
- Do not attempt to disassemble the mirror, as this may cause damage to the product.
Warranty- Don’t return to the retailer. Contact us first if there are any issues.
Clever Concepts products come with a 90 Day limited warranty from the date of purchase. It covers defects in materials and workmanship. Does not cover damage to the product as a result of misuse or accidents.Should your product become defective during the warranty period we will repair or replace (at our option) your product. Please reach out to customer service on our website – www.blushly.com to register for the warranty and to report the defect.Clever Concepts shall not be liable for any incidental or consequential damages arising from t he defects in this product.Thank you for your purchase and I hope you enjoy the product.We are here to help! Please visit us at www.blushly.com if you have any questions or concerns.Blushly / Clever Concepts International LLC.Hauppauge, NY 11788 www.blushly.com 800-274-7824
Read More About This Manual & Download PDF:
[xyz-ips snippet=”download-snippet”]