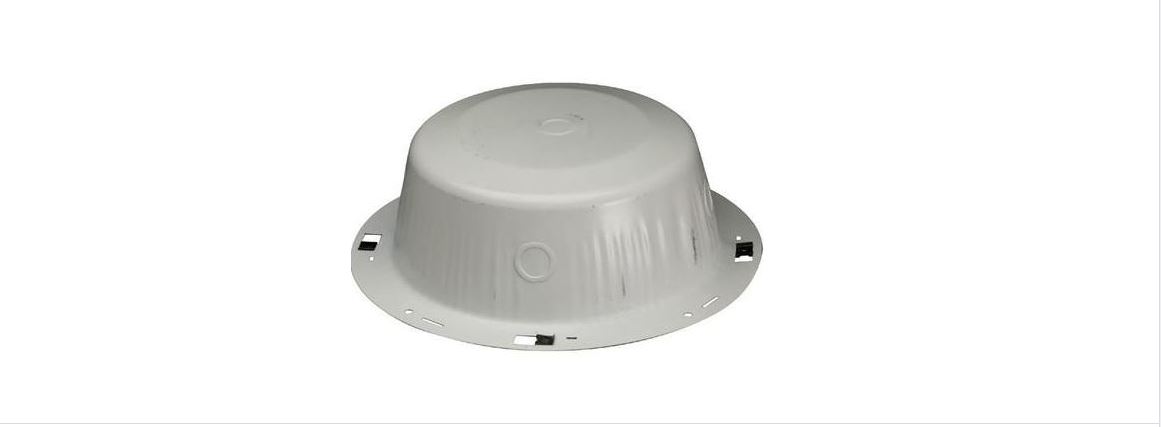
BOGEN RE84 Ceiling Speaker Enclosure and Tile
Bridge User Manual
RE84 Features
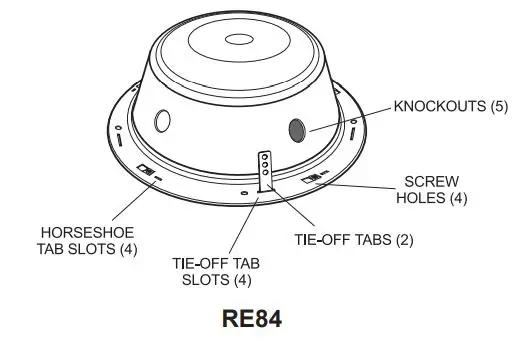
- Listed by Underwriters Laboratories, Inc. Category UUMW.Material and construction permits use where ceiling plenum is part of the air handling system.
- Compound knockout(s) provided for listed type metallic type fittings for 1/2″ and 3/4″ plenum rated cable and plenum whip flexconduit.
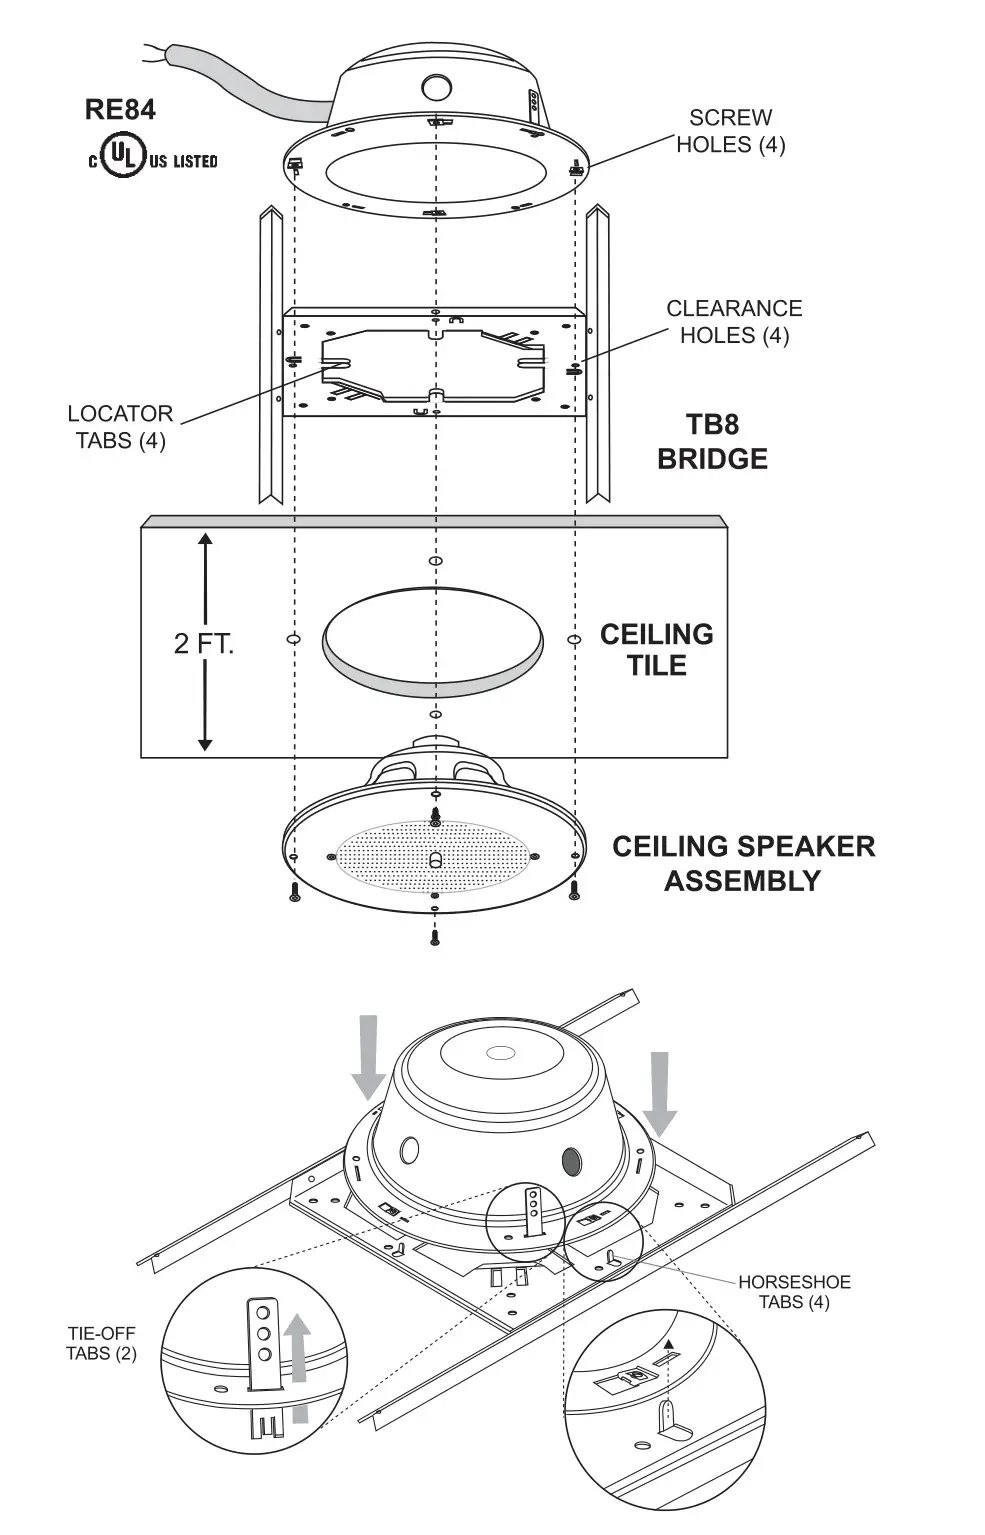
- Four horseshoe tab slots provided on each enclosure to mate with four horseshoe tabs on TB8 bridge eliminates the need for screws.
- Two seismic tie-off tabs and four tie-off tab slots with enclosure.
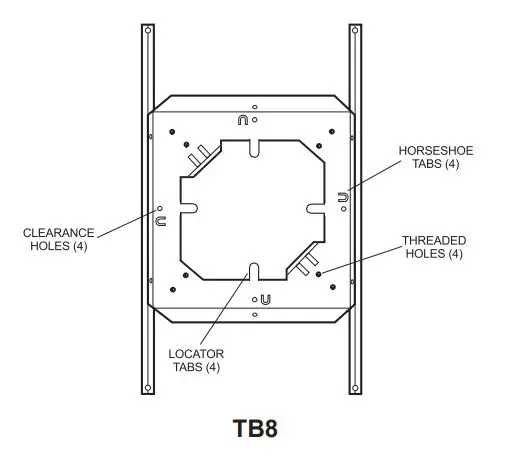
TB8 Features
- Distributes the weight of a speaker, grille, and protective enclosure onto the ceiling grid.
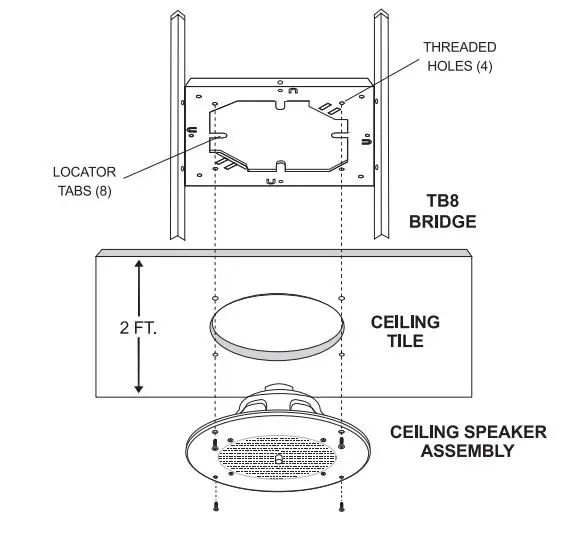
- Four locator tabs to prevent sliding on ceiling tile.
- Four horseshoe tabs to mate with four horseshoe tab slots on enclosure.
A Listed assembly requires that the enclosed loudspeaker is not exposed within the air handling plenum. Wiring, and/or conduit enclosure entry fittings, and installation must comply with local codes. Many local codes require a separate enclosure assembly with customer-supplied “tie-off” wire to secure the assembly to the top of the building structure.
NOTE: All cable splices and connections to Speaker/Transformer pigtails must be made inside of Listed enclosure.
![]()
NOTE: When the RE84 and the TB8 are installed together, the clearance holes on the TB8 are used during installation. However, when the TB8 is installed without the RE84, the threaded holes on the TB8 are used during installation.
TB8 Installation
- Place ceiling tile with the finished side facing up over a large trash can (provides support and saves clean up time).
- Cut hole in the center of the ceiling tile using the raw speaker as a template.
- Position the tile bridge on the unfinished side of the ceiling tile and bend (4) locator tabs into tile opening to prevent sliding.
- Install Ceiling Speaker assembly using (4) 8-32 screws and the threaded holes of the tile bridge as shown. (Screws are provided with Ceiling Speaker assembly).
TB8 with RE84 Installation
- Place ceiling tile with the finished side facing up over a large trash can (provides support and saves clean up time).
- Cut hole in the center of the ceiling tile using the raw speaker as a template.
- Bend (4) horseshoe tabs up on tile bridge.
- Position the tile bridge on the unfinished side of the ceiling tile and bend (4) locator tabs into tile opening to prevent sliding.
- Slip seismic mounting tie-off tabs (2) through RE84 tie-off tab slots until they click into place and secure customer-supplied “tie-off” wire to tab.
- Punch out knockout in the RE84 and install Listed metallic enclosure entry fitting to knockout to accommodate plenum cable or plenum whip and feed cable or whip through the knockout.
- Install RE84 to tile bridge by orienting horseshoe tab slots (4) over horseshoe tabs (4) of bridge.
- With pliers, twist horseshoe tabs (4) of tile bridge 1/2 turn, securing enclosure to bridge.
- Screw the Ceiling Speaker assembly to the RE84 using (4) 8-32 screws provided with the Ceiling Speaker assembly, sandwiching the TB8 and ceiling tile in between. The screws must go through the TB8 clearance holes as shown. (Screws anchor into the RE84).
Limited Warranty
The RE84 and TB8 are warranted to be free from defects in material or workmanship for two (2) years from the date of sale to the original purchaser. Any part of the product covered by this warranty that, with normal installation and use, becomes defective will be repaired or replaced by Bogen, at our option, provided the product is shipped insured and prepaid to: Bogen Factory Service Department, 50 SpringStreet, Ramsey, NJ 07446, USA. The product will be returned to you freight prepaid. This warranty does not extend to any of our products that have been subjected to abuse, misuse, improper storage, neglect, accident, improper installation or have been modified or repaired or altered in any manner whatsoever, or where the serial number or date code has been removed or defaced.
THE FOREGOING LIMITED WARRANTY IS BOGEN’S SOLE AND EXCLUSIVE WARRANTY AND THE PURCHASER’S SOLE AND EXCLUSIVE REMEDY. BOGEN MAKES NO OTHER WARRANTIES OF ANY KIND, EITHER EXPRESS OR IMPLIED, AND ALL IMPLIED WARRANTIES OF MERCHANTABILITY OR FITNESS FOR A PARTICULAR PURPOSE ARE HEREBY DISCLAIMED AND EXCLUDED TO THE MAXIMUM EXTENT ALLOWABLE BY LAW. Bogen’s liability arising out of the manufacture, sale or supplying of products or their use or disposition, whether based upon warranty, contract, tort or otherwise, shall be limited to the price of the product. In no event shall Bogen be liable for special, incidental or consequential damages (including, but not limited to, loss of profits, loss of data or loss of use damages) arising out of the manufacture, sale or supplying of products, even if Bogen has been advised of the possibility of such damages or losses. Some States do not allow the exclusion or limitation of incidental or consequential damages, so the above limitation or exclusion may not apply to you. This warranty gives you specific legal rights, and you may also have other rights which vary from State to State.
Products that are out of warranty will also be repaired by the Bogen Factory Service Department — same address as above or call 201-934-8500. The parts and labor involved in these repairs are warranted for 90 days when repaired by the Bogen Factory Service Department. All shipping charges in addition to parts and labor charges will be at the owner’s expense. All returns require a Return Authorization number.
 report this ad
![]()
References
[xyz-ips snippet=”download-snippet”]