![]()
BV382510V1.0 L gooseneck variable electrical kettleCustomer assistant line:USA 1-855- 664 -1252
Features:Displays Kettle temperature in Fahrenheit or CelsiusDisplays actual Water Temperature in Kettle even after power offAllows user to set and Hold water temperature for up to one hourPreset temperatures for the most popular hot beveragesEasy Grip handle for excellent pour controlGooseneck Spout for accurate pour control and water directing.Commercial UL (USA Only)Brushed Stainless finish1000 WCord Storage wrap in BaseRetains last settings when power off or unplugged
READ THE MANUAL BEFORE USE AND SAVE FOR FUTURE REFERENCE
1 year limited warranty
IMPORTANT SAFEGUARDS
When using electrical appliances, basic safety precautions should always be followed, including the following:
- Read all instructions.
- Do not touch hot surfaces. Use handles or knobs.
- To protect against fire, electric shock, and injury to persons, do not immerse cord, plugs, base, or kettle in water or other liquid.
- Never leave the appliance unattended when in use. Close supervision is necessary when any appliance is used by or near children.
- Unplug from outlet when not in use, no water in kettle, filling water, moving kettle, and before cleaning. Allow cooling before putting on or taking off parts, and before cleaning the appliance.
- Do not operate any appliance with a damaged cord or plug or after the appliance malfunctions, or has been damaged in any manner. Call our toll-free Customer Assistance Number for examination, repair, or adjustment.
- Do not use a base unit other than the one supplied. The use of accessory attachments not recommended by the appliance manufacturer may result in fire, electric shock or injury to persons.
- Do not use outdoors.Do not let cord hang over edge of table or counter, or touch hot surfaces. Always store excess portion of the power cord in the compartment of the base unit.
- Electric kettle must be operated on a flat surface. Do not place on or near a hot gas or electric burner, or in a heated oven, or on the top of other electric appliances.
- Always attach plug to appliance first, then plug cord into the wall outlet. To disconnect, turn control to off, then remove plug from wall outlet.
- Do not use appliance for other than intended use.
- To avoid circuit overload, do not operate another high wattage appliance on the same circuit.
- Do not fill kettle when positioned on base. Remove all moisture on the bottom of the body before placing it onto the power base.
- Be aware of steam being emitted from spout or lid especially during refilling. Do not remove lid during boiling cycle.
- Do not use the kettle to heat anything other than water. Do not fill above the ‘’max’’ indication. If the kettle is overfilled, boiling water may be ejected. The kettle is only to be used with the base unit provided.
- Do not insert any object into slots or holes of the kettle.
- Scalding may occur if the lid is removed during the brewing cycles.
WARNING: This appliance utilizes a high wattage relay for arriving at the desired water temperature. In some instances, this relay may cause slight flickering of lights on the same circuit. It is best to use this appliance on a dedicated circuit or with all other appliances off during this appliance’s use. It will not damage electrical systems but caution should be used to not overload this circuit with other appliances running at the same time.
SAVE THESE INSTRUCTIONS
ADDITIONAL SAFEGUARDS
DO NOT OPERATE APPLIANCE IF THE LINE CORD SHOWS ANY DAMAGE OR IF APPLIANCE WORKS INTERMITTENTLY OR STOPS WORKING ENTIRELY.
EXTENSION CORDS
A short power-supply cord is to be provided to reduce the risk resulting from becoming entangled in or tripping over a longer cord. Longer detachable power- supply cords or extension cords are available and may be used if care is exercised in their use. If a longer detachable power-supply cord or extension cord is used,
- The marked electrical rating of the cord set or extension cord should be at least as great as the electrical rating of the appliance, and
- The extension cord should be a grounding-type 3-wire cord, and
- The longer cord should be arranged so that it will not drape over the countertop or tabletop where it can be tripped over, snagged, or pulled on unintentionally (especially by children).
This appliance must be grounded while in use.CAUTION: To ensure continued protection against risk of electric shock, connect to properly ground outlets only.
GROUNDING INSTRUCTIONS
The appliance has a plug that looks like Figure A. An adaptor, as shown in Figure B, should be used for connecting a 3-prong grounding plug to a 2-wire receptacle. The grounding tab, which extends from the adaptor, must be connected to a permanent ground such as a properly grounded receptacle as shown in Figure C, using a metal screw.

PARTS
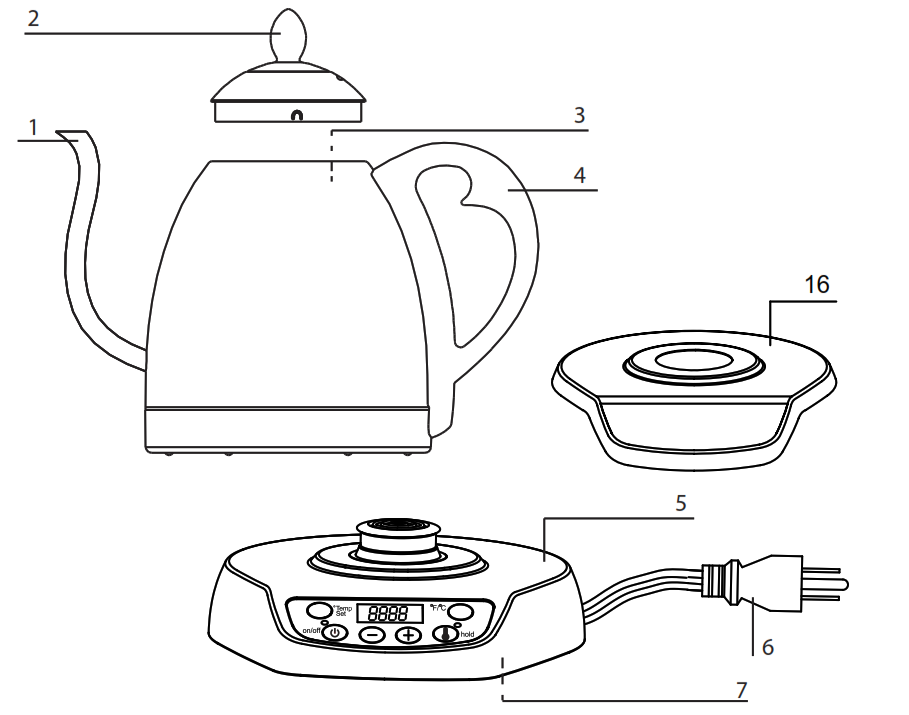

- Spout
- Lid
- Water level Indicator (inside of kettle on Handle side)
- Handle
- Base
- Power cord with plug
- Cord storage in base
- Shut off Temperature Set Button
- On/off switch
- Power on indicator light
- – button
- + button /Count Up Timer Start
- Display Degree °F/°C button
- Hold Temperature button. To maintain a set temperature +/- 2°C
- Hold function indicator light
- Waterproof cover
ILLUSTRATOR

OPERATION
Before plugging the kettle into the wall outlet, check that the electrical circuit is not overloaded with other appliances.
Preparing the Kettle for First-time Use:
- Fill the kettle to Max fill line with cold water to boil at the Max temperature setting and empty.
- Let the appliance cool down 1 minute
- Repeat boiling and rinse at least 2 times before using.
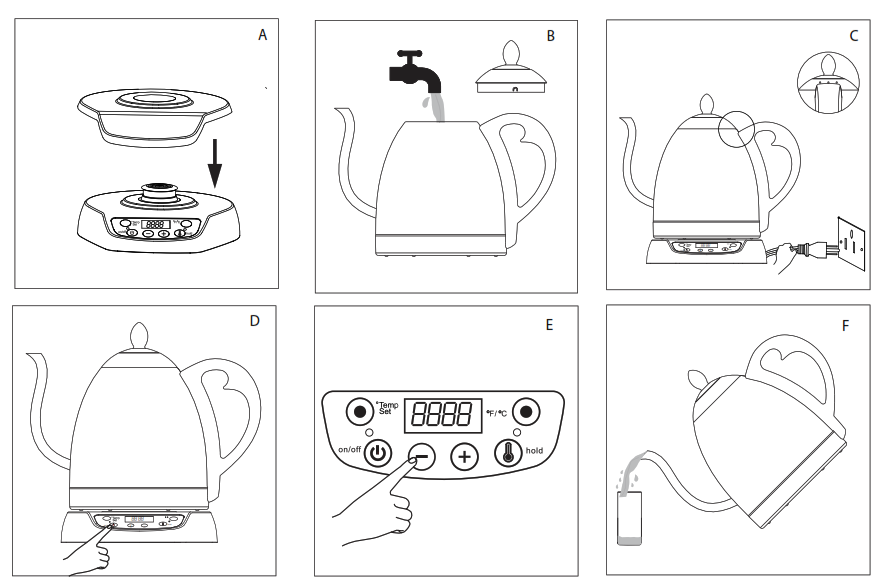
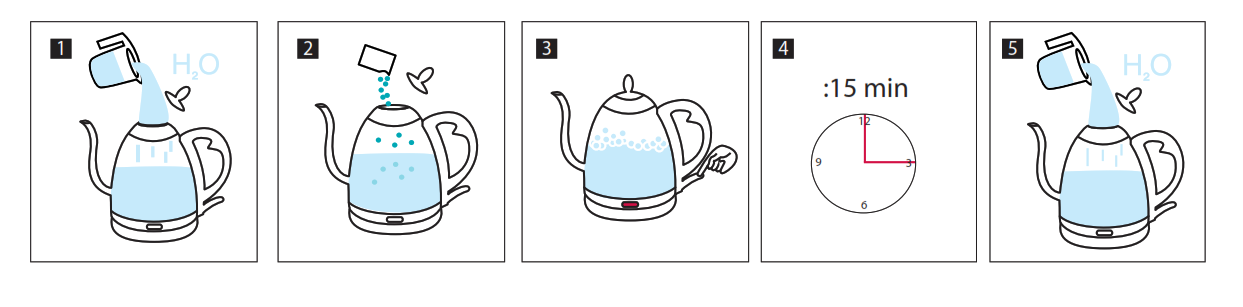
- Setting up the Kettle:• Set the base (5) on a flat, even and steady surface.• Remove the kettle from the base (5). Place the waterproof cover (16) on top of base. (ill.A)• Take off the lid (2). Fill the kettle with cold water (ill. B). Do not fill over the max marking. See the water level (3) for adding the desired amount of water.• After filling the kettle with water, insert the lid (2) into kettle with holes facing towards handle. Plug into the power cord into the standard wall outlet. (ill. C)• Put the kettle firmly on the base and press power-on button, the power-on indicator light on. And the display flashes the set temperature for 3 seconds. (ill. D)
- Selecting the Display Temperature Scale, Fahrenheit or Celsius:• Press the °F/°C button to display the temperature in Fahrenheit or Celsius when power on.
- Setting the shut-off Temperature: (ill. E)Manual Setting Shut Off Temperature :• Press the Shut off Temperature set Button, the last shut-off temperature flashes on the display.• Press the + or – button to select shut off temperature.• Once the display stops flashing the temperature is set and the display shows current water temperature.• Selecting the Preset Shut Off Temperatures• Press the Shut off Temperature Set Button• Continue to press Shut off Temperature Set Button until your desired Preset Shut off Temperature is displayed.Note: The Factory preset temperatures are: 60°C (140°F), 80°C (176°F), 85°C (185°F), 88°C (190°F), 96°C (205°F) and 98°C (208°F).The Factory Default Temperature is 185°F (85°C)Note: Once you have set the Shut Off Temperature is it is stored in Memory and will be recalled whenever you turn on the kettle. No need to set every time unless you want to change shut off temperature.Note: During the heating cycle the LED display shows the current water temperature.Note: After set temperature is reached the heater will shut off but the display will continue to show water temperature for up to 1 hour if the user doesn’t remove the kettle from base.Note: If kettle is removed from base during heating cycle the Heating cycles shuts off and Power On Indicator Light (10) goes off and LED displays “0 00”. When the kettle is returned to base the Display it will show current water temperature for 7 minutes and then the display will shut off.Note: To manually interrupt the boiling process, press the on/of button at any time, Heater and LED lights will shut off.
- Selecting Water Temperature Hold:• This feature allows the Kettle to reach and maintain water at a set temperature for up to one hour. This is an optional setting.• First select the Shut off temperature using above steps.• Press the hold button, the last set Hold temperature will flash on the display for 3 seconds and the hold indicator LED light is lit. (ill. E).• When set temperature is reached the heater will turn heating off and on as needed to maintain set temperature. The power-on indicator light is on and the LED displays the current water temperature.• When you lift kettle to pour and return to the base, the Hold button must be pressed again within 5 seconds if you want to continue the Hold Temperature function. If you don’t press the Hold button within 5 seconds of returning to base the display will show current water temperature for 7 minutes and then the unit will power off.
Note: To manually interrupt the boiling process, press the on/of button at any time, Heater and LED lights will shut off.
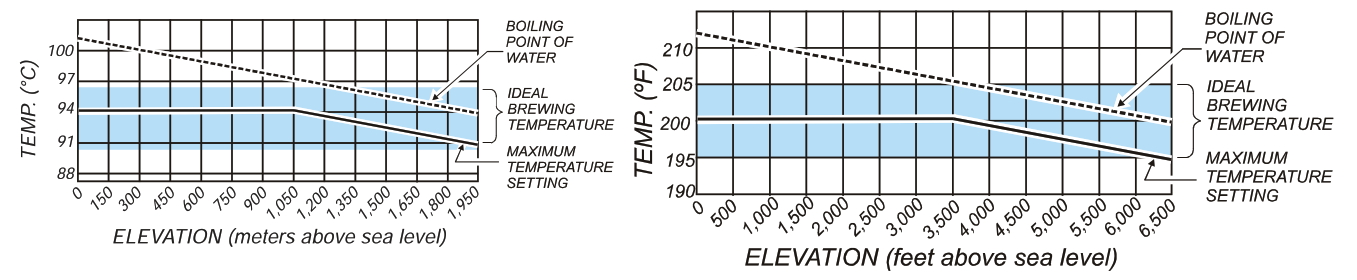
High Altitude UsersWater boils at lower a temperature at higher elevations, according to the below graph to set your kettle brewing temperature
Count Up Timer Feature:
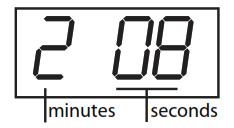
Note: when you lift the kettle, the LED display will Display the count-up timer. The first number indicator the minutes, and the last two number indicator the seconds (the maximum count time is 7 minutes). Press the + button to start the timer. Set the kettle back on the base and lift back off to reset timer to zero.
WARNING: The appliance is very hot during use. Do not touch kettle surface. Danger of burns!
WARNING: Never leave the kettle unattended while boiling water. Especially if there are children nearby.WARNING: Do not open the lid while boiling water.WARNING: Do not immerse the base or the kettle in water or any liquids. This may cause electric shock or damage the appliance.WARNING: Be careful when handling hot water. Danger of scalding!
Suggested temperature chart:
| Setting | Temperature |
| Co ee | 200 °F ( 93 °C) |
| Green Tea | 175 °F ( 80 °C) |
| White Tea | 185 °F ( 85 °C) |
| Oolong Tea | 190 °F ( 88 °C) |
| Black Tea/ Herbal Tea / Tea Bags | 208 °F ( 98 °C) |
| Cereal | 195 °F ( 91 °C) |
| Cocoa | 190 °F ( 88 °C) |
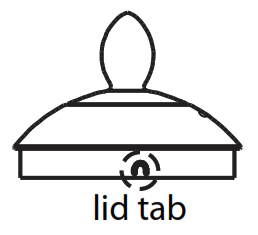
Customizing the kettle lid tension.
If you feel the kettle lid is too hard or too easy to take from the kettle, please follow the below step to adjust the tension.
- Take off the lid from the kettle.
- Use a tool to adjust the three tabs of the kettle lid.If you push in the tab, the lid tension will be less and easier to push on and off. If you pull out the tab, the lid will be harder to put and take off

- Adjust the tab, replace the lid and take off to see if the adjustment is correct.
- Repeat the step 2 and 3 until you have customized the lid to your preference.
CLEANING
Clean the kettle regularly. This appliance contains no user-serviceable parts and requires little maintenance. Leave any servicing or repairs to qualified personnel.
- Clean the outside of the base and the kettle with a damp soft cloth.
- Clean the inside of the kettle with dishwasher detergent and rinse thoroughly with water.
- Do not use abrasive cleansers.
- After cleaning dry the kettle and the base thoroughly.
WARNING: Never immerse the kettle or the base in water or other liquids.
DECALCIFYING
When mineral scale builds up in your kettle, it can affect temperature consistency and slow down boil time. If Not descaled regularly, the kettle can stop working accurately. To ensure optimum performance, Bonavita recommends descaling the kettle when mineral build-up is visible inside the kettle.
Note: Vinegar many not effectively descale the kettle and can be difficult to thoroughly rinse. Vinegar may also leave behind an odor that could affect future uses. Bonavita recommends using Dezcal Descaler.
How to use Decal Descaler:
- Fill the kettle with warm water.
- Add one packet of Dezcal to kettle.
- Bring solution to boil.
- Let vessel cool for 15 mins, then discard solution.
- Rinse thoroughly with fresh water.
STORAGE
Clean and dry all parts before storing. Store the kettle in its box or in a clean, dry place. Never wrap the power cord around the kettle. Always use the cord storage on the bottom of the base.
TECHNICAL DATA
Rated voltage: 120 V 60 HzRated current: 8.3 ARated power input: 1000 WCapacity: max. 33.8 oz (1.0 L)
Pour over manual brew coffee
Pour over manual brew coffeeThis is the simplest coffee brewing approach. It allows the individual the most control of saturation of the coffee grounds, also the most participation by the user. It requires more time than hitting the On switch of a drip coffee maker but for many, its higher involvement is part of the pleasure of coffee overall.
Equipment needed:
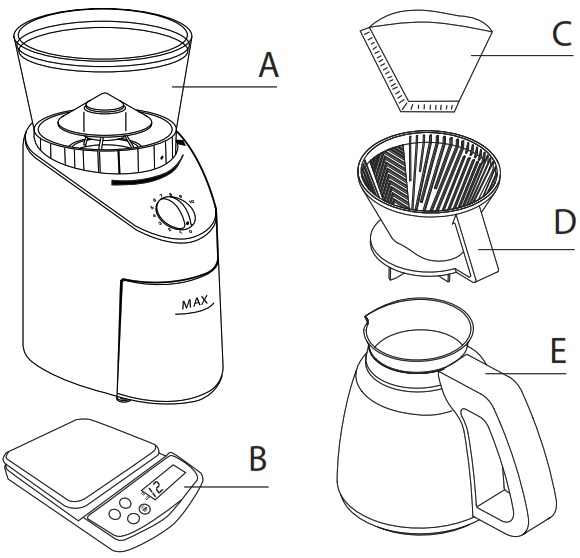
A. GrinderB. ScaleC. Paper filter, cloth or permanent filterD. Pour over filter basketE. Drinking cup or carafe
Brewing manual pour-over method:
- Measure about 6 ounces of water for each cup you intend to brew. Place measured water in kettle and turn on kettle to boil the water.
- Use the Bonavita pour kettle with gooseneck spout, boil the amount of water you desire.
- Grind two tablespoons of beans per cup of coffee.
- Rinse the filter cone, filter, and coffee pot (or whatever you are brewing into) in hot water to preheat them.
- Assemble the filter cone, filter, and vessel and dump the ground coffee into the filter.
- When the water reaches a boil, take the kettle off the heat source and count about five to fifteen seconds. The desired coffee brewing temperature is 205 °F so slightly lower than boiling temperature.
- Now pour the water into the filter. Stir the coffee just a bit to be sure it all gets saturated with water. A slow steady pour allows for the best extraction from the grounds.
Tips:
- You may have to pour two or three times depending in the grind, filter size, andamount of coffee being made.
- Pre-wetting the coffee grounds a minute before start pour-over helps extraction.
- A narrower spout allows better water flow control.
- Pour-over coffee is usually ground finer than drip coffee maker, but not as fine asespresso. If you are using a Melitta cone (which we recommend) the grind will be more fine than that if you used a flat-bottom filter
LIMITED WARRANTY
1 year limited warranty from the date of original purchase.
- This warranty extends only to the original consumer purchaser or gift recipient. Keep the original sales receipt, as proof of purchase is required to make a warranty claim. The product must be purchased at an authorized retailer for the warranty to be valid.
- Defects that occurred due to improper connection, improper handling, or repair attempts by non-authorized persons are not covered by the warranty. The same applies for failure to comply with the use of consumables (e.g. cleaning and decalcifying agents or water filters) that do not correspond to the originalspecifications.
- Routine wear parts (e.g. Seals and valves, permanent filter) and fragile parts like glass are excluded from the warranty.
- Damages which are not under responsibility of the manufacturer are not covered by the warranty. This is valid, especially for claims arising from improper use (e.g. operation with wrong type of current or voltage).
- The guarantee becomes void if repairs are carried out by third parties, who are not authorized by the manufacturer to do so and/or if spare parts are used other than the original ones.
- Failure to comply with any important safeguards listed in section 1 will void limited warranty.
- Commercial UL Rated: USA
- Household UL Rated: Canada
To make a warranty claim, do not return this appliance to the store. Please email or call 1-855-664-1252. For faster service, locate the model, type and series numbers on your appliance and have available for the call or website visit.
bonaVITA BV382510V User Manual – bonaVITA BV382510V User Manual –
[xyz-ips snippet=”download-snippet”]