BOSCH Gas SIR Corner Cover Kit Installation Guide
Safety Definitions
WARNING
This indicates that death or serious injuries may occur as a result of non- bservance of this warning.
CAUTION
This indicates that minor or moderate injuries may occur as a result of non-observance of this warning.
NOTICE: This indicates that damage to the appliance or property may occur as a result of non-compliance with this advisory.Note: This alerts you to important information and/or tips.
WARNING
If the information in this manual is not followed exactly, a fire or explosion may result causing property damage, personal injury or death.
Do not store or use combustible materials, gasoline or other flammable vapors and liquids in the vicinity of this or any other appliance.
WHAT TO DO IF YOU SMELL GAS
- Do not try to light any appliance.
- Do not touch any electrical switch.
- Do not use any phone in your building.
- Immediately call your gas supplier from a neighbor’s phone. Follow the gas supplier’s instructions.
- If you cannot reach your gas supplier, call the fire department.
Installation and service must be performed by a qualified installer, authorized service agency or the gas supplier.
IMPORTANT SAFETY INSTRUCTIONS
READ AND SAVE THESE INSTRUCTIONS
WARNING
- If the information in this manual is not followed exactly, property damage or personal injury may result.
- Read the instructions completely before attempting one of these procedures.
- Installation of Corner Covers requires access to the mounting screws on the sides of the range. If electrical or gas connections prevent access to the screws, contact a qualified technician before proceeding (see Figure 2: Rear trim side screw locations).
WARNING
- DO NOT block or obstruct the flow of air through the ventilation openings. The oven vents are located at the back of the range. The vents need to be unobstructed and open to provide necessary airflow for proper oven performance.
- DO NOT touch the oven vent area while the range is on and for several minutes after the range is off. Some parts of the vents and surrounding area become hot enough to cause burns. Allow range sufficient time to cool before touching or cleaning vent areas.
- DO NOT position plastic or other heat sensitive items on or near the oven vents. These items could melt or ignite.
Appliance Handling Safety
CAUTION
- The range is heavy and requires at least two persons or proper equipment to move.
- Hidden surfaces may have sharp edges. Use gloves and caution when reaching behind or under appliance.
Do not move the range using the oven door handle. You may wish to remove the oven door for easier handling. See the Installation Manual for your range for more information.
Turn power OFF at the service panel. Lock service panel to prevent power from being turned ON accidentally.
Refer to the data plate on your range for more information. See the Installation Manual for your range to find the data plate location.
WARNING
TIP OVER HAZARD!
A child or adult can tip the range over and be killed. Verify that the anti-tip bracket is securely installed. Ensure the anti-tip bracket is engaged whenever the range is moved to a new location.
Do not operate the range without the anti-tip bracket in place. Failure to follow the instructions in this manual can result in death or serious burns to children and adults.
Check for proper installation and use of the anti-tip bracket. Carefully tip the range forward pulling from the back to ensure that the anti-tip bracket engages the range leg and prevents tip-over. Range should not move more than 1” (25 mm).
NOTICE
Proper Handling Technique
To avoid risk of damage to the range oven door, do not lift, push, or pull the range by holding the door handle.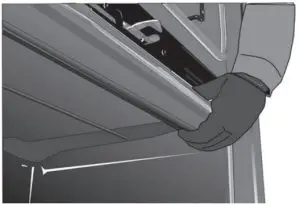
Note: It is recommended to wear gloves and long sleeves to protect hands and forearms from abrasion and potential scratches during the sliding process. It is also recommended to take off watches and jewelry and to wear work shoes during installation for foot protection.
Installation of 00634736 – Kit, Corner Covers, Gas
Tools Needed
- Torx T20 screwdriver
- gloves
- 1¼ wrench (if range height needs adjustment)
Preparation
IMPORTANT!If the range is already installed, can the range slide out enough to give access to the side screws of the rear trim? See Figure 1: Identify right and left corner covers and Figure 2: Rear trim side screw location.
- If the range is not yet installed or can slide out, continue to the Procedure.
- If the range is already installed and cannot slide out, contact a qualified service technician to disconnect the gas or electrical connections that prevent the range from being pulled out before continuing to the Procedure.
- Read the Tip Over Warning in the Safety section of this manual. Be aware of this when the range has been pulled out of the anti-tip bracket for corner cover installation.
report this adProcedure
- Confirm that the range surfaces and cooktop grates are cool enough to be comfortably touched.
- Identify which corner cover is to be attached to the left (A) and right (B) rear of the range. See Figure 1: Identify right and left corner covers.
 Figure 1: Identify right and left corner covers
 - Slide the range out enough to access the rear trim side mounting screws (see Figure 2: Rear trim side screw location). Read the Proper Handling Technique Notice in the Safety Section of this manual.
- Remove only the two side screws holding the rear trim (one on each side); see Figure 2: Rear trim side screw location. Save these screws to attach the corner covers. If there are no screws in these locations, screws are included in the kit for this purpose.Figure 2: Rear trim side screw location
- Insert the right corner piece as shown (see Figure 3: Right side corner cover placement, first step).Figure 3: Right side corner cover placement, first step
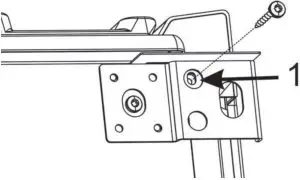
- Rotate the corner cover so that the corner cover is flat and the round hole in the corner cover aligns with hole 1 (see Figure 4: Right side corner cover placement, second step).Figure 4: Right side corner cover placement, second step
- . Insert screw (saved or from the kit) into hole 1 and lightly tighten (see Figure 5: Screw placement).Figure 5: Screw placement
- Press up on the corner cover at the arrow (see Figure 6: Tighten screw) while finishing the tightening of the screw.Figure 6: Tighten screw
- Repeat the previous steps 5 through 8 for the left side corner cover.
- If necessary, have a qualified service technician reattach electrical or gas connections.
- Slide the range back into position. If necessary, to avoid scratching the countertop, adjust the height of the range by adjusting the range feet (see Figure 7: Adjusting range height). Be sure to engage the anti-tip bracket. See the Tip Over Hazard Warning earlier in this instruction and also in the Gas Slide-In Range Installation Manual.Figure 7: Adjusting range height
 Figure 1: Identify right and left corner covers
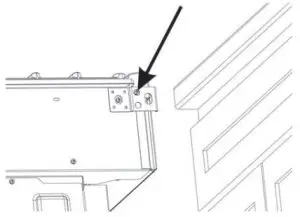 Figure 2: Rear trim side screw location
References
[xyz-ips snippet=”download-snippet”]