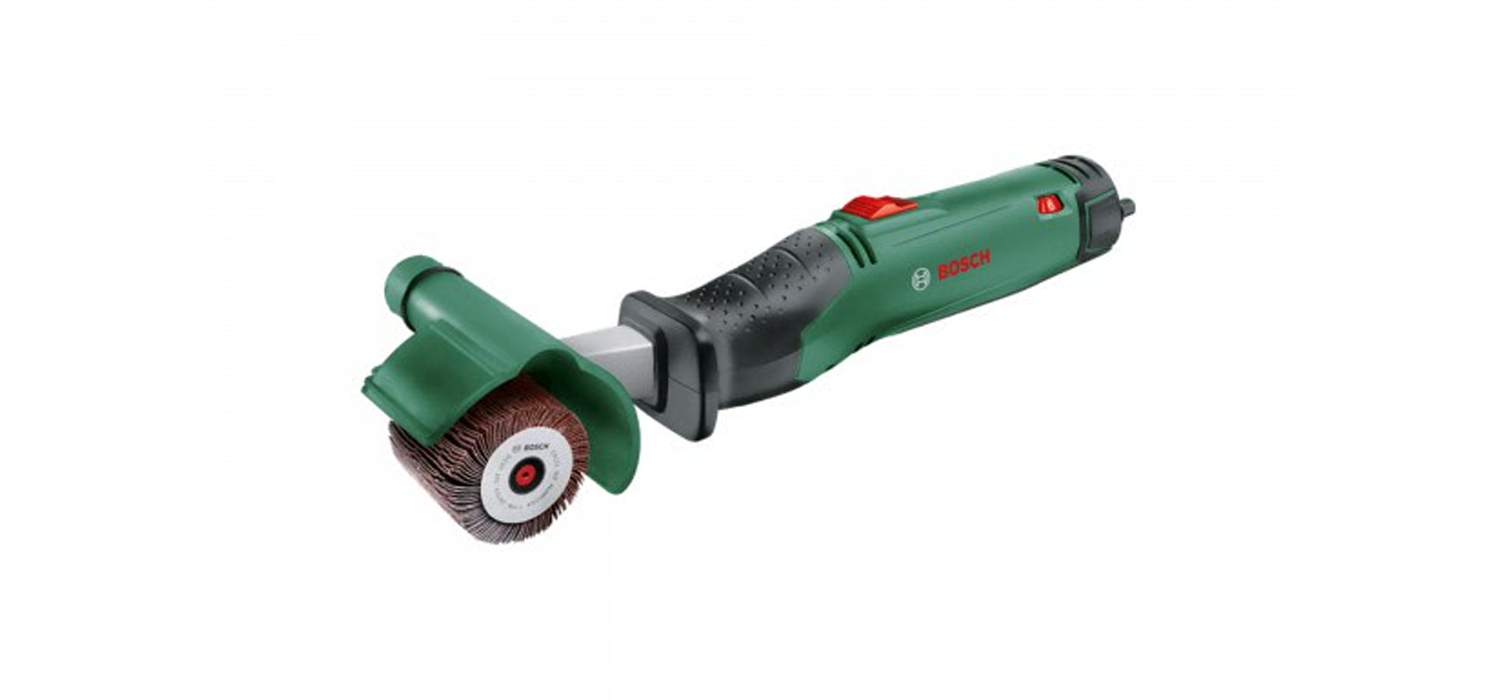
Texoro Robert Bosch Power Tools GmbHInstructions Manual
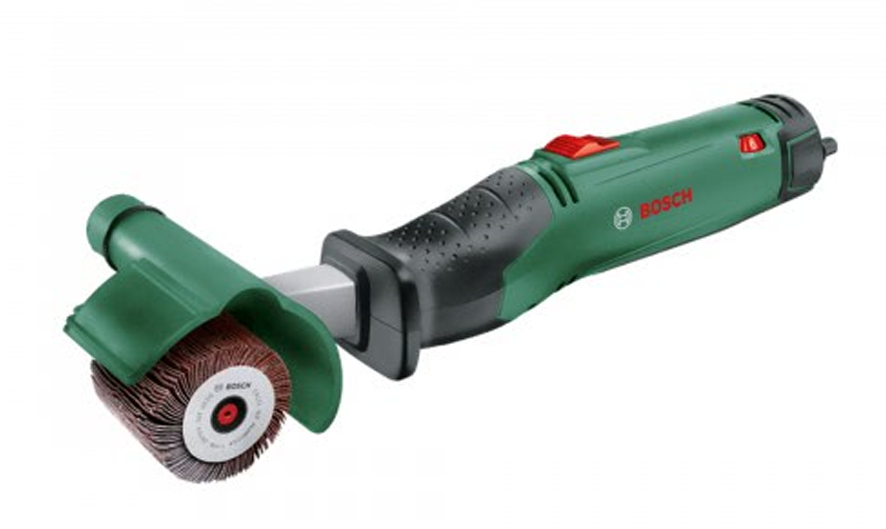
Diagram


Safety instructions
General Power Tool Safety Warnings
WARNING: Read all safety warnings, instructions, illustrations and specifications provided with this power tool. Failure to follow all instructions instructions listed below may result in electric shock, fire and/ or serious injury.
Save all warnings and instructions for future reference.The term “power tool” in the warnings refers to your mainsoperated(corded) power tool or battery-operated (cordless) power tool.
Work area safety
- Keep work area clean and well lit. Cluttered or dark areas invite accidents.
- Do not operate power tools in explosive atmospheres, such as in the presence of flammable liquids, gases or dust. Power tools create sparks which may ignite the dust or fumes.
- Keep children and bystanders away while operating a power tool. Distractions can cause you to lose control.
Electrical safety
- Power tool plugs must match the outlet. Never modify the plug in any way. Do not use any adapter plugs with earthed (grounded) power tools. Unmodified plugs and matching outlets will reduce risk of electric shock.
- Avoid body contact with earthed or grounded surfaces, such as pipes, radiators, ranges and refrigerators.There is an increased risk of electric shock if your body is earthed or grounded.
- Do not expose power tools to rain or wet conditions.Water entering a power tool will increase the risk of electric shock.
- Do not abuse the cord. Never use the cord for carrying, pulling or unplugging the power tool. Keep cord away from heat, oil, sharp edges or moving parts.Damaged or entangled cords increase the risk of electric shock.
- When operating a power tool outdoors, use an extension cord suitable for outdoor use. Use of a cord suitable for outdoor use reduces the risk of electric shock.
- If operating a power tool in a damp location is unavoidable, use a residual current device (RCD) protected supply. Use of an RCD reduces the risk of electric shock.
Personal safety
- Stay alert, watch what you are doing and use common ense when operating a power tool. Do not use a power tool while you are tired or under the influence of drugs, alcohol or medication. A moment of inattention while operating power tools may result in serious personal injury.
- Use personal protective equipment. Always wear eye protection. Protective equipment such as a dust mask, non-skid safety shoes, hard hat or hearing protection used for appropriate conditions will reduce personal injuries.
- Prevent unintentional starting. Ensure the switch is in the off-position before connecting to power source and/or battery pack, picking up or carrying the tool.Carrying power tools with your finger on the switch or en ergising power tools that have the switch on invites accidents.
- Remove any adjusting key or wrench before turningthe power tool on. A wrench or a key left attached to arotating part of the power tool may result in personal injury.
- Do not overreach. Keep proper footing and balance atall times. This enables better control of the power tool inunexpected situations.
- Dress properly. Do not wear loose clothing or jewellery.Keep your hair and clothing away from movingparts. Loose clothes, jewellery or long hair can be caughtin moving parts.
- If devices are provided for the connection of dust extractionand collection facilities, ensure these are connectedand properly used. Use of dust collection can reducedust-related hazards.
- Do not let familiarity gained from frequent use of toolsallow you to become complacent and ignore toolsafety principles. A careless action can cause severe injurywithin a fraction of a second.
Power tool use and care
- Do not force the power tool. Use the correct power tool for your application. The correct power tool will do the job better and safer at the rate for which it was designed.
- Do not use the power tool if the switch does not turn it on and off. Any power tool that cannot be controlled with the switch is dangerous and must be repaired.
- Disconnect the plug from the power source and/or removethe battery pack, if detachable, from the power tool before making any adjustments, changing accessories, or storing power tools. Such preventive safety measures reduce the risk of starting the power tool accidentally.
- Store idle power tools out of the reach of children and do not allow persons unfamiliar with the power tool or these instructions to operate the power tool. Power tools are dangerous in the hands of untrained users.
- Maintain power tools and accessories. Check for misalignment or binding of moving parts, breakage ofparts and any other condition that may affect the power tool’s operation. If damaged, have the powertool repaired before use. Many accidents are caused by poorly maintained power tools.
- Keep cutting tools sharp and clean. Properly maintained cutting tools with sharp cutting edges are less likely to bind and are easier to control.
- Use the power tool, accessories and tool bits etc. in accordance with these instructions, taking into account the working conditions and the work to be performed.Use of the power tool for operations different from those intended could result in a hazardous situation.
- Keep handles and grasping surfaces dry, clean and free from oil and grease. Slippery handles and grasping surfaces do not allow for safe handling and control of the tool in unexpected situations.
Service
- Have your power tool serviced by a qualified repair person using only identical replacement parts. This will ensure that the safety of the power tool is maintained.Safety Warnings for Sanding Roller Safety Warnings common for Sanding or Wire Brushing Hold the power tool by insulated gripping surfaces, because the sanding surface may contact its own cord. Cutting a “live” wire may make exposed metal parts of the power tool “live” and could give the operator an electric shock.
- This power tool is intended to function as a sander or wire brush. Read all safety warnings, instructions, illustrations and specifications provided with this power tool. Failure to follow all instructions listed below may result in electric shock, fire and/or serious injury.
- Operations such as polishing or cutting-off are not recommended to be performed with this power tool. Operations for which the power tool was not designed may create a hazard and cause personal injury.
- Do not use accessories which are not specifically designed and recommended by the tool manufacturer.Just because the accessory can be attached to your power tool, it does not assure safe operation.
- The rated speed of the accessory must be at least equal to the maximum speed marked on the power tool. Accessories running faster than their rated speed can break and fly apart.
- The outside diameter and the thickness of your accessory must be within the capacity rating of your power tool. Incorrectly sized accessories cannot be adequately guarded or controlled.
- Threaded mounting of accessories must match the grinder spindle thread. For accessories mounted by flanges, the arbour hole of the accessory must fit the locating diameter of the flange. Accessories that do not match the mounting hardware of the power tool will run out of balance, vibrate excessively and may cause loss of control.
- Do not use a damaged accessory. Before each use inspect the accessory such as abrasive wheels for chips and cracks, backing pad for cracks, tear or excess wear, wire brush for loose or cracked wires. If power tool or accessory is dropped, inspect for damage or install an undamaged accessory. After inspecting and installing an accessory, position yourself and bystanders away from the plane of the rotating accessory and run the power tool at maximum no load speed for one minute. Damaged accessories will normally break apart during this test time.
- Wear personal protective equipment. Depending on application, use face shield, safety goggles or safety glasses. As appropriate, wear dust mask, hearing pro-ping small abrasive or workpiece fragments. The eye protection must be capable of stopping flying debris generated by various operations . The dust mask or respirator must be capable of filtrating particles generated by your operation. Prolonged exposure to high intensity noise may cause hearing loss.
- Keep bystanders a safe distance away from work area.Anyone entering the work area must wear personal protective equipment. Fragments of workpiece or of a broken accessory may fly away and cause injury beyond immediate area of operation.
- Never lay the power tool down until the accessory has come to a complete stop. The spinning accessory may grab the surface and pull the power tool out of your control.
- Do not run the power tool while carrying it at your side. Accidental contact with the spinning accessory could snag your clothing, pulling the accessory into your body.
- Regularly clean the power tool’s air vents. The motor’s fan will draw the dust inside the housing and excessive accumulation of powdered metal may cause electrical hazards.
- Do not operate the power tool near flammable materials.Sparks could ignite these materials.
- Do not use accessories that require liquid coolants.Using water or other liquid coolants may result in electrocution or shock.
- Position the cord clear of the spinning accessory. If you lose control, the cord may be cut or snagged and your hand or arm may be pulled into the spinning accessory.Safety Warnings specific for Wire Brushing operations u Be aware that wire bristles are thrown by the brush even during ordinary operation. Do not overstress the wires by applying excessive load to the brush The wire bristles can easily penetrate light clothing and/or skin.
- If the use of a guard is recommended for wire brushing, do not allow any interference of the wire wheel or brush with the guard. Wire wheel or brush may expand in diameter due to work load and centrifugal forces.
Additional safety warnings Wear safety goggles.
- Wear protective gloves.
- Switch the power tool off when the power supply is interrupted, e.g. as a result of a power cut or the mainsplug being pulled. This prevents uncontrolled restarting.
- Only use the power tool for dry sanding. Water entering a power tool will increase the risk of electric shock.
- Switch the power tool on before making contact with the workpiece and only switch the power tool off after you have removed it from the workpiece. The power tool can move suddenly.
- Never touch the grinding tool when it is running. This poses a risk of injury.
- Ensure that no persons are at risk due to flying sparks.Remove combustible materials from the surrounding area. Flying sparks are created when sanding metals.
- Do not use any worn, torn or severely clogged sanding belts. Damaged sanding belts can tear, fly off and injure someone.
- Clean the air vents on your power tool regularly. The motor’s fan will draw the dust inside the housing and excessive accumulation of powdered metal may cause electrical hazards.
- Secure the workpiece. A workpiece clamped with clamping devices or in a vice is held more secure than by hand.
- Always wait until the power tool has come to a complete stop before placing it down. The application tool can jam and cause you to lose control of the power tool.
- Warning: Danger of fire! Avoid overheating the workpiece and the sander. Always empty the dust collector before taking a break from work. Sanding dust in the dust bag, microfilter, paper bag (or in the filter bag or vacuum cleaner filter) can spontaneously combust under certain conditions, for example if flying sparks are created when sanding metals. This risk is increased if the sanding dust is mixed with paint or polyurethane residue or with other chemical substances and if the workpiece is hot as a result of prolonged work.
Products sold in GB only:
Your product is fitted with an BS 1363/A approved electric plug with internal fuse (ASTA approved to BS 1362).If the plug is not suitable for your socket outlets, it should be cut off and an appropriate plug fitted in its place by an authorised customer service agent. The replacement plug should have the same fuse rating as the original plug.The severed plug must be disposed of to avoid a possible shock hazard and should never be inserted into a mains socket elsewhere.
Product Description and Specifications
Read all the safety and general instructions.Failure to observe the safety and general instructions may result in electric shock, fire and/or serious injury.
Please observe the illustrations at the beginning of this operating manual.
Intended Use
The power tool is intended for sanding and brushing wood, plastic, metal, filler (e.g. plaster) and varnished surfaces without the use of water. It is especially suitable for sanding uneven surfaces.
Product Features
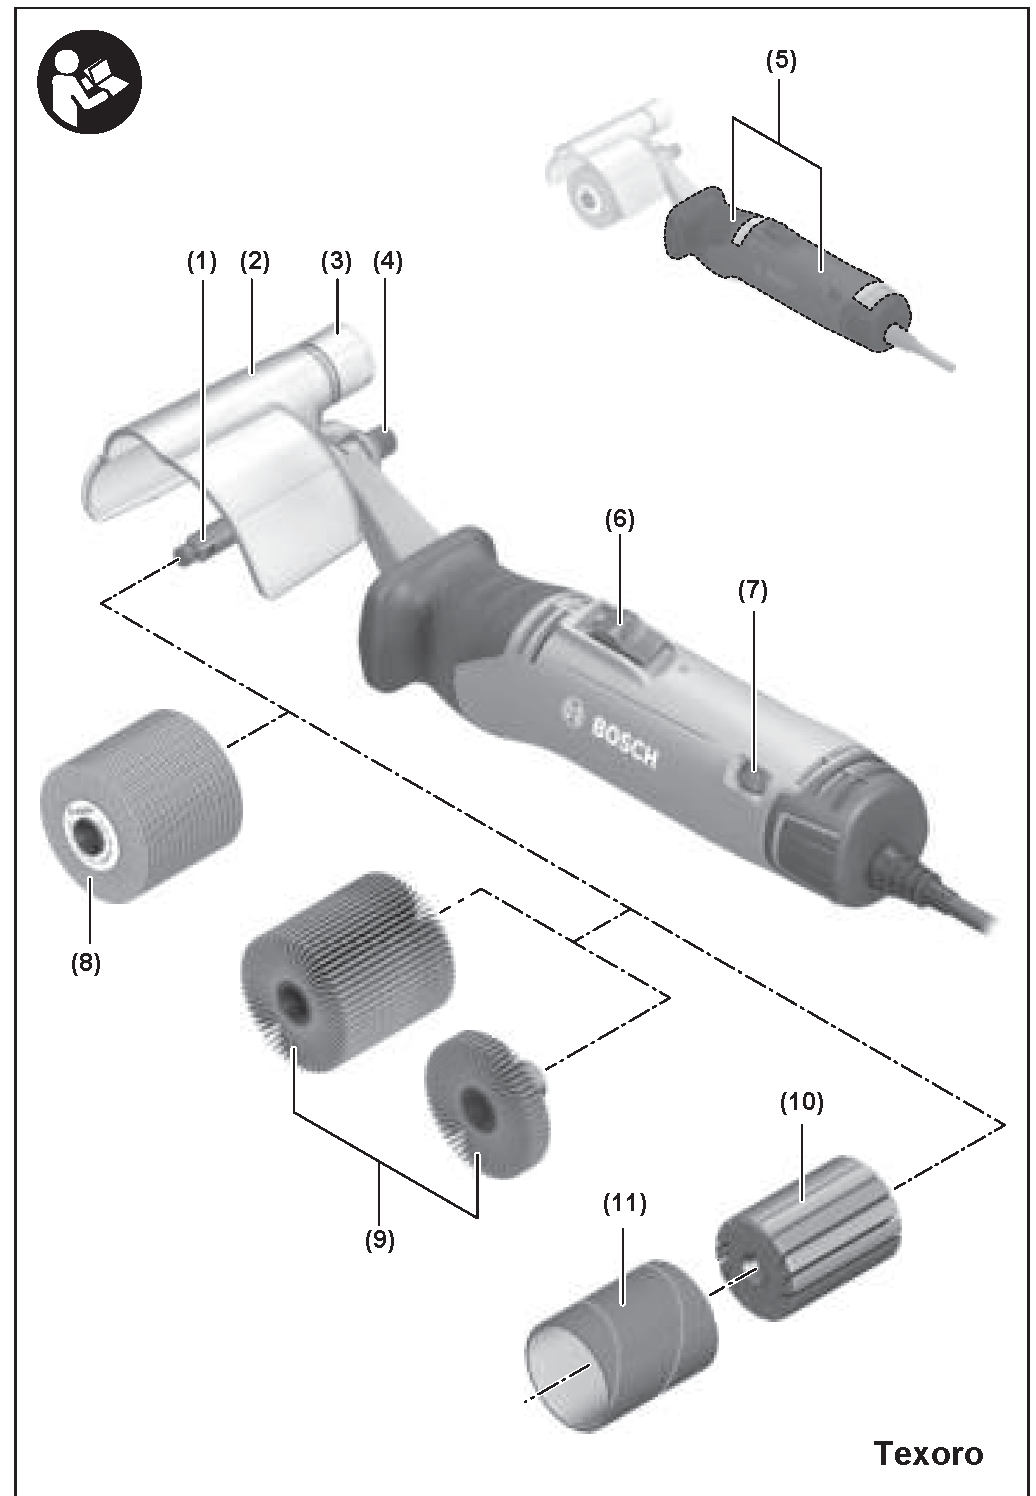
The numbering of the product features refers to the diagram of the power tool on the graphics page.
- Grinding spindle
- Dust extraction guard
- Extraction outlet
- Clamping screw for mounting dust extraction guard
- Handle (insulated gripping surface)
- On/off switch
- Speed preselection thumbwheel
- Flexible wheel
- Flap wheels
- Shank for sanding sleevea)
- Sanding sleevea)
- SDS mount
- SDS mounting spring
- SDS actuator button for unlocking the abrasive tool
- Tool arm
- Fastening groove of the dust extraction guard
- Latching grooves
- Extraction hose
- Dust extraction adapter (dia. 19 mm)
Accessories shown or described are not included with the product as standard. You can find the complete selection of accessories in our accessories range.
Technical Data
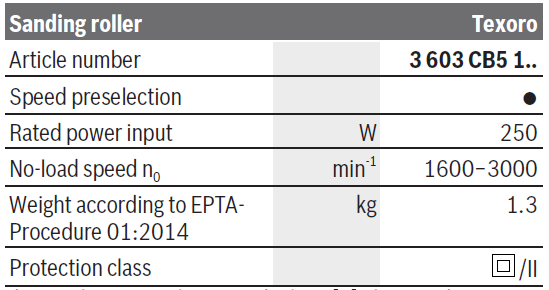
The specifications apply to a rated voltage [U] of 230 V. These specifications may vary at different voltages and in country-specific models.
Noise/Vibration InformationNoise emission values determined according to
EN 62841-2-4.Typically, the A-weighted noise level of the power tool is:Sound pressure level 79 dB(A); sound power level 90 dB(A). Uncertainty K = 3 dB.
Wear hearing protectionTotal vibration values ah (triax vector sum) and uncertainty K determined according to EN 62841-2-4:Sanding with sanding sleeve: ah = 3.5 m/s2, K = 1.5 m/s2, Sanding with flap wheel (60 mm): ah = 2.5 m/s2,K = 1.5 m/s2, Sanding with flap wheel (10 mm): ah = 3 m/s2, K = 1.5 m/s2, Working with wire brush: ah = 6 m/s2, K = 1.5 m/s2.
The vibration level and noise emission value given in these instructions have been measured in accordance with a standardized measuring procedure and may be used to compare power tools. They may also be used for a preliminary estimation of vibration and noise emissions.
The stated vibration level and noise emission value represent the main applications of the power tool. However, if the power tool is used for other applications, with different application tools or is poorly maintained, the vibration level and noise emission value may differ. This may significantly increase the vibration and noise emissions over the total working period.
To estimate vibration and noise emissions accurately, the times when the tool is switched off or when it is running but not actually being used should also be taken into account.This may significantly reduce vibration and noise emissions over the total working period.
Implement additional safety measures to protect the operator from the effects of vibration, such as servicing the power tool and application tools, keeping their hands warm, and organizing workflows correctly.
Assembly
- Pull the plug out of the socket before carrying out any work on the power tool.
Changing the abrasive tools
You can use the SDS mount (12) on the grinding spindle (1) to easily and conveniently change the abrasive tool without using additional tools.
The Autolock system locks the grinding spindle when the power tool is switched off. It is better to attach or remove abrasive tools when the grinding spindle is fixed in place.
Flexible rollers (8), flap wheels (9) and wire brushes can be attached directly to the grinding spindle (1).
For sanding sleeves (11), the shank (10) must first be attached to the grinding spindle (1). The sanding sleeve (11) can then be twisted onto the shank (10).
Fitting the abrasive tools (see figure A)
- Hold the abrasive tool so that the SDS mounting springs (13) are pointing away from the grinding spindle (1).
- Slide the abrasive tool onto the grinding spindle (1) in a turning motion until you hear it engage.
- Check that it is locked by pulling on the abrasive tool.
Fitting the sanding sleeves (see figure B1 − B2)
- Hold the shank (10) so that the SDS mounting springs (13) are pointing away from the grinding spindle (1).
- Slide the shank (10) onto the grinding spindle (1) in a turning motion until you hear it engage.
- Check that it is locked by pulling on the shank.
- Wind the sanding sleeve (11) over the shank (10) until the rubber flaps are completely covered.
Removing the abrasive tool (see figures C1−C2)
- Press the SDS actuator button (14) to unlock it and pull the abrasive tool off the grinding spindle (1).
Dust extraction guard
Note: When working with wire brushes, always use the dust extraction guard provided.
Fitting the dust extraction guard (see figure D)
- Push the dust extraction guard (2) all the way into the two fastening grooves (16) of the tool arm (15); note that some light resistance will be felt.
- Tighten the clamping screw (4).The dust extraction guard is now firmly mounted on the tool arm.
Adjusting the dust extraction guard (see figure E)
Adjust the dust extraction guard (2) so that dust or sparks are not directed towards the operator.The dust extraction guard (2) can cover the grinding spindle at various angles. This is done using the latchinggrooves (17).
- Once it has been mounted, turn the dust extraction guard (2) to suit the application and the workpiece shape.
The dust extraction guard locks into three positions.
Dust/Chip Extraction
The dust from materials such as lead paint, some types of wood, minerals and metal can be harmful to human health.
Touching or breathing in this dust can trigger allergic reactions and/or cause respiratory illnesses in the user or in people in the near vicinity.
Certain dusts, such as oak or beech dust, are classified as carcinogenic, especially in conjunction with wood treatment additives (chromate, wood preservative). Materials containing asbestos may only be machined by specialists.
- Use a dust extraction system that is suitable for the material wherever possible.
- Provide good ventilation at the workplace.
- It is advisable to wear a P2 filter class breathing mask.
The regulations on the material being machined that apply in the country of use must be observed.
Avoid dust accumulation at the workplace. Dust can easily ignite.
External dust extraction (see figure F)
- Connect an extraction hose (18) with a suitable dust extraction adapter (19) (diameter 19 mm) via the extraction outlet (3). Connect the extraction hose to a dust extractor (accessory).
You will find an overview of how to connect to various dust extractors at the end of these operating instructions.
The dust extractor must be suitable for the material being worked.
When extracting dust that is dry, especially detrimental to health or carcinogenic, use a special dust extractor.
Operation
- Pull the plug out of the socket before carrying out any work on the power tool.
- Hold the power tool firmly with both hands and make sure you have a stable footing. The power tool can be more securely guided with both hands.
Starting Operation
- Pay attention to the mains voltage. The voltage of the power source must match the voltage specified on the rating plate of the power tool.
- Products that are only sold in AUS and NZ: Use a residual current device (RCD) with a nominal residual current of 30 mA or less.
Switching On and Off
- To start the power tool, slide the on/off switch (6) forwards.
- To lock the on/off switch (6) in position, push the on/off switch (6) forwards until it clicks into place.
- To switch off the power tool, release the on/off switch (6); or, if the switch is locked, briefly press the on/off switch (6) backwards and down and then release it.
Always check abrasive tools before using them. The abrasive tool must be fitted properly and be able to move freely. Carry out a test run for at least one minute with no load. Do not use abrasive tools that are damaged, run untrue or vibrate during use. Damaged abrasive tools can burst apart and cause injuries.
Selecting the abrasive tool
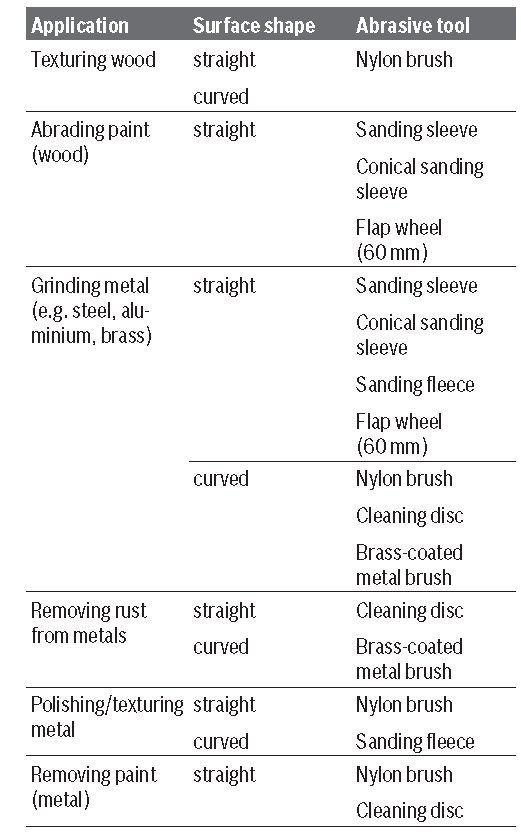
Choose the abrasive tool based on the surface shape and material you want to sand. Select an appropriate grit for the required material removal rate.

Working Advice
The material removal rate and surface quality are primarily determined by the choice of abrasive tool, the pre-selected speed setting and the contact pressure.Only immaculate abrasive tools will deliver good grinding performance and protect the power tool.Use only original Bosch-sanding accessories.
Preselecting the speed
You can preselect the required speed using the thumbwheel for speed preselection (7), even during operation.If the final setting of “6” is reached, the thumbwheel audibly engages.1 − 2 low speed3 − 4 medium speed5 − 6 high speedThe required speed depends on the material and the working conditions; it can be ascertained through practical tests.The figures in the table below are recommended values.

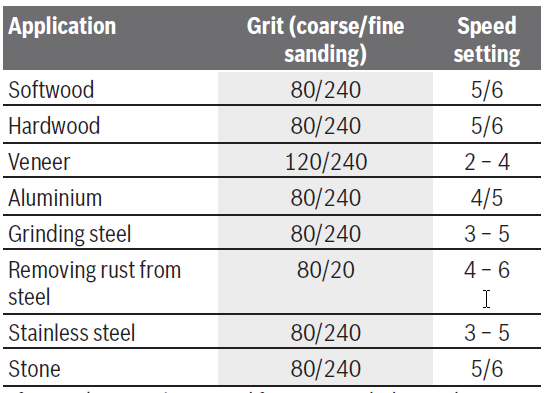
After working at a low speed for an extended period, you should operate the power tool at the maximum speed without load for approx. three minutes to cool it down.
Sanding
- Switch the power tool on, place the entire sanding surface against the surface of the workpiece and apply moderate pressure as you move the sander over the workpiece.
- Be sure to apply consistent contact pressure, in order to increase the service life of the abrasive tools. An excessive increase of the sanding pressure does not lead to an increase of the sanding capacity, but to increased wear of the power tool and the abrasive tool.
- Do not use an abrasive tool for other materials after it has been used to work on metal.
Maintenance and Service
Maintenance and Cleaning
- Pull the plug out of the socket before carrying out any work on the power tool.
- To ensure safe and efficient operation, always keep the power tool and the ventilation slots clean.
In order to avoid safety hazards, if the power supply cord needs to be replaced, this must be done by Bosch or by an after-sales service centre that is authorised to repair Bosch power tools.
After-Sales Service and Application Service
Our after-sales service responds to your questions concerning maintenance and repair of your product as well as spare parts. You can find explosion drawings and information on spare parts at: www.bosch-pt.comThe Bosch product use advice team will be happy to help you with any questions about our products and their accessories.In all correspondence and spare parts orders, please always include the 10‑digit article number given on the nameplate of the product.
Great BritainRobert Bosch Ltd. (B.S.C.)P.O. Box 98
References
Bosch elektromos kéziszerszámok | Bosch elektromos kéziszerszámok
Elektrické nářadí Bosch | Elektrické nářadí Bosch
Scule electrice Bosch | Scule electrice Bosch
Loading…
Početna | Bosch u Hrvatskoj
Ana Sayfa | Bosch Türkiye
Domov | Bosch v Sloveniji
bosch-pt.ru
ÐлекÑÑоинÑÑÑÑменÑÑ Bosch | Bosch Professional
Bosch-sähkötyökalut | Bosch-sähkötyökalut
Електроинструменти на Bosch | Електроинструменти на Bosch
Ηλεκτρικά εργαλεία Bosch | Ηλεκτρικά εργαλεία Bosch
Elektronarzędzia Bosch | Elektronarzędzia Bosch
My Blog
Invented for life | Bosch Global
ÐлекÑÑоÑнÑÑÑÑменÑи Bosch | Bosch Professional
Bosch el-værktøj | Bosch el-værktøj
Select your country | Bosch Power Tools
Invented for life | Bosch Global
Elektrické náradie Bosch | Elektrické náradie Bosch
Bosch Power Tools | Bosch Power Tools
Početna strana | Bosch u Srbiji
Outillage électroportatif Bosch | Outillage électroportatif Bosch
Service worldwide
Skånevik Ølen Kraftlag AS
Bosch Elektrowerkzeuge und Zubehör | Bosch Elektrowerkzeuge
Bosch električni alati | Bosch električni alati
[xyz-ips snippet=”download-snippet”]

