BOSS Audio Systems
Please read all instructions carefully before using
Thank you for purchasing a Boss Audio Systems product. If you are not totally satisfied, please give us a call at 805-751-4853 or visit our customer service at bossaudio.com/support.
Introduction
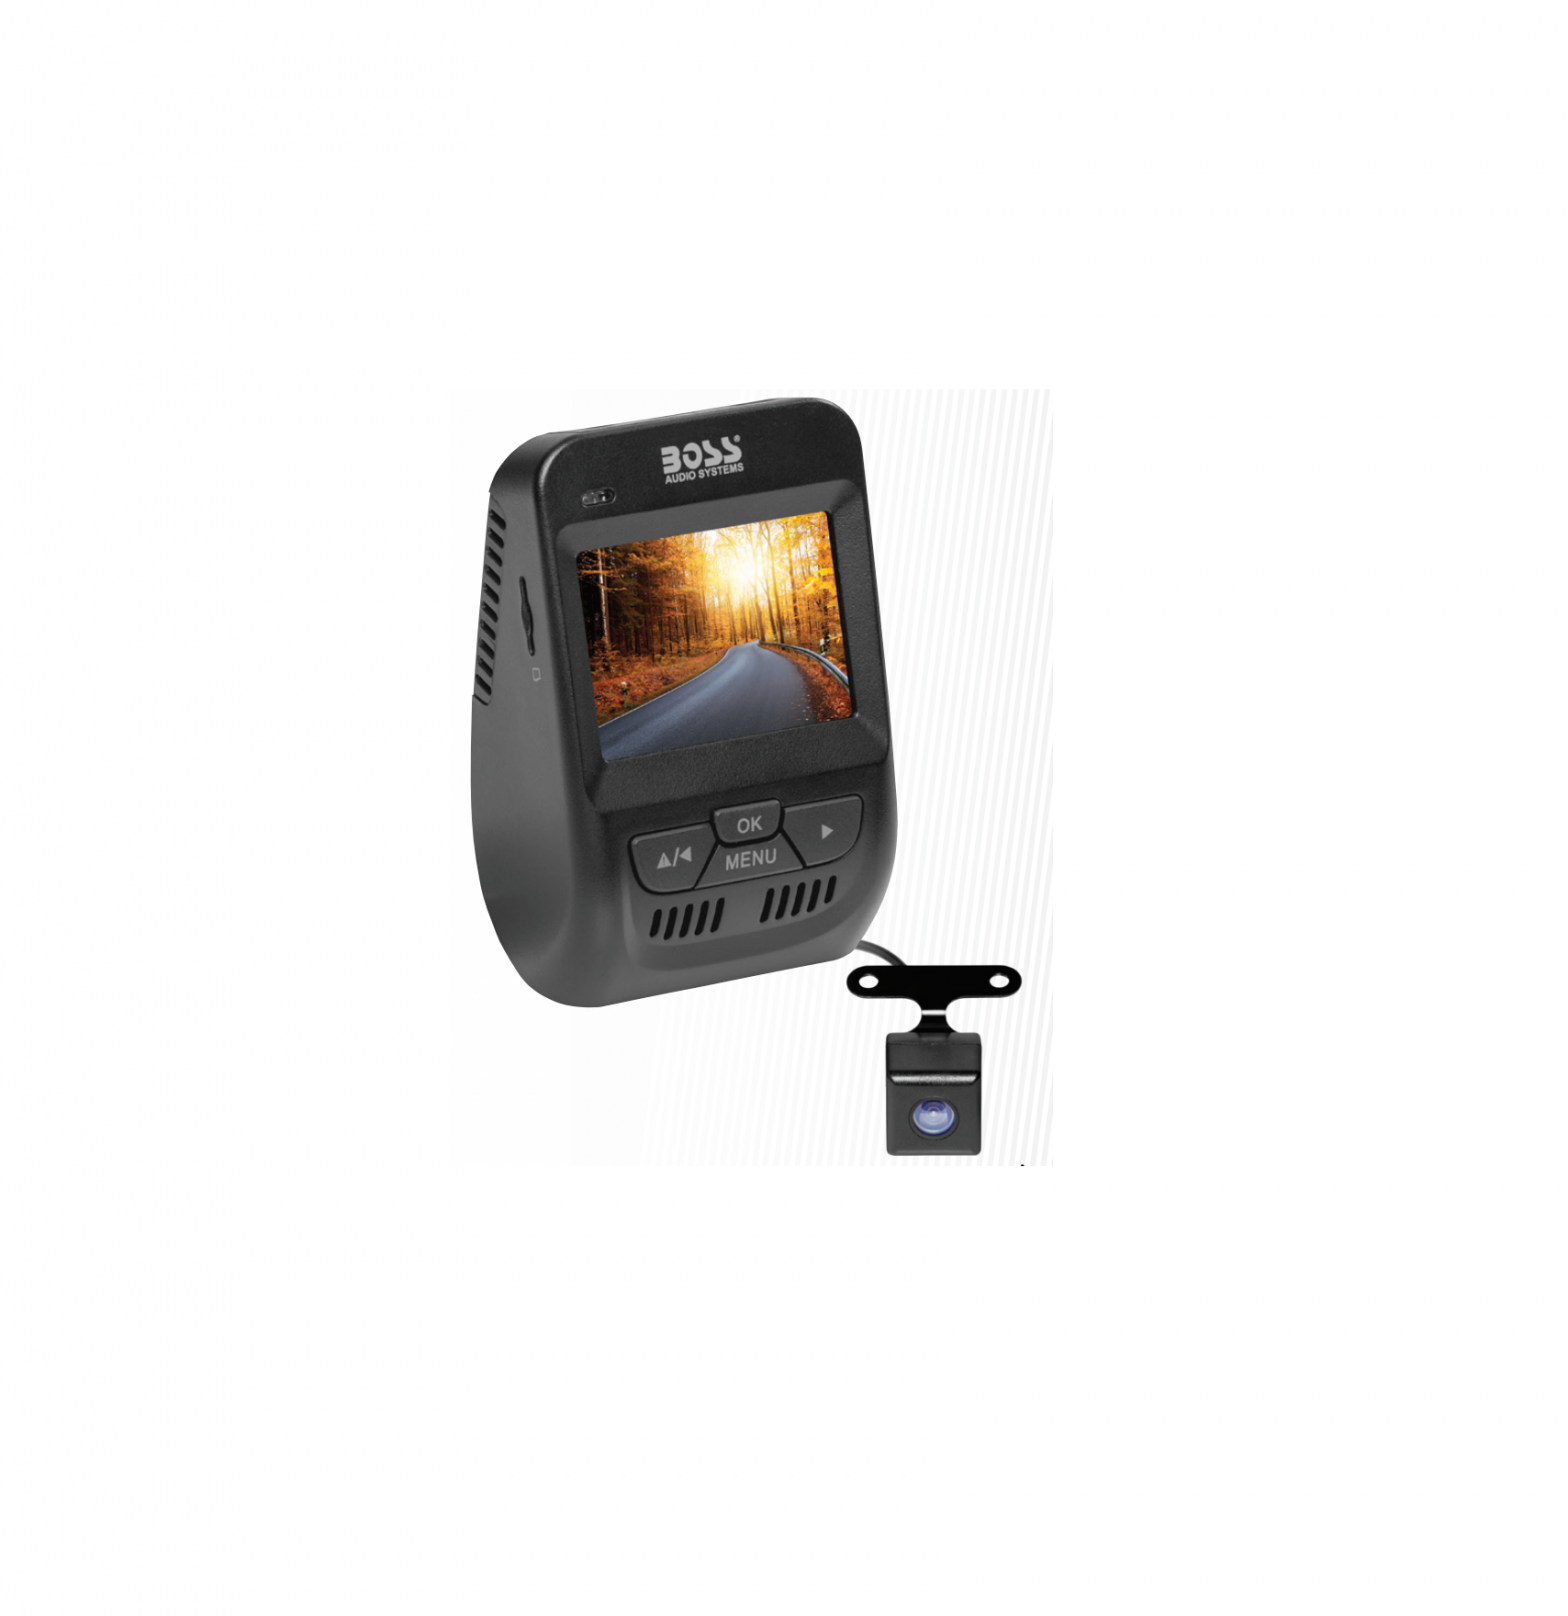
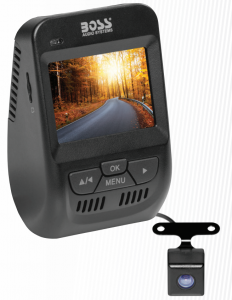
What’s in the box?
- 3M Adhesive x 2
- Cable Clip
- Car Charger
- User Manual
- Rear Camera
- 16GB Micro SD Card

Before You Start
Tips:
- Clean windshield before mounting.
- Preview the image before mounting. (ideally behind the rear view mirror)
- Make sure there is no glare in the picture before mounting.
- Do not block the view of the road or impede the deployment of any airbags in case the event of an accident.
- For best quality make sure the windshield is clean and the lens is periodically cleaned with a soft damp cloth that will not scratch the lens.
- Reduce the amount of sky in the picture. Too much sky will darken the road due to the automatic exposure compensation.
- Do not adjust controls while driving.
- Always use the original car charger and power cable provided. Using any other power adapter will damage the product.
- Some vehicles keep supplying power even when turned off. Please manually turn off the dash cam or pull out the car charger to protect the product when the car is not on.
- View footage after a couple power cycles to ensure footage is captured as preferred (automatically record when powering on, loop, etc).
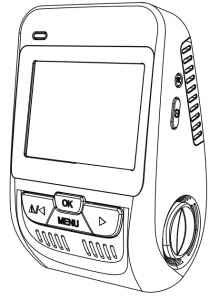
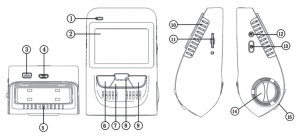
Product Overview
- Status Indicator
- Display
- Rear Camera Port
- Micro USB Port
- Mic
- Up Button / Audio Switch
- Mode Button
- OK Button
- Down Button / Front / Rear Camera Switch
- Heat Dissipation Hole
- Micro SD Card
- Reset Button
- Power ON/OFF
- Lens Knob
- Lens
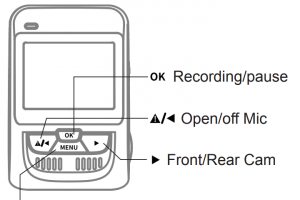
Descriptiona. UP button: short press to lock recording mode.b. MENU button:In non-recording mode: short press to enter setup menu; long press to switch among snapshot mode, playback mode, and recording mode.In recording mode: short press to turn on/off video sound.c. Down button: short press to lock recording mode.
 Tips:
Tips:
- Emergency recording: Video will be automatically locked when colliding
- Screen Off: The Screen will keep recording unless you remove the car charger
- Recording/Pause: When power on, it is recording, short press the “ok” it will pause, short press “ok” it will start recording again
- Indicator Definitiona. Slow Flash: recordingb. No Light: power off / in non-recording modec. Fast Flash: system is abnormal
Specifications
| Sensor | SONY IMX323 |
| Lens | F2.0 aperture, 150° wide angle, 6-layer glasses |
| Image sensor | Wide dynamic 1/2.9 inch 2.1 million pixel COMS |
| Video resolution | Full HD (1920*1080P/30fps); VGA |
| Pixel | 2.4-inch TFT LCD screen |
| Memory card | Support up to 32GB Micro SD Card |
| White balance | Automatic sunny/cloudy/incandescent/carbon light |
| Video format | H.264, MOV file |
| Image format | JEPG |
| Working temperature | -20℃~+70℃ |
| Storage temperature | -30℃~+85℃ |
| Input | 5V/1.5A(max) |
| Material | ABS |
| Dimension | 96.5*65.5*53mm |
| Weight | 97.3g |
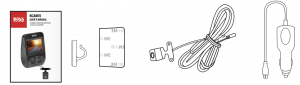
How to install
- Install Dash CamRemove the protective sticker from the 3M mount and attach it to the center of the static sticker* Please push the bracket to make sure it is securely mounted on the static sticker.
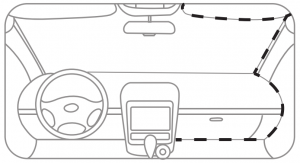
- Power SupplyRun the power cable in your car as shown by the dotted line in the picture. Plug the car charger into the cigarette lighter for the power supply.* The cigarette lighter position may vary for different vehicles, so please use the picture below for reference only.

How to Use
- Adjust AngleAdjust the camera angle to ensure it is facing the front of the car when powered on.
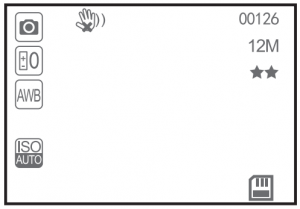
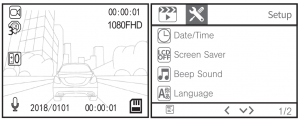
- Recording Screen Overview Recording standby status Recording Loop recording Exposure compensation Microphone on/off Micro SD CardWhen the product is powered on, the flashing red icon indicates that it is in recording mode.
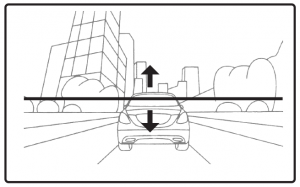
- Emergency recordingThe “G-sensor” must be turned on in settings in order to use this function.It detects possible accidents or collisions automatically and locks the video in the “RO” folder.Due to the complexity of road conditions while driving, you may not find emergency videos in the “RO” folder. Please check the normal video folder.?The gravity sensing level can be adjusted as shown below.
- SnapshotIn recording mode, press the “OK” button to stop and press “Menu” for 2 seconds to get into snapshot mode. In snapshot mode, press “OK” to take pictures and save automatically
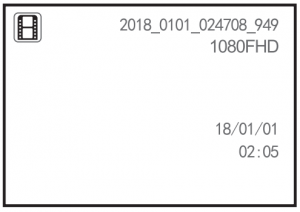
- Viewing Videos & PhotosIn recording mode, press the “OK” button to stop. Press and hold “Menu” twice to get into the playback interface. Press the “Up” or “Down” button to select playback video files or photos and press “OK” to playback/pause the selected video file. Press the “Down” button to return to the preview interface.
- Settings“MENU” button 一 “Settings”In system settings, set up screen off time, system time, Micro SD Card, etc. The specific settings may vary based on the camera’s system version.
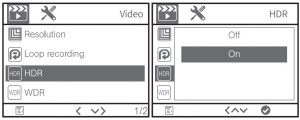
- HDRWhen set to “ON”, the screen will adjust the brightness automatically.
- WDRWhen set to “ON” the picture taken will be clearer at night.
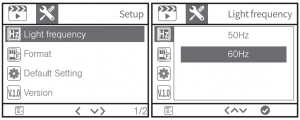
- Light FrequencyPlease set according to local grid frequency to avoid screen flicker effectively.
- Press the “MENU” button twice to switch to the device settings page.
- Micro SD CardThis device supports a standard Class 10 and above Micro SD Card with 8GB to 32GB capacity. After inserting the Micro SD Card, please format it for better compatibility or there may be a “read card error or not formatted phenomenon”.
 When the product is powered on, the flashing red icon indicates that it is in recording mode.
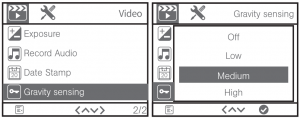


Storage Usage
|
Video type |
8GB | 16GB |
32GB |
|
1080P/30FPS |
about 80 mins | about 160 mins |
about 320 mins |
|
720P/30FPS |
about 130 mins | about 260 mins |
about 520 mins |
*Note: the above data is for reference only
Loop Recording: The recorder will record over earlier video records when the Micro SD card is full. Please backup important videos.Multiple loops may cause damage or age the Micro SD card. If this happens please replace the card with a new one.Please buy a genuine Micro SD card from a legitimate source. We are not responsible for any video loss or damage due to the use of an unqualified memory card.Please format a new Micro SD Card before use for a better user experience.Do not insert or extract the Micro SD Card while the power is on.
Troubleshooting
| Problem | Possible Cause & Solution | |
| Installing Process | High temperature glue insecure | Paste it in the center |
| Power On | Cannot turn on | Please check power supply If it connects to power supply properly, please restart |
| Auto Restart | Please use original accessories, and try to re-insert car charger | |
| Screen Off | Please check power supply, and try to re-insert car charger. | |
| Running Process | Does not start recording when power is on | Please use proper Micro SD Card and format it before use |
| Abnormal termination during recording process | Please format Micro SD Card or replace Micro SD Card | |
| Poor image quality | Make sure there is no dirt on the front windshield of the car, and no blockage on the cam lens. | |
| No sound | Please turn on Mic on settings | |
| Video damaged | Please use proper Micro SD Card | |
| System time error | Please reset system time in “settings” | |
| No response | Press “RESET” to restart dash cam. |
Rear camera function:
- Rear detection: When the backup camera is plugged in, the screen automatically switches to the two-way display and both video frames will work normally.
- Display switching between front and rear cameras: press “ ” to switch to single-screen display during video recording.
- Video files on PC: the last letter of the front camera is “A” and the last letter of the rear camera is “B”.
- Video files on machine: File name 001 is for the front camera (also shows as HFD) and File name 002 is for the rear camera.
Precautions
- This product is a driving assistance product that cannot ensure driving safety.
- Some functions of the product may be unable to work properly due to vehicle conditions, driving style, driving environment or others. This product does not guarantee to save all videos in all situations. The recorded videos are for reference only.
- Please install the product correctly. Do not block driver’s view or the airbag.
- Please take off the protective film on the camera lens upon first use. Please keep the lens clean.
- Please keep the product away from strong magnetic fields.
- Please do not insert or extract the Micro SD Card while the camera is running.
- This product supports a Class 10 Micro SD Card with 8GB to 32GB capacity.Please format it before use.
- The product can detect possible accident and collisions automatically andwill save the records. But it cannot guarantee to record all accident images.Slight collision cannot start the G-sensor, so the image may not be recorded in a dedicated folder.
- Please press RESET to restart if the product will not work.
- The normal operating temperature of the dash camera is -20℃ to 70 ℃.
- Please reset system time when it is not in use for a period of time.
- Do not violently impact or vibrate the product.
- Do not dismantle or repair it without authorization.
- The product is an in-car gadget, so do not use it in a rainy or humid environment.
- Do not spray water directly inside the car, avoid contact with chemicals or cleaning agents, which may damage the product.
- Please use this product within the scope of the law.
BOSS Audio Systems3451 Lunar Court• Oxnard, CA 93030www.bossaudio.com800-999-1236 US Toll-free805-751-4853 Customer ServiceTech Support: www.bossaudio.com/support

[xyz-ips snippet=”download-snippet”]