Boss Loop Station Owner’s Manual
Installing the Batteries
Install four alkaline batteries (AA, LR6) in the battery compartment located on the bottom of the unit.
- When turning the unit over, be careful so as to protect the buttons and knobs from damage. Also, handle the unitcarefully; do not drop it.
- If you handle batteries improperly, you risk explosion and fluid leakage. Make sure that you carefully observe all ofthe items related to batteries that are listed in “USING THE UNIT SAFELY” and “IMPORTANT NOTES” (separate sheet “USING THE UNIT SAFELY” and owner’s manual.
- “BATTERY LOW” will appear on the display if the batteries are low. Replace them with new ones.
Attaching the Rubber FeetYou can attach the rubber feet (included) if necessary. Attach them in the locations shown in the illustration.
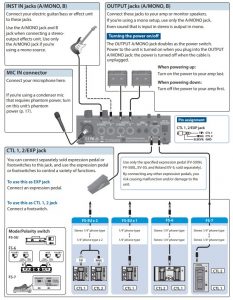
Connecting the Equipment
- To prevent malfunction and equipment failure, always turn down the volume, and turn off all the units before making any connections.
- Before turning the unit on/off, always be sure to turn the volume down. Even with the volume turned down, you might hear some sound when switching the unit on/off. However, this is normal and does not indicate a malfunction.
Connecting the Equipment
Top Panel
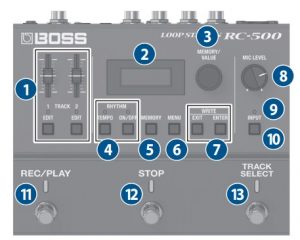
Name / Explanation
| 1. TRACK 1, 2 | |
| [TRACK 1],[TRACK 2] sliders | Adjust the playback levels of tracks 1 and 2 |
| TRACK 1, 2 indicators | Indicate the status of the tracks. |
| Lit blue | No phrase |
| Lit red | Recording |
| Lit green | Playing |
| Lit Yellow | Overdubbing |
| Lit White | Phrase exists |
| Blink | Currently selected track (current track) |
| TRACK 1, 2 [EDIT] buttons | Press to make track settings. Press a button twice to switch the current track. |
| 2. Display | |
| Shows various information of the RC-500. During recording/playback/overdubbing, the color of the screen changes according to the status. | |
| Lit blue | No phrase |
| Lit Red | Recording |
| Lit Green | Playing |
| Lit Yellow | Overdubbing |
| Lit White | Phrase Exits |
| 3. [Memory/Value] knob | |
| Turning | Selects a memory. When editing, selects a parameter or changes a value. |
| Pressing | Specifies the parameter to edit. Alternatively, confirms an operation. |
| Turn while pressing | Changes a value in larger steps. |
| 4. Rhythm | |
| TEMPO indicato | Blinks in time with the specified tempo |
| [TEMPO] button | Press to specify the tempo of the rhythm. You can also set the tempo by pressing the button at the desired interval (tap tempo). |
| ON/OFF indicator | Indicates the status of the rhythm. |
| Unlit | Off |
| Lit Green | On |
| Blink | Ready to play Rhythm |
| [ON/OFF] button | Each time you press the button, the rhythm switches on/off/standby. Long-press the button (two seconds or longer) to select rhythm settings mode. |
| 5. [MEMORY] button | |
| Let’s you make settings for loop play/record, and specify the function of an expression pedal or footswitch connected to this unit. | |
| 6. [MENU] button | |
| Let’s you make settings that affect the entire RC-500, such as system settings and MIDI settings. | |
| 7. Write | |
| [EXIT] button | Press to return to the previous screen. |
| [ENTER] button | Press to confirm an operation. |
| By pressing the [EXIT] button and [ENTER] button simultaneously, you can save a memory (write) or erase (clear) memory data. | |
| 8. [MIC LEVEL] knob | |
| Adjusts the mic input level | |
| 9. INPUT indicators | |
| These are lit according to the input level. | |
 |
|
Adjust the input level so that the indicator is occasionally lit red.
|
|
| 10. Input Button | |
| Press to turn phantom power on/off, or to make settings related to input and output | |
| 11. (REC/PLAY) Switch | |
| Switches between recording, playback, and overdubbing | |
| Recording |
|
| For a phrase that contains data | |
| Playback |
|
| Long press (two seconds or longer) the switch during playback or overdubbing to Undo (cancel the recording or the last overdubbing). Long press (two seconds or longer) the switch once again to Redo (cancel the Undo | |
| 12. Stop Switch | |
| Stops the track that is currently recording/playing/ overdubbing. If you long-press the switch (two seconds or longer), the track is cleared. | |
| 13. Track Select Switch | |
| Switches between tracks 1 and 2. |
Memo:You can assign other functions to the [REC/PLAY], [STOP], and [TRACK SELECT] switches. For details, refer to “Specifying the Function of the Switches”.
Getting Ready How the RC-500 Is Organized
Track:You can use two “tracks” to record and play back audio from a mic or from an instrument such as guitar.Loop FX:The effect applied to the tracks is called the “loop FX.” By applying the loop FX, you can change how the loop plays back.Rhythm:In addition to the two tracks, the RC-500 can also play a “Rhythm”.You can record while listening to a rhythm at the tempo you specify.Memory:The two tracks, together with the “rhythm” and “loop FX” settings, are collectively called a “memory.” The RC-500 can store up to 99 memories.System:Settings that are common to the entire RC-500, such as the display contrast adjustment and MIDI settings, are called “system settings.”
“Recording” versus “Overdubbing”In this manual, we refer to the act of recording to an empty track for the first time as “recording.” Any subsequent recordings that are made, which are added on top of the existing recording, we refer to as “over dubbning.”
Play screenThe screen that appears after you turn on the power is called the “Play screen.”

Recording on a Single Track
Getting ready to record
- Connect your guitar or mic.
- If a mic is connected, use the [MIC LEVEL] knob to adjust the mic input level.
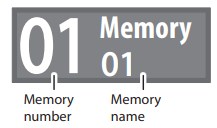
- Turn the [MEMORY/VALUE] knob to select a memory.

Screen
Status
Blue
Empty Track
White
Track Contains Data
- Press the [TRACK SELECT] switch to the track 1 or 2.
Track Indicator Status
Lit Blue
No Phrase
Blink blue
No Phrase (current track)
Lit White
Phrase Exists
Blink White
Phrase exists (current track)

MEMO:The track that is currently selected (currently the target of operations) is called the “current track.”
Recording
- Press the [REC/PLAY] switch to start recording.The screen and the REC/PLAY indicator are lit red.
- Play your guitar or vocalize into your mic to input audio.Playback1. Press the [REC/PLAY] switch.The screen and the REC/PLAY indicator are lit green. The recorded phrase plays as a loop.Overdubbing1. Press the [REC/PLAY] switch to start overdubbing.The screen and the REC/PLAY indicator are lit yellow.2. Overdub-record your performance (audio) onto the phrase that’s playing as a loop.Playback:OverdubbingStopping1. Press the [STOP] switch.The screen and the REC/PLAY indicator are lit white. If you want to keep the recorded phrase, save it in a memory.
 OverdubbingStopping
 1. Press the [STOP] switch.The screen and the REC/PLAY indicator are lit white. If you want to keep the recorded phrase, save it in a memory.
Recording on Two Tracks
You can use two tracks to create a single loop phrase. In this example, we explain how to record in the order of “track 1” ![]() “track 2.”
“track 2.”
Press the [TRACK SELECT] switch to select track 1.  Recording (Track 1)
- Press the [REC/PLAY] switch to start recording.The screen and the REC/PLAY indicator are lit red.
- Play your guitar or vocalize into your mic to input audio.Playback (Track 1)1. Press the [REC/PLAY] switch.The screen and the REC/PLAY indicator are lit green.The recorded phrase plays as a loop.Overdubbing (Track 1)1. Press the [REC/PLAY] switch to start overdubbing.The screen and the REC/PLAY indicator are lit yellow.2. Overdub-record your performance (audio) onto the phrase that’s playing as a loop.Playback (Track 1)Press the [REC/PLAY] switch to start overdubbing.Press the [TRACK SELECT] switch to select track 2.Recording (Track 2)
 Playback (Track 1)1. Press the [REC/PLAY] switch.The screen and the REC/PLAY indicator are lit green.The recorded phrase plays as a loop.
- Press the [REC/PLAY] switch to start recording.The screen and the REC/PLAY indicator are lit red.
- Record your performance while you listen to the loop playback of track 1.Playback (Track 2)
- Press the [REC/PLAY] switch.The screen and the REC/PLAY indicator are lit green. The phrase recorded on track 2 plays as a loop.Overdubbing (Track 2)Playback (Track 2)Stopping1. Press the [STOP] switch.The screen and the REC/PLAY indicator are lit white. If you want to keep the recorded phrase, save it in a memory.
 Playback (Track 2)Stopping1. Press the [STOP] switch.The screen and the REC/PLAY indicator are lit white. If you want to keep the recorded phrase, save it in a memory.
Record While Listening to the Rhythm Sound
In addition to the two tracks, the RC-500 can also play a “Rhythm.” You can record while listening to a rhythm at the tempo you specify.
Sounding a Rhythm
- Press the RHYTHM [ON/OFF] button.The rhythm switches on/off/ready to play rhythm each time you press the button. When the rhythm is on, the RHYTHM ON/OFF indicator is lit.
Setting the Tempo of Rhythm
- Press the RHYTHM [TEMPO] button.The tempo setting screen appears.
- While the tempo setting screen is shown, turn the [MEMORY/VALUE] knob to set the tempo.Value: 40.0300.0

Tap tempoYou can set the tempo by pressing a button at the desired interval.
- Press the RHYTHM [TEMPO] button several times in time with the desired tempo.
MEMO:If you long-press the RHYTHM [TEMPO] button (two seconds or longer), the tempo returns to the default value.
- The specified tempo can be saved as a setting in memorySaving a Memory (WRITE)
- You can specify the volume and type of rhythm, and how the rhythm plays.“Editing the Rhythm Settings”.
Saving a Memory (Write)
If you select a different memory or turn off the power after recording or editing the settings, the recorded content or edited settings will be lost. If you want to keep the data, you must save it.
- Press the [EXIT] button and [ENTER] button simultaneously.The UTILITY screen appears.
- Turn the [MEMORY/VALUE] knob to select “WRITE,” and press the [MEMORY/VALUE] knob.
- Turn the [MEMORY/VALUE] knob to select the save-destination memory.
- This procedure is not required if the memory number is acceptable as is.
- If you decide to cancel, press the [EXIT] button.
- Press the [MEMORY/VALUE] knob or [ENTER] button.The memory will be saved.
- Do not turn off the power while the “EXECUTING…” message is shown.


MEMO:You can assign a name to the memory. For details, refer to “Parameter Guide” (PDF).
Erasing Data from a Memory (CLEAR)
You can erase the data that is saved in a memory, clearing that memory to an empty state.
- Record/playback settings.
- CONTROL settings* If CTL1–2 PREF is “MEMORY”
- “Assign” settings.
- Press the [EXIT] button and [ENTER] button simultaneously.The UTILITY screen appears.
- Turn the [MEMORY/VALUE] knob to select “CLEAR,” and press the [MEMORY/VALUE] knob.
- Turn the [MEMORY/VALUE] knob to select the memory that you want to clear.
- This procedure is not required if the memory number is acceptable as is.
- If you decide to cancel, press the [EXIT] button.
- . Press the [MEMORY/VALUE] knob or [ENTER] button.The memory will be cleared.* Do not turn off the power while the “EXECUTING…” message is shown.


Editing the Settings of Tracks 1 and 2
You can specify the volume and playback method for track 1 and track 2. For details on the parameters, refer to “Parameter Guide” (PDF).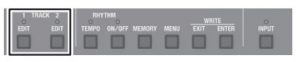
Here we explain how to edit the settings of track 1. The procedure is the same when editing track 2.
- Select the memory for which you want to edit the track settings.
- Press the TRACK 1 [EDIT] button.The track settings screen appears.
- Turn the [MEMORY/VALUE] knob to select the parameter that you want to edit, and press the [MEMORY/VALUE] knob.
- Turn the [MEMORY/VALUE] knob to change the value, and press the [MEMORY/VALUE] knob.
- Repeat steps 34 to edit the parameter that you want.
- Press the TRACK 1 [EDIT] or [EXIT] button to return to the play screen.
- If you want to save the edited settings, execute the Write operation.

| Parameter | Explanation |
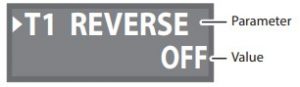
| REVERSE | Specifies whether to play back normally or in reverse. |
| LOOP FX | Specifies whether to apply the loop FX. |
| 1SHOT | Specifies whether to play back as one- shot or as the usual loop playback. |
|
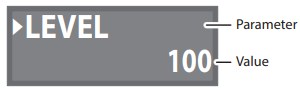
LEVEL |
Adjusts the playback level of the track. You can also use the [TRACK 1] and [TRACK 2] sliders to adjust the playback
level. |
| PAN | Specifies the stereo position (pan) of the track. |
|
START |
Specifies whether playback starts with a fade-in or immediately when the track plays. |
| STOP | Specifies how the track stops. |
| MEASURE | Specifies the number of measures in the track. |
|
LOOP.S (LOOP SYNC) |
Specifies whether the beginning of the track 1 and track 2 phrases are aligned for loop playback, or whether they loop-play at the length of their respective phrases. |
|
TEMPO.S (TEMPO SYNC) |
Specifies whether each track plays at its original tempo (the tempo during recording) or at the tempo that is specified in memory. |
| INPUT | Specifies the input from which sound is recorded. |
| OUTPUT | Specifies the output destination of the playback audio. |
Editing the Settings of a Memory
Here’s how to edit the settings of each memory. For details on the parameters, refer to “Parameter Guide” (PDF).
- Select the memory that you want to edit.
- Press the [MEMORY] button.The memory settings screen appears.
- Turn the [MEMORY/VALUE] knob to select the item that you want to edit, and press the [MEMORY/VALUE] knob.
- Turn the [MEMORY/VALUE] knob to select the parameter that you want to edit, and press the [MEMORY/VALUE] knob.
- Turn the [MEMORY/VALUE] knob to change the value.
- Press the [MEMORY] button to return to the play screen.
- If you want to save the edited settings, execute the Write operation.


| Item | Explanation |
| REC | Make settings related to recording/ overdubbing. |
| PLAY | Specify how loop phrases play back. |
| LOOP FX | Make settings for loop FX. |
| RHYTHM | Make rhythm settings. |
|
CONTROL |
Specify the functions of the [REC/PLAY] switch, [STOP] switch, [TRACK SELECT] switch, and a footswitch or expression pedal connected to the CTL 1, 2/EXP jack.
* With the factory settings, these perform the functions that are specified by the system settings. |
|
ASSIGN1–8 |
Make “assign” settings.
By using the assign settings, you can control other parameters at the same time as the specified functions when you operate the RC-500’s switches/knobs or a footswitch or expression pedal connected to the CTL 1, 2/EXP jack. You can also make settings to control the RC-500 from an external MIDI device. Eight assign settings can be specified for each memory. |
|
NAME |
Specifies the memory name.
* Maximum of 12 characters |
Using the Loop FXBy applying the loop FX, you can change how the loop plays back.
- In step 3 of p. 12, select “LOOP FX” and then press the [MEMORY/VALUE] knob.
- Press the [MEMORY/VALUE] knob, then turn the [MEMORY/VALUE] knob to select “ON,” and then press the [MEMORY/VALUE] knob.
- Turn the [MEMORY/VALUE] knob to select “TYPE,” and press the MEMORY/VALUE] knob.
- Turn the [MEMORY/VALUE] knob to set the type.
- Press the [MEMORY] button to return to the play screen.
- If you want to save the edited settings, execute the Write operation.

| Type | Explanation |
| REPEAT1–3 | Plays the track repeatedly in time with the beat. |
| SHIFT1–2 | The track will play shifted by the length of the beat. |
| SCATTER1–4 | The track will be scrubbed in time with the beat. |
| VINYL FLICK | The track will sound as though you are touching the turntable. |
MEMO:The function of turning loop FX on/off can be assigned to the [REC/PLAY], [STOP], or [TRACK SELECT] switch.
Specifying the Function of the Switches
As appropriate for your method of use, you can assign other functions to the [REC/PLAY], [STOP], and [TRACK SELECT] switches.As an example, here’s how to assign the following functions to these switches.
|
Switch |
Function |
| [REC/PLAY] | Track 1 record/play/stop (clear) |
| [STOP] | Track 2 record/play/stop (clear) |
| [TRACK SELECT] | Loop FX On/Off |
- In step 3 of p. 12, select “CONTROL” and then press the [MEMORY/VALUE] knob.
- Turn the [MEMORY/VALUE] knob to select one of “PDL 1 FUNC” to “PDL 3 FUNC,” and press the [MEMORY/VALUE] knob.
- Turn the [MEMORY/VALUE] knob to make the following settings.
Parameter Value PDL 1 FUNC T1 R/P/S(C PDL 2 FUNC T2 R/P/S(C PDL 3 FUNC LOOP FX - Press the [MEMORY] button to return to the play screen.

The functions assigned to each switch can be saved and used as “system” settings (one for the entire unit) or as “memory” settings (individual memories).To save and use the assignments as system settings:In the system settings (p. 16), set PREF/PDL13 PREF to “SYSTEM.” There is no need to execute the Write operation.To save and use the assignments as memory settings:In the system settings, set PREF/PDL13 PREF to “MEMORY.” Execute the Write operation to save the settings in a memory.
Editing the Rhythm Settings
For details on the parameters, refer to “Parameter Guide” (PDF).* Rhythm parameters can also be edited from the edit screens for a memory.
- Select the memory for which you want to edit the rhythm settings.
- Long press the RHYTHM [ON/OFF] button.The rhythm settings screen appears.
- Turn the [MEMORY/VALUE] knob to select the parameter that you want to edit, and press the [MEMORY/VALUE] knob.
- Turn the [MEMORY/VALUE] knob to change the value, and press the [MEMORY/VALUE] knob.
- Repeat steps 34 to edit the parameter that you want.
- Long press the RHYTHM [ON/OFF] button, or press the [EXIT] button to return to the play screen.
- If you want to save the edited settings, execute the Write operation.

| Parameter | Explanation |
| LEVEL | Adjusts the volume of the rhythm sound. |
| REVERB | Specifies the depth of the reverb that is applied to the rhythm. |
| PATTERN | Selects the rhythm pattern. |
| VARIATION | Selects the rhythm pattern variation. |
| VAR.CHANGE | Specifies the timing at which the rhythm pattern’s variation is changed. |
| KIT | Selects the drum kit used to play the rhythm. |
| BEAT | Specifies the time signature of the rhythm. |
| START | Specifies how rhythm playback starts. |
| STOP | Specifies how rhythm playback stops. |
| REC COUNT | Specifies whether a count-in is heard for recording. |
| PLAY COUNT | Specifies whether a count-in is heard for playback. |
| FILL | Specifies whether the rhythm plays with a fill-in or without a fill-in. |
| PART1–4 | Specify individually whether each drum sound of the selected drum kit is heard. |
| TONE LOW | Adjusts the tonal character of the rhythm sound. |
| TONE HIGH |
Changing How the Rhythm Starts and StopsAs appropriate for your recording method or the phrase that you’re recording, you can change the way in which the rhythm starts and stops.
- In step 3 of p. 14, select “START” and then press the [MEMORY/VALUE] knob.
- Turn the [MEMORY/VALUE] knob to specify how the rhythm starts, and then press the [MEMORY/ VALUE] knob.
- Turn the [MEMORY/VALUE] knob to select “STOP,” and press the [MEMORY/VALUE] knob.
- Turn the [MEMORY/VALUE] knob to specify how the rhythm stops, and then press the [MEMORY/ VALUE] knob.
- Long press the RHYTHM [ON/OFF] button, or press the [EXIT] button to return to the play screen.
- If you want to save the edited settings, execute the Write operation.


| Parameter | Explanation |
| START | |
| LOOP START | The rhythm plays when loop recording or playback starts. |
|
REC END |
The rhythm plays when loop recording ends and switches to playback.
This is useful if you want to perform without specifying a tempo, then start recording, and then play the loop in time with the rhythm when playback starts. |
|
BEFORE LOOP |
The rhythm plays before loop recording or playback.
The rhythm starts playing when you press the switch once, and recording/playback starts in time with the rhythm when you press the switch once again. |
| Stop | |
|
OFF |
The rhythm always continues playing.
If you are performing in synchronization with an external MIDI device, you can keep the rhythm playing continuously to allow synchronized playback. |
| LOOP STOP | The rhythm stops when the loop stops. |
|
REC END |
The rhythm stops when loop recording ends.
This is useful when you want to use the rhythm as a guide during recording. |
System Settings
For details on the parameters, refer to “Parameter Guide” (PDF).
- Press the [MENU] button.The SETUP screen appears.
- Turn the [MEMORY/VALUE] knob to select the item that you want to edit, and press the [MEMORY/VALUE] knob.
- Turn the [MEMORY/VALUE] knob to select the parameter that you want to edit, and press the [MEMORY/VALUE] knob.
- Turn the [MEMORY/VALUE] knob to change the value.
- Press the [MENU] button to return to the play screen.


| Item | Parameter/Explanation |
|
GENERAL |
DISP CONT |
| Adjusts the display contrast. | |
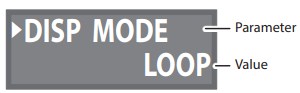
| DISP MODE | |
| Specify what is shown in the screen during recording, playback, and overdubbing.
* If you use the unit with High Brightness mode turned on, we recommend that you use an alkaline battery. |
|
| UNDO/REDO | |
| Specifies whether Undo/Redo is executed while you hold down the switch, or the instant that you take your foot off the switch. | |
|
PREFERENCE |
PDL1–3 PREF, CTL1–2 PREF, EXP PREF |
| Selects whether the [REC/PLAY] switch, [STOP] switch, [TRACK SELECT] switch, and a footswitch or expression pedal connected to the CTL 1, 2/EXP jack perform the functions specified by each memory or the functions specified by the system settings. | |
| MIDI | Refer to “Controlling Devices via MIDI” |
|
EXTENT |
EXT1–5 MIN, EXT1–5 MAX |
| Specifies the extent (lower limit and upper limit) in which memories can be switched.
You can create five types of settings. |
|
| STORAGE | Refer to “Connecting a Computer via USB” |
| F.RESET | Returns the RC-500 to its factory-set state. |
Input/Output Settings
Here’s how to make settings such as phantom power on/off, and settings related to the input and output jacks. For details on the parameters, refer to “Parameter Guide” (PDF).
- Press the [INPUT] button.The editing screen for input/output settings appears.
- Turn the [MEMORY/VALUE] knob to select the parameter that you want to edit, and press the [MEMORY/VALUE] knob.
- Turn the [MEMORY/VALUE] knob to change the value, and press the [MEMORY/VALUE] knob.
- Repeat steps 23 to edit the parameter that you want.
- Press the [INPUT] or [EXIT] button to return to the play screen.


| Parameter | Explanation |
|
PHANTOM |
Turns phantom power on/off.
NOTE Always turn the phantom power off when connecting any device other than condenser microphones that require phantom power. |
| MIC IN | Specifies the output destination of the audio that is input to the MIC IN jack. |
|
INST IN |
Specifies the output destination of the instrumental sound that is input to the INST IN (A/MONO, B) jacks. |
| RHYTHM | Specifies the output destination of the rhythm sound. |
|
MIC IN NS |
Specifies the depth of the noise suppressor that’s applied to the audio input from the MIC IN jack. |
|
INST IN NS |
Specifies the depth of the noise suppressor that’s applied to the instrumental sound input from the INST IN (A/MONO, B) jacks. |
| PEAK SRC | Specifies the input/output that is shown by the INPUT indicator. |
Connecting a Computer via USBIf the RC-500 is connected via USB to your computer, you’ll be able to do the following.
- Back up the RC-500’s data to your computer.
- Restore (recover) backed-up data from your computer to the RC-500.
- Use BOSS TONE STUDIO to import or back-up loop phrases (audio files).
To use BOSS TONE STUDIOAccess the following URL, and download BOSS TONE STUDIO. & https://www.boss.info/support/
Connecting the RC-500 and Computer
- Use a commercially available USB cable to connect the RC-500’s O (USB) port to your computer’s USB port.
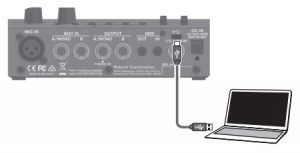
NOTE:
- Use a USB cable that supports USB 2.0 Hi-Speed.
- Do not use a micro USB cable that is designed only for charging a device. Charge-only cables cannot transmit data.
- This might not work correctly for some models of computer. Refer to the BOSS website for details on the operating systems that are supported.
Backing-Up or Recovering Data
- Press the [MENU] button. The SETUP screen appears.
- Turn the [MEMORY/VALUE] knob to select “STORAGE,” and press the [MEMORY/VALUE] knob.
- Turn the [MEMORY/VALUE] knob to set “PREPARING…”
- Use a USB cable to connect the RC-500’s USB port to your computer’s USB port.When a connection with the computer is established, the message “CONNECTING…” appears.* USB connection is not possible if the unit is not stopped, or if there is a phrase that has not been saved.
- Open the BOSS RC-500 drive.WindowsWithin My Computer (or Computer), open “BOSS RC-500” (or Removable Disk).Mac OS:On the desktop, open the “BOSS RC-500” icon.
- Back-up or recover the data.Backup:Copy the entire “ROLAND” folder from the BOSS RC-500 drive to your computer.Recover:* When you execute this operation, the memory currently saved in the RC-500 disappears. Back up in advance.In the BOSS RC-500 drive, delete the “ROLAND” folder, and then copy the backed-up “ROLAND” folder from the computer into the BOSS RC-500 drive.NOTE: Do not delete the folders in the BOSS RC-500 drive other than when executing the recovery operation.
- Eject the USB drive.Windows:In the lower right of your screen, click the icon icon, and then click “Eject BOSS RC-500.”Mac OS:Drag the “BOSS RC-500” icon to the trash (“Eject” icon).


Controlling Devices via MIDI
ConnectionMIDI cables are connected to these connectors as needed.
| Connector | Explanation |
| MIDI IN | Receives messages from another MIDI device. |
| MIDI OUT | Transmits messages from this device. |
To make these connections, use TRS/MIDI connecting cables (sold separately: BMIDI-5-35).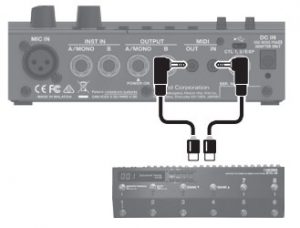
MIDI Settings
Use of MIDI requires that the MIDI channels be matched with those of the connected device. Data cannot be transmitted to, nor received from another MIDI device unless the MIDI channels are set properly. For details on each of the MIDI setting parameters, refer to “Parameter Guide” (PDF).
Controlling an External MIDI Device from the RC-500
|
Overview |
Explanation |
| Transmitting tempo data and data for starting and stopping playback | |
| The RC-500’s performance tempo data is transmitted to external MIDI devices as MIDI Clock. | Setting an external MIDI device to the same tempo as the RC-500:MIDI Clock messages are output from the RC-500 at all times. Set the external MIDI device beforehand so it is ready to receive MIDI Clock and MIDI Start and Stop messages. For details, refer to the owner’s manual that came with the device. |
| Playback start and stop operations with the RC-500’s switches can be transmitted as MIDI Start and Stop messages. | Transmitting Start/StopA MIDI Start message is transmitted at the moment that recording or playback of the track begins, when tracks had been stopped. This message is also transmitted when an All Start is carried out. A MIDI Stop message is transmitted when tracks have stopped. This is also transmitted when All Stop is in carried out.* If you want MIDI synchronized performance to continue even after the track stops, set the RHYTHM parameter STOP to “OFF.”* Tracks whose 1SHOT setting (p. 11) is “ON” and tracks whose LOOP.S setting (p. 11) is “OFF” will not transmit Start/Stop data |
| Transmitting Program Change messages | |
| When a memory is selected with the RC-500, a Program Change message corresponding to the selected memory number is transmitted simultaneously. | Transmitting Program Change messages
When memories are switched on the RC-500, a MIDI Program Change message is transmitted to the connected external MIDI device. You can transmit Program Change messages numbered 1 through 99, corresponding to the 99 individual memories 1–99. * Set “PC OUT” to ON beforehand. * Program Change messages 100–128 cannot be transmitted. * Bank Select MIDI messages (Control Change #0, #32) cannot be transmitted |
| Transmitting Control Change messages | |
| Operating information for the RC-500’s switches, buttons, knobs, and an external expression pedal or footswitch is transmitted as Control Change messages. | Transmitting Control Change messages
If you select a Control Change as the “ASSIGN” target, you can transmit MIDI Control Change messages by operating the RC-500’s switches, buttons, knobs, or an external footswitch or expression pedal (connected to the CTL 1, 2/EXP jack). |
Controlling the RC-500 from an External MIDI Device
| Overview | Explanation |
| Receiving tempo data and data for starting and stopping playback | |
| The RC-500 will synchronize to the tempo of MIDI Clock data from an external MIDI device. | Setting the RC-500 to the same tempo as an external MIDI device
Make settings on your external MIDI device so that it will transmit MIDI Clock and MIDI Start/Stop data. For details, refer to the owner’s manual of your device. Set the RC-500’s MIDI SYNC to “AUTO.” * You can’t switch the tempo during recording |
| Start/stop data will be received from an external MIDI device to play/stop the RC-500. | Receiving MIDI Start
When MIDI Start (FA) is received, all tracks will play (All Start). |
| Switching memories | |
| The RC-500’s memories switch simultaneously upon receipt of corresponding Program Change messages from external MIDI devices. | Switching memories
You can switch the RC-500’s memories with Program change messages from external MIDI devices. The RC-500 can receive program change messages numbered 1 through 99, corresponding to the 99 individual memories 1–99. * Program Change messages 100–128 cannot be received. * Even if received, Bank Select MIDI messages (Control Change #0, #32) are disregarded. |
| Receiving Control Change messages | |
| The RC-500 can be controlled using Control Change messages from external MIDI devices. | Receiving Control Change messages
You can use Control Change messages from an external MIDI device to control functions that would be difficult to control using the RC-500’s own controllers. As the “ASSIGN” setting, set SOURCE to “CC#1–#31 or CC#64–#95,” and as TARGET select the parameter that you want to control. |
Connecting Two RC-500 Units
Two RC-500 units can be synchronized after connecting them together using a MIDI cable.* To make this connection, use a stereo mini-plug , stereo mini-plug cable.
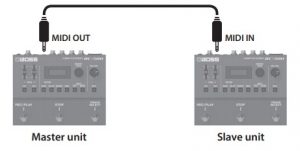
Begin recording on the master RC-500 unit’s tracks. The slave RC-500 unit starts in synchronization when the master RC-500 unit’s track starts playing. Tracks for which TEMPO.S is ON will play at the memory tempo of the master unit. Tracks whose LOOP.S is ON will loop according to the firstrecorded phrase on the master RC-500.
Troubleshooting
| Problem | Items to Check | Action |
| Problems with sound | ||
|
No sound/low volume |
Is the RC-500 properly connected to other devices? | Check the connections to other devices. |
| Is the power to the connected amp or mixer not turned on, or is the volume turned down? | Check the settings for connected devices. | |
| Are the connection cables shorted? | Try replacing the connection cable. | |
| Could the [TRACK 1] slider, [TRACK 2] slider, or the [MIC LEVEL] knob be lowered? | Adjust sliders/knob to the suitable positions. | |
|
Are the track 1and 2 level set correctly? |
Check the T1 LEVEL and T2 LEVEL settings.
Check whether an external expression pedal might have been used to adjust the level . |
|
| Are the track 1 and 2 audio output destinations set correctly? | Check the T1 OUTPUT and T2 OUTPUT settings. | |
|
Has anything been recorded to the tracks? |
Check the TRACK 1, 2 [EDIT] button to see whether the track has been recorded. If the TRACK 1, 2 [EDIT] button is lit blue, nothing has been recorded. | |
|
No rhythm sound |
Is RHYTHM LEVEL set correctly? | Check the RHYTHM LEVEL setting. |
| Is the output destination of the rhythm sound set correctly? | In “Input/Output Settings” check the RHYTHM setting. | |
| Sound is missing from the beginning and end of the recorded track | To prevent noise, a fade-in and a fade-out are applied at the beginning and end of a recording. In some cases, it may sound as if some of the sound has been left out. | |
| Unable to hear sounds from device connected to INST IN jacks/ MIC IN connector | Could the [TRACK 1] slider, [TRACK 2] slider, or the [MIC LEVEL] knob be lowered? | Adjust sliders/knob to the suitable positions. |
| Is the audio output destination set correctly? | In “Input/Output Settings” check the MIC IN, INST IN, and RHYTHM settings. | |
| Problems with operation | ||
|
Memories not switching |
Is something other than the Play screen appearing in the display? | You cannot switch memories while any screen other than the Play screen is displayed. Press the [EXIT] button to return to the Play screen. |
|
Recording/overdubbing stops before finishing |
Is there insufficient memory remaining? |
If memory is insufficient, clear any unneeded memories before recording or overdubbing. |
|
Is LOOP.S set to “ON” in the track? |
When recording with Loop Sync set to ON, once the end of the longest track is reached, the RC-500 automatically switches to overdubbing. | |
|
Playback tempo not changing |
Is recording or overdubbing in progress? |
You cannot change the memory tempo during recording or overdubbing. Change the tempo while the performance is stopped or being played back. |
|
Is TEMPO.S set to “ON” in the track? |
When TEMPO.S is not set to ON in a track, the playback speed does not change even if the memory tempo is changed.
To match the playback speed to the memory tempo, set the track’s TEMPO.S setting to “ON.” |
|
|
Is the RC-500 synchronized via MIDI? |
If MIDI clock is being received via the MIDI IN connector or the USB port, the RC-500 will synchronize its tempo to MIDI clock.
If you don’t want to synchronize with an external device, set SYNC to “INTERNAL.” |
|
|
MIDI messages not being transmitted/received |
Could there be a short in the MIDI cable? | Try replacing the MIDI cable. |
| Is the external MIDI device properly connected? | Check the connections to the external MIDI device. | |
| Are the MIDI channels matched to those of the external MIDI device? | Confirm that both devices are set to the same MIDI channels. | |
| If transmitting from the RC-500, have you made the necessary settings for transmission? | Check the TX CH (transmit channel) setting and the PC OUT (program change message transmit) on/off setting. | |
| Problems with USB | ||
|
Unable to communicate with computer |
Is the USB cable properly connected? | Check the connection. |
| (If exchanging files via USB with your computer) Could “STORAGE” be OFF? | In the procedure “Backing-Up or Recovering Data,” set STORAGE to “PREPARING…”. | |
|
Could you be editing a memory? |
USB connection is not possible if there is an unsaved memory. Save the memory (p. 10), and then try USB connection again. |
Error Message List
| Message | Meaning | Action |
| LOOPER | ||
|
DATA DAMAGED |
Data may have been damaged. |
In the factory reset function. choose “SYS+MEM” to return the RC-500 to its factory settings. |
| DATA READ ERR | A problem has occurred with the content of the RC-500’s memory. |
Consult your Roland dealer or local Roland Service. |
| DATA WRITE ERR | ||
| DATA TOO LONG | Playback is not possible because the recording time or audio file is too long. | The recording time or audio file length must not exceed 1.5 hours. |
| DATA TOO SHORT | Playback is not possible because the recording time or audio file is too short. | The recording time or audio file length must be at least 0.1 seconds. |
| EVENT FULL | Further overdubbing is not possible. | Save the memory (p. 10). |
|
MEMORY FULL |
The recorded time of one track exceeded 1.5 hours (approximately). |
No further recording is possible on the current track.
Save the memory (p. 10). If you want to continue recording, select a different memory. |
| The total recording time of all memories exceeded 13 hours (approximately).
No further recording is possible. |
Clear unneeded memories. |
|
| NOT EMPTY | You are attempting to overwrite-save onto a memory in which a phrase is already recorded. | Either clear the currently selected memory, or select an empty memory. |
| TEMPO TOO FAST | Since the track is being played at a much faster tempo than when it was recorded, it might not play back correctly. |
Adjust the tempo. |
| TEMPO TOO SLOW | Since the track is being played at a much slower tempo than when it was recorded, it might not play back correctly. | |
|
TOO BUSY
TOO BUSY OMSG |
The RC-500 could not process the data completely.
For “TOO BUSY OMSG”: Since you attempted to apply the loop FX to a phrase that was set to a significantly slower tempo than when it was recorded, the data could not be processed quickly enough. |
Lower the performance tempo.
In the case of “TOO BUSY OMSG,” return to the tempo that was used during recording. |
| Save the current content to a memory. | ||
| If this appears frequently, back up the data to your computer, then execute factory reset “SYS+MEM,” and then recover the data. | ||
| UNDEFINED ERR | An error of unknown cause has occurred during recording, playback, or overdubbing. | Consult your Roland dealer or local Roland Service. |
| MIDI | ||
| BUFFER FULL | An excessive volume of messages were received and could not be processed properly. | Reduce the number or size of MIDI messages transmitted to the RC-500. |
| OFFLINE | There is a problem with the MIDI cable connection. | Check to make sure the cable has not been disconnected and that there is no short in the cable. |
| Others | ||
| BATTERY LOW | The battery has run down. |
Replace the batteries, or use an AC adaptor. |
|
BATTERY LOW!! STOP ALL |
Because the battery has run down, the unit cannot function correctly.
All operations of the RC-500 have stopped. |
|
| MEMORY FULL | This unit’s memory is insufficient. If this message appears, recording or overdubbing might end mid-way. | Clear unneeded memories and then try recording again. |
| STOP LOOPER | The operation is not possible during recording, playback, or overdubbing. | Stop before performing the operation. |
| STOP ALL | The operation is not possible during recording, playback, overdubbing, or rhythm playback. | Stop all of these before performing the operation. |
|
STOP ALL&SAVE |
The operation is not possible during recording, playback, overdubbing, or rhythm playback when there is also unsaved data. |
Stop all of these, and then save the memory. |
|
UNSUPPORTED FILE |
This audio file is unplayable. |
Check the format of the audio file. |
Restoring the Factory Default Settings (Factory Reset)
Not only can you return all of the settings to the values in effect when the RC-500 was shipped from the factory, you can also specify the items to be reset.* When you execute “Factory Reset,” the settings you made will be lost. In advance, back up important data to your computer.
- Press the [MENU] button.The SETUP screen appears.
- Turn the [MEMORY/VALUE] knob to select “F.RESET,” and press the [MEMORY/VALUE] knob.
- Turn the [MEMORY/VALUE] knob to specify thesettings that will be returned to their factory set state, and press the [MEMORY/VALUE] knob.
Value Explanation MEMORY Memory 1–99 SYSTEM System settings MEM+SYS Memory 1–99 and system settings A confirmation message “ARE YOU OK?” appears.* Do not turn off the power while the “EXECUTING…” message is shown.
- Once the factory reset is complete, you are returned to the Play screen.* Do not turn off the power while the “EXECUTING…”message is shown. Once the factory reset is complete, you are returned to the Play screen.


Main Specifications
| Sampling Frequency | 44.1 kHz | |
| AD/DA Conversion | 32 bits | |
| Processing | 32-bit floating point | |
|
Recording/Playback |
Number of Tracks: 2
Data Format: WAV (44.1 kHz, 32-bit float, stereo) Approx. 1.5 hours (1 track), Approx.13 hours (total of all memories) |
|
| Rhythm Type | 57 Patterns x 2 Variations | |
| Rhythm Kit | 16 types | |
|
Effect |
LOOP FX (only for loop tracks)
Type: BEAT REPEAT, BEAT SHIFT, BEAT SCATTER, VINYL FLICK |
|
| Reverb (only for rhythm part) | ||
| Memory | 99 | |
| Nominal Input Level | MIC IN:-40 dBu (variable)
INST IN A/MONO, B: -10 dBu |
|
| Maximum Input Level | MIC IN:+8 dBu
INST IN A/MONO, B: +8 dBu |
|
| Input Impedance | MIC IN: 4 kΩ
INST IN A/MONO, B: 1 MΩ |
|
| Nominal Output Level | OUTPUT A/MONO, B: -10 dBu | |
| Maximum Output Level | OUTPUT A/MONO, B: +8 dBu | |
| Output Impedance | OUTPUT A/MONO, B: 1 kΩ | |
| Recommended Load Impedance | OUTPUT A/MONO, B: 10 kΩ or greater | |
| Bypass | Buffered bypass | |
| Display | Graphic LCD (96 x 32 dots, RGB backlit LCD) | |
|
Connectors |
INST IN A/MONO, B jacks: 1/4-inch phone type
MIC IN jack: XLR type (balanced, phantom power: DC 48 V, 10 mA Max OUTPUT A/MONO, B jacks: 1/4-inch phone type CTL 1,2/EXP jack: 1/4-inch TRS phone type USB port: USB micro B type MIDI (IN, OUT) jacks: stereo miniature type DC IN jack |
|
| Power Supply | Alkaline battery (AA, LR6) x 4
AC adaptor (PSA series: sold separately) |
|
| Current Draw | 330 mA (with phantom power)
240 mA (without phantom power) |
|
| Expected battery life under continuous use | * These figures will vary depending on the actual conditions of use.
Alkaline: Approx. 3.5 hours (without phantom power), Approx. 2 hours (with phantom power) |
|
|
Dimensions |
(excluding rubber foot)
170 (W) x 138 (D) x 60 (H) mm 6-3/4 (W) x 5-7/16 (D) x 2-3/8 (H) inches |
(including rubber foot)
170 (W) x 138 (D) x 62 (H) mm 6-3/4 (W) x 5-7/16 (D) x 2-1/2 (H) inches |
| Weight (including battery) | 950 g
2.1 lbs |
|
| Accessories | Owner’s Manual, Leaflet “USING THE UNIT SAFELY,” AC adaptor, Rubber foot x 4 | |
|
Options (sold separately) |
AC adaptor: PSA-S series Footswitch: FS-5U
Dual Footswitch: FS-6, FS-7 Expression Pedal: FV-500H, FV-500L, EV-30, Roland EV-5 TRS/MIDI connecting cable: BMIDI-5-35 |
- dBu = 0.775 Vrms
- This document explains the specifications of the product at the time that the document was issued. For the latest information, refer to the Roland website.
USING THE UNIT SAFELY
![]() CAUTIONKeep small items out of the reach of children
CAUTIONKeep small items out of the reach of children![]() To prevent accidental ingestion of the parts listed below, always keep them out of the reach of small children.
To prevent accidental ingestion of the parts listed below, always keep them out of the reach of small children.
- Included PartsRubber feet.
![]() CAUTIONPrecautions concerning use of phantom power supplyAlways turn the phantom power off when connecting any device other than condenser microphones that require phantom power. You risk causing damage if you mistakenly supply phantom power to dynamic microphones, audio playback devices, or other devices that don’t require such power. Be sure to check the specifications of any microphone you intend to use by referring to the manual that came with it. (This instrument’s phantom power: 48 V DC, 10 mA Max)
CAUTIONPrecautions concerning use of phantom power supplyAlways turn the phantom power off when connecting any device other than condenser microphones that require phantom power. You risk causing damage if you mistakenly supply phantom power to dynamic microphones, audio playback devices, or other devices that don’t require such power. Be sure to check the specifications of any microphone you intend to use by referring to the manual that came with it. (This instrument’s phantom power: 48 V DC, 10 mA Max)
IMPORTANT NOTESPower Supply: Use of Batteries
- Batteries should always be installed or replaced before connecting any other devices. This way, you can prevent malfunction and damage.
- If operating this unit on batteries, please use alkaline batteries.
- Even if batteries are installed, the unit will turn off if you connect or disconnect the power cord from the AC outlet while the unit is turned on, or if you connect or disconnect the AC adaptor from the unit. When this occurs, unsaved data may be lost. You must turn off the power before you connect or disconnect the power cord or AC adaptor.
Repairs and Data
- Before sending the unit away for repairs, be sure to make a backup of the data stored within it; or you may prefer to write down the needed information. Although we will do our utmost to preserve the data stored in your unit when we carry out repairs, in some cases, such as when the memory section is physically damaged, restoration of the stored content may be impossible. Roland assumes no liability concerning the restoration of any stored content that has been lost.
Additional Precautions
- Any data stored within the unit can be lost as the result of equipment failure, incorrect operation, etc. To protect yourself against the irretrievable loss of data, try to make a habit of creating regular backups of the data you’ve stored in the unit.
- Roland assumes no liability concerning the restoration of any stored content that has been lost.
- Never strike or apply strong pressure to the display.
- When disposing of the packing carton or cushioning material in which this unit was packed, you must observe the waste disposal regulations that apply to your locality.
- Do not use connection cables that contain a built-in resistor.
[xyz-ips snippet=”download-snippet”]