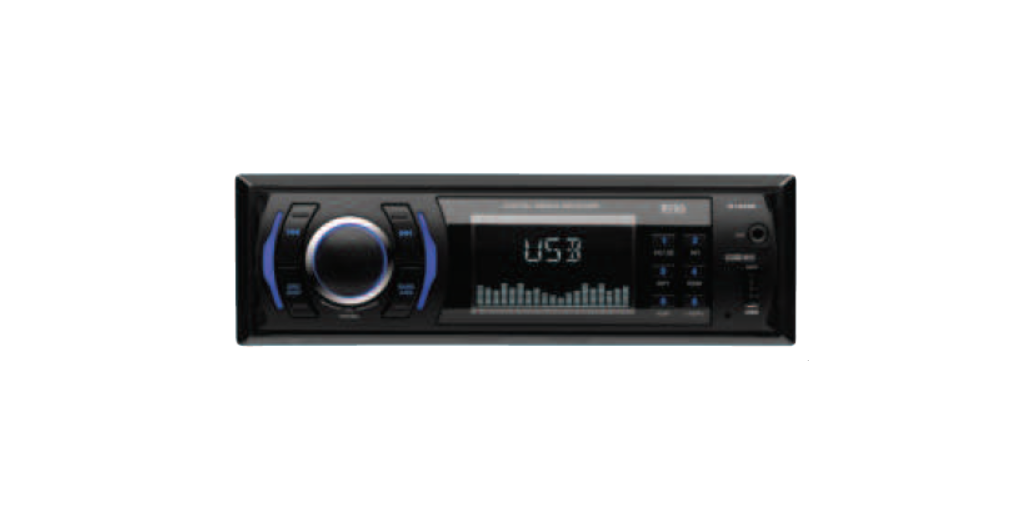
BOSS MP3-Compatible Digital, Media AM/FM Receiver User Manual
PRECAUTIONS
Precautions & Warnings
- To reduce the risk of fire, electric shock, and interference, do not attempt to repair this unit yourself. Refer all service to a qualified technician.
- Some MP3/WMA files may not be playable.
- Keep the volume at a reasonable level to avoid distracted driving. High volume levels may make it difficult to concentrate on traffic and road conditions while driving.
- If the car has been in direct sunlight for an extended period, you may need to reduce the temperature inside the car before turning on and using the unit.
- If the battery is disconnected, discharged, or changed, the preset memory of the unit will be lost and require reprogramming.
- The unit is designed to be installed in a level, horizontal position. For optimal performance, avoid installing the unit at an angle.
- Never use excessive force when removing or attaching the faceplate.
- Do not tightly grip the display and buttons to avoid damage.
Installation ProceduresFirst complete the electrical connections and then check for correctness of connection.
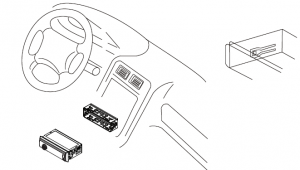
Installation OpeningThis unit can be installed in any dashboard which has an opening as shown below.

Insert the mounting sleeve into the dashboard. Then bend the tabs on the mounting sleeve with a screwdriver to achieve fastening of the mounting sleeve.Make sure that lock lever is flush with the mounting sleeve( not projecting outward).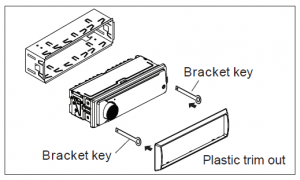
INSTALLATION(CONT.)
Connect all wiring harness and slide the head unit into the mounting collar until it clicks into place.
Wiring Connections
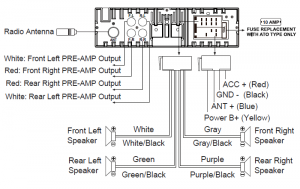
 – +12V DC Negative Ground.– Only support speakers of 4 ohms or above.– The maximum current of the Amp remote trigger is 200mA.– The equipment shall be protected by the circuit with max. 15 Amperes of the front end of DC source.
Uninstall the Main Unit
- Remove the plastic trim out from the main unit.
- Insert a bracket key into the left and right side of the main unit and draw the unit out of the mounting sleeve.
Overview of the Components

- PWR(power On/Off), VOL (volume) knob and SEL (select/menu) button
- (tune/seek down, previous track, fast reverse) button
- (tune/ seek up, next track, fast forward) button
- SRC (source) button, DISP(clock setting) button
- BAND button, AMS(automatic store / preset station scan, automatic music search) button
- LCD Display
- (pause/play), (MUTE) button, Preset station 1 button
- INT (intro), Preset station 2 button
- RPT (repeat), Preset station 3 button
- RDM (random), Preset station 4 button
- . -10(previous 10 tracks), F-(previous folder), Preset station 5 button
- . +10(next 10 tracks), F+(next folder), Preset station 6 button
- . USB Port
- . AUX IN (auxiliary input) jack
- . Reset button
General Operation
Turn Unit on/offPress any button to turn on the unit. Press and hold the VOL knob to turn off the unit.
Adjust the volumeRotate the VOL knob to increase or decrease the volume level. Adjust Menu Options
- Press the VOL knob repeatedly to cycle through the following adjustable audio functions:
General Operation
– ILL MID/HI/LOW: This receiver is equipped with 3 brightness settings.Rotate the volume knob to preset the illumination to middle, high or low.– BASS/TREBLE: -7, -6, ~, -1, 0, +1, ~, +6, +7– BALANCE: L7, L6,~, L1, 0, R1,~,R6, R7– FADER: R7,R6, ~, R1,0, F1,~,F6, F7– Loudness: LOUD ON/OFF– EQ(Equalizer) Setting: OFF, FLAT, CLASSIC, POP, ROCK, JAZZ– STEREO/MONO: Switches between MONO and STEREO reception mode for radio frequencies.– DX/LOCAL: Enables or disables the local broadcast mode (LOCAL).– CLOCK 12/24: Select between 12 hours and 24 hours display.Note: If 12 hour display is selected , AM= Morning; PM= Afternoon– AREA US/EU: This car radio is equipped the USA / Europe frequency. Rotate the volume knob to switch between USA and Europe frequency.The system will change the frequency setting in about 3 seconds.
- Rotate the VOL knob to adjust the selected item.
Change the SourcePress the SRC/DISP button to select the different modes: Radio, USB(with USB device inserted) and AUX-IN(aux audio input) modes.
Setting the ClockPress and hold the SRC/DISP button to display time. Press the SRC/DISP button again, the hours digits start flashing on the display. Set hours by rotating the VOL knob.Press the SRC/DISP button or VOL knob again. The minute digits start flashing. Set minutes by rotating the VOL knob. Press the SRC/DISP button or VOL knob to confirm settings.
LCD Display
Mute On/OffIn power on mode, short press the ![]() (MUTE) button to toggle mute on or off.
(MUTE) button to toggle mute on or off.
USB PortConnect to a USB storage device for audio play, or charging of a mobile phone.
Aux Audio Input JackConnect to the headphone jack on an external device (e.g. a mobile phone or MP3 player) for audio play.
ResetPush the RESET button with a thin object with a pointed end to reset the unit. This function may be used when the LCD does not display normally or soundis distorted, or when any of controls are disabled.
Switch Between USA area and Europe area FrequencyIn radio mode, press the VOL knob to enter the switch state of the US(USA) and EU(europe) frequency, then rotate the VOL knob to switch between US (USA) andEU(europe) frequency. The system will change the frequency setting in about 3 seconds.
Change BandsIn radio mode, shortly press the BAND/AMS button to switch between the FM1(F1), FM2(F2), FM3(F3) and AM1(A1), AM2(A2) bands.
To Store / Recall Preset StationsThe radio can be stored 6 preset stations for each band (FM1, FM2, FM3, AM1 and AM2) for a total of 30 preset stations.
To memorize a station:Press and hold the desired preset buttons (1-6) to save a radio station.
– To recall a preset station:Briefly press the respective station button (1-6) to recall the corresponding preset station.
Manual TuningIn the radio mode:Press and hold the ![]() button to enter the manual tuning mode. In manual tuning mode, briefly press
button to enter the manual tuning mode. In manual tuning mode, briefly press ![]() the or button to search the next or previous frequency step by step.
the or button to search the next or previous frequency step by step.
Seek TuningIn radio mode, press the ![]() button, the automatic search will start, it will search upward or downward for the strong signal radio station within thecurrent band. The auto searching will stop until find a station.
button, the automatic search will start, it will search upward or downward for the strong signal radio station within thecurrent band. The auto searching will stop until find a station.
Automatic Store Preset Station (AMS)Press and hold the BAND/AMS button to store 18 FM stations and 12 AM stations automatically.
Aux Audio Operation
Using this socket, it is possible to hear the sound of other playback devices such as MP3 players, CD players etc. through the car loudspeaker.
- Please connect the external device with a 3.5 mm stereo jack plug to the AUX socket.
- Press the SRC button repeatedly until “AUX IN” appears in the display.
- You hear the playback from the external device via the loudspeakers. You can adjust the volume of the external device to a comfortable level with the volume control of this device.
USB Operation
Play MP3/WMA music from a USB device Insert the USB stick with MP3/WMA musics into the USB port, it will play automatically. Note: the USB port also supports charging mobile phone, the maximum charging ability is 5V / 1A.
Select Next Track or Previous TrackIn the USB mode, briefly press the ![]() button to play the the next or previou track.
button to play the the next or previou track.
Fast Forward/ReversePress and hold the ![]() button to fast forward or reverse a track.
button to fast forward or reverse a track.
Play / PausePress the ![]() button to interrupt the playback of a music (pause function). Press this button again to continue the playback.
button to interrupt the playback of a music (pause function). Press this button again to continue the playback.
Introduction ScanPress the INT button to play the first 10 seconds of each track. Press again to stop the introduction scan, and play the current track.
Repeating the trackPress the RPT button to toggle between RPT ONE (Continuously repeat current track) and RPT FOD (Continuously repeat all tracks in current folder), RPT ALL (Play all track).
Playing all tracks in randomPress RDM once, play all tracks randomly. Press RDM once again, exit from random playback.
Track/Folder Navigation– Press the -10/F- or +10/F+ button buttons to jump 10 tracks backward or forward. It is required that over 10 tracks be available on the storage medium.– Press and hold the -10/F- or +10/F+ button button to select the previous or the next folder. (If there are folders on the storage medium.)
If you suspect something is wrong, immediately switch power off. Do not use the unit in abnormal condition, for example without sound, or with smoke or foul smell, can cause fire orelectric shock. Immediately stop using it and call the store where you purchased it. Never try to repair the unit by yourself because it is dangerous to do so.
General
- Car’s engine switch is not on.Turn you car’s key to ACC or ON.
- Cable is not correctly connected.Check the connection.
- Fuse is burnt. Replace fuse.Replace fuse.
- Volume is in mute or minimum.Check volume or mute on/off, adjust volume to a desired level.
- Sound skips.The installation angle is more than 30°. Adjust the installation angle less than 30°.
- The operation keys do not work.The built-in micro- computer is not operating properly due to noise. Press the RESET button to restore the program to zero.
Radio
- Much noise in broadcasts.Station or signal is too weak. Select other stations of stronger signal level.
- The antenna cable is not connected.Insert the antenna cable firmly into the antenna socket of this car radio
- Preset station is reset.Battery cable is not correctly connected. Connect the battery cable to the terminal that is always live.
USB
USB is connecting but no sound
a) USB connection is not good. Take it out and insert again.b) USB is damaged or no music file inside. Change to another USB, or record music inside it.
SPECIFICATIONS
General
Power supply Requirement : DC 12VMaximum power output : 50W X 4CHSpeaker impedance : 4 – 8 OhmUnit Dimensions(WxHxD) : 7.0 X 2.0 X 2.76 inchesWeight : 1.04 lbsFuse : 10 A
RADIO
FM
Frequency Range: 87.5 MHz – 107.9 MHz (USA) 87.5 MHz – 108.0MHz (EUROPE)Channel step: 200 KHz (USA) 50 KHz (EUROPE)
AM
Frequency Range: 530 KHz – 1710 KHz (USA) 522-1620 KHz (EUROPE)Channel step: 10 KHz (USA) 9 KHz (EUROPE)
USB
Usable Audio Formats: MP3/WMAPre-amp Output: Front and RearFrequency Response: 20 Hz – 20KHzS/N Ratio: 60dBUSB Port Type: 2.0USB Charging: 5V/1A
Read More About This Manual & Download PDF:
[xyz-ips snippet=”download-snippet”]