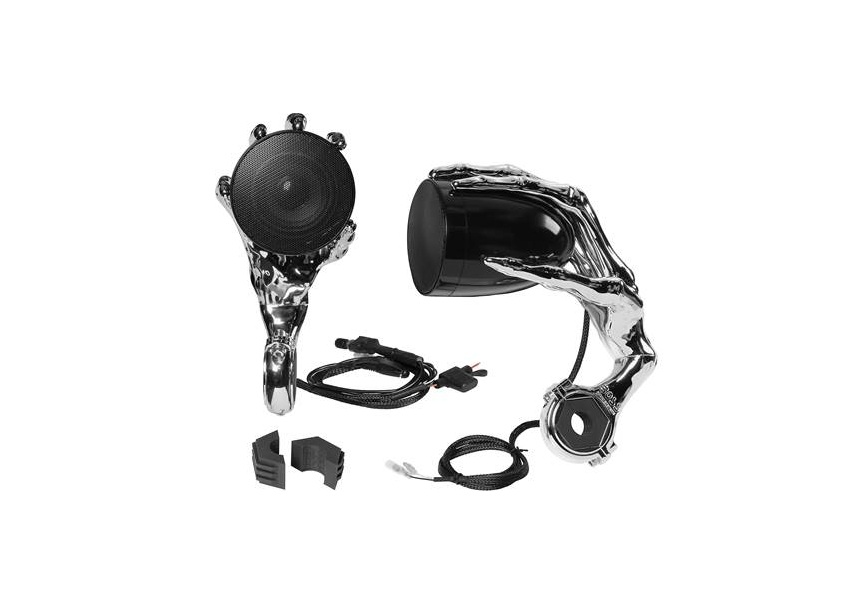
BOSS Weather Rated Chrome Speaker Instructions
Congratulations
On your new purchase of a Phantom900 amplified speaker system. It has been designed, engineered and manufactured to bring you the highest level of performance and quality, for years of listening pleasure.
Thank youFor making Boss Audio Systems your choice for motorcycle audio entertainment.
Please read through these instructions carefully so you will know how to operate your speaker properly. After you have finished reading this instructions, keep this document in a safe place for future reference.
Features
Your new Phantom900 speakers feature the following:
- 3.5mm audio input
- Adjustable speaker clamps
- Weatherproof volume control
- Weatherproof speakers
- Bluetooth audio streaming
- Built-in class D amplifier
Specifications
| THD | < 0.1% |
| S / N: | > 75 dB |
| Channel separation: | > 50 dB |
| Frequency response: | 50Hz – 20 KHz |
| Input sensitivity: | Max 400 my |
| Speaker wires: | 3.3′ |
| Volume control wires: | 4.9′ |
| Audio input cable: | 0.8’ |
| Power cable: | 3.3′ |
| Mounting diameter: | 1″, 1.25″, 1.5″ only |
| Dimensions: HxDxW | 11.46″ x 6.38″ x 4.77″ |
| Unit weight: | 5.221bs 12.37 kg |
Specification subject to change without notice.
Troubleshooting
|
SYMPTOM |
SOLUTION |
| No sound | Unit or Device is MUTED |
| Audio is distorted | Bluetooth is out of range |
| No Power-on tone | Check fuse or wiring |
| Bluetooth | not connecting Switch off power for 10 secs |
Wiring
- Be sure to run the wiring securely and far away from any moving components.
- Connect the power cable to the power source. You will need to connect the 12V red wire to a fused7.5A (not included) switched power source.
- Use the 3.5mm stereo jack to connect to your source of music (MP3 player, mobile device, etc.).
- Use your player device and wired remote volume controller to control the volume.
Bluetooth Connection
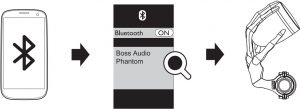
- Go into the Settings Menu of your mobile device.
- Enter the Bluetooth menu.
- Search for and select ” Boss Audio Phantom ” from the available devices.
- If prompted, enter passcode “0000”.
Installation / Mounting
- Adjust the direction of the speaker and screw the bracket to the bottom of the speaker.
- Select the rubber inserts that fit your mounting bar and place them into the brackets.
- Find a safe, ideal mounting location and fit the clamps over the chosen bars.
- Fasten the mounting screws after you review the safety of the mounting location.

Reminder
- The components and wiring should not be installed around any moving parts, keep away from ignition parts, fuel lines, or any hot exhaust components.
- Speakers should not be installed where they might inhibit safety features on the vehicle ( i.e. lights, horns, brake levers, etc.).
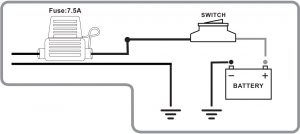
Power Supply Connection
Option A
Connected to Battery through a12 VDC SPDT Relay (Single Pole Double Throw)NOT INCLUDED, SOLD SEPARATELY
Option B
Connected to Battery through aWaterproof Switch (250V AC/6A)NOT INCLUDED, SOLD SEPARATELY
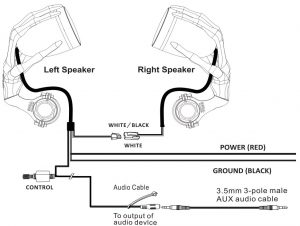
Note:
- AUX 3.5 female input connector for output of other audio device like mobile phone, MP3, !pod and so on.
- Should use standard 3.5mm 3-pole male plug AUX cable (not included).
- Stop BT connection first when using the 3.5mm AUX input as an audio source input.
Option A (Relay)

Option B (Switch)
[xyz-ips snippet=”download-snippet”]