BOX DESIGN Pro-Ject Stream Box S2 Instructions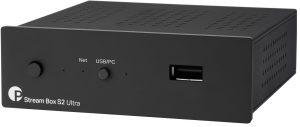
INSTRUCTIONS FOR USE
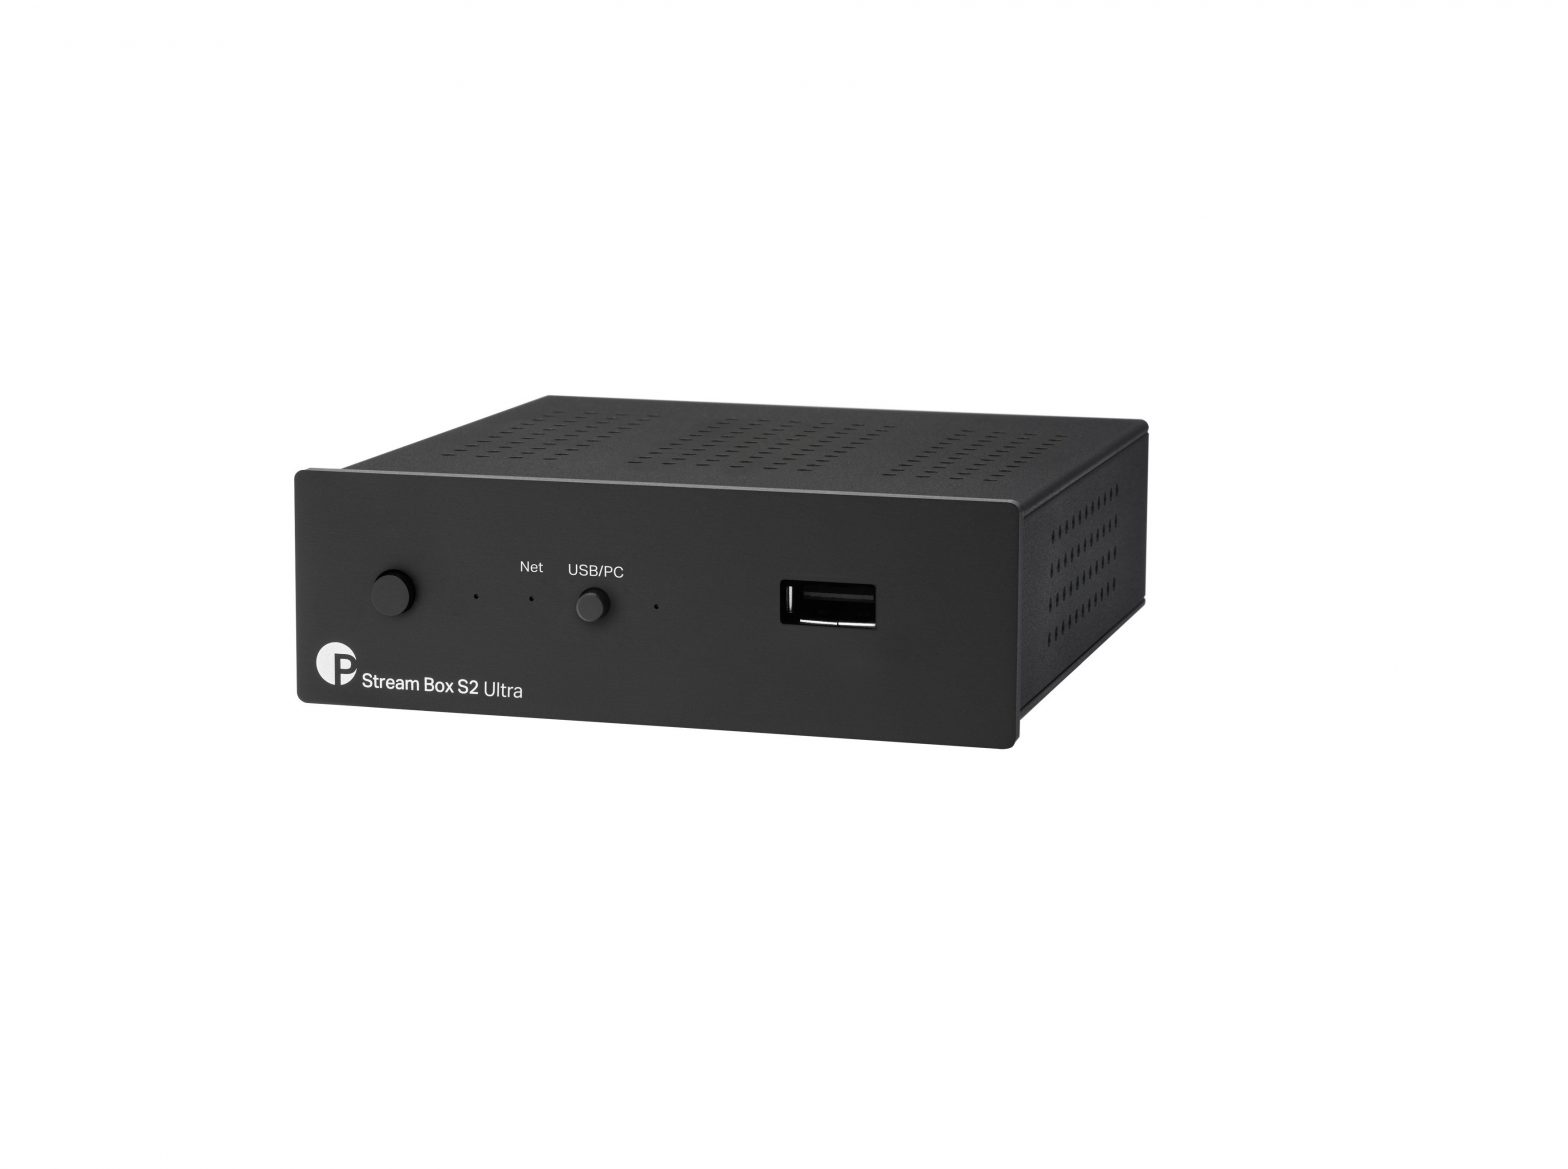
Pro-Ject Stream Box S2
Dear music lover, thank you for purchasing a Pro-Ject Audio Systems streamer. In order to achieve maximum performance and reliability you should study these instructions for use carefully.
![]() Warning of a hazard for the user, the unit or possible misuse
Warning of a hazard for the user, the unit or possible misuse
![]() Important notice
Important notice
Safety instructions
- AC outlet voltages vary from country to country.
- Before connecting to the mains, make sure that the voltage in your area meets the voltage requirements printed on the power supply.
- The power supply is used to disconnect the unit from the mains. Make sure that the power supply is easily accessible at all times.
- Never handle the device or the power supply while your hands are wet or damp.
- Avoid letting liquids enter the device or the power supply.
- Never place any item containing liquid, such as a flower vase on or near the device.
- Never spill any liquid on the device or the power supply.
- Never place any naked flame sources, such as lighted candles on or near the device.
- The product shall not be used in damp or wet locations, next to a bathtub, sink, swimming pool or any other similar conditions.
Connectors
Make all connections whilst the preamplifier is disconnected from the power supply.![]() Take care to connect the left and right channels correctly. The right channel is usually marked red, the left channel black or white.
Take care to connect the left and right channels correctly. The right channel is usually marked red, the left channel black or white.
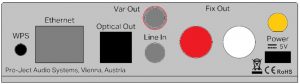
Mains power connectionConnect the low voltage plug from the power supply to the micro-USB socket Power 5V DC before connecting the power supply to the mains.
Output : The unit is equipped with 3 outputs: 2x analogue and 1x digital.
- fixed level analogue output RCA socket
- variable jack 3.5mm output
- digital optical output
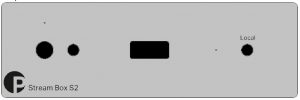
Local Inputs : The unit offers 2 inputs:
- USB input for USB flash disk and drives located on the front panel
- Line input (jack 3.5mm) on the rear panel.
Front Panel
To switch on from standby or to standby : The push button on the front panel of the unit alternately turns the power on or returns it to standby mode. The blue LED above the stand-by push button shows that the unit is switched on.
Installation and first use
- The unit can be connected to the network/internet via a wired or a wireless connection.
- Wired connection: Connect the LAN cable from your network to the Ethernet socket on the back panel.
- Wireless connection (WiFi)
Note : Make sure that antenna is mounted to its connector on the backpanel
Use only supplied antenna, this equipment should be installed and operated with a minimum distance of 20cm between the radiator and your body.
- There are more options of how to connect the streamer to a wireless network.
WiFi Connection via mobile App:
Download the „Pro-Ject Stream S2” App from the Google Play Store (Android) or the App Store (iOS) to your mobile device. Open the app and press the ![]() Symbol in the right upper corner.
Symbol in the right upper corner.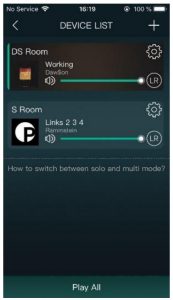
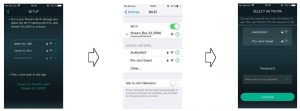
You are now prompted to connect to the Stream Box S2’s integrated Hotspot (Stream_Box_S2_E690 or similar, depending on each unit). Go to the WiFi System Settings on your mobile device and connect to this Hotspot. Afterwards, open the Pro-Ject Stream S2 App and continue with the setup. Chose your desired home network and enter your password. Your Stream Box S2 is now connected to your Wi-Fi. Connect your mobile device to that same home network, you just connected your Stream Box S2 to, and you are now able to control the Stream Box S2 via the Pro-Ject Stream S2 app.
WiFi connection via Web-Interface:
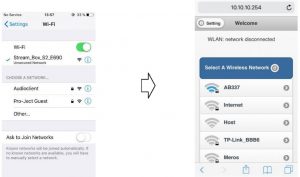
The Stream Box S2 can be connected to a wireless network using any web browser. To do so, connect your mobile device to the integrated Hotspot of your Stream Box S2 (Stream_Box_S2_E690 or similar, depending on each unit). Open a web browser and enter http://10.10.10.254 into the address bar. You’ll get to the web interface and can now choose your home network and enter your password to connect to your WiFi. Connect your mobile device to that same Wifi, you just connected your Stream Box S2 to, and you are now able to control the Stream Box S2 via the Pro-Ject Stream S2 app.
Reset WiFi settings
Press the WPS button on the back of the device (see picture) to reset the Stream Box S2’s network configuration. The integrated Hotspot will be activated again and you can connect your Stream Box S2 to a new wireless network.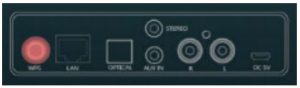
Using the „Pro-Ject Stream S2“ App
The App is divided into three main pages, which are accessible by swiping to the left or right.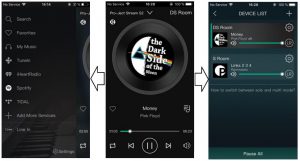
Left-Side Pag
Choose your playback or streaming source and add or remove services from your list:
- Music that you added to your favorites will be displayed under
 Favorites
 - Network and Media server, locally stored music on the mobile device and USB sources :
- Phone: access to music stored on your mobile device
- Home Music Share: access to all music in network locations
- My playlists: creating and managing of playlists
- Recently played: list of recently played music
- USB: access to USB storage; only displayed when USB Stick or HDD is connected
- Internet Radio : and
- Streaming Services : und
- Under you can add or remove different music services to your list.
- External Input: (also available with the push of a button on the front panel).
Center Page
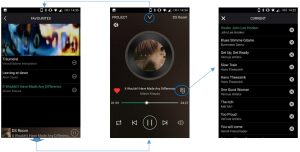
This page allows you to control the currently played title. You’ll find information like album art work, title name, artist name and some additional meta data and a volume control. The heart symbol ![]() allows you to add tracks to your favorites. The
allows you to add tracks to your favorites. The ![]() symbol on the right-hand side accesses your current playlist and allows you to remove upcoming tracks from the playlist. The Center Page is also used as a sub menu for the Left Side Page. The arrow symbol
symbol on the right-hand side accesses your current playlist and allows you to remove upcoming tracks from the playlist. The Center Page is also used as a sub menu for the Left Side Page. The arrow symbol ![]() in the top middle of the Center Page takes you to the currently active sub-menu. Once in the sub-menu, you can move back to the Center Page by tapping the bottom part of the screen.
in the top middle of the Center Page takes you to the currently active sub-menu. Once in the sub-menu, you can move back to the Center Page by tapping the bottom part of the screen.
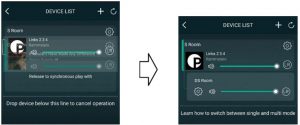
Right-Side Page
The Right-Side Page displays all Stream Box S2 devices currently found in your network and their status: Name, currently played music volume and the Basic System Settings ![]() menu. You can choose which unit you want to control or group multiple units together into a multi-room mode.
menu. You can choose which unit you want to control or group multiple units together into a multi-room mode.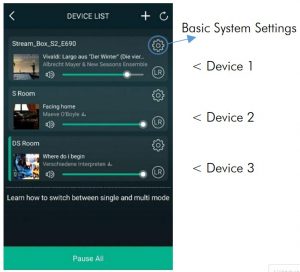
Drag one device on top of another to group them into a multi-room mode. You can now control both Stream Box S2 devices at the sam time and, amongst other things, play the same music in different rooms. You can alternatively set up a multi-mono mode, where each device only plays either the left or right channel separately. Use the LR Symbol ![]() to configure the channels that are being played on each device.
to configure the channels that are being played on each device.
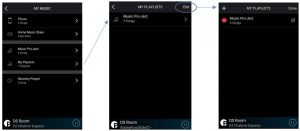
Create and manage playlists
- Under on the Left Side page, you can view and manage your playlists. To create a new playlist, choose the menu:
- Here you find a collection of all your playlists. Choose to create a new playlist or modify an existing one.
- The + symbol allows you to create a new playlist. The notebook symbol modifies an existing one.
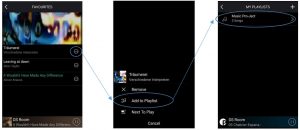
- Tracks that you have already added to your favorites, can be added to a playlist with the symbol.
- Choose
- Choose the playlist you want to add the track to.
Basic System Settings
The Basic System Settings can be accessed via the ![]() symbol on the Right-Side Page.
symbol on the Right-Side Page.
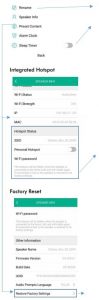
Rename allows you to change the name of your Stream Box S2. Sleep Timer allows you to define a period of time after which the Stream Box S2 automatically enters stand-by mode.
An important setting is the hotspot status. After connecting your Stream Box S2 to a WiFi network for the first time, the integrated hotspot is automatically hidden. Ifyou want to connect to this hotspot again you have to turn off “Need Hide SSID”,like in the screenshot to the left and set a password. After connecting to the hotspot, you can access the Stream Box S2 by entering http://10.10.10.254 into the address bar of a web browser, to for example connect to a new home WiFi. Allows you to reset the Stream Box S2 to factory settings.
Spotify
- Use your phone, tablet or computer as a remote control for Spotify.
- Go to spotify.com/connect to learn how.
Technical data
|
Digital output |
1x Optical (16bit/48kHz) |
|
Analogue line level outputs |
1x variable jack 3.5mm, 1x RCA socket fixed output |
|
Analogue line level outputs |
1x jack 3.5mm |
|
Ethernet connection |
1x RJ45 socket |
|
supported format/frequency |
192kHz/24Bit (wav, flac, mp3, m4a, aac) |
|
DAC |
ESS9023 |
|
Accessories |
WiFi Antenna, Power Supply |
|
Outboard Power supply |
5V/1A DC, 110-240V/50, 60Hz |
|
Dimensions W x H x D |
103 x 37 x 122 mm (including knob and connectors) |
|
Weight (without power supply): |
355g |
Service : Should you encounter a problem which you are not able to alleviate or identify, please contact your dealer for further advice. Only if the problem cannot be resolved there, the unit should be sent to the responsible distributor in your country.
Warranty : The manufacturer accepts no responsibility for damage caused by not adhering to these instructions for use. Modification or changes to any part of the product by unauthorized persons release the manufacturer from any liability over and above the lawful rights of the customer.
Copyright, trademarks : Pro-Ject Audio Systems is a registered Trademark of H. Lichtenegger. This guide was produced by: Pro-Ject Audio Systems Copyright © 2018. All rights reserved. The information was correct at the time of going to press. The manufacturer reserves the right to make changes to the technical specification without prior notice as deemed necessary to uphold the ongoing process of technical development. Mac® and Mac OS® are trademarks of Apple Inc., registered in the U.S. and other countries. TOSlink® is a registered trademark of Toshiba corporation
Spotify : The Spotify software is subject to third party licenses found here: www.spotify.com/connect/third-party-licenses Waste from Electrical and Electronic Equipment (WEEE): This directive mandates the collection and recycling of electronics and component materials in order to reduce the amount going to landfills. Outside North America, when the user decides to discard this product, it must be sent to a separate collection facility for recycling. Please contact your point of purchase for more details.
Federal Communication Commission (FCC) Interference Statement FCC Part 15: This equipment has been tested and found to comply with the limits for a Class B digital device, pursuant to Part 15 of the FCC Rules. These limits are designed to provide reasonable protection against harmful interference in a residential installation. This equipment generates, uses and can radiate radio frequency energy and, if not installed and used in accordance with the instructions, may cause harmful interference to radio communications. However, there is no guarantee that interference will not occur in a particular installation. If this equipment does cause harmful interference to radio or television reception, which can be determined by turning the equipment off and on, the user is encouraged to try to correct the interference by one or more of the following measures:
- Reorient or relocate the receiving antenna
- Increase the separation between the equipment and receiver
- Connect the equipment into an outlet on a circuit different from that to which the receiver is connected
- Consult the dealer or an experienced radio/TV technician for help.
This device complies with part 15 of the FCC Rules. Operation is subject to the following two conditions:
- This device may not cause harmful interference, and
- this device must accept any interference received, including interference that may cause undesired operation. FCC Radiation Exposure Statement: This equipment complies with FCC radiation exposure limits set forth for an uncontrolled environment.
To maintain compliance with FCC´s RF exposure guidelines, this equipment should be installed and operated with minimum distance 20cm between the radiator and your body. Use on the supplied antenna. Contains FCC ID: 2AAPP-A31.
Declaration of Conformity
We, Canor spol. s r.o. Družstevná 13925/39 08006 Prešov Slovakia (manufacturer) and Pro-Ject Audio Systems a division of Audio Tuning GmbH Margaretenstrasse 98 1050 Vienna, Austria (distributor) declare under our responsibility that the product is in conformity with the provisions of Directives:
2014/35/EU including amendments2014/30/EU including amendments2014/53/EU including amendments
The following harmonized standards were applied:Health: EN62479:2010Safety: EN60950-1:2006+A11:2009+A1:2010+A12:2011+A2:2013,EN62368-1:2014/A11:2017,EN61558-1:2005/A1:2009, EN61558-2-16:2009/A1:2013EMC: EN301489-1 V2.2.0, EN301489-3 V2.1.1, EN301489-7 V1.3.1, EN301489-17 V2.2.0,EN55032:2015, EN55035:2017, EN61000-3-2:2014, EN61000-3-3:2013Radio Spectrum: EN300328 V2.1.1 (2016-11)
Pro-Ject Audio Systems a division of Audio Tuning GmbH1050 Vienna, Austria, Margaretenstrasse 98[email protected]
References
[xyz-ips snippet=”download-snippet”]