
Instructions for ‘Spiral 12 Warp Kumihimo Bracelet – Calm Seas’ Kit
Project KB-GP-065HS
[Skill Level: Intermediate]
Designer: Kat Silvia
Project Components
NOTE: To account for potential mistakes, there may be extra pieces of some types of findings.
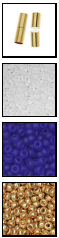
1 – gold-plated magnetic clasp
1 – matte white seed beads
1 – colbalt seed beads
1 – gold seed beads

1 – spool of blue cord
1 – super new glue
1 – Kumihimo Disk
1 – kumihimo bobbins
Recommended Tools (not included)
Scissors
Techniques Taught
12 Warp Kumihimo, How to tie an overhand knot
Instructions
For video instructions, go to www.beadaholique.com/how-to-make-the-spiral-12-warp-kumihimo-bracelet-kits-bybeadaholique
You will also need a ruler for this project. If you do not have a kumihimo weight, you will need to make something to weigh down your braid as you work. A binder clip with a small several ounce object (a bag of pennies works well) attached to it via a rubber band or cord length. The instructions below will make approx. 7 inch bracelet. Please see video for further sizing info. You kit comes with enough beads to make an 9 inch bracelet. Simply adjust the number of beads strung on to each strand accordingly.
- Begin by cutting 6 strands of cord, 10 feet each. This will give you plenty of cord. This insures that you will have enough if you get all the way to the end and realize that you need to lengthen it. Please keep in mind that your braid may be 7 inches along a ruler but because it is so thick it will be closer to 6.75 inches on your wrist.
- Fold each strand in half and tie an overhand knot*, tying them all together.
- Separate each strand. Take the Super New Glue and coat the last end two inches of each cord in a thin layer of glue. When it dries this will form a needle to make stringing the beads easier.
- Once the glue has dried, trim the end at an angle with your scissors to form a needle. Place the overhand knot into the center of the disc. Attach your weight to the knot.
- Spread the cords and firmly place one in each of the following notches. Place one cord on the left side of the 2 with a second cord on the right side of the 2. Place one cord on the left side of the 8 with a second cord on the right side of the 8. Place one cord on the left side of the 14 with a second cord on the right side of the 14. Place one cord on the left side of the 18 with a second cord on the right side of the 18. Place one cord on the left side of the 24 with a second cord on the right side of the 24. Place one cord on the left side of the 30 with a second cord on the right side of the 30.
- You are ready to string on your beads. On to the cords surrounding notch 2; add 55 beads each of Blue. As you string on your beads place the cord into the bobbin (it pops open) and wind the cord until you have about 12 inches sticking out. On to the cords surrounding notch 8; add 55 beads each of Gold. On to the cords surrounding notch 14; add 55 beads each of Blue. On to the cords surrounding notch 18; add 55 beads each of White. On to the cords surrounding notch 24; add 55 beads each of Gold. On to the cords surrounding notch 30; add 55 beads each of White.
- Follow along the the 12 Warp Kumihimo instruction sheet* and braid for 1″ without beads.
- After you have braided one inch, start adding beads. To see how to do this, please refer to the instructions included with this kit*. You will add beads to every warp, every time.
- Once you have braided all your beads and are happy with the length of the braid, braid one inch without beads, same as we did in the beginning.
- Remove your weight, cut off the bobbins and gather all strands, releasing them from the disc and tie an overhand knot.
- You may set aside the disc and bobbins. You are ready to add the clasp. The diameter of the magnetic clasp is greater than that of the non-beaded portion of the kumihimo braid. We are going to “bulk” up that portion to make it thicker so it fits into the clasp better. To do so, cut a 14″ length of cord. Over the non-beaded braid, near where the beads are, tie a double overhand knot. Next wrap the cord around the braid to bulk it up. Once it is thick enough to fit inside the magnetic clasp, tie a double overhand knot. Trim the excess cord and cut the braid so that you have the winded cord ready to fit into the clasp.
- Separate out the magnetic clasp so that you have the two halves.
- Add a few drops of the Super New Glue into the well of the clasp. Slip the end of the braid into the clasp.
- Repeat the above process with the other end of the braid. Be sure to let the bracelet to dry without the clasp attached so that it doesn’t glue together. We recommend allowing 24 hours before wearing for maximum bond.
*To see how to do this technique, please refer to the included techniques guide. Thank you!
All designs © Beadaholique Inc.
You may use our designs to make items for personal use or gifts.
Sale of our designs, whether in written form or assembled, is prohibited.

[xyz-ips snippet=”download-snippet”]