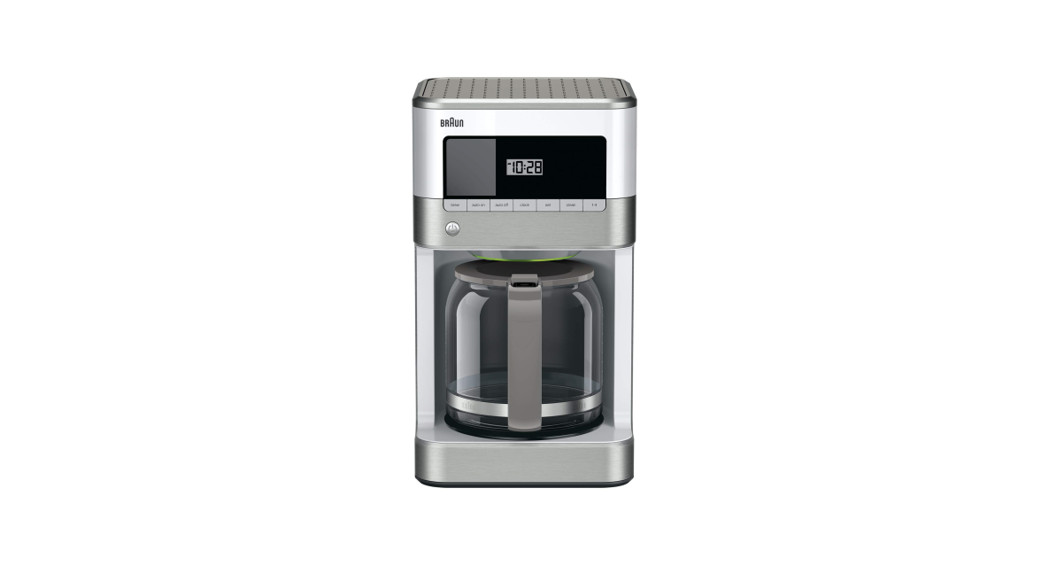
OptiBrewCoffee Maker
InstructionsType KF502BNRegister your productwww.braunhousehold.com
IMPORTANT SAFEGUARDS
When using electrical appliances, basic safety precautions should always be followed to reduce the risk of fire, electric shock and/or injury to persons, including the following:
READ ALL INSTRUCTIONS.
- The appliance is not intended for use by persons (including children) with reduced physical, sensory or mental capabilities, or lack of experience and knowledge, unless they have been given supervision or instructions concerning use of the appliance by a person responsible for their safety.
- Always unplug appliance from outlet when not in use and before cleaning. Allow to cool before putting on or taking off parts and before cleaning the appliance.
- To protect against the risk of electric shock, do not put cord, plugs or appliances in water or other liquids.
- The use of attachments/accessories not sold or recommended by Braun may cause fire, electrical shock or risk of injuries to persons.
- Regularly inspect the power cord, power plug and actual appliance for any damage. Do not operate if damaged in any way or after the appliance malfunctions. Immediately cease use of the appliance and call Braun Customer Service for examination, repair or adjustment.
- Do not use outdoors or for anything other than its intended purpose.
- Snap lid securely onto carafe before serving any coffee.
- Scalding may occur if the reservoir cover is opened during the brewing cycle.
- The glass carafe is designed for use with this appliance only. It must never be used on a range top or in a microwave oven.
- Do not set a hot carafe on a wet or cold surface.
- Do not use cracked carafe or a carafe having a loose or weakened handle.
- Do not clean carafe or keep warm plate with abrasive cleansers, steel wool pads, or other abrasive materials.
- Do not immerse in water.
- Do not touch hot surfaces. Use handles and buttons.
- Do not let cord hang over edge of table or counter, or touch hot surface.
- Do not place on or near a hot gas or electric burner, or in a heated oven.
- Always fill water reservoir first, then plug cord into the wall outlet. To disconnect, press the „On/Off“ button, then remove plug from wall outlet.
- Warning: Risk of fire or electric shock. Do not remove the base panel. No user-serviceable parts are inside. Repair should be done by authorized service personnel only.
- Do not operate your appliance in an appliance garage or under a wall cabinet. When storing in an appliance garage always unplug the unit from the electrical outlet.Not doing so could create a risk of fire, especially if the appliance touches the walls of the garage or the door touches the unit as it closes.
- Never open the reservoir cover during the brewing cycle, even if no water is draining from the filter basket, since extremely hot water/coffee can spill out from the filter basket and cause injury. If water/coffee is not draining from the filter basket during the brewing cycle, unplug the unit and wait 10 minutes before opening the top cover and checking the filter basket.
- We suggest you save all packing materials in the event that future shipping of the machine is needed. Keep all plastic bags away from children.
- This appliance has a polarized plug (one blade is wider than the other). To reduce the risk of electric shock, this plug will fit in a polarized outlet only one way. If the plug does not fit fully in the outlet, reverse the plug. If it still does not fit, contact a qualified electrician. Do not modify the plug in any way.
SAVE THESE INSTRUCTIONS
FOR HOUSEHOLD USE ONLY SPECIAL CORD SET INSTRUCTIONS
A short power-supply cord is provided to reduce the risks resulting from becoming entangled in or tripping over a longer cord. Longer detachable power-supply cords or extension cords are not recommended but may be used if care is exercised. If an extension cord is used:
- the marked electrical rating of the cord set or extension cord should be at least as great as the electrical rating of the appliance,
- the cord should be arranged so that it will not drape over the countertop or tabletop where it can be pulled on by children or tripped over unintentionally
Warranty and Service
For detailed information see separate warranty and service leaflet or visit www.braunhousehold.com.
Both the design specifications and these user instructions are subject to change without notice.Please do not dispose the product in the household waste at the end of its useful life. Disposal can take place at appropriate collection points provided in your country.
© Copyright 2020 All rights reservedDe’Longhi Braun Household GmbHCarl-Ulrich-Straße 463263 Neu-Isenburg/Germany5713247151 10/20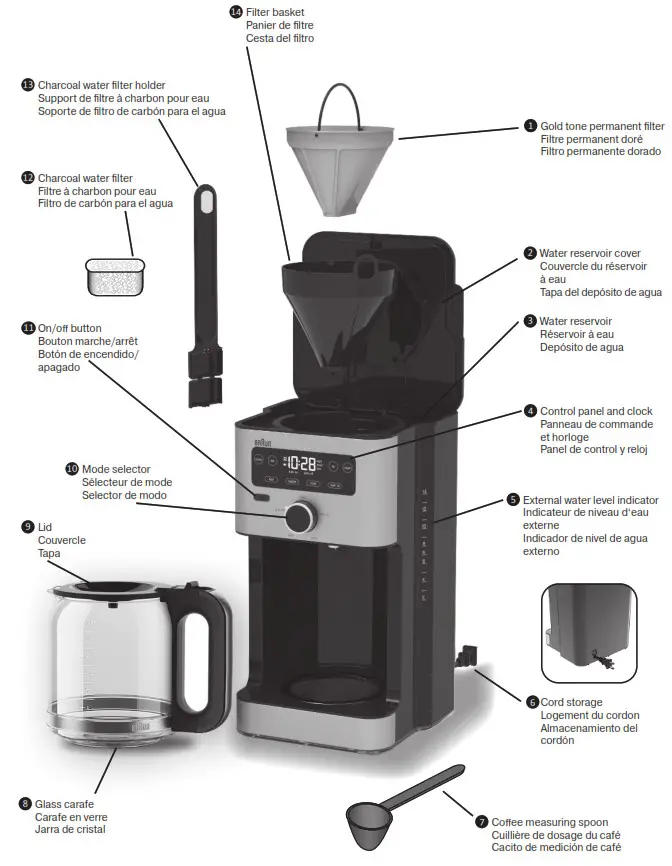
Control panel and clock
| clock | use to set time of day | auto on | indicates that auto on is activated |
| set | use to set functions | auto-off | visible during setting of auto-off time (default setting 2 hours) |
| ok | use to confirm settings | high/ med/ low | indicates the temperature level of the keep warm plate |
| clean | indicates when it is time to cleanuse to activate descaling modeuse to set water hardness level | fast/ regular/bold | use to select the brew mode and start the brew cycle. |
Mode selector
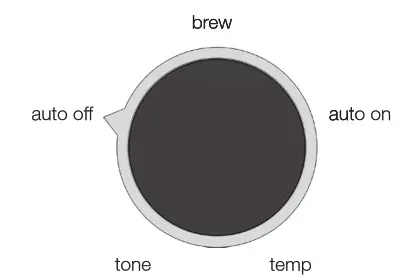
tone: use to switch on/off brew end signalauto-off: use to select auto-off timebrew: use to make coffeeauto-on: use to select auto on time and activate auto on settingtemp: use to select the temperature of the keep warm plate
Before first use
Please read instructions carefully and completely before using the appliance.
- Remove all packaging material and stickers from the appliance.
- Switch on the appliance. Run the coffee maker through a complete brew cycle without ground coffee. Use a full carafe of fresh cold water. This will remove any dust from the manufacturing process or residues that have remained in the unit.
- Set the clock and water hardness level (see explanation in dedicated paragraphs hereafter).
If during the setting process no function is selected for 10 seconds, the function currently set will be saved.
A. Clock setting

NOTE: When the coffee maker is first plugged in or when power is restored after an interruption (max. 60 sec.), the display starts flashing 12:00 AM. When the number count passes 12, the PM light will be displayed.
B. Water hardness level
Set the water hardness level on the coffee maker to the water hardness level for your local area.The default setting is h3.Press SET to scroll through the options (h1 = soft, h2 = normal, h3 = hard) and select the appropriate water hardness level. The pre-set water hardness disap- pears after a few seconds and the time of day will show on the LED control panel.
C. Installing the charcoal water filter
Use of the charcoal water filter is optional, but strongly recommended. The filter eliminates chlorine, bad tastes and odors from tap water and should be changed every 2 months. The coffee maker will operate normally without it. Replacement water filters can be purchased in stores, through the Braun website, or by calling Customer Service.
NOTE: Caution must be used when inserting the charcoal water filter. Improper placement in the water filter holder can cause tearing of the filter skin.
D Tone 
The default setting is that the brew end signal is activated. For deactivating the brew end signal follow the steps hereafter. If the brew end signal has been switched off, ![]() is shown in the display.
is shown in the display.
E. Auto Off setting
The default AUTO OFF time is 2 hours.
The AUTO OFF time can be set from 0-4 hours. During setting AUTO OFF is illuminated in the display; once saved it disappears. x
F. Keep warm plate temperature setting
 The default setting is MED. You can choose between 3 levels: HIGH, MED, LOW. The selected temperature level is illuminated in the display.
G. Making coffee
Start the brewing process by selecting the brew mode (FAST, REGULAR, BOLD).
Brew and Pause: this feature halts the flow of coffee from the filter basket when the carafe is removed, so a cup can be poured before brewing is finished. The carafe should be returned to the keep warm plate (maximum 20 seconds) to prevent the filter basket from overflowing.NOTE: The maximum amount of ground coffee the coffee maker can take is 14 coffee measuring spoons. Exceeding this amount may cause overflow if the coffee is too finely ground. We recommend using 1 measuring x spoon of ground coffee per cup.
H. Making coffee using Auto On mode
This function can only be activated if the AUTO ON time and the time of the day have been set.
Select a brew mode to activate the function.NOTE: The AUTO ON remains illuminated even when the appliance has been switched off. To deactivate the function switch on the appliance and press again the selected brew mode.
I. Brew over–ice coffee
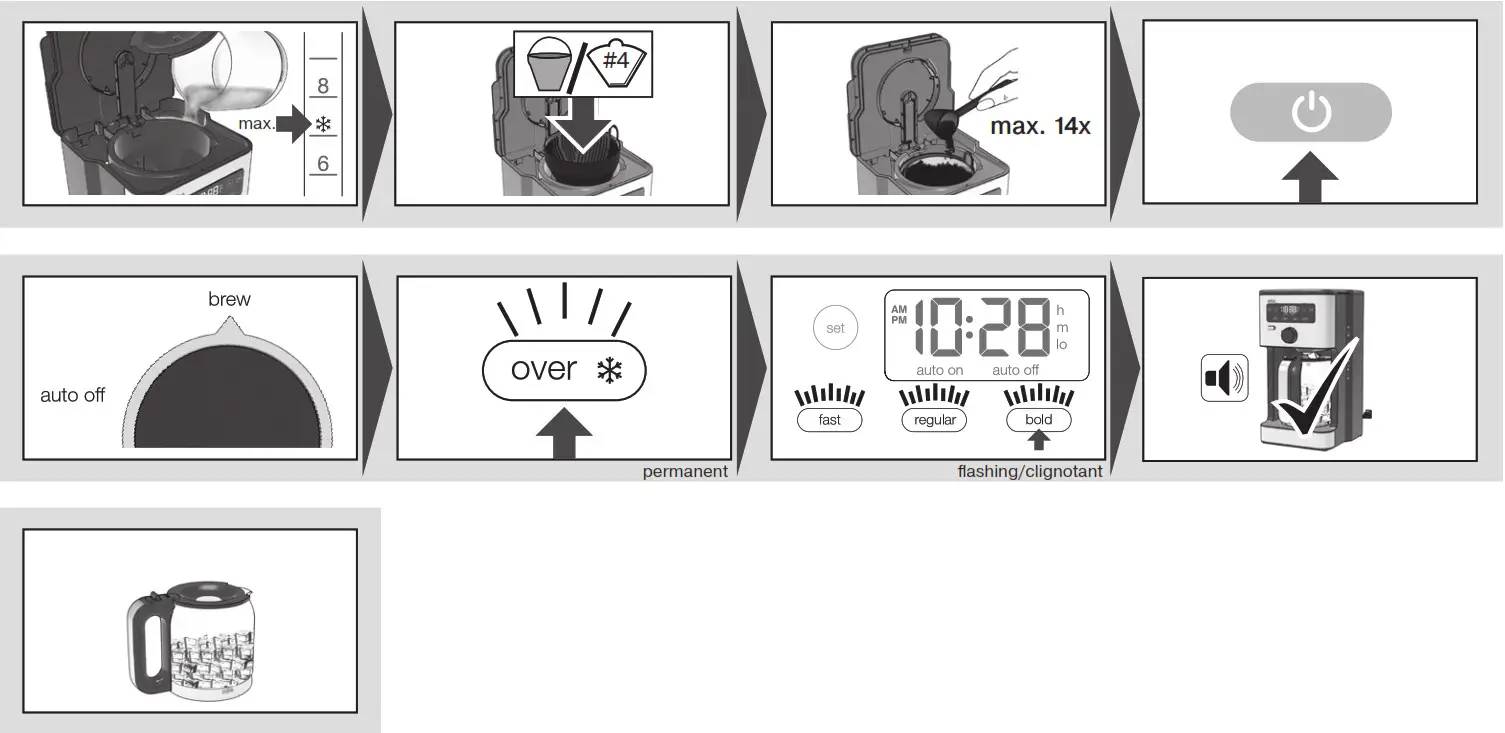
Place 7 cups of water in the water tank and 14 level scoops of coffee in the basket. For optimal results also add a paper filter on top of the filter basket. To start the brewing process, select the brew mode, push “over ice” button and select bold for optimal results. We recommend using the “bold” mode but you can also use the “fast” or “regular” settings.
Start brewing into the carafe on the hot plate by clicking “over ice” and “bold”. Let brew all the way through. Add ice to the carafe until the 10 cup mark, then stir to melt the ice and incorporate. Add ice up to the 14 cup mark to chill the coffee.
J. Descaling
For the best performance from your Braun coffee maker, descale the unit when the LED CLEAN lights up. This indicates it is time to descale your coffee maker. Before starting the descaling, remove the charcoal water filter holder including the charcoal water filter and the gold-tone permanent filter. Fill the water reservoir with 7 cups of fresh water.
Fill the descaling solution (follow packaging instruction on the descaler agent) in the water reservoir. Place the empty carafe in its position on the keep warm plate. Press CLEAN. CLEAN starts flashing fast. Press SET to start the descaling process. CLEAN is flashing slowly. Once the descaling process has started, it is not possible to stop the program until finished. After about 15 minutes CLEAN starts flashing fast. Empty the carafe.
Refill the water reservoir with a full carafe (not exceeding 14 cups) of freshwater, place the empty carafe on the keep warm plate and press again SET to start the rinsing cycle.
After descaling fill the water reservoir with a full carafe (14 cups) of clean, fresh water. Run the coffee maker through two complete brew cycles to flush the unit after descaling. Use a full carafe of fresh cold water each time. Repeat the procedure as many times as necessary in order to reduce the brewing time per cup to a normal level.
Project: 190807 The removal of built-up calcium deposits from the water reservoir will help extend the life of your coffee maker and keep your coffee tasting great. The frequency will depend upon the hardness of your tap water and how often you use the coffee maker.
Article: Scale: 1:1 Process: 02 07.08.2019 Colour: Reference is always the latest version of the CMF document 01 26.6.2019 Version Date © De´Longhi Braun Household GmbH | Strictly Confidential – For internal use only We recommend using the Braun Descaling Solution (can be purchased in stores, through the Braun website, or by calling Customer Service). You can use a commercially available descaling agent that is safe to use on aluminum. Follow package instructions on the descaling agent.
NOTE: For your convenience, the cleaning cycle is automatic. The entire cleaning cycle including rinsing can take up to 30 minutes to complete.After completion, the appliance goes into stand-by.
K. Cleaning
 report this ad
Troubleshooting guide
| PROBLEM | CAUSE |
SOLUTION |
| Display does not show a time. | The appliance is unplugged. There was a power outage. | Plug unit in.Wait for power to be restored. |
| Display flashes 12:00 AM | Initial operation or there was a power outage. | Set clock. |
| It is not possible to set the AUTO ON time. | ON/OFF button is not pressed. Clock has not been set. | Press ON/OFF button. Set clock time. |
| Coffee is not brewing. | The appliance is unplugged.There was a power outage.“fast,regular or bold” was not selected. There is no water in the reservoir. | Plug unit in.Wait for power to be restored. Select “fast,regular or bold”. Pour water into the reservoir. |
| “CLEAN” lights up solid | Coffee maker is calcified | Descale the unit soon, following the instruction in chapter “Descaling” |
| Brewing process takes too long | Coffee maker is calcified | Descale the unit soon, following the instruction in chapter “Descaling”. Check if water hardness setting corresponds with the hardness of water that is used to brew coffee. Adjust setting of water hardness if needed. |
| Different brewing mode selected | The different brewing modes have different preparation times. |
| The conee maker is overflowing. | The filti2r basket is not properly inserted. | insert the filter basket correctly. |
| The carate was not properly positioned on the keep warm plate. | Be sure the carafe is centered directly under the filter basket. | |
| The lid is not on the carafe. | Place the lid on the carate. | |
| Carafe was removed for more than 20 seconds while the unit is brewing. | Carafe should be replaced prompby after removing. | |
| Using too much conee grounds. | Remove filter from the filter basket. It using the gold tonl2 permanent filter, discard cof- fee and rinse. If using a papl2F filter, replace with new one.Restart the coffee brewing process with proper amount of coffee grounds. | |
| Using coffee that is too finely ground. | Use only coffee that is ground far drip coffee makers. | |
| Paper filter and gold tone permanent filti2r are used together | Use either paper or gold tone permanent fiher, never both at the same time. | |
| Coffee is flowing out of the fifti2r basket onto the keep warm plate when the carafe is not in place. | The fifti2r basket spring popped out during cleaning. | Reattach the sprtng to the filter basket. |
| Coffei2 is not hot. | There was a power outage. | Wait for power to be restored. |
| Keep warm mode has stopped | ||
| There are coffee grounds at the bottom of the carafe. | The paper filter (paper or gold tone) was not inserted correcdy into the filter basket. | Rnse filter basket, set filter into the filter basked and restart brewing. |
| PapRr filter collapsed. | Remove filter, rinse filter basket and restart brewing wrth a new paper filter. | |
| Acoustic signal turns on before the water tank is empty | Cori2e maki2r is calcified | Descaie the unit, following thi2 instruction in chapter “Descaling” |
| Display shows „E1″ or E2″ | Error messages | Contact Braun Customer Service. |
References
[xyz-ips snippet=”download-snippet”]