
Breathe Payments Troubleshooting Guide
![]()
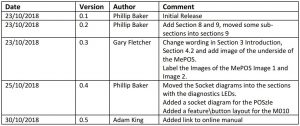
Document Change History
Introduction
This document details common issues and possible resolutions for hardware issues with the MePOS, POSzle and M010 Payment devices.
This document also includes common issues and possible resolutions for the Register application and web portal.
Online Manual link
POSzle
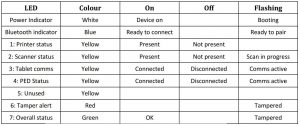
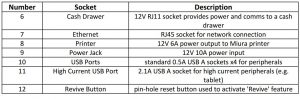
Diagnostic Status LEDs and Socket Layout
Interpretation of diagnostic LEDS is as follows. Yellow LEDs are numbered from the right:

Will not open cash drawer
- Check that all of the cabling is secure
- Check that the tablet is pair to the POSzleo This can be done by the settings screeno The tablet show be pair with a device called Miura POSzle XXX
- Where XXX is the last 3 digits of the serial number
- Ensure that the cash drawer cable is plugged into the cash drawer port
- Power off and on the tablet
- Reboot the POSzle turn it off and on at the wall power socket
- Ensure that the POS Software is setup correctly to use the cash drawer
Will not print
- Check that the till roll is in the correct way round
- Check that the tablet is paired to the POSzleo This can be done by the settings screeno The tablet should be paired with a device called Miura POSzle XXX
- Where XXX is the last 3 digits of the serial number
- Power off and on the tablet
- Reboot the POSzle turn it off and on at the wall power socket
- Ensure that the POS Software is setup correctly to use the printer
Tablet will not charge
- Ensure that the cable is plugged into the tablet
- Ensure that the cabling is secured into the base
Re-Pairing the POSzle
- Remove the Bluetooth pair from the tableto Enter the tablets settings menu by swiping down twice from the top of the tablet screeno Click the settings Cog Wheel Icono Select the Bluetooth option.o Remove the pair named Miura POSzle XXX
- Where XXX is the last 3 digits of the serial number
- Press and hold the pairing button for 5 seconds
- Once the button is release the Bluetooth light will begin flashing rapidly
- The device should show up in the Bluetooth screeno The device should show up as Miura POSzle XXX
- Where XXX is the last 3 digits of the serial number
- Click the device
- Confirm any prompts to pair with the POSzle
Register Tablet Application (Tablet Cash Register)
(Check online manual for further details)
Missing products on the Register
If the tablet is not showing all of the products that have been put into the web portal:
- Ensure that the tablet has an internet connection:• Enter the tablets settings menu by swiping down twice from the top of the tablet• Click the settings Cog Wheel Icon• Select the WLAN/Wi-Fi option.• Ensure that there is a network that is showing the status as connected
- Perform a sync using the ‘update data’ button on the staff sign in screen.• This can be found on upper right-side of the staff sign in screen
- If this still isn’t working log into the web portal and check that the products have been loaded correctly in the customers ‘product’ area.
- Go into settings menu within the application and do a ‘full sync’• The settings menu can be access from the staff sign in screen, by clicking the three vertical dots in the top right corner.
Issues finding products when scanning
If the application is returning ‘product not found’ or similar when scanning an item
- First go into the stock screen on the tablet, from there you can find the item and the associated details for that item on the right hand side. Check that the product has a barcode against it.• If there is no barcode against the product these will need to be added via the web portal; you can export the products, add the barcodes and then reimport the products to do this. Or you can add them in individually.• If there is a barcode against the product, first check that the barcode is correct. Sometimes these are imported incorrectly wrong for 2 common reasons.• Either the cell has changed formatting and is importing the barcode as a scientific cell (901E+12 for example)• The cells in excel have deleted the ‘0’ from the start of the barcode, this will also be due to formatting.• In both of these cases the barcodes will need adding via the web portal; again, you can export the products, add the barcodes and then reimport the products to do this. Or you can add them in individually.
- If the customer cannot find the product through the stock screen then you can check these on the web portal instead.
- If all the products seem to be loaded ok be sure to do a sync (‘update data’) on the tablet to pull the new information down from the portal.
Tablet is not opening in Register
If the tablet for some reason is not in the Register application upon unlocking the tablet
- First close any open applications on the tablet
- Re-launch Register by using the home button on the tablet, choose the Register application and then choose the option ‘always’
- Make sure this connects to the printer and cash drawer
- Do a no sale and print feed on the till to check this
Register Web Portal
(Check online manual for further details)
The first thing to check when diagnosing Register Web Portal issues is to ensure that the customer is using GOOGLE CHROME as their browser. All testing is done on Google Chrome and this is the only browser that is supported.
There can also be issues when trying to change things via the portal on the tablet, we would always recommend using a PC/laptop when using the web portal to make changes.
Importing Product Issues
When the customer imports a CSV file with their products on, if there are any issues, the portal will show the customer exactly what the issue is and what field the issue is in. There are occasions though where the products get imported but there are errors on them, due to user error.
(Always ensure that the customer is saving the import file(s) as a CSV).
The most common issue is that barcodes are imported as formulas (e.g. 901E+12) rather than numbers. To correct this:
- Export all of the products using the export tool on the products screen.
- Correct the barcodes that have the errors and make sure the formatting is correct when saving the spreadsheet as a CSV file.• Please note: When you save a CSV file, the formatting is kept, however if you re-open the CSV file before importing, the formatting will be removed meaning the barcodes may return to their formula state. Once the CSV is saved, do not re-open until imported.
- Make sure the ‘Import Record’ column is set to YES otherwise some lines of products will be ignored.
- Re-upload the products using the import tool.
- Double check in some of the products that the barcode is now correct.
There has also been issues where the customer has uploaded duplicate products due to using different SKU’s, to resolve this:
- First export the products
- You can then use data validation in excel to show the duplicate values (you can do this by barcode, product name etc.)
- Next to the duplicate values, use the ‘delete’ column on the spreadsheet to remove the duplicate products from Register.
- Save the file as a CSV and re-import using the import tool.
Report Issues
There are certain reports that need certain parameters set to be able to run them, if they aren’t set then there will be no data returned when the report is created. These are below:
- Stock Report – you need to select departments to run this.
- Department Report – you need to select departments to run this.
- Low Level Stock Report – you need to select departments to run this.
- Department Product Report – you need to select departments to run this.
Receipt settings need changing
If the receipt settings are set incorrectly it will not print properly and may be out of line, this can occur if a customer doesn’t follow the correct procedure when updating the receipt details.
- Log into the web portal and find the customer account (merchant) via the tenants tab.o E.g. Tenants > FIS Live Customers > Ben’s Garage
- You can then go into their profile and look at their current receipt settings.o Config > Profiles > ‘edit profile’ > Receipt tab
- Here you can edit the receipt footer and header, if you click the ‘i’ logo this will give you instructions on how to set the receipts.o You need to put ‘Cxx:’ before the text at the start of each line, this will then set that line to the centre of the receipt. ‘Lxx:’ will align left and ‘Rxx:’ will align right. The ‘xx’ value is the character width of the receipt printer. • POSzle Receipt Width: 40• MePOS Receipt Width: 44
Example:
- C44:Secure Retail Ltd
- C44:Walker Road
- C44:Bardon Hill
- C44:Coalville
- C44:Leicestershire
- C44:LE67 1TU
- C44:Tel:+44 (0) 1530 511150
Customer has forgotten log on details for web portal
You can reset any customers’ passwords easily through a tenant login for the web portal.
- Log into the web portal and find the customer account (merchant) via the tenants tab.o E.g. Tenants > FI S Live Customers > Ben’s Garage
- You can then go into their portal userso Admin > Portal Users
- From here you can edit (pencil icon) the user that requires the password resetting and change their password from that screen. If you give them a generic one similar to ‘Reset123’, for example, they can then amend this when they log in.
M010
Features and Button Layout
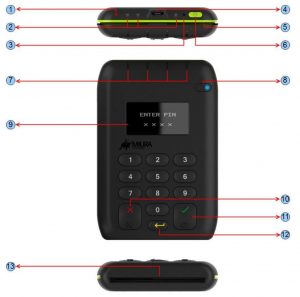


M010 Showing Tamper
- The device is not usable will need to be replaced with a new device
Payment not being passed to M010
- Ensure that the M010 is powered on
- Ensure that Bluetooth is enabled on the tableto Enter the tablets settings menu by swiping down twice from the top of the tableto Click the settings Cog Wheel Icono Select the Bluetooth option.o Ensure Bluetooth is toggled to on
- Reboot the tablet
- Re-Pair the M010 to the tableto Enter the tablets settings menu by swiping down twice from the top of the tableto Click the settings Cog Wheel Icono Select the Bluetooth optiono Remove any existing pair for the M010 (This should show up as the serial number of the M010. For Example M010-852369)o Press and hold the Bluetooth button on the M010 until it starts to rapidly flash blueo Select the device on the tableto Confirm the pairing on both the tablet (Select Ok) and the M010 (Press the green tick)
M010 shows payment failed
Ensure that the tablet is connect to the Wi-Fi:
- Enter the tablets settings menu by swiping down twice from the top of the tablet
- Click the settings Cog Wheel Icon
- Select the WLAN/Wi-Fi option.
- Ensure that there is a network that is showing the status as connected
M010 not reading cards
- Does this issue appear with more than one card
- Clean the card slot with cleaning cards
- Replace with a new device
M010 keypad not responding
- Power off and on the device
- Replace with a new device
M010 is stuck/frozen
- Power off and on the device
- If this is not possible or fails, use a paper clip to press the revive button this will put the M010 in revive modeo The button is located at the top of the device next to the power button o The button is recessed into the case, to prevent accidental pressing
- Select the option 1) “Power up as Normal”
Breathe Payments Troubleshooting Guide – Breathe Payments Troubleshooting Guide –
Questions about your Manual? Post in the comments!
[xyz-ips snippet=”download-snippet”]