
![]()
PS150 Slimline and PS400 Slimline
Digital Receiving Scale
User Instructions
AWT 35-100029Issue AB
Brecknell is part of Avery Weigh-Tronix. Avery Weigh-Tronix is a trademark of the Illinois Tool Works group of companies whose ultimate parent company is Illinois Tool Works Inc (“Illinois Tool Works”). Copyright © 2020 Illinois Tool Works. All rights reserved.
No part of this publication may be reproduced by making a facsimile copy, by the making of a copy in three dimensions of a two-dimensional work and the making of a copy in two dimensions of a three-dimensional work, stored in any medium by electronic means, or transmitted in any form or by any means, including electronic, mechanical, broadcasting, recording or otherwise without the prior written consent of the copyright owner, under license, or as permitted by law.
All other trademarks, product names, brands, and/or company names are the property of their respective owners.
This publication was correct at the time of going to print, however Avery Weigh-Tronix reserves the right to alter without notice the specification, design, price or conditions of supply of any product or service at any time.
1 General Information and Warnings
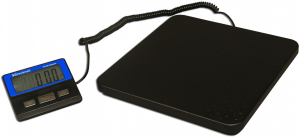
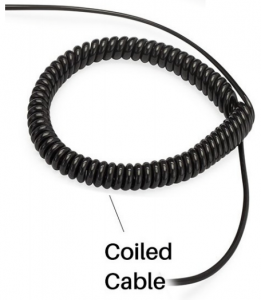
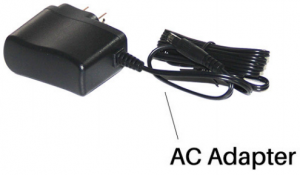
The PS150 Slimline is a 150lb Digital Receiving Scale. The PS400 Slimline is a 400lb Digital Receiving Scale. Both units can be powered with (4) AA batteries or by using the provided power supply that plugs into the side of the indicator. The scale is equipped with a movable display that can be placed on the work surface or mounted to the wall.
1.1 Specifications
| Capacity (LB): | PS150 Slimline = 150lb x 0.1lb / 70kg x 0.05kg |
| PS400 Slimline = 400lb x 0.2lb / 200kg x 0.1kg | |
| Capacity (KG): | PS150 Slimline = 68kg x 0.1kg |
| PS400 Slimline = 181kg x 0.2kg | |
| Power Source: | 4 AA batteries with automatic shutoff |
| LCD Display | 1” digit size displays weight |
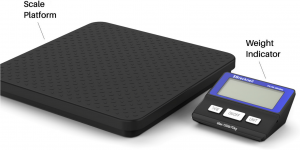
1.2 Description of Parts

4
1.3 Installation
- Remove the scale and indicator from the box.
- Connect the power supply to the side of the indicator or install batteries.Refer to section 1.4 for information on installing batteries.
1.4 Battery Installation
The Digital Receiving Scale operates with (4) “AA” batteries (Alkaline preferred). The battery compartment is located on the underside of the indicator portion of the scale.

- Turn the indicator over to expose the battery compartment.
- Remove battery compartment door and insert batteries into compartment.Make certain to observe the correct polarity.
- Replace compartment door.
1.5 Auto Shutoff Feature
This feature makes the scale shut off after 5 minutes of non-use to conserve battery life. You can disable this feature so the scale will operate continuously.
- With the scale off, press and hold the UNIT button.
- Press and hold ON, while holding the UNIT button down.
- The display will show “8888” and then “A_of” will appear. The auto-off feature is now de-activated. Release the buttons.
- To make the auto-off active again, repeat steps 1 and 2 and “A_on” will appear. The auto-off is now enabled.
5
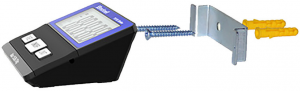
1.6 Mounting the Indicator
- Mount bracket to wall using (2) screws that are appropriate anchors for the surface being mounted to.
- Using the grooves in the rear of the indicator, slide indicator onto mounted bracket.
1.7 Routine Maintenance

IMPORTANT: This equipment must be routinely checked for proper operation and calibration.Application and usage will determine the frequency of calibration required for safe operation.
Always turn off the machine and isolate from the power supply before starting any routine maintenance to avoid the possibility of electric shock.
1.8 Sharp Objects
Do not use sharp objects such as screwdrivers or long fingernails to operate the keys.
1.9 Cleaning the Indicator

Table 1.1 Cleaning DOs and DON’Ts
|
DO |
DO NOT |
| Wipe down the outside of standard products with a clean cloth, moistened with water and a small amount of mild detergent | Attempt to clean the inside of the indicator |
| Use harsh abrasives, solvents, scouring cleaners or alkaline cleaning solutions | |
| Spray the cloth when using a proprietary cleaning fluid | Spray any liquid directly on to the display window |
6
7
2 General Operation
2.1 Display and Function
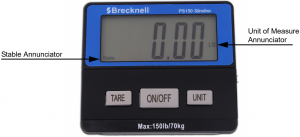
2.2 Keypad
Tare ButtonWhen pressed one time, the scale will tare (zero out) the load on the platform.
Unit ButtonPress to change between the following units of measure: kg, lb, lb-oz.
ON/OFF ButtonPress to turn the scale “ON” or “OFF”.

By default, the scale turns off automatically after 5 minutes of inactivity.
8
2.3 Functions
2.3.1 Power on
To turn the scale on, press the ON/OFF button. The display will turn on and automatically zero the weight. This indicates that the scale is ready for use.
2.3.2 Weighing
If the scale does not show zeros, verify that nothing is on the scale and press TARE to zero the scale.
-
-
- When the display shows “0” it is ready to weigh an object.
- Place the item to be weighed on the scale base.The weight appears on the indicator.
-
2.3.3 Tare Operation
When weighing an item in a box or container, use the TARE function to zero out the weight of the container.
-
-
- Place the box or container on the platform.
- Press TARE.The display will show “0”.
- Place the item to be weighed in the container.The weight on the display is the weight of the item and does not include the box or container.
-
9
2.4 Calibrating the Scale
The PS150/400 Slimline can be calibrated using either kilograms or pounds, depending on the unit of measure you will be using the scale in.
Before beginning the calibration procedure, be sure to have the necessary weights available.
For calibration, the following weights are allowed:
|
Calibration in kilograms |
Calibration in pounds |
|
10 kg |
20 lb |
|
20 kg |
50 lb |
|
30 kg |
100 lb |
|
75 kg |
150 lb |
|
100 kg |
200 lb |
|
150 kg |
300 lb |
|
200 kg |
400 lb |
Values in bold italics (above) are for the PS400 Slimline, only.
1. With the scale on and the display showing zeros, press and hold the UNIT key until the maximum capacity of the scale is displayed. The display will also indicate which unit of measure (lb or kg).

2. Press the UNIT key again to display the units of measure for calibration.
3. Press the TARE key to change the calibration unit of measure if necessary.
10
4. Press the UNIT key to accept the calibration unit.The calibration span weight is displayed.
5. Press TARE to change the calibration span weight. Available span weights are shown below.
|
Calibration in kilograms |
Calibration in pounds |
|
10 kg |
20 lb |
|
20 kg |
50 lb |
|
30 kg |
100 lb |
|
75 kg |
150 lb |
|
100 kg |
200 lb |
|
150 kg |
300 lb |
|
200 kg |
400 lb |
Values in bold italics (above) are for the PS400 Slimline, only.
6. With the correct span weight displayed, press UNIT to accept.The display flashes.7. Place the calibration weight on the scale and press UNIT to accept.8. The display flashes showing either PASS or FAIL.


9. If FAIL is displayed, repeat the calibration process.
11
![]()
Brecknell USA1000 Armstrong Dr.Fairmont MN 56031Tel:507-238-8702Fax:507-238-8271Email: [email protected]http://www.brecknellscales.com
Brecknell UKFoundry Lane,Smethwick, West Midlands,England B66 2LPTel:+44 (0) 8452 46 6717Fax:+44 (0) 8452 46 6718Email: [email protected]http://www.brecknellscales.com
References
[xyz-ips snippet=”download-snippet”]