![]() Microscope · Mikroskop ·Science TFM 201/301 + Infinity
Microscope · Mikroskop ·Science TFM 201/301 + Infinity
 Instruction manual
visit our website via the following QR Code or web link to find further information on this product or the available translations of these instructions.
 http://www.bresser.de/download/science

http://www.bresser.de/warranty_terms
Imprint (German)
Bresser GmbHGutenbergstr. 246414 RhedeGermanywww.bresser.deFor any warranty claims or service inquiries, please refer to the information on “Warranty” and “Service” in this documentation. We apologize for any inconvenience caused by the fact that we cannot process inquiries or submissions sent directly to the manufacturer’s address.Errors and technical changes excepted.© 2021 Bresser GmbHAll rights reserved.The reproduction of this documentation – even in extracts – in any form (e.g. photocopy, print, etc.) as well as the use and distribution by means of electronic systems (e.g. image file, website, etc.) without the prior written permission of the manufacturer is prohibited.The designations and brand names of the respective companies used in this documentation are generally protected by trade, trademark, and/or patent law in Germany, the European Union, and/or other countries.
Validity note
This documentation is valid for the products with the following article numbers:5750800 5750900 5760700Manual version: 0421Manual designation:Manual_5750800-5750900-5760700_Science-Series_en-de_BRESSER_v042021aAlways provide information when requesting service.
About this Instruction Manual
NOTICE These operating instructions are to be considered a component of the device.Read the safety instructions and the operating manual carefully before using this device.Keep this instruction manual in a safe place for future reference. When the device is sold or given to someone else, the instruction manual must be provided to the new owner/user of the product.
Intended use
- This device is not intended for use by persons (including children) with impaired physical, sensory or mental abilities, or for lack of experience and/or knowledge unless they are supervised by or have received instructions from a person responsible for their safety on how to use this device.
- This device is for personal use only.
- It was developed for a magnified representation of nature observations.
- The device is intended only for indoor use.
General safety instructions
 DANGER
 Risk of an electric shock!This device contains electronic parts that are powered by a power source (AC adapter and/or batteries). Improper use of this product may result in electric shock. Electric shock can cause serious or fatal injuries. It is therefore imperative that you observe the following safety information.
- Disconnect the power supply by pulling the mains plug when the appliance is not in use, in case of a longer interruption of operation and before any maintenance and cleaning work.
- Place your device so that it can be disconnected from the power supply at any time. The power outlet should always be near your appliance and should be easily accessible, as the plug of the power cord serves as a disconnect device from the mains supply.
- To disconnect the unit from the mains, always pull the mains plug and never pull the cable!
- Check this device, cables and connections for damage before use.
- Never attempt to operate a damaged device or a device with damaged electrical parts! Damaged parts must be replaced immediately by an authorized service agent.
- Operate the device only in a completely dry environment and do not touch the device with wet or damp body parts.
DANGERThe danger of suffocation!Improper use of this product may result in suffocation, especially for children. It is therefore imperative that you observe the following safety information.
- Keep packaging materials (plastic bags, rubber bands, etc.) away from children! There is a danger of choking!
- This product contains small parts that can be swallowed by children! Choking hazard!
- If small parts are swallowed, consult a doctor immediately!
DANGER Explosion hazard!Improper use of this product may result in fire. It is essential that you observe the following safety information in order to avoid fires.
- Do not expose the device to high temperatures. Use only the supplied AC adapter. Do not short circuit the device or batteries or dispose of in fire! Excessive heat and improper handling can cause short circuits, fires, and even explosions!
CAUTION Risk of body injury!This device contains components and/or accessories that can cause minor or serious bodily injury if used improperly. It is therefore essential that you observe the following safety information in order to prevent body injuries.
- Sharp-edged and pointed tools are often used for working with this device. Therefore, keep this device and all accessories and tools in a place inaccessible to children. The danger of bodily injury!
- Chemicals and liquids do not belong in children’s hands! Don’t drink! Clean hands thoroughly under running water after use. In case of accidental contact with eyes or mouth, rinse with water. In case of complaints, consult a doctor immediately and show the substances.
CAUTION Fire hazard!Improper use of this product may result in fire. It is essential that you observe the following safety information in order to avoid fires.
- Never cover the ventilation slots or cooling fins of the device during operation or until it has cooled down completely!
NOTICEDanger of material damage!Improper handling may result in damage to the unit and/or accessories. Therefore, use the device only in accordance with the following safety information.
- Do not disassemble the device! In the event of a defect, please contact your dealer. They will contact the Service Center and can arrange the return of this device for repair if necessary.
- Do not expose the device to high temperatures and protect it from water and high humidity.
- Do not subject the device to excessive vibrations.
- Only use accessories and spare parts for this device that comply with the technical specifications.
Product images
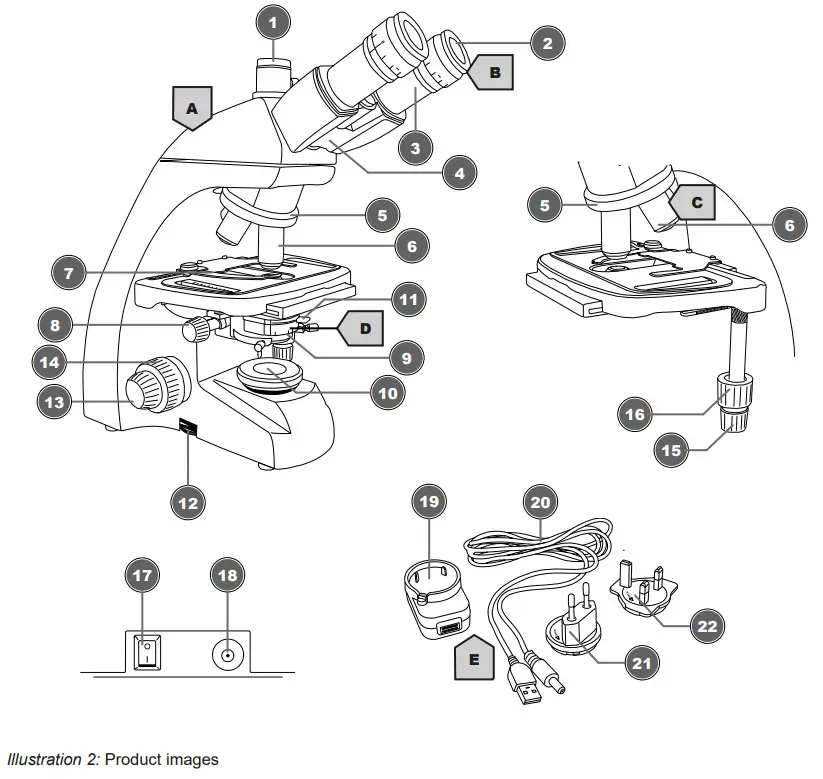
Parts overview
| 1. Trinocular extension* / Photo adapter*2. Eyepiece3. Eyepiece holder4. Microscope head5. Objective nosepiece6. Objective7. Object clamping8. Condenser height adjustment9. Condenser10. Lighting11. Adjusting lever for iris diaphragm | 12. Rotary wheel for brightness control13. Fine focus14. Coarse focus15. Crosstable transverse adjustment (X-axis)16. Crosstable longitudinal adjustment (Y-axis)17. On/Off switch18. DC connection socket19. Universal USB power adapter20. USB power cable with barrel connector21. Mains adapter attachment (EU)22. Mains adapter attachment (UK) |
*not for model TFM-201
Scope of delivery
Microscope (A); 10x WF Eyepiece (B); 4 Objectives (pre-assembled) (C); Condenser (pre-assembled)(D); Power adapter with plug and cable (E)
Choice of location
Choose a suitable location before installation and commissioning.Place the device on a stable, level and vibration-free surface.
Installing the USB power adapter
 Illustration 3: USB power adapter with exchangeable attachment
| 1. USB power adapter3. Adapter attachment (UK) | 2. Adapter attachment (EU)4. USB power cable with coaxial/barrel connector |
- Place suitable adapter attachment with its notches on the pins of the USB power adapter.
- Turn the adapter attachment in the LOCK direction until it is locked.
- Put the USB plug of the power cable into the USB port of the power adapter.
- To remove the adapter attachment, push the PUSH button and turn the attachment in the OPEN direction.
 NOTICEUsing the USB power cable with a computerAlternatively, the device can be powered by a computer via the included USB power cable: Put the USB plug into a free USB port of the computer.
Setting up power supply

Illustration 4: DC connection socket for coaxial/barrel connector
| 1. On/Off switch |
| 2. DC connection socket |
- Put the DC connector of the power cable into the DC connection socket of the device.
- Put the mains plug of the power cable into the power outlet.
Turning on/off the device
- Move On/Off switch to position ‘I’ to turn on the device.
- Move On/Off switch to ‘O’ position to turn off the device.
Adjusting the lighting
 Illustration 5: Lighting unit
| 1. Rotary knob for brightness adjustment | 2. Illumination |
 NOTICEDo not operate the device on the highest brightness over a longer time!This will reduce the lifetime of the LED.To control the brightness proceed as follows:
- Turn on the device.
- Turn/Move the dimmer control to adjust the brightness of the light source.
NOTICEIlluminating the object optimallyAdjust the brightness of the light source so that the illumination works at its optimum. Depending on light influences from outside and the object being observed, the illumination needs regular adjustments.Inserting slides
- Move the object plate downwards completely by turning the focus wheel.
- Press the object clamping outwards.
- Insert the slide straight into the fixture’s angle.
- Let the object clamping fall back carefully until the slide is fixed in the fixture.
Observation
NOTICEUsing eyepieces and objectivesWhen using a specific eyepiece or objective, you will get the individual magnification of an object being observed. The magnification is imprinted on the eyepiece and objective with a large number (e.g. 10x for 10-fold magnification, 4 for 4-fold magnification).
- Move the object plate downwards completely by turning the focus wheel.
- Insert a slide and place it in the middle under the objective.
- Set an objective with the lowest magnification below the object plate.
- Insert an eyepiece with the lowest magnification in the eyepiece holder.
- Turn on the device and the illumination.
- Look through the eyepiece and move the object plate upwards by turning the focus wheel until a sharp image is visible.
- If necessary, adjust the image sharpness by turning the fine focus adjustment.
NOTICEAvoid damages to the specimen!Make sure you turn the focus wheel very slowly, to avoid the objective touch the slide or specimen, and thus avoiding damages to either of them or to both. Only turn the focus wheel until it stops and does not apply excessive pressure.
Adjusting the eye distance
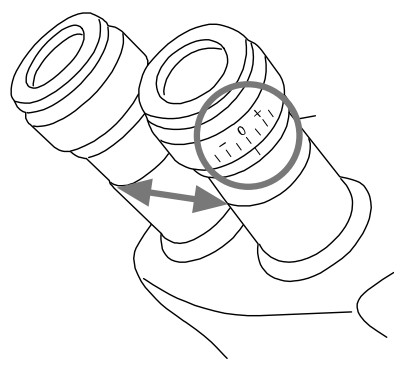 Illustration 6: Distance between the eyepieces and diopter adjustment
- With the eyes look through both eyepieces.
- Change the distance between the eyepieces by pushing them together or pulling them apart until a circular image of the observed object is visible.
Diopter adjustment
- Turn the diopter adjustment ring to position ‘0’.
- With the left eye, look through the left eyepiece and turn the focusing wheel until a sharp image of the observed object is visible.
- With the right eye, look through the right eyepiece and turn the diopter adjustment ring until a sharp image of the observed object is visible too.
The diopter adjustment can also be done in the opposite way on the left eyepiece.
Using the iris diaphragm
NOTICEThe iris diaphragm is used to increase the depth of focus.With an open aperture more light is getting through but the depth of focus is less. With a partially closed aperture, the depth of focus is higher but it is necessary to increase the brightness of the illumination then.It is recommended not to close the iris diaphragm too much when working with higher magnifications. Otherwise, the image resolution will decrease.Using the Köhler illumination
- Focus on the object with the 10x objective.
- Close the condenser and the light field aperture. For microscopes with additional lenses, fold it out.
- Move the condenser up and down until the edge of the light field aperture is in focus.
- If necessary, use the adjustment screws to move the condenser until the light field aperture is centered in the field of view.
- Open the light field aperture as far as it is not visible in the field of view anymore.
Oil immersion
- Focus on the object with the 40x objective.
- Turn the 40x objective sideways.
- Drop a drop of immersion oil onto the cover glass of the preparation.
- Retract the 100x objective so that it is immersed in the oil.
- Refocus the image.
- Clean the 100x objective after each use.
Using the trinocular extension

| 1. Trinocular extension | 2. Protection cap |
| 3. Fixing screw | 4. Photo adapter thread |
| 5. Photo adapter |
The trinocular extension of the microscope was specially designed for C-mount threads. For the camera mounting proceed as follows:
- Remove the dust protection cap from the trinocular head.
- Attach the camera* with its C-mount thread to the photo adapter thread and turn it on.
- Loosen the clamping screw of the trinocular extension to move the photo adapter with the camera* within the extension tube. In this way, the image sharpness and the position of the camera can be adjusted. Most camera models can be adjusted parfocal to the eyepieces when doing so.
- Re-tighten the screw to fix the camera in the desired position.
*not included
Cleaning and maintenance
- Protect the device from dust and moisture!
- Avoid fingerprints and similar contamination of the optical surfaces.
- The residual moisture must be completely degraded before use.
- Disconnect the power supply by pulling the mains plug when the appliance is not in use, in case of a longer interruption of operation and before any maintenance and cleaning work.
- Only clean the device externally using a dry cloth. Do not use a cleaning solution to prevent damage to the electronic parts.
- Do not use organic solvents (e.g. alcohol, ether, acetone, xylol or other dilutions) to clean lacquered parts or plastic parts!
- Disassemble optical elements (e.g. objective, eyepiece, etc) before cleaning.
- Blow away loose dust from the lens surfaces first.
- Use high-quality lens cleaning towels or soft cloth and moisten it with a little bit of pure alcohol (available in a drug store). Wipe the lens surface with it.
- Pull a dust protection cover* over the microscope and store it in a closed container at a dry and mold-free place. Store the microscope and the accessories in the relevant containers when they are not used for a longer time. It is recommended to store also objectives and eyepieces in closed containers with desiccant.
(*depending on the model a dust protection cover and box can be part of the content)
NOTICERemember:A well-maintained microscope will keep its optical quality for years and thus maintain its value.Disposal
 Dispose of the packaging materials properly, according to their type, such as paper or cardboard. Contact your local waste disposal service or environmental authority for information on the proper disposal.
 Do not dispose of electronic devices in the household garbage!According to the European Directive 2012/19/EU on Waste Electrical and Electronic Equipment and its transposition into national law, used electrical equipment must be collected separately and recycled in an environmentally sound manner.
 Batteries and rechargeable batteries must not be disposed of with household waste. You are legally obliged to return used batteries and accumulators and can return the batteries after use either in our sales outlet or in the immediate vicinity (e.g. in the trade or in municipal collection points) free of charge.
Batteries and accumulators are marked with a crossed-out dustbin and the chemical symbol of the pollutant, “Cd” stands for cadmium, “Hg” stands for mercury and “Pb” stands for lead.
Technical data
| Science TFM-201 | Science TFM-301 | Science Infinity | |
| Article No. | 5750800 | 5750900 | 5760700 |
| Microscope head | binocular | trinocular (incl. photo adapter) | trinocular (incl. photo adapter) |
| Crosstable | Yes, with the Nonius scale | Yes, with the Nonius scale | Yes, with the Nonius scale |
| Eyepiece(s) | 1 Pair of DIN WF 10x | 1 Pair of DIN WF 10x | 1 Pair of DIN WF 10x |
| Objective(s) | 4x / 10x / 40x / 100x | 4x / 10x / 40x / 100x | 4x/ 10x /40x / 100x |
| Magnification | 40x / 100x / 400x / | 40x / 100x / 400x / | 40x / 100x / 400x / |
| 1000x | 1000x | 1000x | |
| Power supply | DC 5V / 1000mA | DC 5V / 1000mA | DC 5V / 1000mA |
| Illumination | LED* | LED* | LED* |
*The LED illumination used in this device has a very long lifespan and do not need to be changed.LEDs can not be changed due to technical reasons!
Warranty
EC Declaration of Conformity
UKCA Declaration of Conformity
 Bresser GmbH has issued a “Declaration of Conformity” in accordance with applicableguidelines and corresponding standards. The full text of the UKCA declaration of conformity is available at the following internet address:www.bresser.de/download/575080057509005760700/UKCA/575080057509005760700_UKCA.pdfBresser UK Ltd. • Suite 3G, Eden House, Enterprise Way, Edenbridge, Kent TN8 6Hf, Great Britain
References
[xyz-ips snippet=”download-snippet”]