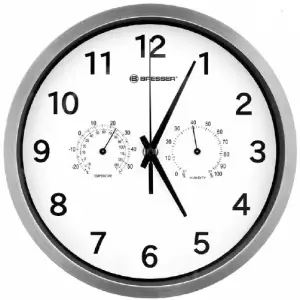
BRESSER 8020313CM3000 MyTime Thermo/Hygro Instruction Manual
INSTRUCTION MANUAL
![]() ABOUT THIS INSTRUCTION MANUALThese operating instructions are to be considered a component of the device. Please read the safety instructions and the operating instructions carefully before use. Keep these instructions for renewed use at a later date. When the device is sold or given to someone else, the instruction manual must be provided to the new owner/user of the product.
ABOUT THIS INSTRUCTION MANUALThese operating instructions are to be considered a component of the device. Please read the safety instructions and the operating instructions carefully before use. Keep these instructions for renewed use at a later date. When the device is sold or given to someone else, the instruction manual must be provided to the new owner/user of the product.
This product is intended only for private use.
GENERAL WARNINGS
![]() CHOKING HAZARD!Keep packaging material, like plastic bags and rubber bands, out of the reach of children, as these materials pose a choking hazard.
CHOKING HAZARD!Keep packaging material, like plastic bags and rubber bands, out of the reach of children, as these materials pose a choking hazard.
![]() RISK of ELECTRIC SHOCK!This device contains electronic components that operate via a power source (batteries). Children should only use the device under adult supervision. Only use the device as described in the manual; otherwise, you run the risk of an electric shock.
RISK of ELECTRIC SHOCK!This device contains electronic components that operate via a power source (batteries). Children should only use the device under adult supervision. Only use the device as described in the manual; otherwise, you run the risk of an electric shock.
![]() RISK of FIRE/EXPLOSION!Do not expose the device to high temperatures. Use only the recommended batteries. Do not short-circuit the device or batteries, or throw them into a fire. Excessive heator improper handling could trigger a short-circuit, a fire or an explosion!
RISK of FIRE/EXPLOSION!Do not expose the device to high temperatures. Use only the recommended batteries. Do not short-circuit the device or batteries, or throw them into a fire. Excessive heator improper handling could trigger a short-circuit, a fire or an explosion!
Batteries not included with purchase.
![]()
Do not immerse the unit in water.Do not subject the unit to excessive force, shock, dust, extreme temperature or high humidity, which may result in malfunction, shorter electronic life span, damaged batteries and distorted parts.Do not disassemble the device. In the event of a defect, please contact your dealer. The dealer will contact the Service Centre and can send the device in to be repaired, if necessary. Use only the recommended batteries. Always replace weak or empty batteries with a new, complete set of batteries at full capacity.Do not use batteries from different brands or with different capacities. Remove the batteries from the unit if it has not been used for a long time. The manufacturer is not liable for damage related to improperly installed batteries!
GENERAL INFORMATION
This item is available in the following variants. The functions and technical data are the same. They only differ in its design/in its colour.8020313CM3000: MyTime Thermo-/Hygro, black8020313GYE000: MyTime Thermo-/Hygro, white8020313E8G000: MyTime Thermo-/Hygro, red8020313WXH000: MyTime Thermo-/Hygro, blue8020313B4K000: MyTime Thermo-/Hygro, green
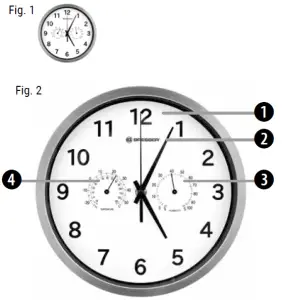
SCOPE OF DELIVERY (Fig. 1)Wall clock, Instruction manual Required batteries: 1 x 1.5V battery (Size AA/LR6) Batteries not included with purchase.
PARTS OVERVIEW
Wall clock (Fig. 2)
- Dial plate
- Clock hands (hours, minutes, seconds)
- Humidity display (indoor)
- Temperature display (indoor)
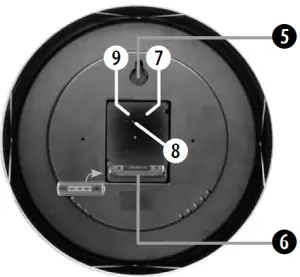
- Wall mount
- Battery compartment
- M.SET button
- RESET button
- REC button
GETTING STARTED/POWER SUPPLY
![]() Make sure to place the batteries strictly according to the right polarities (+/-) as shown in the battery compartment.
Make sure to place the batteries strictly according to the right polarities (+/-) as shown in the battery compartment.
- Remove the locking pin from the clockwork. The clock can be operated only after the pin has been removed.
- Insert one battery (1.5V, AA/LR6) into battery compartment (6).
TIME SETTING
![]() After the clock received the MSF time signal the time will be set according to the Coordinated Universal Time (UTC). Summer and winter time change (and reverse) is also set automatically. Other deviating times can be set manually only.
After the clock received the MSF time signal the time will be set according to the Coordinated Universal Time (UTC). Summer and winter time change (and reverse) is also set automatically. Other deviating times can be set manually only.
Automatic time setting via MSF time signalAfter inserting the battery the time will be set automatically via MSF signal. This process may take a few minutes. During this process the clock hands will turn several times with interruption until they will display the right time.
Initiate to receive the MSF time signal manually
![]() Use this function when e.g. automatic summer/winter time change does not work or the wall clock temporarely receives no time signal.
Use this function when e.g. automatic summer/winter time change does not work or the wall clock temporarely receives no time signal.
- Press and hold the REC button (9) for 3 seconds to start manual search for the MSF signal.
- The clock hands will move to their start position (12:00 a.m.) and a the wall clock then tries to receive the signal.
- Wait approx. 2-5 minutes until the current time will be displayed.
Manual time setting
![]() It is necessary to set the time manually in places where no radio signal is received.
It is necessary to set the time manually in places where no radio signal is received.
- Press and hold the M.SET button (7) for approx. 3 seconds.
- When the minutes hand starts moving you can the set the time manually:• Press the M.SET button shortly to set the time in minutes steps.• Press and hold the M.SET button to set the time continously.
- Release M.SET button to stop manual setting and save the time automatically and exit manual time setting mode.
TEMPERATURE AND HUMIDITY DISPLAYTemperature and humidity measurement work manually. It may take a few minutes until the value that is currently measured will be displayed.
MOUNTING/POSITIONING
![]() Make sure you have mounted or placed the device in a safe way. Otherwise the device may fall down and heavy damages can occur for which the manufacturer is not liable.The wall clock can be mounted on walls with the wall mount (5).
Make sure you have mounted or placed the device in a safe way. Otherwise the device may fall down and heavy damages can occur for which the manufacturer is not liable.The wall clock can be mounted on walls with the wall mount (5).
TROUBLESHOOTING
Transmission collisionSignals from other household devices, such as door bells, home security systems and entry controls, may interfere with those of this product and cause temporarily reception failure. This is normal and does not affect the general performance of the product. The transmission of the radio signal will resume once the interference recedes.
Other malfunctionsIf there is no response from the wall clock by keystrokes or if any other malfunctions occur perform the following steps.
![]() With this procedure all received data will be deleted.
With this procedure all received data will be deleted.
- Press RESET button (8) with a pointed instrument (e.g. pen).
- The clock hands will move to their start position (12:00 a.m.) and the wall clock then tries to receive the signal.
- Wait approx. 2-5 minutes until the current time will be displayed.
CLEANING AND MAINTENANCEBefore cleaning the device, disconnect it from the power supply (remove batteries)! Only use a dry cloth to clean the exterior of the device. To avoid damaging the electronics, do not use any cleaning fluid. Protect the device from dust and moisture. The batteries should be removed from the unit if it has not been used for a long time.
![]() DISPOSALDispose of the packaging materials properly, according to their type, such as paper or cardboard. Contact your local waste-disposal service or environmental authority for information on the proper disposal.
DISPOSALDispose of the packaging materials properly, according to their type, such as paper or cardboard. Contact your local waste-disposal service or environmental authority for information on the proper disposal.
 Do not dispose of electronic devices in the household garbage!As per Directive 2002/96/EC of the European Parliament on waste electrical and electronic equipment and its adaptation into German law, used electronic devices must be collected separately and recycled in an environmentally friendly manner.
 EC DECLARATION OF CONFORMITYBresser GmbH has issued a “Declaration of Conformity” in accordance with applicable guidelines and corresponding standards. This can be viewed any time upon request.
WARRANTY & SERVICEThe regular guarantee period is 5 years and begins on the day of purchase. You can consult the full guarantee terms as well as information on extending the guarantee period and details of our services at www.bresser.de/ warranty_terms.
 report this ad
ContactBresser GmbH Gutenbergstraße 26414 Rhede · Germany www.bresser.de

Read More About This Manual & Download PDF:
References
[xyz-ips snippet=”download-snippet”]